
Image Source: contentgrid.homedepot-static.com
DIY: How to Install a Single Handle Kitchen Faucet
Can you install a single handle kitchen faucet yourself? Yes, absolutely! With a little patience and the right tools, you can tackle this DIY kitchen repair and upgrade your sink with a new single lever faucet installation. This guide will walk you through the entire process, from turning off the water to enjoying your sparkling new faucet.
Replacing your old kitchen faucet is a fantastic way to refresh your kitchen’s look and functionality. Single handle faucets are popular for their ease of use and sleek design, making them a great choice for any homeowner.
Gathering Your Tools and Materials
Before you start, make sure you have everything you need. This will save you trips to the hardware store mid-project.
- New Single Handle Kitchen Faucet: Choose one that fits your sink’s hole configuration.
- Adjustable Wrenches (2): One for holding and one for turning.
- Basin Wrench: This specialized tool is crucial for reaching nuts in tight spaces under the sink.
- Plumber’s Putty or Silicone Caulk: For sealing the faucet base.
- Bucket: To catch any residual water.
- Old Towels or Rags: For cleaning up drips and spills.
- Safety Glasses: To protect your eyes from debris.
- Flashlight or Headlamp: For better visibility under the sink.
- Screwdriver (Phillips and Flathead): May be needed for some connections.
- Pipe Thread Tape (Teflon Tape): For sealing threaded connections.
- Wire Brush: To clean threads on supply lines.
- New Water Supply Lines (Optional but Recommended): It’s a good idea to replace old, corroded supply lines when you replace the faucet.
Step-by-Step Guide to Single Lever Faucet Installation
Let’s get started with the actual installation. Follow these steps carefully for a smooth DIY kitchen repair.
Step 1: Shut Off the Water Supply
This is the most important initial step. You don’t want any surprises with water spraying everywhere!
- Locate Shut-off Valves: Look under your sink for two valves, usually attached to pipes coming out of the wall. One controls hot water, and the other controls cold water.
- Turn Off Valves: Turn both valves clockwise until they are completely closed.
- Test: Turn on your old faucet to ensure the water is completely off. Let any remaining water drain out.
Step 2: Disconnect the Old Faucet
Now, you’ll remove the old faucet. This often involves working in a cramped space, so your basin wrench will be your best friend.
- Place Bucket and Towels: Position your bucket directly under the water supply line connections to catch any drips. Lay down towels to absorb spills.
- Disconnect Supply Lines: Using an adjustable wrench, loosen the nuts that connect the water supply lines to the shut-off valves. If you’re replacing the supply lines, disconnect them from both the shut-off valves and the old faucet.
- Loosen Faucet Mounting Hardware: Look up under the sink where the faucet meets the countertop. You’ll see nuts or a mounting bracket holding the faucet in place. Use your basin wrench to loosen and remove these.
- Remove the Old Faucet: Once all connections are loose and the mounting hardware is removed, gently pull the old faucet up and out from the sink.
Step 3: Prepare the Sink Surface
A clean surface ensures a good seal for your new faucet.
- Clean the Area: Use a damp cloth or sponge to clean the sink deck where the old faucet was mounted. Remove any old plumber’s putty, caulk, or debris. A putty knife can help with stubborn residue.
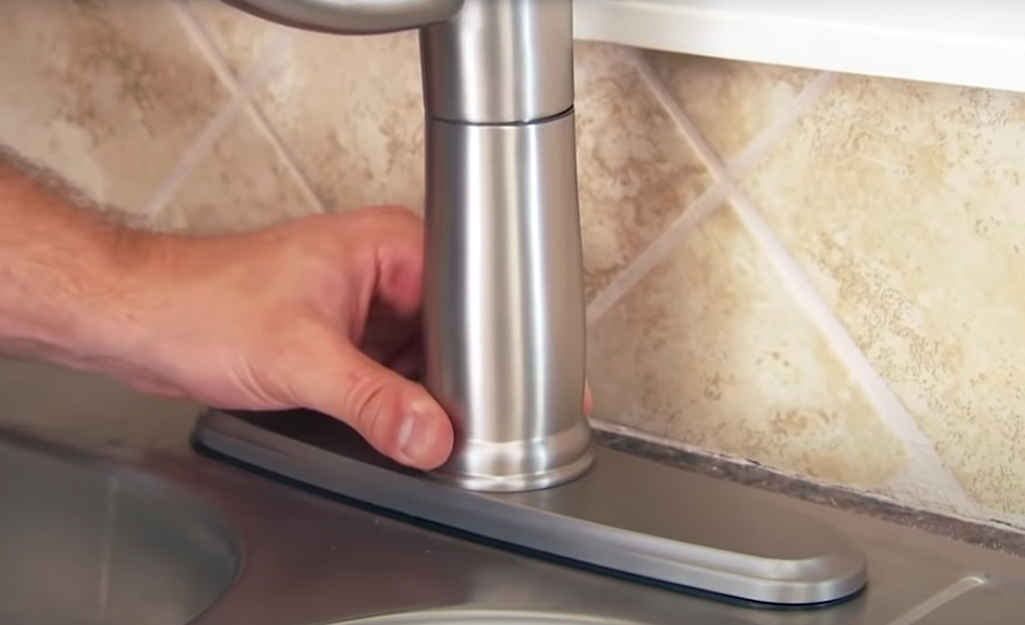
Step 4: Install the New Faucet
This is where your new single lever faucet installation really begins!
- Apply Sealant: Many new faucets come with a gasket or require plumber’s putty or silicone caulk. If your faucet has a gasket, simply place it onto the base of the new faucet. If it doesn’t, apply a thin bead of plumber’s putty or silicone caulk around the underside of the faucet base. This is crucial for sealing faucet base and preventing leaks.
- Position the Faucet: Carefully insert the new faucet through the holes in your sink. Ensure it’s centered and facing the correct direction.
- Secure from Below: From under the sink, thread the faucet’s mounting hardware (washers, nuts, or the faucet mounting bracket) onto the faucet shanks. Hand tightening connections is a good start.
- Tighten Securely: Use your basin wrench or an adjustable wrench to tighten the mounting nuts. Tighten them evenly, alternating between nuts if there are multiple. Don’t overtighten, as this can damage the sink or faucet. The faucet should feel secure and not wiggle.
Step 5: Connect the Water Supply Lines
This step involves connecting the new plumbing to your water source.
- Prepare Supply Lines: If you bought new supply lines, check their ends. Some have rubber gaskets that need to be seated properly. If you’re reusing old lines, use a wire brush to clean the threads on both the faucet and the shut-off valve ends.
- Apply Pipe Thread Tape: Wrap pipe thread tape (Teflon tape) clockwise around the threads of the shut-off valves. This helps create a watertight seal.
- Connect Lines to Faucet: Connect the appropriate supply lines (hot to hot, cold to cold) to the corresponding inlets on the new faucet. Hand tighten the connections first, then use an adjustable wrench to tighten them another quarter to half turn.
- Connect Lines to Shut-off Valves: Connect the other ends of the supply lines to the shut-off valves. Again, hand tighten first, then use a wrench to snug them up. Be careful not to overtighten.
Step 6: Turn the Water Back On and Check for Leaks
This is the moment of truth for your leak testing plumbing.
- Slowly Open Valves: Gently turn both the hot and cold water shut-off valves counter-clockwise to open them.
- Inspect Connections: Carefully examine all the connections you made: where the supply lines connect to the faucet and where they connect to the shut-off valves. Look and feel for any drips or signs of leaks.
- Run Water: Turn on the new faucet, letting both hot and cold water run for a minute. Continue to inspect for leaks under the sink.
- Tighten if Necessary: If you find any minor drips, try gently tightening the connection a little more. If a leak persists, you may need to shut off the water again, disconnect the line, and reapply pipe thread tape.
Step 7: Final Touches and Cleanup
You’re almost done!
- Wipe Down: Wipe up any water or excess sealant around the faucet and under the sink.
- Test Faucet Operation: Make sure the handle moves smoothly and operates both hot and cold water correctly. Check the spray function if your faucet has one.
- Secure Any Loose Items: Ensure all plumbing basics are in place and no tools or materials are left behind under the sink.
Common Challenges and Solutions
Even with careful planning, you might encounter a few hiccups. Here are some common issues and how to fix them:
- Stubborn Old Faucet: If the old faucet is corroded or stuck, you might need to use a penetrating oil or even carefully cut the old mounting nuts with a mini hacksaw or oscillating tool. Always wear safety glasses when cutting.
- Leaky Connections: Most leaks from new installations are due to connections not being tight enough or sealant not being applied correctly. Double-check all your connections and sealant application.
- Low Water Pressure: This could be due to several reasons: the shut-off valves aren’t fully open, there’s debris in the aerator of the new faucet, or the water supply lines are kinked. Check each of these.
- Sink Holes Don’t Match: If your new faucet doesn’t fit the existing sink holes, you might need a faucet adapter plate or consider a faucet that is designed for your sink’s configuration.
Fathoming the Faucet Mounting Bracket
The faucet mounting bracket is the unsung hero that keeps your faucet firmly in place. It’s a sturdy piece, often made of metal or tough plastic, that screws onto the underside of your sink. Its job is to grip the faucet shanks tightly. When you’re hand tightening connections, make sure this bracket is snug. Using your basin wrench to tighten it ensures it provides solid support, preventing any wobbling or movement of the faucet. A well-seated faucet mounting bracket is key to a professional-looking installation.
Deciphering Under-Sink Plumbing
Navigating under-sink plumbing can seem daunting, but it’s quite straightforward once you identify the key components. You’ll typically see:
- Shut-off Valves: These are your emergency shut-offs for hot and cold water.
- Water Supply Lines: These flexible hoses connect the shut-off valves to the faucet.
- Drain Pipes: These carry wastewater away from the sink. For faucet installation, you won’t be touching these, but it’s good to know they are there.
- Mounting Hardware: Nuts, washers, and sometimes a mounting bracket that secure the faucet to the sink.
Getting familiar with these parts helps you feel more confident during the entire DIY kitchen repair process.
Interpreting Water Supply Lines
Water supply lines are the direct pathways for water to reach your faucet. They are usually made of braided stainless steel or reinforced rubber. When you’re doing a faucet replacement, it’s highly recommended to replace old, stiff, or corroded supply lines. New ones are less likely to leak and ensure a clean connection. Make sure you buy the correct length and diameter for your setup. When connecting them, always use pipe thread tape on the valve threads and hand-tighten the connections first, then a snug turn with a wrench.
Sealing Faucet Base: The Importance of a Good Seal
The seal between your new faucet and the sink surface is critical to prevent water from seeping into the countertop or cabinet below. This is where plumber’s putty or silicone caulk comes in.
- Plumber’s Putty: A malleable, clay-like substance that creates a watertight seal. It’s ideal for most sink materials like stainless steel and porcelain. You roll it into a rope and place it around the faucet base.
- Silicone Caulk: A flexible, waterproof sealant that adheres well and provides a durable seal. It’s often used for countertops made of granite, quartz, or laminate, or if the faucet manufacturer specifically recommends it.
Applying the sealant correctly ensures a clean finish and prevents future water damage.
Gearing Up for Hand Tightening Connections
The phrase “hand tightening connections” means to use only your hands to screw fittings together as far as they will go. This is especially important for delicate connections, like those on plastic pipes or when you’re first starting to thread a connection to ensure it’s not cross-threaded. After hand tightening, you’ll use a wrench for a final snug turn, but starting by hand helps prevent damage and ensures a proper alignment of threads.
Practicing Leak Testing Plumbing Techniques
Leak testing plumbing is a vital part of any plumbing project. It’s the process of ensuring that all your new connections are watertight before you put them to full use. When you turn the water back on slowly and check all the joints, you are performing leak testing. Any sign of moisture at a connection point means it needs further attention, whether it’s a tighter connection or a reseal. It’s always better to find and fix a small drip at this stage than a big leak later.
Frequently Asked Questions (FAQ)
Q1: How long does it typically take to install a single handle kitchen faucet?
A1: For most DIYers, replacing a kitchen faucet takes about 1 to 2 hours. This can vary depending on the complexity of the old faucet’s removal and your comfort level with plumbing basics.
Q2: Do I need to turn off the main water supply to the house?
A2: No, you usually only need to turn off the hot and cold water supply valves located directly under your sink.
Q3: What if my new faucet has a different number of holes than my sink?
A3: Many new faucets are designed to fit sinks with 1, 2, 3, or 4 holes. They often come with decorative base plates or escutcheons to cover any unused holes. If your sink has more holes than your faucet can cover, you may need to purchase a separate deck plate.
Q4: Can I reuse my old water supply lines?
A4: While you can reuse them if they are in good condition, it’s highly recommended to replace old supply lines during a faucet replacement. Old lines can become brittle and prone to leaks.
Q5: What is a basin wrench and why do I need one?
A5: A basin wrench is a specialized tool with a long, swiveling jaw that is designed to reach and turn nuts in tight, awkward spaces, typically found under the sink where faucets are mounted. It’s essential for most faucet installations.
Q6: How tight should I make the connections?
A6: Hand tighten all connections first. Then, use a wrench to snug them up – usually about a quarter to half turn past hand-tight. Overtightening can strip threads or crack fittings, causing leaks. It’s better to be slightly loose and re-tighten than to overtighten.
Q7: My new faucet is dripping slightly after installation. What should I do?
A7: First, ensure the water supply valves are fully open. If it’s still dripping, turn off the water and check if the faucet handle is properly aligned and seated. Sometimes, debris can get lodged in the valve mechanism. You may need to disassemble the handle assembly slightly to check and clean it, or consult the faucet manufacturer’s instructions.
By following these detailed steps, you can successfully complete your single handle kitchen faucet installation, enhancing your kitchen’s functionality and style with this rewarding DIY kitchen repair.