
Yes, you can absolutely change your kitchen cabinet color, and it’s a fantastic way to update your kitchen! Whether you’re dreaming of a modern farmhouse vibe or a sleek, contemporary look, changing your cabinet color can make a dramatic difference without the hefty cost of a full renovation. This comprehensive guide will walk you through everything you need to know about giving your cabinets a fresh new hue, covering the process from start to finish.
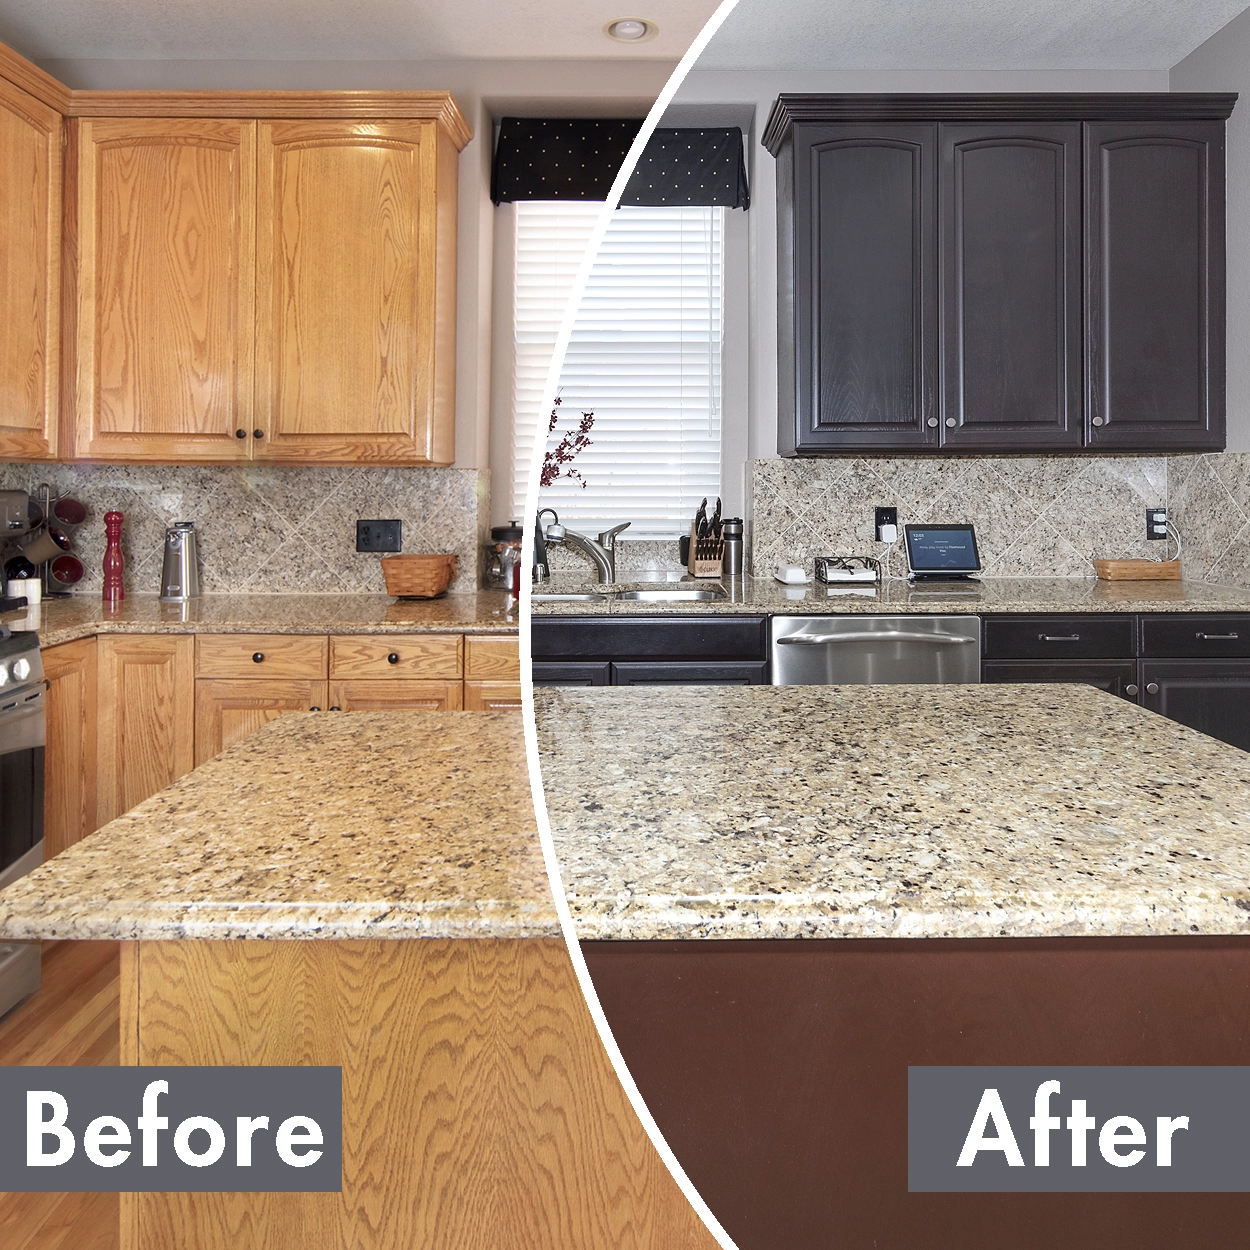
Image Source: www.nhance.com
Why Change Your Kitchen Cabinet Color?
Your kitchen cabinets are often the focal point of your culinary space. Over time, trends shift, your taste evolves, or perhaps the original color just doesn’t feel right anymore. Changing your cabinet color is a powerful way to:
- Modernize your kitchen: Outdated colors can make even the most functional kitchen feel old.
- Reflect your personal style: From classic whites and grays to bold blues and greens, the possibilities are endless.
- Increase home value: A refreshed kitchen is a significant selling point.
- Save money: It’s a far more budget-friendly option than replacing all your cabinets.
Choosing Your New Cabinet Color: Cabinet Color Ideas Galore
The first step is deciding on your new look. This is where the fun begins! Consider the overall style of your home, the amount of natural light in your kitchen, and the existing elements like countertops and backsplashes.
Popular Cabinet Color Trends
- Whites and Off-Whites: Timeless, bright, and versatile. They make spaces feel larger and airier.
- Grays and Greiges: Sophisticated and neutral, offering a modern alternative to white.
- Blues and Greens: Especially muted or deep shades, these add personality and depth. Think navy, sage, or teal.
- Black: Bold and dramatic, black cabinets create a striking contemporary or traditional look.
- Wood Tones: While not a “color” in the painted sense, updating the stain can completely transform the look. Consider warm honey tones or rich espresso.
Cabinet Stain Colors: A Different Approach
If your cabinets are currently painted or you have unpainted wood cabinets, cabinet stain colors offer a different aesthetic. Staining allows the natural wood grain to show through, providing warmth and character.
- Light Stains: Oak, maple, or birch with light stains can create a Scandinavian or minimalist feel.
- Medium Stains: Walnut or cherry stains offer a classic, warm look that complements many decor styles.
- Dark Stains: Espresso or ebony stains provide a luxurious, modern, or rustic appearance.
Creating a Mood Board
Gather samples of paint chips, countertop materials, backsplash tiles, and hardware. Lay them out together to see how they harmonize. This visual aid is invaluable for making the right color choice.
Is DIY Cabinet Makeover Possible?
Absolutely! With the right preparation, materials, and a bit of patience, a DIY cabinet makeover is achievable. It’s a project that many homeowners undertake successfully. The key is meticulous preparation and following the steps carefully.
Methods for Changing Cabinet Color: Cabinet Refinishing vs. Cabinet Painting
There are two primary methods for changing your cabinet color: cabinet refinishing and kitchen cabinet painting. While both achieve a new look, they differ in process and outcome.
Cabinet Refinishing: Bringing Out the Wood’s Natural Beauty
Cabinet refinishing typically involves sanding down the existing finish to the bare wood and then applying a new stain or clear protective coat. This method is ideal if you love the look of natural wood grain and want to enhance it.
- Pros of Refinishing:
- Highlights natural wood grain for warmth and character.
- Can achieve a rich, deep, or light natural wood look.
- Often more durable if done properly with high-quality finishes.
- Cons of Refinishing:
- Requires thorough sanding, which can be labor-intensive.
- Limited color options compared to painting; you’re working with the wood’s base color.
- Can be trickier to achieve a perfectly uniform finish on different wood types.
Kitchen Cabinet Painting: The Versatile Transformation
Kitchen cabinet painting involves cleaning, sanding, priming, and then applying paint. This is the most popular method for dramatically changing the look of cabinets, especially if they are currently laminate, thermofoil, or have a dated painted finish.
- Pros of Painting:
- Offers an almost limitless range of colors.
- Can completely hide imperfections or dated finishes.
- Allows for various finishes (matte, satin, semi-gloss, gloss).
- Cons of Painting:
- Requires careful preparation to ensure adhesion and a smooth finish.
- If not done correctly, can look “DIY” or chip easily.
- The wood grain is obscured.
Cabinet Resurfacing: A Hybrid Approach
Sometimes, cabinet resurfacing is mentioned. This term can be used broadly. If it refers to applying a new laminate or veneer over existing cabinets, it’s a different process entirely. However, if it’s used in the context of painting, it essentially means cabinet refinishing or a thorough repainting process. For the purpose of this guide, we’ll focus on the painting and staining aspects.
The Step-by-Step Guide to Kitchen Cabinet Painting
This section details the process for kitchen cabinet painting, a popular and effective way to update your cabinetry.
Step 1: Preparation is Key
This is the most crucial step for a professional-looking finish. Rushing here will show in the final result.
Removing Doors and Drawers
- Label Everything: Use masking tape and a pen to label each door and drawer with its corresponding location (e.g., “Upper Left,” “Drawer 2”). This is vital for reassembly.
- Store Hardware: Keep hinges, screws, and handles organized. Ziploc bags with labels are perfect for this.
Cleaning the Cabinets
- Degrease Thoroughly: Kitchen cabinets accumulate grease and grime. Use a strong degreaser like TSP (Trisodium Phosphate) substitute or a specialized cabinet cleaner. Wear gloves and ensure good ventilation.
- Rinse and Dry: Wipe down all surfaces with a damp cloth to remove cleaner residue, then dry completely with a lint-free cloth.
Sanding for Adhesion
- The Goal: You don’t need to remove the old finish completely unless it’s peeling or damaged. The goal is to scuff up the surface so the primer and paint can adhere properly.
- Sanding Grit: Start with a medium-grit sandpaper (100-150 grit) for the initial scuff. Follow up with a finer grit (180-220 grit) for a smoother finish.
- Sanding Technique: Sand in the direction of the wood grain. For doors and drawer fronts, a sanding block or an orbital sander can be helpful. For cabinet frames, a sanding sponge or folded sandpaper works well.
- Clean Dust: After sanding, use a vacuum with a brush attachment to remove dust, then wipe down surfaces with a tack cloth or a microfiber cloth slightly dampened with mineral spirits (for oil-based finishes) or water (for water-based finishes).
Repairing Imperfections
- Fill Holes: Use wood filler to fill any nail holes, dents, or deep scratches.
- Sanding Filler: Once the filler is dry, sand it smooth, ensuring it’s flush with the surrounding surface.
Step 2: Priming for a Lasting Finish
Primer is essential for good paint adhesion, blocking stains, and ensuring a uniform color.
- Choosing the Right Primer: For kitchen cabinets, an oil-based or shellac-based primer is often recommended for superior adhesion and stain-blocking. However, high-quality water-based bonding primers are also very effective. Consider the best paint for kitchen cabinets, which often pairs well with specific primers.
- Application: Apply a thin, even coat of primer using a high-quality synthetic brush for edges and corners, and a foam roller or a fine-nap roller for flat surfaces.
- Drying Time: Allow the primer to dry completely according to the manufacturer’s instructions.
- Light Sanding: After the primer is dry, lightly sand the surfaces with 220-grit sandpaper to create an ultra-smooth surface. Wipe away dust with a tack cloth.
Step 3: Painting Your Cabinets
This is where your cabinets start to take on their new identity.
- Choosing the Best Paint for Kitchen Cabinets:
- Type: Alkyd enamel (oil-based) or high-quality water-based acrylic enamel paints are best. Oil-based paints offer superior durability and a smoother finish but are harder to clean up. Water-based acrylics are easier to work with and clean up, and modern formulations are very durable.
- Sheen: Satin or semi-gloss sheens are typically recommended for kitchen cabinets. They offer good durability, are easy to clean, and resist moisture. High-gloss can be too reflective, and matte finishes are harder to maintain in a high-traffic kitchen.
- Application Techniques:
- Brushing: Use a high-quality angled brush for cutting in edges and detailed areas.
- Rolling: Use a high-density foam roller or a small, fine-nap roller for the larger, flat surfaces. This will give a smoother finish than a standard roller.
- Spraying (Optional): For a factory-perfect finish, consider using a paint sprayer. This requires practice and significant masking but yields the best results.
- Applying Thin Coats: The key to a durable and professional-looking paint job is applying multiple thin coats rather than one thick one.
- First Coat: Apply the first coat evenly. Avoid overworking the paint.
- Drying Between Coats: Allow each coat to dry completely according to the manufacturer’s recommendations. This is crucial for adhesion.
- Light Sanding (Optional but Recommended): After the first or second coat, lightly sand the entire surface with 320-grit sandpaper and wipe with a tack cloth. This knocks down any dust nibs and ensures a smoother final finish.
- Subsequent Coats: Apply additional coats (usually 2-3 total) until you achieve full coverage and the desired depth of color.
Step 4: Reassembling and Finishing Touches
Once the paint is fully cured (this can take several days to a week, even if it feels dry to the touch), it’s time to reassemble.
- Reattach Hardware: Install new or reattach your existing hinges and handles.
- Rehang Doors and Replace Drawers: Refer to your labels for correct placement.
- Clean Up: Remove all painter’s tape and clean up your workspace.
The Step-by-Step Guide to Cabinet Refinishing (Staining)
If you’ve opted for a stained finish, the process is similar in preparation but differs in the finishing stages.
Step 1: Preparation (Same as Painting)
Follow all the cleaning, sanding, and repair steps outlined above. For staining, ensure you sand down to the bare wood.
- Sanding to Bare Wood: This is crucial for stain to penetrate evenly. Use progressively finer grits of sandpaper, from 80 or 100 grit up to 150-220 grit.
- Wipe Down: Thoroughly wipe down all surfaces with a clean cloth dampened with mineral spirits to remove all dust and natural oils from the wood. Allow to dry completely.
Step 2: Applying Wood Conditioner (Optional but Recommended)
Wood conditioner helps to ensure that the stain is absorbed evenly, especially on woods like pine or maple that can be blotchy.
- Application: Apply the conditioner with a brush, following the wood grain.
- Drying: Let it sit for the time specified by the manufacturer (usually 10-15 minutes) before wiping off any excess.
Step 3: Applying Cabinet Stain Colors
- Choosing Your Stain: Select your desired cabinet stain colors. Test the stain on a scrap piece of wood from your cabinets or an inconspicuous area to ensure you like the color and how it absorbs.
- Application:
- Brush or Cloth: Apply the stain generously with a high-quality natural bristle brush or a clean, lint-free cloth. Work in sections.
- Wipe Off Excess: Allow the stain to penetrate for a few minutes (check product instructions), then wipe off the excess with a clean cloth, always moving in the direction of the wood grain. The longer you leave the stain on, the darker the color will be.
- Multiple Coats: If you want a darker color, allow the first coat to dry completely and then apply a second coat, wiping off the excess as before.
Step 4: Applying a Protective Topcoat (Sealer/Varnish)
Stain alone does not offer protection. A topcoat is essential for durability and moisture resistance.
- Types of Topcoats: Polyurethane (oil-based or water-based), varnish, or lacquer are common choices. For kitchen cabinets, a durable, moisture-resistant finish like a water-based polyurethane or a durable oil-based varnish is recommended.
- Application: Apply thin, even coats using a high-quality synthetic brush or a foam applicator. Avoid over-brushing.
- Drying and Sanding: Allow each coat to dry thoroughly. Lightly sand between coats with 220-320 grit sandpaper and wipe with a tack cloth for a smooth finish.
- Number of Coats: Apply 2-3 coats for adequate protection.
What is the Best Paint for Kitchen Cabinets?
The best paint for kitchen cabinets is typically a high-quality acrylic enamel or an oil-based enamel with a satin or semi-gloss finish. These paints offer the best balance of durability, washability, and adhesion for the demanding environment of a kitchen. Brands like Benjamin Moore’s Advance or Sherwin-Williams’ Emerald Urethane Trim Enamel are often cited as excellent choices.
Cabinet Painting Techniques for a Professional Look
Beyond the basic steps, specific cabinet painting techniques can elevate your DIY cabinet makeover.
- Using a Primer Specifically for Cabinets: Don’t skip primer. Choose one formulated for high-traffic areas or cabinets.
- The “Flow” of Paint: When rolling, use long, even strokes. For brushed areas, use smooth, overlapping strokes. Aim for a consistent application.
- Avoid Overworking the Paint: Too much brushing or rolling can lead to brush marks or an uneven texture.
- Clean Tools Religiously: If using water-based paint, clean brushes and rollers immediately after use with soap and water. For oil-based paints, use mineral spirits.
- Working in a Dust-Free Environment: Dust is the enemy of a smooth paint finish. If possible, paint in a clean garage or a well-ventilated room with good airflow but minimal airborne dust.
Updating Kitchen Cabinets: Beyond Just Color
While color is a major factor, consider other ways to enhance your updating kitchen cabinets project:
- New Hardware: Replacing knobs and pulls is a simple yet impactful change.
- Cabinet Doors: If your cabinet boxes are in good shape but the doors are dated or damaged, you can replace just the doors.
- Add Molding or Trim: Decorative molding can add a custom, high-end look.
- Under-Cabinet Lighting: This is both functional and adds ambiance.
Cabinet Refinishing vs. Painting: A Quick Comparison
| Feature | Kitchen Cabinet Painting | Cabinet Refinishing (Staining) |
|---|---|---|
| Color Choice | Unlimited | Limited by wood type and stain availability |
| Wood Grain | Obscured | Highlighted |
| Finish | Smooth, opaque | Natural wood tone, can be slightly translucent |
| Preparation | Cleaning, sanding (scuffing), priming | Cleaning, sanding (to bare wood), conditioning (optional) |
| Durability | High with proper paint and application | High with proper topcoat |
| Difficulty | Moderate (requires patience for multiple thin coats) | Moderate to High (sanding to bare wood can be labor-intensive) |
| Best For | Dated laminate/thermofoil, desire for specific colors, hiding imperfections | Natural wood cabinets, desire for warm, natural look |
Frequently Asked Questions (FAQ)
How long does it take to paint kitchen cabinets?
The time commitment varies significantly depending on the size of your kitchen, the number of doors and drawers, and whether you’re DIYing or hiring a professional. For a DIY project, expect to spend anywhere from a long weekend to a full week or more, spread out due to drying times between coats.
Can I paint over existing cabinet stain?
Yes, but it requires thorough preparation. You’ll need to clean, lightly sand, and apply a good quality primer (like a bonding primer) before painting. It’s usually easier and yields better results to paint over existing paint than stain.
What is the most durable finish for kitchen cabinets?
High-quality acrylic enamel or oil-based enamel paints with a satin or semi-gloss finish, applied over a proper primer, are very durable. For stained cabinets, a durable polyurethane or varnish topcoat is essential for longevity.
Do I need to remove the doors to paint them?
Yes, absolutely. Removing the doors and drawers allows you to paint them flat, which is much easier and leads to a smoother, more even finish without drips. It also ensures you can access all areas of the cabinet frames.
What if my cabinets are laminate or thermofoil?
These materials can be painted, but they require special preparation. Clean them thoroughly to remove any surface treatments, lightly sand with fine-grit sandpaper (around 150-180 grit) to create a surface for adhesion, and use a bonding primer specifically designed for laminate or plastics before applying your cabinet paint.
How do I achieve a smooth finish without brush marks?
Use high-quality brushes and rollers designed for smooth finishes. Apply paint in thin, even coats, and avoid over-brushing or over-rolling. Lightly sanding between coats with very fine-grit sandpaper (320 grit or higher) and using a tack cloth to remove dust before the next coat will also help achieve a smooth, professional look.
By following these detailed steps and choosing the right materials, you can successfully transform your kitchen cabinets, giving your kitchen a beautiful, updated look that you’ll love for years to come. Happy transforming!