
Can you paint laminate kitchen cabinets? Yes, you absolutely can paint laminate kitchen cabinets, and this guide will show you exactly how to achieve a beautiful, durable finish that transforms your kitchen. While laminate presents unique challenges compared to wood, a proper preparation and painting process can result in a stunning laminate cabinet makeover. This comprehensive guide covers everything you need to know for successful DIY laminate cabinet painting.
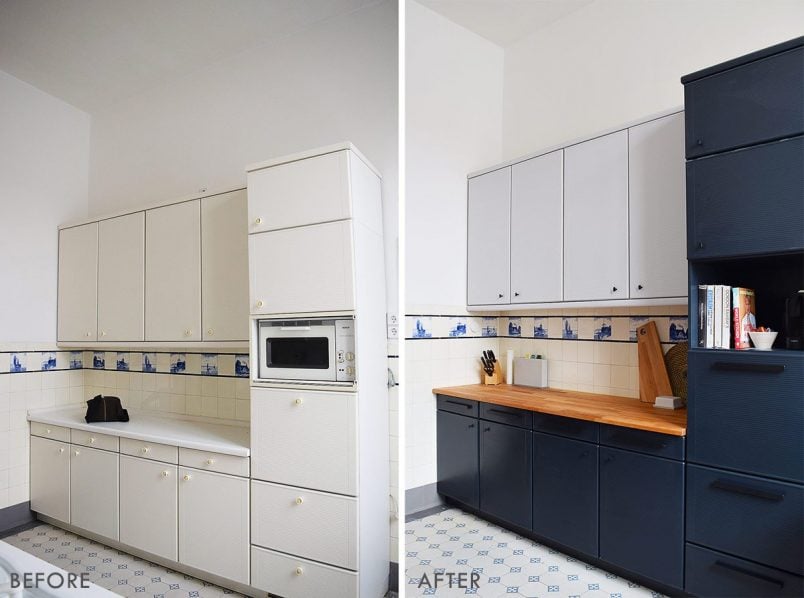
Image Source: www.littlehouseonthecorner.com
Why Paint Your Laminate Kitchen Cabinets?
Laminate cabinets are popular for their affordability and ease of cleaning. However, over time, their color can become dated, the finish can wear, or you might simply desire a fresh new look for your kitchen. Painting offers a cost-effective way to achieve this transformation without the expense of a full cabinet replacement. A successful laminate cabinet refinishing can dramatically change the aesthetic of your entire kitchen, giving it a modern and updated feel. Whether you’re dealing with laminate or even melamine, the principles of preparing and painting these surfaces remain similar, making this guide versatile for various laminate-type materials, including Formica.
Is Laminate Cabinet Refinishing a Good Idea?
Absolutely. Laminate cabinet refinishing is an excellent DIY project for homeowners looking to refresh their kitchen on a budget. It requires patience and attention to detail, but the results can be incredibly rewarding. You’ll be amazed at how a fresh coat of paint can completely revitalize your kitchen space. This isn’t just about aesthetics; it’s about extending the life and appeal of your existing cabinetry.
Preparing Your Laminate Cabinets for Paint: The Crucial First Step
The success of your painting project hinges on thorough preparation. This is arguably the most important stage when painting laminate kitchen cabinets. Rushing this step will lead to paint peeling or chipping later on.
Gathering Your Cabinet Painting Supplies for Laminate
Before you begin, ensure you have all the necessary cabinet painting supplies laminate will require:
- Degreaser/Cleaner: A strong kitchen degreaser or a solution of TSP (trisodium phosphate) and water.
- Rubbing Alcohol: For final cleaning and to ensure the surface is free of oils.
- Sanding Sponges or Fine-Grit Sandpaper: 120-grit and 220-grit are ideal.
- Orbital Sander (Optional): For larger areas, but be cautious not to oversand.
- Tack Cloths: To remove dust after sanding.
- Painter’s Tape: High-quality tape for clean lines.
- Plastic Sheeting or Drop Cloths: To protect your countertops and floors.
- Screwdrivers/Drill: To remove cabinet doors and hardware.
- Paint Trays and Rollers: High-density foam rollers are best for smooth finishes.
- Paint Brushes: Angled brushes for corners and edges.
- Primer: A high-quality bonding primer specifically designed for laminate or slick surfaces.
- Paint: Cabinet-grade paint, often an enamel or acrylic latex.
- Top Coat/Sealer (Optional but Recommended): For added durability.
- Safety Glasses and Gloves: For protection.
Step-by-Step Preparation Guide for Laminate Cabinet Painting Prep Laminate
Proper cabinet painting prep laminate is non-negotiable. Follow these steps meticulously:
- Clear and Remove: Empty your cabinets. Remove all contents, shelves, and any decorative items from the cabinet doors.
- Label Everything: As you remove doors and drawers, label them with a number or letter on the back or inside edge. This will make reassembly much easier. Use painter’s tape and a marker for labeling.
- Remove Hardware: Unscrew and remove all hinges, knobs, and pulls. Store them in a safe place, perhaps in a labeled baggie.
- Clean Thoroughly: This is critical. Laminate surfaces often have grease and grime. Use a strong degreaser or TSP solution to clean every inch of the cabinet doors, drawer fronts, and cabinet frames. Rinse thoroughly with clean water and allow to dry completely.
- Wipe with Alcohol: Once dry, wipe down all surfaces with rubbing alcohol. This removes any residual oils or residues that the degreaser might have left behind, ensuring the primer adheres well.
- Light Sanding: This step is essential for creating a surface that the primer can grip onto. Use 120-grit sandpaper or sanding sponges to lightly scuff up all surfaces you intend to paint. You don’t need to remove the laminate finish, just create a dull, slightly rough texture. This is crucial for adhesion. If you’re painting melamine cabinets, this step is equally vital.
- Dust Removal: After sanding, use a vacuum with a brush attachment to remove as much dust as possible. Then, use tack cloths to wipe down all surfaces. Tack cloths are designed to pick up fine dust particles. Ensure every speck is gone.
- Tape Off: Carefully apply painter’s tape to any areas you don’t want to paint, such as the cabinet interiors, countertops, or appliance edges. Press the tape down firmly to create a seal and prevent paint bleed.
Choosing the Best Primer for Laminate Cabinets
Selecting the right primer is paramount for a durable paint job on laminate. Laminate is a non-porous material, meaning paint can have trouble adhering to it without a proper base.
Why Primer is Essential for Laminate
Primer acts as a bridge between the laminate surface and your topcoat of paint. It helps with adhesion, blocks stains, and provides a uniform base for your chosen paint color. Without a good primer, your paint job is likely to chip or peel.
The Best Primer Options for Laminate
When painting laminate kitchen cabinets, you need a bonding primer that’s formulated for slick or non-porous surfaces. Here are some highly recommended types:
- Adhesion-Promoting Primers: Look for primers specifically labeled as “bonding primers” or “adhesion primers.” These are designed to stick to challenging surfaces like laminate, plastic, and metal.
- Shellac-Based Primers: Shellac primers are known for their excellent adhesion and stain-blocking properties. They dry quickly and create a very hard finish that paint adheres to exceptionally well. They are also great for covering any dark laminate colors.
- Oil-Based Primers: Similar to shellac, oil-based primers offer strong adhesion and durability. However, they can have stronger fumes and require mineral spirits for cleanup.
- Water-Based Bonding Primers (Latex/Acrylic): Many high-quality water-based primers now offer excellent adhesion to laminate. These are often easier to work with and clean up. Always check the product label to ensure it states suitability for laminate or glossy surfaces.
Table: Primer Comparison for Laminate Cabinets
| Primer Type | Adhesion | Durability | Ease of Use | Cleanup | Best For |
|---|---|---|---|---|---|
| Shellac-Based | Excellent | Very High | Moderate | Denatured Alcohol | Tough adhesion, covering dark colors, fast drying |
| Oil-Based | Excellent | High | Moderate | Mineral Spirits | Durability, stain blocking |
| Water-Based Bonding | Good to Very Good (check label) | Good | High | Soap and Water | Ease of use, low VOCs, general application |
For DIY laminate cabinet painting, a water-based bonding primer or a shellac-based primer are generally the top choices. Always read the manufacturer’s instructions and recommendations.
Applying the Primer for a Flawless Finish
Once you’ve chosen your primer and prepped your surfaces, it’s time to apply.
How to Apply Primer to Laminate
- Stir, Don’t Shake: Stir your primer thoroughly. Shaking can introduce air bubbles that transfer to your surface.
- First Coat: Apply a thin, even coat of primer using a high-density foam roller for the flat surfaces and an angled brush for the edges and corners. Work in manageable sections. Avoid applying the primer too thickly, as this can lead to drips and an uneven finish.
- Drying Time: Allow the primer to dry completely according to the manufacturer’s instructions. This is crucial for proper bonding.
- Light Sanding (Between Coats): Once the primer is dry, lightly sand it with 220-grit sandpaper or a fine-grit sanding sponge. This will knock down any imperfections and create a smoother surface for the paint. Wipe away dust with a tack cloth.
- Second Coat (If Needed): For dark laminate colors or if you want extra assurance, apply a second thin coat of primer. Repeat the light sanding and dusting process.
Selecting the Right Paint for Your Laminate Cabinet Update
Choosing the right paint is vital for a durable and beautiful laminate cabinet update.
Types of Paint Suitable for Laminate
- Acrylic Latex Enamels: These are a popular choice for cabinets. They offer good durability, are relatively easy to clean up, and come in a wide range of colors. Look for formulas specifically designed for cabinets or trim, as they have a harder finish.
- Cabinet-Specific Paints: Some brands offer paints formulated specifically for cabinets, which often have superior adhesion and durability.
- Alkyd Enamels (Oil-Based): While offering excellent durability and a smooth finish, oil-based paints require mineral spirits for cleanup and have stronger fumes. They are a good option if durability is your absolute top priority.
Paint Finishes to Consider
- Satin: A popular choice for cabinets, offering a slight sheen that’s easy to clean and hides minor imperfections well.
- Semi-Gloss: Provides a higher sheen, making it very durable and easy to wipe down. It can highlight surface imperfections more than satin.
- Gloss: Offers the highest sheen and is the most durable and easiest to clean. However, it will show every flaw in the surface.
For most DIYers, a satin or semi-gloss acrylic latex enamel is the best combination of durability, ease of use, and aesthetic appeal for painting laminate kitchen cabinets.
The Painting Process: Bringing Your Laminate Cabinet Makeover to Life
With primer applied and dry, you’re ready to apply the paint for your laminate cabinet makeover.
How to Paint Laminate Kitchen Cabinets
- Stir Your Paint: Just like the primer, stir your paint thoroughly.
- First Coat of Paint: Apply a thin, even coat of paint. Use a high-density foam roller for the majority of the surface and an angled brush for the edges and details. Avoid overloading the roller or brush. Move in a consistent direction to minimize brush strokes.
- Work in Sections: Paint one door or drawer front at a time, or work on a section of the cabinet frame. This helps maintain a wet edge and prevents lap marks.
- Drying Time: Allow the first coat to dry completely. Check the paint can for recommended drying times, which can vary significantly.
- Light Sanding (Between Coats): Once the first coat is dry, lightly sand the surface with 220-grit sandpaper or a fine-grit sanding sponge. This is essential for creating a smooth, even finish and ensuring good adhesion for subsequent coats. Wipe away all dust with a tack cloth.
- Second Coat of Paint: Apply a second thin, even coat. Again, use a roller for flat surfaces and a brush for edges.
- Third Coat (If Necessary): Many cabinet painting projects benefit from a third coat for complete coverage and durability. Repeat the sanding and dusting process between coats.
Applying a Top Coat for Enhanced Durability
While good quality cabinet paint offers durability, a top coat can provide an extra layer of protection, especially in high-traffic kitchen environments.
When to Use a Top Coat
A top coat is highly recommended for painting laminate kitchen cabinets, as it protects against scratches, chips, and moisture. It can significantly extend the life of your paint job.
How to Apply a Top Coat
- Choose Your Top Coat: Opt for a clear water-based polyurethane or a polycrylic product. These are durable, non-yellowing, and easy to clean up.
- Ensure Paint is Fully Cured: Most paints need several days to fully cure (harden) before applying a top coat. Check the paint manufacturer’s recommendations.
- Apply Thin Coats: Apply the top coat in thin, even layers using a high-quality foam roller or a good synthetic brush.
- Light Sanding (Optional): Some professionals lightly sand between top coats with very fine-grit sandpaper (320-grit or higher) and wipe with a tack cloth for an exceptionally smooth finish. However, this is often not necessary with polycrylic.
- Allow to Cure: Let the top coat dry and cure completely before reassembling your cabinets. This curing process can take several days to a couple of weeks for maximum hardness.
Reassembly and Final Touches
The final step is to put your beautifully painted cabinets back together.
Reassembling Your Cabinets
- Reattach Hardware: Once the doors and drawer fronts are completely dry and cured, reattach your original hardware or install new knobs and pulls.
- Hang Doors and Insert Drawers: Carefully rehang the cabinet doors and slide the drawers back into place. Use your labels to ensure everything goes back in the correct spot.
- Clean Up: Remove all painter’s tape and plastic sheeting. Clean your rollers and brushes thoroughly.
Enjoy Your New Kitchen Look!
Step back and admire your work! You’ve successfully completed a laminate cabinet refinishing project that has transformed your kitchen’s appearance.
Tips for Long-Lasting Results
- Patience is Key: Don’t rush any step, especially drying and curing times.
- Thin Coats are Better: Multiple thin coats are always superior to one or two thick coats.
- Clean Regularly: Use gentle cleaning products on your freshly painted cabinets to maintain the finish. Avoid abrasive cleaners.
- Avoid Dragging: Be mindful when sliding heavy items out of cabinets, as this can scratch the new finish if not fully cured.
Frequently Asked Questions (FAQ)
Q: Can I paint laminate cabinets without sanding?
A: While some kits claim you can skip sanding, it is highly recommended to lightly sand laminate surfaces before painting. Sanding creates a crucial mechanical bond for the primer and paint, preventing peeling and chipping. If you don’t sand, you risk the paint not adhering properly.
Q: What is the best paint for laminate cabinets?
A: The best paint for laminate cabinets is typically a high-quality acrylic latex enamel or a paint specifically formulated for cabinets. Look for options that offer good adhesion and a durable finish, like satin or semi-gloss.
Q: How do I paint Formica cabinets?
A: Painting Formica cabinets follows the same principles as painting other laminate surfaces. Thorough cleaning, light sanding, a good bonding primer, and multiple thin coats of quality paint are essential.
Q: How long does it take to paint laminate kitchen cabinets?
A: The process can take anywhere from a weekend to several days, depending on how many cabinets you have, drying times between coats, and whether you’re painting doors off the cabinet or on. Factor in drying and curing time, which is crucial for durability.
Q: Will the paint chip or peel?
A: If the preparation and priming steps are done correctly, and you use the right materials, your painted laminate cabinets should hold up well. Improper preparation is the most common reason for paint failure on laminate.
Q: Can I paint the edges of laminate cabinets?
A: Yes, you can paint the edges of laminate cabinets. Ensure you sand and prime these areas thoroughly, as they are often subject to more wear and tear.
By following this comprehensive guide, you can confidently tackle your DIY laminate cabinet painting project and achieve a beautiful, durable, and updated look for your kitchen.