
What is kashering a kitchen? Kashering a kitchen means preparing it to meet Jewish dietary laws, or kashrut, especially for Passover. Can I kasher a kitchen myself? Yes, with the right knowledge and tools, you can kasher your kitchen to adhere to these important practices.
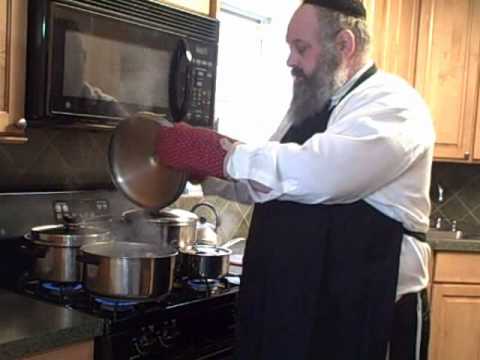
Image Source: crckosher.org
Laying the Groundwork for a Kosher Kitchen
Embarking on the journey to make your kitchen kosher, particularly for the heightened requirements of Passover, is a significant undertaking rooted in tradition and Jewish dietary laws. This process, known as kashering, ensures that your food preparation environment aligns with the meticulous standards of kashrut. Whether you’re establishing a permanent kosher kitchen or preparing for the special observance of Passover, the principles remain the same: to purify and dedicate your space for the preparation of kosher food.
Fathoming the Principles of Kashrut
At its core, kashering is about separating the permissible from the forbidden according to Jewish law. This involves more than just what you eat; it extends to how and where your food is prepared. The goal is to remove any traces of non-kosher food or forbidden cooking methods. This meticulous approach ensures that every meal prepared in your kitchen is in accordance with G-d’s will as outlined in the Torah.
The Significance of a Kosher Kitchen
A kosher kitchen is not merely a place where food is cooked; it’s a sanctified space that upholds spiritual values. For many, it’s a central hub for family life, celebration, and observance. Establishing and maintaining a kosher kitchen is a way to infuse daily life with religious meaning and connect with generations of tradition.
Preparing for the Kashering Process
Before you begin the physical act of kashering, thorough planning and preparation are essential. This stage involves identifying what needs to be kashered, gathering the necessary supplies, and understanding the specific requirements for different items.
Assessing Your Kitchen’s Contents
The first step is to go through your entire kitchen. This means looking at every utensil, appliance, and surface.
- Non-Kosher Items: Any items that cannot be kashered or that have come into contact with non-kosher food must be removed. This includes non-kosher food items, utensils made from forbidden materials, or items that have been used for non-kosher cooking.
- Passover-Specific Considerations: For Passover, the rules are even stricter. All chametz (leavened products) must be removed or kashered. This often means replacing many items or undertaking a more extensive kashering process.
Gathering Your Kashering Supplies
You’ll need a few key items to kasher your kitchen effectively:
- Boiling Water: This is crucial for kashering many items. You’ll need a large pot or kettle.
- Heat Source: A stove burner or a blowtorch can be used for certain types of kashering.
- Cleaning Supplies: Soap, scouring pads, and clean cloths are necessary for thorough cleaning before kashering.
- Food-Grade Sealant: For some surfaces, a sealant might be required after kashering.
- Gloves: To protect your hands during the cleaning and kashering process.
Creating a Kashering Schedule
Kashering can be a time-consuming process. It’s helpful to create a schedule to tackle each area systematically. Consider breaking it down by appliance, cabinet, or type of utensil.
Kashering Utensils: A Detailed Approach
Utensils are a central part of kitchen preparation, and their kashering requires careful attention. Different materials and types of utensils have specific kashering methods.
Metal Utensils: The Primary Focus
Metal utensils are generally kashered by boiling. The principle is that heat, particularly boiling water, purifies them.
Kashering Pots and Pans
- Thorough Cleaning: Wash all pots and pans thoroughly with soap and water. Ensure there are no food particles or grease.
- Boiling Method (Hagalah):
- Fill a large pot with water, enough to fully submerge the utensil.
- Bring the water to a rolling boil.
- Using tongs, carefully immerse the utensil in the boiling water. Ensure the entire utensil, including handles and rims, is submerged.
- Keep it in the boiling water for a short period (a few seconds to a minute is usually sufficient, depending on custom).
- Carefully remove the utensil and immediately rinse it with cold water.
- This process should be repeated for each metal utensil that requires kashering.
Kashering Cutlery and Silverware
Each piece of cutlery needs to be kashered individually.
- Cleanliness is Key: Wash all silverware thoroughly.
- Boiling Individually: Fill a large pot with water and bring it to a boil. Submerge each piece of silverware, one by one, using tongs. Remove and rinse with cold water.
Kashering Metal Sink and Drains
Metal sinks and their drains also need to be kashered.
- Intense Cleaning: Scrub the sink and drain thoroughly to remove all food residue and grease.
- Boiling Water or Blowtorch:
- Boiling Water: Pour boiling water over the entire surface of the sink and into the drain. Ensure all areas are covered.
- Blowtorch (Libun): For a more thorough kashering, a blowtorch can be used to heat the metal surfaces until they are very hot, simulating the effect of boiling. This method requires caution and an understanding of its application.
Glassware: A Nuance in Kashering
Glassware is a subject of some debate in Jewish law regarding kashering.
- Traditional View: Many authorities hold that glass, once used for non-kosher purposes, cannot be kashered. This is because glass is considered absorbent. Therefore, for Passover, many people opt for new glassware or use glass items that were previously designated as kosher for Passover.
- Alternative Views: Some rabbinic opinions permit kashering glass through boiling water, especially for certain types of glass. If you are unsure, it is best to consult with a rabbi.
Ceramic and Porcelain: Similar to Glass
Ceramic and porcelain items are often treated similarly to glass.
- Absorption Concern: Like glass, there is a concern that these materials absorb flavors.
- Consultation Advised: It is generally recommended to consult with a knowledgeable rabbi regarding the kashering of ceramic and porcelain items, especially for Passover.
Plastic and Other Materials
- Plastic: Plastic is generally considered non-kasherable, as it can melt or warp under intense heat, and its porous nature makes effective kashering difficult. It’s usually best to replace plastic items for Passover.
- Wood: Wooden utensils and cutting boards can be kashered by scrubbing them thoroughly and then pouring boiling water over them. However, deeply ingrained stains or cuts can make them problematic for Passover.
Kosherizing Appliances: Addressing the Heat
Appliances that use heat or have been used for cooking require a specific approach to kashering.
The Oven: A Critical Component
Ovens are often used for both dairy and meat preparation, and their interior surfaces can absorb flavors over time.
Kashering an Oven for General Kosher Use
- Thorough Cleaning: The oven must be cleaned meticulously. Remove all racks, oven liners, and any visible food debris. Scrub all interior surfaces, including the walls, ceiling, floor, and door.
- Self-Cleaning Cycle (with caution): Some rely on the self-cleaning cycle. However, this should only be done after a thorough manual cleaning, and it’s important to understand the specific rabbinic opinions on whether this method is sufficient.
- Manual Kashering: The most common method involves using heat:
- Heating: Turn the oven on to its highest setting for at least 30-60 minutes. Some recommend covering the heating elements with foil (though this needs careful consideration to avoid fire hazards).
- Cooling and Wiping: Allow the oven to cool completely and then wipe down all surfaces.
Kashering an Oven for Passover
For Passover, the process is more rigorous:
- Deep Cleaning: Remove all racks and clean them separately. Scrub the entire interior of the oven with a degreaser.
- Kiln-like Heat (Libun Gamur): The ideal method is to heat the oven to its absolute highest setting for an extended period (several hours) until it reaches a temperature that would effectively burn off any remaining residue. This is akin to a kiln-like heat. This can be achieved by turning the oven on at its highest setting and letting it run for a prolonged period.
- Rack Kashering: Oven racks are typically kashered by boiling or using a blowtorch.
The Stovetop: Direct Heat Application
Stovetop burners and grates require direct heat application.
Kashering Burners and Grates
- Cleaning: Clean the burners and grates thoroughly.
- Direct Heat (Libun):
- Burners: Turn on each burner to its highest setting for a significant amount of time until it glows red hot.
- Grates: If removable, grates can be placed on the highest setting in the oven, or individually heated with a blowtorch until red hot. If they cannot be removed, direct heat from the stovetop flame or a blowtorch can be applied.
The Microwave: A Challenging Item
Microwaves are tricky because of how they cook.
- Thorough Cleaning: Clean the interior thoroughly.
- Boiling Water Method: Place a microwave-safe bowl filled with water and perhaps a bit of lemon or vinegar inside the microwave. Heat on high until the water boils and steam fills the microwave. Leave the door closed for a few minutes to allow the steam to penetrate. Wipe down the interior.
- Passover Considerations: For Passover, many opt to kasher it by placing a bowl of water with a bit of vinegar or lemon inside and heating it until steaming, then wiping down. Some authorities recommend covering the turntable with foil.
The Refrigerator and Freezer: Cold Storage
While these appliances don’t cook, they store food.
- Empty and Clean: Empty the refrigerator and freezer completely.
- Wipe Down: Wipe down all interior surfaces, shelves, and drawers with a cleaning solution. For Passover, this cleaning needs to be exceptionally thorough to remove any crumbs or residue.
The Dishwasher: Steam and Heat
- Empty and Clean: Ensure the dishwasher is empty and clean of any food particles.
- Run a Hot Cycle: Run the dishwasher on its hottest and longest cycle, preferably with a sanitizing option. For Passover, some recommend running an empty cycle with a cup of white vinegar.
Kashering Food: A Separate, Yet Related, Task
While this guide focuses on the kitchen itself, it’s worth noting that koshering food is a parallel process. This involves ensuring that the food items themselves meet kashrut standards. For Passover, this means scrupulously avoiding chametz and ensuring all ingredients are certified Kosher for Passover.
Making Kitchen Kosher: Step-by-Step for Passover
When preparing a kosher kitchen for Passover, the process is intensified.
Passover Kitchen Preparation: Beyond the Basics
- Chametz Removal: The primary goal is the complete removal of all chametz from the home. This includes thorough cleaning of all cupboards, drawers, and surfaces.
- Dedicated Utensils: Many families opt for a completely separate set of koshering utensils and dishes specifically for Passover. This eliminates the need to kasher items that might have been used for chametz.
- Surface Kashering: All countertops, shelves, and tabletops need to be thoroughly cleaned and, where applicable, kashered.
Kashering Countertops
- Laminate/Formica: Clean thoroughly. For Passover, some cover them with foil or plastic wrap.
- Granite/Marble: Clean thoroughly. Kashering by pouring boiling water over the surface is a common practice. Ensure no cracks or crevices remain uncleaned.
- Stainless Steel: Clean thoroughly. Kashering can be done with boiling water or a blowtorch.
Kashering Cabinets and Drawers
- Empty Completely: Remove everything.
- Wipe Down: Wipe down all interior surfaces. For Passover, ensure no chametz crumbs remain.
Table of Kashering Methods by Item
| Item | General Kashering Method | Passover Kashering Method |
|---|---|---|
| Pots & Pans (Metal) | Boiling water (Hagalah) | Boiling water (Hagalah) |
| Cutlery (Metal) | Boiling water (Hagalah) | Boiling water (Hagalah) |
| Sink (Metal) | Boiling water or blowtorch (Libun) | Boiling water or blowtorch (Libun) |
| Oven | Thorough cleaning, then high heat | Thorough cleaning, then prolonged high heat (kiln-like) |
| Stovetop Burners/Grates | Direct heat until red hot (Libun) | Direct heat until red hot (Libun) |
| Microwave | Steam from boiling water | Steam from boiling water, often with vinegar/lemon; consider foil on turntable |
| Refrigerator/Freezer | Thorough cleaning | Extremely thorough cleaning, ensuring no residue |
| Dishwasher | Hot cycle | Hot cycle, possibly with vinegar; consider empty hot cycle |
| Glassware | Debated; consult rabbinic authority. Often new is preferred. | Generally not kashered; new or designated Passover items are used. |
| Ceramic/Porcelain | Debated; consult rabbinic authority. Often new is preferred. | Generally not kashered; new or designated Passover items are used. |
| Plastic | Generally not kashered | Generally not kashered; replace |
| Wooden Utensils/Boards | Scrub and pour boiling water | Scrub and pour boiling water; if deeply stained or cut, replace |
| Countertops (Laminate) | Clean | Clean; often covered with foil/plastic wrap |
| Countertops (Stone/Metal) | Clean; boiling water/blowtorch as appropriate | Clean; boiling water or blowtorch as appropriate; ensure no crevices |
| Cabinets/Drawers | Clean | Thoroughly empty and clean; ensure no chametz residue |
Ongoing Maintenance of a Kosher Kitchen
Kashering is not a one-time event. Maintaining a kosher kitchen requires ongoing vigilance.
Daily Practices
- Separation: If keeping separate meat and dairy utensils, ensure they are used and stored separately.
- Cleaning: Maintain a high standard of cleanliness.
Regular Checks
- Periodically inspect utensils and appliances for any damage that might compromise their kosher status.
- Stay informed about any updates or new interpretations of Jewish dietary laws from reputable rabbinic authorities.
Conclusion: The Fulfillment of Making Kitchen Kosher
The process of making your kitchen kosher is a journey of dedication and meticulous attention to detail, deeply connected to the observance of Jewish dietary laws. Whether for daily living or the specific demands of Passover, the kashering process transforms your cooking space into one that honors tradition and spiritual practice. By following these guidelines, you can confidently establish and maintain a kosher kitchen that serves your family and your faith.
Frequently Asked Questions (FAQ)
Q1: What is the primary difference between kashering for general kosher use and for Passover?
A1: The primary difference is the stringent removal of chametz (leavened products) for Passover. For general kosher use, the focus is on separating meat and dairy and ensuring only kosher ingredients and utensils are used. For Passover, the elimination of chametz is paramount, requiring a much more thorough cleaning and often the replacement or rigorous kashering of items that have come into contact with chametz.
Q2: Can I use the same pots and pans for both meat and dairy in a kosher kitchen?
A2: No, in a strictly kosher kitchen, separate sets of utensils, including pots and pans, are required for meat and dairy. This is a fundamental aspect of kosher kitchen rules to prevent the mixing of meat and dairy, which is forbidden in Jewish dietary laws.
Q3: What if I’m unsure about kashering a specific item?
A3: If you are uncertain about the kashering status of an item, it is always best to consult with a qualified rabbi or a knowledgeable Jewish authority. They can provide guidance based on specific traditions and interpretations.
Q4: Is it permissible to kasher items that are not made of metal?
A4: The permissibility of kashering non-metal items like glass, ceramic, or plastic varies depending on the material and the specific rabbinic interpretation. Many authorities hold that glass and ceramic are inherently non-kasherable due to absorption. Plastic is generally considered non-kasherable. For Passover, it is common practice to use separate, designated Passover items.
Q5: How often do I need to kasher my kitchen?
A5: The main kashering process is typically done before Passover. However, maintaining a kosher kitchen involves ongoing cleanliness and adherence to kosher kitchen rules throughout the year. If a non-kosher item is accidentally used in the kitchen, the affected areas or utensils may need to be kashered again.