
Can you change a kitchen faucet yourself? Yes, for most homeowners, changing a kitchen faucet is a manageable DIY project, often described as having a moderate difficulty level. This guide will walk you through the process, demystify the kitchen faucet replacement difficulty, and equip you with the knowledge to tackle it head-on.
The difficulty of plumbing tasks can often seem intimidating, but replacing a kitchen faucet is a common entry point for DIY enthusiasts. While it requires some basic plumbing knowledge, patience, and the right tools, it’s far from an impossible feat. Many homeowners successfully undertake DIY faucet installation, saving money on labor costs. If you’re looking to perform a kitchen sink faucet repair or simply upgrade your existing fixture, this guide will help you assess if you have the necessary plumbing skills for faucet change.
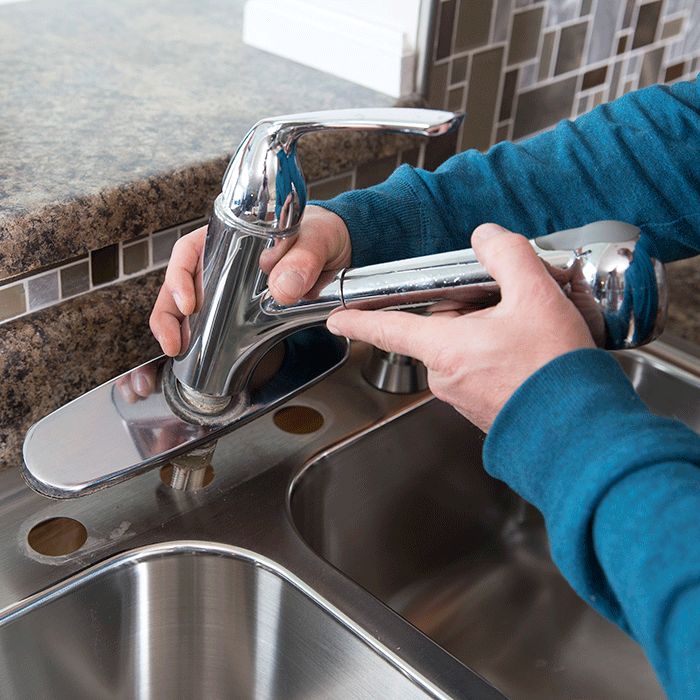
Image Source: mobileimages.lowes.com
Deciphering the Challenge: How Hard Is It Really?
The kitchen faucet replacement difficulty largely depends on a few key factors: your comfort level with basic tools, the age and condition of your existing plumbing, and the complexity of the new faucet you’ve chosen. Generally, changing a faucet falls into the “intermediate” DIY category. It’s not as simple as changing a light bulb, but it doesn’t require the expertise of a seasoned plumber either.
Factors Influencing Difficulty
- Existing Faucet Condition: If your current faucet is old, corroded, or has been installed for a long time, removing it can be challenging. Stuck nuts and mineral buildup are common culprits.
- Plumbing Access: The space beneath your sink can be cramped. If you have a garbage disposal, water filter, or a lot of pipes in the way, maneuvering tools and hands can be tricky.
- New Faucet Type: Simple two-handle faucets are generally easier to install than single-handle faucets with pull-down sprayers or touch-activated features.
- Your Comfort Level: If you’ve never done any plumbing work before, it’s natural to feel a bit apprehensive. However, with clear instructions and the right approach, most people can manage.
Essential Tools for a Smooth Installation
Having the right tools for faucet replacement is crucial for a stress-free experience. Investing in a few basic plumbing tools will make the job much easier and prevent unnecessary frustration.
The DIYer’s Toolkit
Here’s a list of the most important tools you’ll need:
- Adjustable Wrenches (Two): These are essential for gripping and turning nuts and bolts. Having two allows you to hold one part steady while turning another.
- Basin Wrench: This specialized tool is a lifesaver for reaching nuts in tight spaces under the sink that regular wrenches can’t access. It has a long shaft and a pivoting jaw.
- Pipe Wrench: Useful for gripping pipes, though less frequently needed for faucet installation itself unless you encounter unusually stubborn connections.
- Plumber’s Putty or Silicone Caulk: Used to create a watertight seal between the faucet base and the sink.
- Bucket: To catch any residual water in the supply lines.
- Towels and Rags: For wiping up spills and drying parts.
- Safety Glasses: Protect your eyes from debris and dripping water.
- Flashlight or Headlamp: To illuminate the dark space under the sink.
- Screwdriver Set (Phillips and Flathead): For any screws that might be involved in mounting or securing parts.
- Penetrating Oil (e.g., WD-40): Can help loosen stubborn nuts and bolts.
- Utility Knife: For cutting away old caulk or putty.
- New Supply Lines: It’s highly recommended to replace old supply lines when installing a new faucet for safety and to prevent leaks. Ensure you get the correct length and fitting size.
The Step-by-Step Guide: Faucet Removal Steps and Installation
Let’s break down the process of how to change a faucet yourself. This involves carefully removing the old fixture and then meticulously installing a new kitchen faucet.
Phase 1: Safely Removing the Old Faucet
Before you start unscrewing anything, it’s imperative to shut off the water supply. This is the most critical step to avoid a flood.
Step 1: Turn Off the Water Supply
- Locate the hot and cold water shut-off valves under your sink. They are typically small knobs or levers connected to the pipes coming from the wall.
- Turn the handles clockwise until they are fully closed.
- Open the old faucet handles (both hot and cold) to relieve any remaining pressure in the lines and to confirm the water is indeed off. You should only get a trickle or no water at all.
Step 2: Disconnect the Water Supply Lines
- Place your bucket underneath the connection points of the supply lines to the shut-off valves.
- Using an adjustable wrench, loosen the nuts connecting the supply lines to the shut-off valves. Have a towel ready for any drips.
- Next, disconnect the other end of the supply lines from the faucet itself. These connections are usually under the sink basin.
Step 3: Remove Mounting Hardware
- Look for the nuts or screws that secure the faucet to the underside of the sink or countertop. These are often plastic or metal.
- This is where the basin wrench will likely become your best friend. Use it to loosen and remove these nuts. The nuts can sometimes be in very awkward positions.
- If the nuts are corroded and won’t budge, a penetrating oil can be applied and allowed to sit for a while before trying again.
Step 4: Lift Out the Old Faucet
- Once all connections are undone and mounting hardware removed, carefully lift the old faucet straight up and out from the top of the sink.
- You might need to gently pry it loose if it’s sealed with old putty or caulk. Use a utility knife to carefully cut through any seals.
- Clean the sink surface where the old faucet was mounted to remove any residual putty, caulk, or grime.
Phase 2: Installing Your New Kitchen Faucet
With the old faucet out of the way, it’s time to prepare for the new one. This is where the real satisfaction of DIY faucet installation comes in.
Step 1: Prepare the New Faucet
- Unpack your new faucet and familiarize yourself with its parts. Read the manufacturer’s instructions, as there can be slight variations between models.
- Some faucets come with integrated supply lines, while others require you to attach separate ones. If attaching separate lines, do so now, ensuring they are snug but not overtightened.
- Apply plumber’s putty or silicone caulk around the base of the new faucet where it will meet the sink. This creates a watertight seal. Follow the manufacturer’s recommendation for sealant type.
Step 2: Position the New Faucet
- Carefully guide the new faucet through the mounting holes on your sink or countertop from above.
- Ensure the faucet is properly aligned and centered.
Step 3: Secure the New Faucet from Below
- From underneath the sink, install the mounting hardware (washers and nuts) that came with your new faucet.
- Hand-tighten the nuts first, ensuring the faucet remains straight and centered on the sink.
- Use your basin wrench or an adjustable wrench to snug up the mounting nuts. Be careful not to overtighten, as this can damage the sink or faucet. The faucet should feel secure and not wobble.
Step 4: Connect the Water Supply Lines
- Connect the new (or existing, if in good condition) hot and cold water supply lines to the corresponding inlets on the new faucet. Hand-tighten the connections, then use an adjustable wrench to tighten them about a quarter to a half turn more.
- Connect the other ends of the supply lines to the shut-off valves. Again, hand-tighten and then give them a slight turn with the wrench.
Step 5: Test for Leaks
- Turn the water supply shut-off valves back on slowly.
- Check all connection points under the sink for any signs of leaks. Gently wipe them dry with a towel.
- Turn on the new faucet. Let the water run for a minute or two to flush out any debris that may have entered the lines during installation.
- While the water is running, inspect all connections again for leaks. Pay close attention to the supply line connections at both the faucet and the shut-off valves, as well as the mounting nuts for the faucet itself.
- Turn off the faucet and check one last time for any drips.
Step 6: Finishing Touches
- If you used plumber’s putty, wipe away any excess that squeezed out around the faucet base. If you used silicone caulk, smooth any excess.
- Clean up your workspace.
Troubleshooting Common Issues
Even with careful planning, you might encounter minor hiccups. Here are a few common problems and how to address them.
Stubborn Nuts and Corrosion
If you can’t loosen a nut, try applying penetrating oil and letting it sit for 15-30 minutes. You can also try gently tapping the nut with the handle of your wrench, which can sometimes break the corrosion bond. If all else fails, a pipe wrench might offer better grip, but be careful not to damage the surrounding pipes.
Leaks After Installation
- Supply Line Leaks: The most common cause is an improperly tightened connection. Turn off the water and tighten the nut slightly. Ensure the rubber washer or gasket inside the fitting is seated correctly.
- Faucet Base Leaks: This usually indicates a problem with the plumber’s putty or caulk seal. Turn off the water, remove the faucet, reapply the sealant properly, and re-secure the faucet.
- Leaks from Sprayer Hose: Check the connection point of the sprayer hose to the faucet body, and ensure the O-ring is properly seated if it has one.
When to Call a Professional
While how to change a faucet yourself is achievable for many, there are instances where calling a plumber is the wiser choice.
- Extremely Corroded or Damaged Pipes: If the shut-off valves are corroded and won’t turn, or if the pipes themselves appear damaged, it’s best to let a professional handle it to prevent further damage.
- Unfamiliar Plumbing: If your plumbing system is complex, or you’re unsure about the type of pipes you have (e.g., galvanized steel which can be prone to corrosion), a plumber can provide expertise.
- Persistent Leaks: If you’ve followed all steps and still can’t stop a leak, a plumber has specialized tools and experience to diagnose and fix the problem.
- Lack of Confidence: If you feel overwhelmed at any point, it’s always okay to stop and call for professional help. It’s better than causing more significant damage.
Frequently Asked Questions (FAQ)
Q1: How long does it typically take to change a kitchen faucet?
A: For an experienced DIYer, it can take 1-2 hours. For a first-timer, it might take 3-4 hours, especially if you encounter any difficulties with removal.
Q2: Do I need to shut off the main water supply to my house?
A: No, usually you only need to shut off the hot and cold water supply valves located directly under your sink.
Q3: What is the most difficult part of replacing a kitchen faucet?
A: The most challenging aspect is often removing an old, corroded faucet due to stuck nuts and tight spaces under the sink. The basin wrench is essential for this.
Q4: Should I replace the water supply lines when replacing the faucet?
A: Yes, it’s highly recommended. Old supply lines can degrade over time and are a common source of leaks. Replacing them during faucet installation is good preventative maintenance.
Q5: What if my new faucet doesn’t fit my sink holes?
A: You might need an adapter plate or a different style of faucet. Double-check the measurements before purchasing your new faucet to ensure compatibility. For significantly different hole patterns, you might need to consider replacing the sink or countertop.
Q6: Is plumber’s putty or silicone caulk better for sealing the faucet?
A: Most manufacturers provide instructions. Plumber’s putty is traditionally used for metal-to-metal or metal-to-porcelain seals. Silicone caulk is generally more flexible and waterproof and is often recommended for certain materials or if you’re concerned about staining. Always check the faucet manufacturer’s recommendation.
Q7: My old faucet is really stuck. What else can I try?
A: If penetrating oil doesn’t work, you might need to resort to carefully cutting the nuts with a mini-hacksaw or a Dremel tool. Be extremely careful not to cut into the sink or supply pipes. This is where professional help might be a better option.
Replacing a kitchen faucet is a rewarding DIY project that can update the look and functionality of your kitchen. By preparing with the right tools and following these steps carefully, you can confidently tackle this task and enjoy your new fixture. Remember, patience and careful attention to detail are your best allies when dealing with plumbing skills for faucet change.