
Can you clean painted kitchen cabinets without removing the finish? Yes, absolutely! With the right approach, you can keep your painted kitchen cabinets looking fresh and new without damaging their protective coating. This guide will walk you through safe and effective methods for cleaning painted cabinets, focusing on techniques that preserve the cabinet finish.
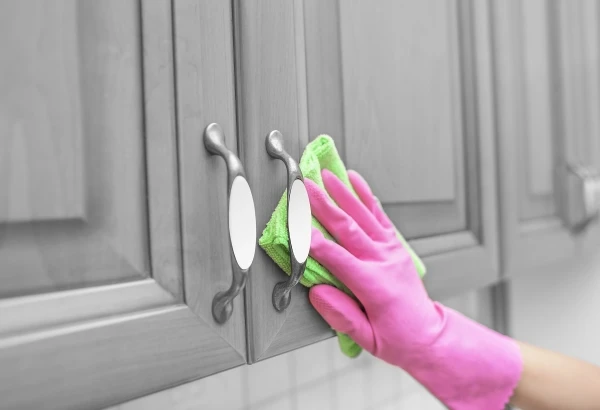
Image Source: www.fivestarpainting.com
Keeping Your Painted Kitchen Cabinets Pristine
Painted kitchen cabinets add a beautiful aesthetic to any home. However, they are also prone to grease, grime, and general wear and tear. Learning how to clean painted kitchen cabinets without stripping the finish is crucial for their longevity and appearance. This isn’t about harsh scrubbing; it’s about gentle, consistent care. We’ll explore the best ways to tackle everyday messes and tougher spots, ensuring your cabinet care routine is both effective and safe.
Choosing the Right Cleaning Products: A Gentle Approach
The secret to cleaning painted cabinets without harming the finish lies in selecting the right cleaning agents. Harsh chemicals or abrasive tools can easily dull the sheen, scratch the surface, or even lift the paint itself. The goal is to find a gentle cabinet cleaner that effectively removes dirt and grease while being kind to your painted surfaces.
What Makes a Cleaner “Gentle”?
A gentle cleaner typically means:
- pH Neutral: Products with a neutral pH are less likely to react negatively with the paint or its protective topcoat.
- Free from Harsh Solvents: Avoid cleaners containing ammonia, bleach, or strong alcohol, as these can break down paint.
- Non-Abrasive: This is perhaps the most critical factor. Abrasive cleaners, including scouring powders or rough cloths, can scratch the paint’s surface.
Your Go-To Cleaning Arsenal: Simple and Effective
Often, the most effective solutions are the simplest. You might be surprised by how a few common household items can form the basis of your DIY cabinet cleaning kit.
- Mild Dish Soap: This is your first line of defense for everyday grime. Dish soap is designed to cut through grease, which is a common kitchen cabinet issue.
- Warm Water: Water is the universal solvent and is essential for diluting cleaners and rinsing surfaces.
- Baking Soda (Used Sparingly and Carefully): For tougher, stuck-on messes, a paste of baking soda and water can be effective. However, its mild abrasive quality means it must be used with extreme caution.
- White Vinegar (Diluted): Vinegar can be a great degreaser, but its acidity means it needs to be diluted significantly to avoid damaging the paint.
When to Consider a Commercial Cleaner
While DIY solutions are often excellent, sometimes a specially formulated non-abrasive cabinet cleaner is a good option. Look for products specifically labeled for painted surfaces or cabinetry. Always read the product label carefully and test in an inconspicuous area first.
The Step-by-Step Guide to Cleaning Painted Kitchen Cabinets
Now that you know what to use, let’s break down the process of cleaning painted cabinets safely. This methodical approach will help you achieve sparkling results without unintended damage.
Preparation is Key
Before you even pick up a cleaning cloth, take a moment to prepare your workspace.
- Clear the Cabinets: Remove any items from countertops adjacent to the cabinets you’ll be cleaning. This prevents them from getting wet or dirty.
- Protect Your Floor: Lay down old towels or newspaper on the floor below the cabinets to catch any drips.
- Gather Your Supplies: Have your chosen safe cabinet cleaner, clean cloths (microfiber is ideal), and a bucket of warm water ready.
The Gentle Wiping Technique
This is where the actual cleaning painted cabinets happens. The method is straightforward, but the gentle touch is paramount.
-
Prepare Your Cleaning Solution:
- For Mild Cleaning: Mix a few drops of mild dish soap with warm water in a bucket. You want a slightly sudsy solution, not an overly soapy one.
- For Slightly Tougher Spots (Use with Caution): Mix equal parts white vinegar and warm water. This is a good degreaser, but ensure thorough rinsing.
- For Stubborn Grime (Last Resort): Make a paste of baking soda and water. This should only be used on specific spots and gently.
-
Dampen, Don’t Soak: Dip a clean microfiber cloth into your chosen cleaning solution. Wring it out thoroughly. The cloth should be damp, not dripping wet. Excess water can seep into cabinet seams and cause damage, especially with painted wood cabinets.
-
Wipe Down Cabinets: Start at the top of the cabinet doors and drawers and work your way down. Use gentle, circular motions to wipe down cabinets. Focus on areas with visible grease or grime. For hinges and hardware, you might need a cotton swab dipped in the cleaning solution for precise cleaning.
-
Rinse the Cloth Frequently: As you wipe, your cloth will pick up dirt and grease. Rinse it out in clean water (or a separate bucket with clean water) regularly. This prevents you from spreading the dirt back onto the cabinets.
-
Address Stubborn Spots: If a spot isn’t coming clean with the initial wipe, reapply your damp cloth. For very stubborn spots (like dried food splatter or heavy grease), you can try the baking soda paste. Apply the paste to the spot, let it sit for a minute or two, and then gently wipe it away with your damp cloth. Crucially, avoid scrubbing. If it doesn’t come off easily, you might need to repeat the process later or accept that some very old stains might be permanent without more aggressive (and risky) methods.
-
Rinse Thoroughly: After cleaning the cabinets, it’s essential to rinse away any cleaning solution residue. Dip a fresh, clean microfiber cloth into a bucket of clean, warm water. Wring it out well. Wipe down cabinets again, focusing on removing all traces of soap or vinegar. This step is vital to protect cabinet finish and prevent it from becoming sticky or dull.
-
Dry Immediately: Use a dry, clean microfiber cloth to thoroughly dry the cabinets. This prevents water spots and streaks. Pay attention to any edges or corners where water might have accumulated.
Protecting Your Cabinet Finish: Long-Term Care
Consistent, proper cabinet care is the best way to maintain the beauty of your painted cabinets and minimize the need for deep cleaning.
Daily Habits for Cleanliness
- Wipe Up Spills Immediately: Any spills, especially greasy ones, should be wiped up as soon as they happen. A quick wipe with a damp cloth will prevent them from setting into the paint.
- Regular Dusting: Dust can dull the finish and attract grime. A quick dusting with a dry microfiber cloth a couple of times a week can make a big difference.
- Ventilation: Ensure your kitchen is well-ventilated when cooking, especially when frying or sautéing. Use your range hood to draw grease and steam away from cabinets.
Seasonal Deep Cleaning
Even with daily attention, a more thorough cleaning may be needed seasonally. Follow the step-by-step guide above for these more in-depth sessions.
What to Avoid at All Costs
To truly protect cabinet finish, there are some common cleaning mistakes you must avoid.
- Abrasive Scrubbers: Steel wool, abrasive sponges, or scouring pads will scratch and damage your painted surface.
- Harsh Chemicals: Bleach, ammonia, oven cleaner, and strong solvents are too aggressive for painted cabinets.
- Excessive Water: Never spray cleaners directly onto cabinets or soak them. Always apply cleaning solutions to your cloth first.
- Steam Cleaners: While effective for some surfaces, steam can force moisture into cabinet seams and potentially damage the paint or wood underneath.
- Rubbing Too Hard: Gentle pressure is key. If you have to scrub hard, your cleaning solution might be too weak, or you might be using the wrong tool.
Specific Challenges: Tackling Tough Kitchen Grime
Kitchens are notorious for grease buildup. Here’s how to handle it on your painted cabinets.
Grease Buildup
Grease tends to accumulate around stovetops and under ventilation hoods.
- Initial Attempt: Start with the mild dish soap and warm water solution. You might need to go over the greasy areas a few times.
- Vinegar Solution (Diluted): If dish soap isn’t cutting it, the diluted white vinegar solution can be more effective. Remember to rinse thoroughly afterward.
- Specialized Cabinet Degreasers: If you have persistent grease that these methods can’t remove, consider a commercial cabinet degreaser. Make sure it’s formulated for painted surfaces and test it in an unseen area first.
Water Spots and Fingerprints
These are typically easy to manage.
- Water Spots: Often, a simple wipe with a slightly damp cloth followed by immediate drying with a clean, dry cloth will remove water spots.
- Fingerprints: Most fingerprints can be wiped away with a dry microfiber cloth. For smudged prints, a slightly damp cloth with plain water or your mild dish soap solution will usually do the trick.
What About Matte vs. Glossy Finishes?
The type of paint finish on your cabinets can influence cleaning.
- Glossy Finishes: These are generally more durable and easier to clean. Grease and grime tend to sit on the surface and wipe away more easily.
- Matte or Satin Finishes: These can be more delicate. They may show smudges more readily and can be more susceptible to burnishing (where rubbing too hard creates a shinier spot). With matte finishes, be extra cautious with any friction and stick to the gentlest cleaning methods.
Maintaining Painted Wood Cabinets: A Deeper Dive
Painted wood cabinets require a bit more attention to moisture control. Wood can expand and contract with moisture changes, which can affect the paint.
- Moisture Control: Always ensure you’re using a damp, not wet, cloth. Prompt drying after cleaning is crucial to prevent moisture from penetrating the wood.
- Sealing: If your cabinets have a good quality paint and a durable topcoat (like polyurethane), they should be well-protected. However, if you’re unsure or notice any chipping or peeling, consult a professional about potential touch-ups or resealing.
Frequently Asked Questions About Cleaning Painted Cabinets
Here are some common questions homeowners have about cleaning their painted kitchen cabinets.
Q1: Can I use furniture polish on painted kitchen cabinets?
A: Generally, no. Furniture polishes are often waxy and can build up on painted surfaces, dulling the finish or making them sticky over time. They aren’t formulated for the specific grease and grime found in kitchens.
Q2: How often should I clean my painted kitchen cabinets?
A: For light cleaning (dusting, wiping up spills), daily or weekly. For a more thorough wipe-down to remove grease, aim for monthly or quarterly, depending on your cooking habits and kitchen usage.
Q3: What is the best way to clean the inside of painted cabinets?
A: The inside of cabinets is usually less exposed to grease. A simple wipe with a damp cloth and mild soap solution is typically sufficient. Ensure they are completely dry before returning items.
Q4: My painted cabinets have a sticky residue. How do I remove it?
A: A sticky residue usually indicates leftover cleaning product or grease. Try wiping them down with a clean, damp cloth (water only) and then a dry cloth. If that doesn’t work, a diluted vinegar and water solution, followed by thorough rinsing and drying, should help.
Q5: Can I use a magic eraser on painted cabinets?
A: Magic erasers are highly abrasive, even though they don’t feel like it. They work by essentially sanding away the surface. While they might remove a stubborn mark, they can also dull or remove the paint’s finish, leaving a noticeable difference. It’s best to avoid them on painted cabinets.
Q6: My paint is starting to chip. What should I do?
A: If you notice chipping or peeling paint, it’s a sign that the paint may be old or was not applied correctly. For minor chips, you can touch them up with matching paint after cleaning and preparing the area. For widespread chipping, you might need to consider repainting the cabinets or having them professionally refinished.
Conclusion: Consistent Care for Lasting Beauty
Cleaning painted kitchen cabinets doesn’t have to be a daunting task. By sticking to a routine of gentle cleaning and employing the right products and techniques, you can effectively wipe down cabinets and keep them looking their best. Remember, patience and a soft touch are your best allies. Proper cabinet care ensures that your painted surfaces remain vibrant and beautiful for years to come, enhancing the overall look and feel of your kitchen. Your commitment to cabinet care will pay off in the longevity and appearance of these key elements of your home.