
Image Source: www.oheverythinghandmade.com
Expert Guide: How To Remove Lower Kitchen Cabinets Without Damage
Can you remove lower kitchen cabinets without damage? Yes, you absolutely can, with careful planning and the right approach. This guide will walk you through the process step-by-step.
Preparing for Cabinet Removal
Before you begin to remove your lower kitchen cabinets, it’s crucial to prepare thoroughly. This ensures a smooth process and minimizes the risk of damage to your cabinets, your kitchen, and yourself.
Gathering Your Tools and Supplies
Having all the necessary tools ready beforehand is key. This saves time and prevents interruptions during the removal. Here’s a comprehensive list:
- Safety Gear: Safety glasses, work gloves, sturdy shoes.
- Screwdrivers: Phillips head and flathead screwdrivers of various sizes. A cordless drill with appropriate bits will speed things up.
- Pry Bar: A slim pry bar is useful for gently separating components.
- Putty Knife or Scraper: For carefully removing caulk or adhesive.
- Wrench or Pliers: For disconnecting plumbing.
- Utility Knife: For cutting caulk or sealant.
- Buckets or Containers: To catch any residual water from plumbing.
- Drop Cloths or Old Blankets: For protecting countertops and flooring.
- Painter’s Tape: To label parts or secure items.
- Camera or Smartphone: To take pictures of wiring and plumbing for future reference.
- A Helper: Having someone to assist with lifting and support makes the job much easier and safer.
Shutting Off Utilities
Safety first! Before touching any electrical or plumbing connections, you must shut off the relevant utilities.
- Water: Locate the shut-off valve for your sink. This is usually found under the sink. Turn it clockwise until it stops. Test the faucet to ensure the water is off. If there’s no local shut-off, you’ll need to turn off the main water supply to your house.
- Electricity: For cabinets with electrical outlets or appliances, you need to shut off the power at the breaker box. Identify the breaker that controls the kitchen circuits, especially those near the cabinets you’re removing. Flip the breaker to the “off” position. It’s a good idea to place a piece of tape over the breaker to prevent someone from accidentally turning it back on.
Step-by-Step Cabinet Removal Process
Now that you’re prepared, let’s get into the actual removal.
Step 1: Remove Cabinet Doors and Drawers
This is usually the easiest part. Removing cabinet doors makes the cabinets lighter and easier to maneuver, reducing the strain on the cabinet boxes and your back.
- Doors:
- Open each cabinet door.
- You’ll need to address the detaching cabinet hinges. Most hinges have screws that attach the hinge plate to the cabinet frame and the hinge arm to the door.
- First, unscrew the hinge arm from the cabinet door. It’s often easier to do this with the door slightly ajar. You might need a helper to support the door as you remove the last screw.
- Place the doors in a safe place and consider labeling them if you plan to reinstall them later.
- Drawers:
- Pull out any drawers.
- Most drawers have runners attached to the cabinet sides. You may need to lift the drawer slightly or press a release lever to fully detach it from the runners.
- If the drawer box is attached to the front panel, you might need to unscrew it from the inside of the cabinet.
Step 2: Disconnect Plumbing and Electrical
This is a critical step that requires precision.
- Disconnecting Sink Plumbing:
- Place buckets or towels under the pipes to catch any remaining water.
- Use a wrench or pliers to loosen the slip nuts connecting the trap and drain pipes. Work carefully; these can be fragile.
- Disconnect the water supply lines from the faucet. Again, have a bucket ready for any residual water.
- If you have a garbage disposal, ensure its power is off at the breaker and disconnect it according to the manufacturer’s instructions.
- Disconnecting Electrical Outlets:
- Once the power is confirmed off at the breaker, you can address any disconnecting electrical outlets or junction boxes within or behind the cabinets.
- Remove the faceplate of the outlet.
- Carefully unscrew the outlet from its box.
- Gently pull the outlet out and observe the wire connections. Take a picture for future reference.
- Use wire nuts to cap each individual wire securely. This is crucial for safety. If you’re unsure about this step, it’s best to consult an electrician.
Step 3: Locate and Remove Cabinet Fasteners
Cabinets are secured to the wall and often to each other. You need to find and remove these connection points.
- Locating Cabinet Fasteners:
- Look inside the cabinet boxes, along the top, bottom, and sides.
- Fasteners are typically screws or nails. They might be hidden behind decorative trim or panels.
- Check the back of the cabinets for screws that go into wall studs.
- If your cabinets are secured to adjacent cabinets, look for screws connecting them from the inside, usually along the face frames or where the cabinet boxes meet.
- Unscrewing Cabinet Mounting Screws:
- Using your drill or screwdriver, systematically remove all unscrewing cabinet mounting screws.
- Keep track of which screws came from where, especially if you plan to reuse the cabinets. Different lengths might be used in different locations.
- If you encounter nails, you might need to use a pry bar and hammer to gently tap them out or pry them loose.
Step 4: Removing Toe Kicks and Accessing the Base
The toe kick is the recessed area at the bottom of the base cabinets. Removing toe kicks often reveals additional support or mounting hardware.
- Removing Toe Kicks:
- Toe kicks are usually attached with small nails or screws.
- Use a putty knife or a thin pry bar to gently loosen and remove the toe kick. Work from a corner, applying even pressure.
- Be careful not to pry too aggressively, as this can damage the cabinet front or the toe kick itself.
- Once the toe kick is off, you’ll have better access to the base of the cabinet and any fasteners that might be hidden underneath.
Step 5: Detaching Cabinets from the Wall and Each Other
This is where the cabinets start to become free.
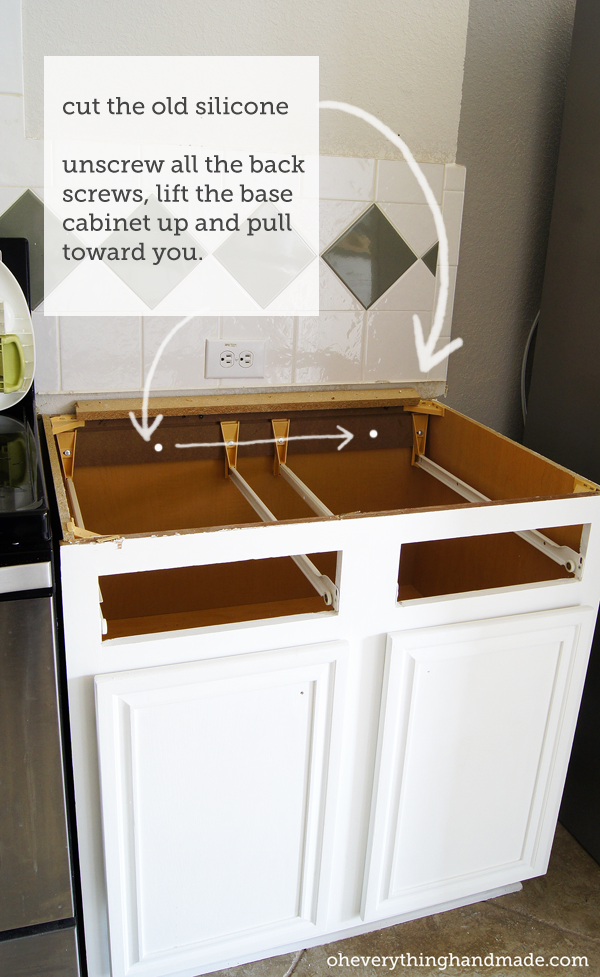
- Breaking Seals:
- Cabinets are often sealed to the wall with caulk or adhesive.
- Use a utility knife or putty knife to carefully cut through any caulk or sealant around the edges of the cabinets where they meet the wall or backsplash.
- Prying Base Cabinets:
- With all screws removed and seals broken, you can begin prying base cabinets away from the wall.
- Insert a thin pry bar between the cabinet and the wall. Apply gentle, steady pressure.
- Work your way around the cabinet, gradually loosening it. Avoid excessive force, which can damage the wall or the cabinet.
- If cabinets are connected side-by-side, you’ll need to repeat this process for each cabinet, ensuring all connections between them are broken.
Step 6: Safely Lifting and Removing the Cabinets
The final stage is to get the cabinets out of the way.
- Safely Lifting Base Cabinets:
- This is where a helper is invaluable. Base cabinets can be surprisingly heavy.
- Position yourself and your helper on either side of the cabinet.
- Bend your knees and lift with your legs, not your back.
- Carefully tilt the cabinet slightly away from the wall and lift it clear of its position.
- Carry the cabinet to your designated staging area.
- Protecting Countertops:
- As you lift, be mindful of the protecting countertops. Ensure no part of the cabinet snags on the countertop or its edge.
- If the countertop is still in place, you may need to gently guide the cabinet away to avoid scratching or chipping the countertop surface.
- Using drop cloths or old blankets over the countertop before you start can provide an extra layer of protection.
Table of Common Cabinet Fastener Locations
To help you find all the screws and nails, here’s a quick reference table:
| Fastener Location | Description |
|---|---|
| Inside Cabinet Boxes | Along the top and bottom edges where the cabinet meets the wall. |
| Back of Cabinet | Screws or nails driven through the back panel into wall studs. |
| Between Cabinets | Screws connecting adjacent cabinet boxes from the inside. |
| Face Frame | Screws often hidden at the top or bottom of the face frame. |
| Underneath Kick Plate | Additional screws or brackets securing the cabinet base. |
| Behind Trim/Decorative Panels | Look for removable or accessible panels that conceal fasteners. |
Post-Removal Considerations
Once the cabinets are out, you’re not quite done.
Cleaning Up
- Remove any debris, dust, or caulk residue from the floor and walls.
- Inspect the walls for any damage that may have occurred during removal. Touch up paint or make minor repairs as needed.
Storing Cabinets (If Reusing)
- If you plan to reuse the cabinets, store them in a dry, protected area.
- You can stack them carefully, perhaps with cardboard or padding between them to prevent scratches.
- Labeling each cabinet and its corresponding doors can save a lot of hassle if you decide to reinstall them later.
Frequently Asked Questions (FAQ)
Q1: How long does it take to remove lower kitchen cabinets?
A1: For a standard set of lower kitchen cabinets, it can take anywhere from 4 to 8 hours with two people, depending on the complexity of the installation and the number of cabinets.
Q2: Do I need to remove the countertop first?
A2: Typically, no. For lower cabinets, you can often remove them while the countertop remains in place, as long as you are careful and protecting countertops. However, if the countertop is very heavy or intricately attached to the cabinets, you might consider removing it first.
Q3: What if the cabinets are glued to the wall?
A3: If cabinets are glued, you’ll need to be more persistent with your pry bar. Work slowly and apply even pressure to break the adhesive bond without damaging the wall or the cabinet. A utility knife can also help cut through adhesive along edges.
Q4: Can I remove kitchen cabinets by myself?
A4: While it’s possible, it is strongly recommended to have at least one helper, especially when safely lifting base cabinets. They are heavy and awkward to maneuver alone, increasing the risk of injury or damage.
Q5: What should I do if I’m uncomfortable disconnecting plumbing or electrical?
A5: If you’re not experienced with disconnecting sink plumbing or disconnecting electrical outlets, it’s best to hire a qualified plumber and electrician. Their expertise will ensure these connections are made safely and correctly, preventing leaks or electrical hazards.
Removing lower kitchen cabinets without damage is achievable with careful preparation and a methodical approach. By following these steps, you can ensure a safe and successful cabinet removal process.