
Yes, you can connect a hose to your kitchen sink. This guide will show you how to connect a hose to your kitchen sink, whether you need to for a temporary cleaning task, to connect a portable sink, or to replace a kitchen sprayer hose. We’ll cover the common methods and the parts you’ll need.
Kitchen sinks are versatile, and sometimes you need to go beyond their standard functionality. Whether you’re looking to attach a water hose for kitchen sink tasks, connect a portable sink hose, or even set up a temporary solution, knowing how to properly connect a hose can be incredibly useful. This comprehensive guide will walk you through the process, ensuring you have the right tools and knowledge for a successful sink hose installation. We’ll cover everything from the basics of identifying your faucet type to the final secure connection.
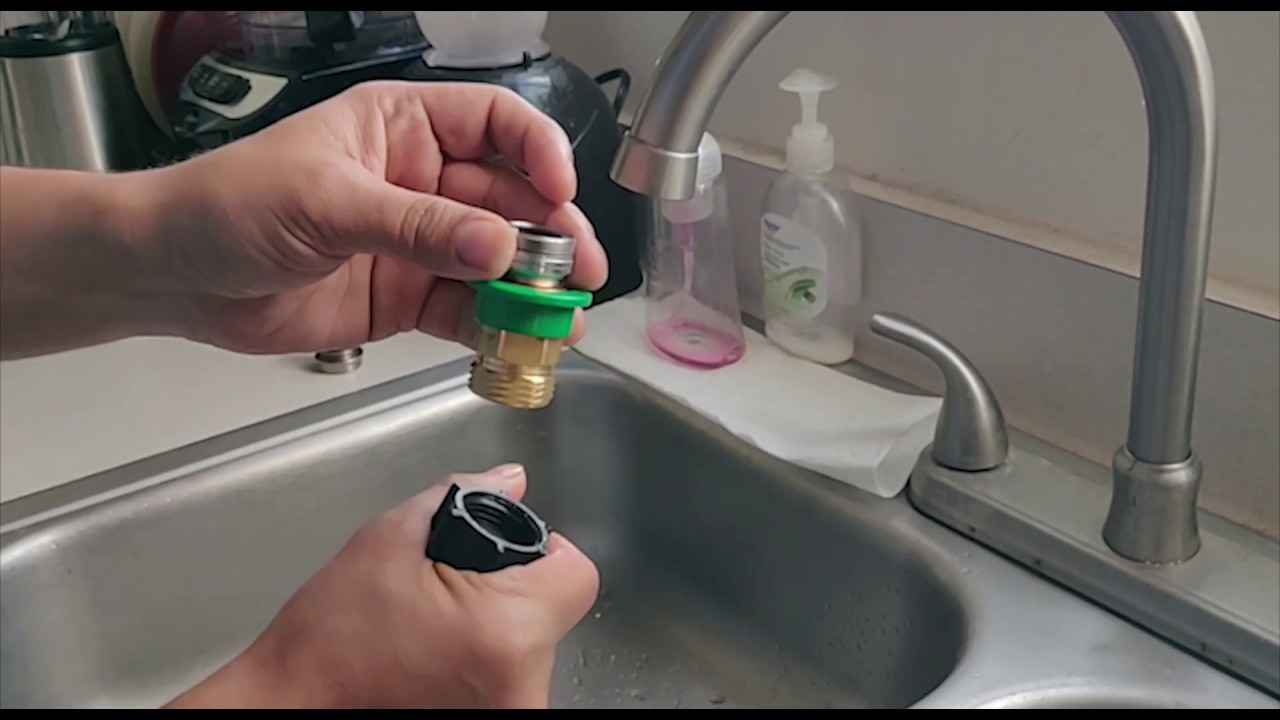
Image Source: i.ytimg.com
Why Connect a Hose to Your Kitchen Sink?
There are several practical reasons why someone might want to connect a hose to their kitchen sink:
- Deep Cleaning: Sometimes, you need a longer reach than your faucet or sprayer provides for cleaning large items, filling large buckets, or even washing pets.
- Temporary Plumbing Needs: If you have a burst pipe or are doing renovations, you might need to temporarily reroute water from your kitchen sink to another area.
- Portable Sinks: For outdoor events, workshops, or camping, a portable sink often needs a hose to connect to a water source, and the kitchen sink can serve this purpose.
- Attaching Garden Accessories: In some specific scenarios, a faucet to garden hose adapter might be used to bring water to garden tools or small watering cans right from your kitchen.
- Kitchen Sprayer Hose Replacement: If your existing kitchen sprayer hose is damaged, you’ll need to know how to disconnect the old one and install a new one, which is essentially connecting a hose.
Common Methods for Connecting a Hose
Connecting a hose to a kitchen sink typically involves using an adapter that fits onto your faucet spout. The specific method depends on the type of hose and adapter you’re using.
Method 1: Using a Faucet Adapter for General Hose Connection
This is the most common method for attaching a standard hose to your kitchen faucet.
What You’ll Need:
- Kitchen Faucet Adapter: This is the key component. These adapters screw onto the end of your faucet spout, providing a threaded connection for your hose. They come in various sizes and thread types, so it’s crucial to get one that matches your faucet.
- Hose with Matching Threads: Your hose will need a connector that matches the threads on your faucet adapter.
- Optional: Plumber’s Tape (PTFE Tape): For a more secure, leak-proof seal.
Steps for Connection:
-
Identify Your Faucet Spout Type:
- Aerator: Most modern faucets have an aerator at the tip of the spout. This is usually where you’ll attach an adapter.
- Remove the Aerator: Most aerators unscrew by hand. If it’s stuck, you might need pliers, but protect the aerator with a cloth to avoid scratching.
- Measure or Check Threads: Once the aerator is removed, look at the threads. Are they on the inside or outside of the spout? What is their diameter? This information is vital for choosing the correct adapter.
-
Select the Right Faucet Hose Converter:
- Female-to-Male Adapter: If your faucet spout has male threads (threads on the outside), you’ll need an adapter with female threads (threads on the inside) to screw onto it.
- Male-to-Female Adapter: If your faucet spout has female threads (threads on the inside), you’ll need an adapter with male threads to screw into it.
- Aerator Adapters: Many adapters are designed to fit directly over the aerator opening. Some come with a set of different sized rubber washers to ensure a snug fit.
-
Install the Faucet Adapter:
- Clean the Faucet Threads: Ensure the threads on your faucet spout are clean and free of debris.
- Apply Plumber’s Tape (Optional but Recommended): Wrap plumber’s tape around the faucet spout threads 2-3 times in a clockwise direction. This helps create a watertight seal.
- Screw on the Adapter: Carefully screw the kitchen faucet adapter onto your faucet spout. Hand-tighten it first.
- Secure the Adapter: Once hand-tight, you can gently tighten it further with pliers if needed, but be careful not to overtighten, which can damage the faucet or adapter.
-
Connect the Hose:
- Check Hose Threads: Ensure your hose’s connector has the correct threads to match the adapter you just installed.
- Screw on the Hose: Screw the hose onto the adapter. Hand-tighten is usually sufficient.
- Turn on Water Slowly: Turn on your kitchen faucet slowly. Check for any leaks around the adapter and hose connection. If there are leaks, try tightening the connection slightly or adding more plumber’s tape.
Method 2: Connecting a Kitchen Sprayer Hose Replacement
If you need to replace your existing kitchen sprayer hose, the process involves working under the sink.
What You’ll Need:
- New Kitchen Sprayer Hose: Ensure it’s compatible with your faucet model. It usually comes with new washers and sometimes a new weight.
- Adjustable Wrench or Pliers: For loosening and tightening connections.
- Bucket or Towels: To catch any residual water.
- Optional: Plumber’s Tape.
Steps for Connection:
- Turn Off Water Supply: Locate the shut-off valves under your sink (usually connected to the hot and cold water lines leading to the faucet). Turn them clockwise until they are fully closed.
- Relieve Water Pressure: Turn on the kitchen faucet to drain any remaining water in the lines.
- Access the Hose Connection:
- Under the Sink: Look for where the sprayer hose connects to the faucet body or a diverter valve. This connection is usually a threaded fitting.
- Disconnect the Old Hose: Place a bucket or towels underneath to catch drips. Use an adjustable wrench or pliers to loosen the fitting connecting the old sprayer hose. Turn it counter-clockwise to unscrew it.
- Prepare the New Hose:
- Check Washers: Ensure the new hose has a rubber washer in its connector. If not, find a suitable replacement washer from the kit or hardware store.
- Apply Plumber’s Tape (Optional): You can apply plumber’s tape to the threads of the new hose connector for a better seal.
- Connect the New Hose:
- Attach the Hose: Screw the new kitchen sprayer hose into the faucet body or diverter valve. Hand-tighten it first.
- Tighten the Connection: Use your wrench or pliers to tighten the fitting securely, but avoid overtightening.
- Re-attach the Sprayer Head: If the sprayer head detaches from the hose, screw it back on.
- Turn On Water Supply: Slowly turn the shut-off valves back on.
- Test for Leaks: Turn on the faucet and test the sprayer. Check all connections under the sink and at the sprayer head for any leaks.
Method 3: Connecting a Portable Sink Hose
When using a portable sink hose, the connection is often designed for ease of use.
What You’ll Need:
- Portable Sink Hose Kit: This usually includes the hose and specific adapters.
- Kitchen Faucet Adapter: If the kit doesn’t include one, you’ll need a faucet hose converter that fits your kitchen faucet.
Steps for Connection:
- Attach the Adapter to the Faucet: Follow the steps in Method 1 to securely attach the appropriate kitchen faucet adapter to your kitchen faucet spout.
- Connect the Portable Sink Hose:
- Matching Connectors: Most portable sink hose kits come with a hose that has a standard threaded end designed to connect to common faucet adapters.
- Screw Hose to Adapter: Screw the end of the portable sink hose onto the kitchen faucet adapter. Hand-tighten.
- Secure the Connection: Ensure the connection is snug to prevent leaks when water flows.
- Position the Portable Sink: Place your portable sink where you need it, ensuring the hose has a clear path.
- Turn on Water: Turn on the kitchen faucet. Water will flow through the hose to your portable sink.
Choosing the Right Adapter
The variety of faucet types and hose sizes means selecting the correct adapter is paramount.
Types of Faucet Adapters:
| Adapter Type | Description | Best For |
|---|---|---|
| Aerator Thread Adapters | Screw onto the faucet spout where the aerator normally sits. | Most standard kitchen faucets with removable aerators. |
| Female Aerator Adapters | Have internal threads to screw onto a faucet spout with external threads. | Faucets with male aerator threads. |
| Male Aerator Adapters | Have external threads to screw into a faucet spout with internal threads. | Faucets with female aerator threads (less common for spout ends). |
| Spout Clamp Adapters | Clamp directly onto the faucet spout without threading. | Faucets where the aerator cannot be removed or has unusual threading. |
| Quick-Connect Adapters | Allow for quick attachment and detachment of hoses with a push or click. | Users who frequently connect and disconnect hoses. |
| Garden Hose Adapters | Specifically designed to connect a standard garden hose thread to a faucet. | Connecting a standard garden hose to the kitchen faucet. |
Factors to Consider When Buying:
- Faucet Spout Diameter: Measure the diameter of your faucet spout or the aerator opening.
- Thread Type: Note whether the threads are internal (female) or external (male).
- Hose Connector Size: Ensure the adapter’s output thread matches your hose’s input thread. Common sizes include 15/16-inch male, 55/64-inch female, 3/4-inch male, and 1/2-inch female.
- Material: Brass or sturdy plastic adapters are generally more durable.
- Brand Compatibility: Some manufacturers offer specific adapters for their faucet models.
Troubleshooting Common Issues
Even with the right parts, you might encounter a few snags.
Leaks at the Connection Point:
- Check Thread Engagement: Ensure the threads are properly aligned and fully engaged.
- Add More Plumber’s Tape: Apply additional layers of plumber’s tape (2-3 more wraps) to the threads.
- Tighten Slightly: Gently tighten the connection using pliers or a wrench, but avoid excessive force.
- Inspect Washers: Ensure rubber washers are present, properly seated, and not damaged in both the adapter and hose connection.
- Adapter Fit: The adapter itself might not be creating a tight seal with the faucet spout. Try a different adapter or one with a better sealing mechanism.
Low Water Pressure or Flow:
- Partially Closed Shut-off Valve: Ensure the water supply valves under the sink are fully open.
- Kinked Hose: Check if the hose is kinked or bent sharply, restricting water flow.
- Clogged Aerator/Adapter: Debris can accumulate in the faucet aerator or the adapter. Unscrew and clean them.
- Flow Restrictor: Some adapters or hoses have built-in flow restrictors that might be limiting pressure.
Adapter Won’t Screw On:
- Wrong Thread Type/Size: Double-check that you have the correct adapter for your faucet’s threads.
- Obstruction: Ensure there’s no debris or damage on the faucet’s threads that’s preventing the adapter from screwing on.
Safety Precautions
When working with water connections, safety is important.
- Always Turn Off Water: Before starting any work that involves disconnecting hoses or replacing parts, turn off the main water supply or the specific shut-off valves under the sink.
- Prevent Water Damage: Place towels or buckets to catch any spills and protect your cabinetry.
- Avoid Overtightening: Forcing connections can strip threads or crack plastic parts, leading to leaks or damage.
- Check for Lead: If you’re dealing with older plumbing or components, be aware of potential lead concerns. Use lead-free certified adapters and hoses whenever possible.
Frequently Asked Questions (FAQ)
Q1: Can I connect a regular garden hose to my kitchen faucet?
Yes, you can, but you’ll need a specific faucet to garden hose adapter. These adapters have the correct threads to connect a standard garden hose to most kitchen faucet spouts.
Q2: Will connecting a hose damage my faucet?
If done correctly with the right adapter and without overtightening, it shouldn’t damage your faucet. However, using an incorrect adapter or applying too much force can lead to damage.
Q3: How do I know what size adapter I need for my kitchen faucet?
You’ll need to measure the diameter of your faucet spout’s threads (or the aerator it screws into). Most kitchen faucet aerators are either male (external threads) or female (internal threads), and common sizes include 15/16-inch and 55/64-inch. You can also buy universal adapters that come with various rubber washers for a better fit.
Q4: What is a faucet hose converter?
A faucet hose converter (often called a faucet adapter) is a device that allows you to attach a hose to your kitchen faucet. It typically screws onto the end of the faucet spout and provides a threaded connection for a hose.
Q5: My kitchen sprayer hose is leaking. Can I replace just the hose?
Yes, you can often replace just the kitchen sprayer hose replacement. You’ll need to disconnect the old hose under the sink and install a new one, following the steps outlined in Method 2.
Q6: Is it safe to use a water hose for kitchen sink tasks?
As long as the hose and adapter are clean and specifically designed for water use (not rough use), it is generally safe for tasks like filling large containers or cleaning. If you are concerned about the water quality, consider using a hose designated for potable water.
Q7: How do I connect a hose to an older faucet without an aerator?
For older faucets without a removable aerator, you might need a spout clamp adapter or a specific adapter designed to fit over the faucet spout. Measure your spout carefully to find a compatible option.
By following this guide, you should be well-equipped to connect a hose to your kitchen sink for various needs, ensuring a secure and leak-free connection.