
Can you secure a kitchen island to the floor? Yes, you absolutely can and should secure most kitchen islands to the floor for safety and stability. This guide will walk you through the process step-by-step, covering various methods for different floor types. Proper kitchen island anchoring prevents wobbling, tipping, and potential hazards, especially in busy kitchens or if you have children.
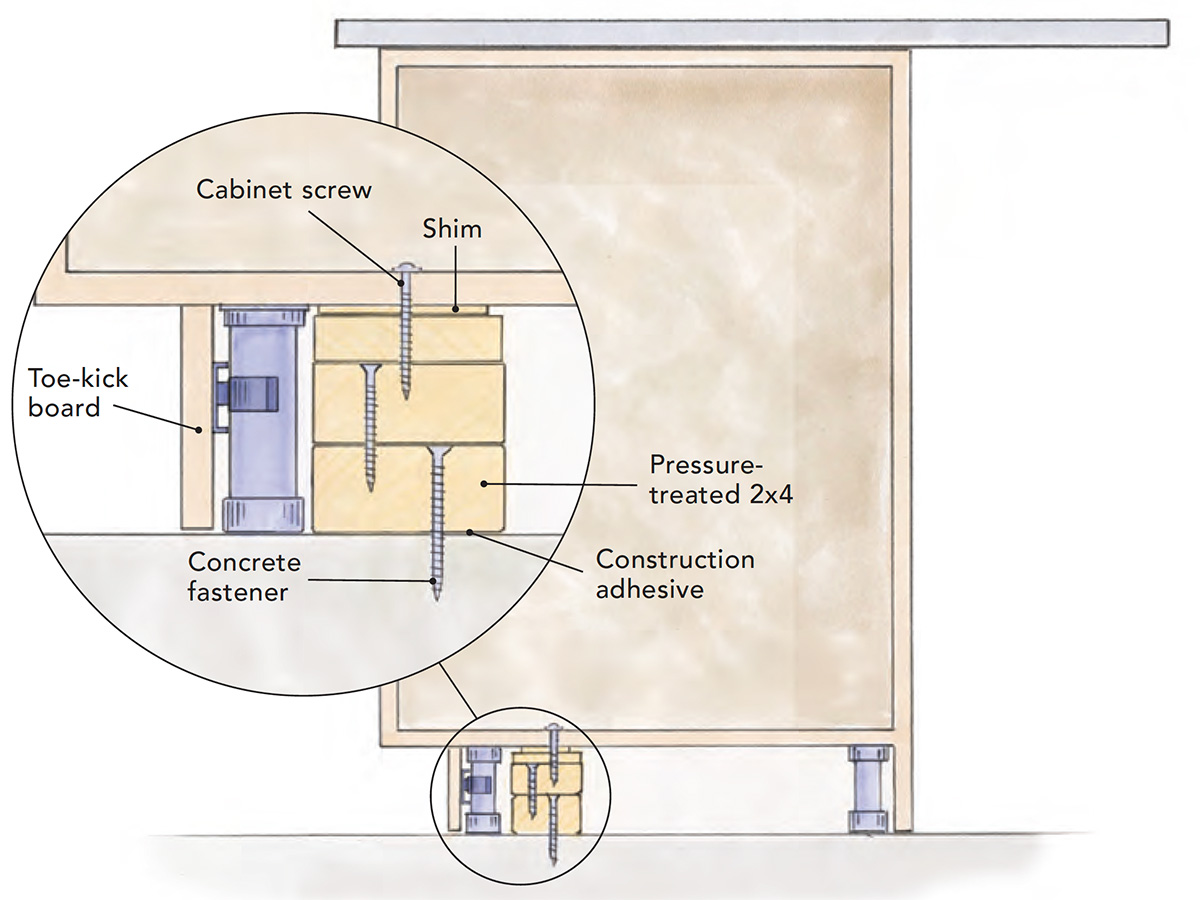
Image Source: images.finehomebuilding.com
Why Securing Your Kitchen Island Matters
A freestanding kitchen island can add fantastic functionality and style to your kitchen. However, without proper kitchen island anchoring, it can become a safety concern. Think about the forces at play in a kitchen: people leaning on it, dropped heavy items, or even minor earthquakes. A well-secured island provides peace of mind and ensures longevity for your investment.
Stability and Safety
The primary reason for securing your kitchen island is stability. Islands that aren’t anchored can shift, wobble, or even tip over. This is particularly dangerous if the island has a heavy countertop or if children are present. Island stability methods are crucial for preventing accidents.
Preventing Damage
Loose islands can also damage your flooring or the island itself. If the island slides, it could scratch or goude your floor. The constant movement can also put stress on the island’s joints, leading to premature wear and tear.
Code Compliance and Insurance
In some areas, building codes may require freestanding islands to be secured, especially if they are built-in or have plumbing or electrical components. Furthermore, if an accident occurs due to an unsecured island, your homeowner’s insurance might not cover damages or injuries.
Assessing Your Kitchen Island and Floor Type
Before you start, it’s essential to know what kind of island you have and what type of flooring you’re dealing with. This will determine the best methods for fastening island to concrete, securing island to subfloor, or other surfaces.
Types of Kitchen Islands
- Freestanding Islands: These are the most common and are not permanently attached to the kitchen structure. They often have cabinets and drawers.
- Rolling Islands: These have wheels and are meant to be mobile. While they often have locking wheels, securing them more permanently might be desirable for heavy-duty use.
- Built-in Islands: These are more like permanent structures and are typically secured during the kitchen renovation process.
Common Flooring Types
- Hardwood/Engineered Wood: Beautiful but can be susceptible to damage from screws or prolonged pressure.
- Laminate/Vinyl: Generally more forgiving but can still be scratched or dented.
- Tile: Can be brittle, and drilling through it requires care.
- Concrete: A very solid base, ideal for secure anchoring.
- Subfloor: This is the foundational layer beneath your finished flooring, often plywood or OSB. Securing island to subfloor is a common and effective method.
Methods for Securing Your Kitchen Island
There are several ways to anchor a kitchen island to the floor. The best method depends on your island’s construction and your flooring.
Method 1: L-Brackets and Wood Screws (Most Common)
This is the most popular and straightforward DIY method for island cabinet attachment.
Materials Needed:
- Heavy-duty L-brackets (typically 2-3 inches)
- Wood screws (appropriate length for your island base and floor)
- Washers
- Drill/Driver
- Drill bits (including pilot bit and countersink bit)
- Stud finder (if anchoring to floor joists through subfloor)
- Pencil
- Measuring tape
Steps:
- Position the Island: Place your kitchen island in its final desired location. Ensure it’s level and centered.
- Locate Attachment Points: Look for sturdy parts of the island’s base cabinet, typically the kick plate or bottom frame. For the floor, aim to connect to the subfloor or, ideally, floor joists for maximum strength.
- Mark Bracket Placement:
- Place an L-bracket against the inside corner where the island’s base meets the floor.
- Ensure the bracket is flush against both the vertical cabinet wall and the horizontal floor.
- Use a pencil to mark the screw holes on both the island’s base and the floor.
- Pre-Drilling:
- On the Island: Drill pilot holes into the island’s base at your marked spots. This prevents the wood from splitting. Use a drill bit slightly smaller than your screws. If you want the screw heads to sit flush, use a countersink bit to create a slight recess.
- On the Floor: This is the critical step.
- If you have access to the subfloor: If your flooring is thin (like vinyl or laminate), you might be able to drill directly into the subfloor.
- If you have thicker flooring (tile, thick hardwood): You’ll likely need to drill through the flooring to reach the subfloor. This requires careful drilling.
- Finding Joists (Recommended): Use a stud finder to locate floor joists directly beneath where you want to place the brackets. This provides the strongest possible attachment. If you can’t hit a joist, you’ll be screwing into the subfloor, which is less robust but still effective.
- Drill pilot holes into the subfloor or joist. The length of these screws needs to be sufficient to go through your flooring, the subfloor, and into the joist (if applicable) – typically 2 to 3 inches total screw length.
- Attaching the Brackets:
- Align the L-bracket with the pilot holes.
- Insert screws with washers through the bracket into the island’s base. Tighten securely but don’t overtighten.
- Insert screws with washers through the bracket into the floor. Again, tighten securely.
- Repeat for Other Brackets: Install additional L-brackets at other strategic points along the island’s base for maximum support. Two or three brackets are usually sufficient for most standard islands.
- Reinforce Island Base (Optional): If your island feels particularly top-heavy or if you’re concerned about rigidity, you can add extra bracing within the island’s base itself. This involves attaching small wooden blocks or additional L-brackets to reinforce the main frame before mounting.
Method 2: Island Cabinet Attachment Plates
Some manufacturers offer specialized attachment plates designed for securing kitchen islands. These are essentially flat metal plates with multiple screw holes that can be screwed into the island’s base and then into the floor.
Materials Needed:
- Island cabinet attachment plates
- Appropriate screws and washers
- Drill/Driver
- Drill bits
- Stud finder (optional but recommended)
- Measuring tape
- Pencil
Steps:
- Position Island: As before, place the island in its final position and ensure it’s level.
- Locate Attachment Points: Identify sturdy sections of the island’s base.
- Mark Plate Placement: Position the attachment plate on the inside of the island’s base, flush with the floor. Mark the screw holes.
- Pre-Drill:
- Drill pilot holes into the island’s base.
- Drill pilot holes into the subfloor or floor joists, ensuring screws are long enough for a secure hold.
- Attach Plates:
- Secure the plates to the island’s base with screws and washers.
- Secure the plates to the floor with screws and washers.
- Repeat: Install plates at multiple points around the island.
Method 3: Island Leg Anchoring (for Islands with Legs)
If your island has legs rather than a solid base, you’ll need a different approach for island leg anchoring.
Materials Needed:
- Heavy-duty metal corner braces or specialized leg mounting plates
- Long wood screws or lag bolts (if screwing into joists)
- Washers
- Drill/Driver
- Drill bits
- Stud finder
- Measuring tape
- Pencil
- Wood filler (optional, to hide screw heads)
Steps:
- Position Island: Place the island where you want it.
- Level the Island: Ensure all legs are making firm contact with the floor. Use shims if necessary to achieve a perfectly level surface.
- Locate Joists: Use a stud finder to locate floor joists beneath the island legs. This is crucial for a strong anchor.
- Attach Braces:
- For each leg, position a metal corner brace or mounting plate so it attaches securely to both the leg and the floor.
- Mark the screw holes on the leg and the floor.
- Pre-Drill:
- Drill pilot holes into the legs.
- Drill pilot holes into the subfloor and, ideally, into the floor joists. Use appropriate length screws or lag bolts.
- Secure: Screw the braces firmly into place, connecting the legs to the floor.
- Hide Unsightly Hardware: If desired, you can use wood filler to cover the screw heads on the legs for a cleaner look.
Method 4: Fastening Island to Concrete Floors
Fastening island to concrete requires different hardware.
Materials Needed:
- Concrete anchors (e.g., wedge anchors, sleeve anchors)
- Tapcon screws (specifically designed for concrete)
- L-brackets or flat mounting plates
- Appropriate length screws for attaching brackets to the island
- Drill/Driver
- Hammer drill (essential for concrete)
- Masonry drill bits (sized for your anchors)
- Measuring tape
- Pencil
- Safety glasses
Steps:
- Position Island: Place the island in its final spot.
- Level the Island: Ensure it’s perfectly level.
- Mark Anchor Points:
- Place L-brackets or mounting plates on the island’s base.
- Mark where the screws will go into the concrete.
- Pre-Drill Concrete:
- Crucial: Use a hammer drill and a masonry bit that matches the diameter of your concrete anchors or Tapcon screws.
- Drill holes into the concrete at your marked locations. The depth should be appropriate for the anchors you are using.
- Clean out the dust from the holes using a brush or compressed air.
- Install Concrete Anchors/Tapcons:
- Wedge/Sleeve Anchors: Insert the anchor into the drilled hole. Tighten the nut to expand the anchor.
- Tapcon Screws: Drive the Tapcon screw directly into the pre-drilled hole.
- Attach Brackets to Island:
- First, secure your L-brackets or mounting plates to the island’s base using appropriate wood screws.
- Connect Island to Floor Anchors:
- Align the island with the installed anchors.
- Use the appropriate hardware (e.g., bolts for wedge/sleeve anchors, or the Tapcon screws themselves) to attach the brackets to the concrete anchors.
- Tighten securely.
Method 5: Securing Island to Subfloor Directly (If No Joist Access)
If you cannot locate or hit floor joists, you can still anchor to the subfloor. However, be aware this method is less robust.
Materials Needed:
- Heavy-duty L-brackets
- Screws specifically designed for subfloor attachment (longer and thicker screws)
- Washers
- Drill/Driver
- Drill bits
- Measuring tape
- Pencil
Steps:
- Position Island: Place the island in its final position.
- Level: Ensure it’s level.
- Mark Bracket Points: Position L-brackets and mark screw holes on the island base and subfloor.
- Pre-Drill:
- Drill pilot holes into the island’s base.
- Drill pilot holes into the subfloor. Ensure the screws are long enough to get good purchase into the subfloor material (usually at least 1.5 inches into the subfloor itself).
- Attach Brackets: Secure brackets to the island base and then to the subfloor.
Reinforcing Your Kitchen Island for Extra Strength
Sometimes, the island’s built-in structure might not be as robust as needed. Reinforcing kitchen island components can significantly improve its stability.
Adding Internal Bracing
- Cross-Bracing: Cut short pieces of 2×4 or plywood to fit inside the island’s base, creating diagonal braces between vertical supports. Screw these securely into place. This adds rigidity and prevents racking (sideways movement).
- Reinforcing the Kick Plate: If the kick plate is thin, add a thicker piece of plywood or a 1×4 to the front and sides of the base for a stronger surface to attach brackets to.
Securing the Top
- Adhesive: For a very secure fit, you can apply a bead of strong construction adhesive between the island’s top and its base structure before installation. This helps bond the components together.
- Screws from Below: If accessible, you can drive screws up through the internal bracing or cabinet framing into the underside of the countertop. Use screws short enough not to penetrate the countertop’s surface.
Choosing the Right Hardware
The longevity and safety of your anchored island depend on the quality of your hardware.
Screws
- Type: Use wood screws for wood subfloors and island bases. For concrete, use specialized concrete screws (Tapcons) or lag bolts with appropriate anchors.
- Length: The total length of the screw should be sufficient to go through your flooring, the subfloor, and into a joist (if applicable) by at least 1 to 1.5 inches. For concrete, follow anchor manufacturer recommendations.
- Gauge/Diameter: Thicker screws (e.g., #10 or #12) offer more strength than thinner ones.
Brackets
- Material: Opt for heavy-gauge steel brackets. Galvanized or zinc-plated steel is good for corrosion resistance.
- Size: Choose brackets that are large enough to provide a good surface area for multiple screws and to adequately support the weight and forces applied.
Washers
- Purpose: Always use washers with screws, especially when attaching to wood. Washers distribute the pressure of the screw head over a larger area, preventing the screw from pulling through the material.
Professional Installation Considerations
While many of these methods are DIY-friendly, there are times when professional help is advisable.
- Complex Islands: Islands with integrated sinks, cooktops, or plumbing may require professional installation to ensure all connections are safe and up to code.
- Uncertainty: If you’re unsure about your flooring, subfloor condition, or the best anchoring method, consult a carpenter or handyman.
- High-End Materials: If you have very expensive flooring, you might want a professional to handle the drilling to minimize the risk of damage.
Frequently Asked Questions (FAQ)
Q: Do I really need to anchor my kitchen island?
A: Yes, for safety and stability, it’s highly recommended to anchor most kitchen islands. This prevents tipping, wobbling, and potential accidents.
Q: What if my island has a thick tile floor?
A: For tile floors, you’ll need to carefully drill through the tile and the grout lines using a masonry bit suitable for tile. Then, continue drilling into the subfloor or joist with the appropriate bit for your anchoring hardware. Using a tile-specific drill bit and drilling slowly with water can help prevent cracking.
Q: Can I anchor my island to the finished flooring without going into the subfloor?
A: No, anchoring only to the finished flooring (like vinyl or thin laminate) is not secure enough. You must anchor through the finished flooring to the subfloor or, ideally, the floor joists for a strong hold.
Q: My island is on a mobile base with locking wheels. Is anchoring still necessary?
A: While locking wheels provide some stability, for heavy islands or in households with children, additional anchoring can offer enhanced safety. You can use brackets that attach to the island’s frame and then anchor to the floor, or consider specialized anchoring systems for mobile units.
Q: What tools will I need for securing an island to concrete?
A: For concrete, you’ll absolutely need a hammer drill and masonry drill bits. You’ll also need concrete anchors (like wedge anchors or Tapcons) and the appropriate screws or bolts to attach your chosen brackets to these anchors.
Q: How do I find floor joists to secure my island?
A: Use a stud finder. Most stud finders work by detecting density changes in the wall or floor. Place it flat on the floor and slowly move it until it indicates a joist. Mark the edges of the joist and find its center.
By following these detailed steps, you can confidently secure your kitchen island to the floor, ensuring a safe, stable, and beautiful addition to your home for years to come. Remember to always prioritize safety and use the right hardware for your specific flooring and island type.