
A kitchen island is attached to the floor through various secure mounting techniques, primarily involving directly screwing it into the subfloor or using specialized brackets that anchor it firmly. The most common and robust methods involve securing island to subfloor for maximum stability. This ensures the island won’t shift or tip, providing a safe and reliable workspace.
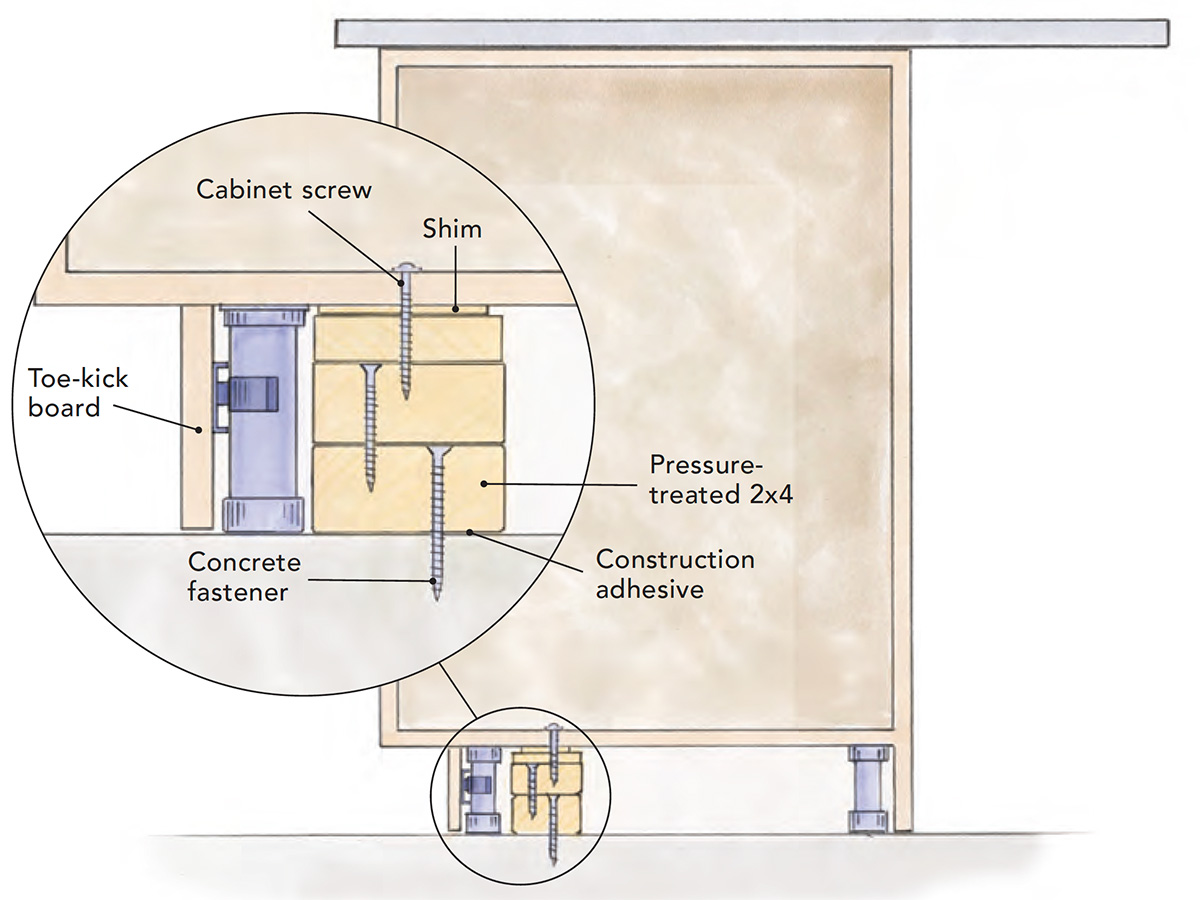
Image Source: images.finehomebuilding.com
Why Secure Your Kitchen Island?
A freestanding kitchen island can be a beautiful and functional addition to any kitchen. However, its placement isn’t merely about aesthetics; it’s also about safety and longevity. Attaching your island securely prevents accidents and ensures it stands the test of time.
Safety First
Imagine a heavy island tipping over. This can happen if it’s not properly secured, especially if someone leans heavily on it or if there are children or pets around. Proper anchoring prevents such dangerous situations. It also stops the island from sliding, which could damage flooring or cause falls.
Stability for Functionality
A wobbly island is not ideal for cooking or preparing food. When you’re chopping vegetables or kneading dough, you need a stable surface. Secure mounting ensures your island remains firm, allowing for confident use of its countertop and any integrated appliances. This contributes to the overall kitchen island leg stability.
Protecting Your Investment
Kitchen islands can be expensive. A well-attached island is less likely to suffer damage from movement, such as cracking countertops or loosening joints. This means your island will look good and function well for years to come, protecting your investment.
Deciphering Different Floor Materials
The way you attach your kitchen island depends heavily on your kitchen island flooring. Different floor types require different approaches to ensure a strong and damage-free connection.
Island to Hardwood Floor Attachment
Attaching an island to a hardwood floor requires care to avoid excessive damage.
- Pre-Drilling is Key: Always pre-drill pilot holes into the hardwood before driving screws. This prevents the wood from splitting.
- Screw Length: Use screws that are long enough to go through the finished flooring, the plywood or OSB subfloor, and into the joists below. However, be mindful not to use screws that are too long, as they could damage plumbing or wiring beneath the subfloor.
- Screws vs. Adhesives: While some may consider strong adhesives, screws offer a much more secure and reversible method for island to hardwood floor attachment.
Kitchen Island to Tile Floor Attachment
Attaching to a tiled floor presents unique challenges.
- Locate Grout Lines: Ideally, you want to avoid drilling directly through the tiles themselves. Look for areas where the screws can be placed on or near grout lines.
- Drilling Through Tile: If drilling through tile is unavoidable, use a ceramic or glass drill bit and a slow speed. Lubricate the bit with water or cutting oil to keep it cool and prevent cracking.
- Grout Removal and Re-grouting: You might need to carefully remove a small section of grout, drill into the subfloor, screw the island down, and then re-grout the area.
- Specialized Anchors: For some tile installations, especially if the subfloor is questionable, using heavy-duty anchors designed for tile and masonry might be considered, though direct subfloor anchoring is generally preferred.
Concrete Floors
If your kitchen has a concrete floor, securing an island is straightforward.
- Concrete Anchors: You will need to use specialized concrete anchors or screws (like Tapcons).
- Drilling: A hammer drill with a masonry bit is essential for drilling into concrete.
- Placement: Ensure you are drilling into solid concrete and not a hollow section.
Cabinet Base Attachment: The Foundation of Stability
Most kitchen islands, especially those with cabinetry, rely on a robust cabinet base attachment for their structural integrity and how they connect to the floor. The island’s base cabinet acts as the primary anchor point.
Building the Island’s Base
The process often starts with building or assembling the island’s base cabinets. These cabinets are typically constructed from plywood or MDF.
- Reinforced Corners: The corners and structural points of the cabinet base should be reinforced. This is where the main force will be applied when screwing the island to the floor.
- Solid Bottom Panel: A solid bottom panel is crucial. This panel is what directly interfaces with the flooring and subfloor.
Attaching the Cabinet Base to the Floor
Once the cabinet base is assembled and in place, the next step is to firmly connect it to the floor.
-
Cabinet Base Attachment Method: The cabinet base is typically attached to the floor using screws driven through the bottom panel of the cabinet.
- Through the Cabinet Bottom: Screws are driven from the inside of the cabinet base, through its bottom panel, and then into the subfloor or joists.
- Toe Kick Access: Often, access for screwing is gained through the toe kick area (the recessed front at the bottom of the cabinets) or from inside the cabinet boxes themselves.
Island Anchoring Methods: A Deeper Dive
Beyond the basic cabinet attachment, various island anchoring methods can be employed to ensure the island is truly immovable.
Direct Bolting to the Subfloor
This is the most common and secure method.
- What is Bolted Kitchen Island? A “bolted kitchen island” refers to an island that is directly and securely fastened to the floor structure using bolts or screws.
- The Process:
- Locate Joists: The most critical step is to locate the floor joists beneath your subfloor. This is usually done using a stud finder or by carefully measuring from walls.
- Pre-Drilling: Drill pilot holes through the island’s bottom panel and the subfloor, directly into the center of the joists.
- Screw Selection: Use substantial wood screws (e.g., lag screws or construction screws) that are long enough to penetrate the subfloor and get a good grip in the joists.
- Secure Mounting: Drive the screws firmly, ensuring the island’s base is pulled tightly against the floor.
Island Support Structure and Reinforcement
The island support structure can be further reinforced to provide extra rigidity.
- Blocking: Additional wood blocking can be installed between the floor joists in the area where the island will be placed. This provides a thicker, more solid anchor point for screws.
- Metal Brackets: Heavy-duty L-brackets or specialized island anchoring brackets can be used. These are attached to the sides of the island’s base cabinets and then screwed into the floor joists or subfloor, offering additional lateral stability.
Securing Island to Subfloor vs. Finished Floor
It’s crucial to understand that the real anchoring happens at the subfloor level. The finished kitchen island flooring (tile, hardwood, etc.) is merely a surface layer.
- Why Subfloor Matters: Screws must penetrate the finished flooring and go into the structural subfloor (plywood or OSB) and, ideally, the floor joists themselves.
- Avoid Surface Screwing: Simply screwing into the finished floor alone will not provide adequate stability.
Island Leg Stability Considerations
If your island has legs rather than a solid cabinet base, achieving stability requires a different approach.
- Heavy-Duty Legs: Choose legs designed for furniture or cabinetry support.
- Leg Mounting Plates: Use robust metal mounting plates that are screwed securely to the island’s base.
- Anchoring Plates to Floor: These mounting plates are then screwed into the floor, ideally into joists. If joists aren’t perfectly aligned, consider using toggle bolts or lag shields for drywall or concrete floors, although direct joist attachment is best.
- Cross-Bracing: For islands with legs, adding cross-bracing between the legs can significantly improve island leg stability and prevent racking.
Practical Installation Steps
Let’s break down the common steps involved in installing and securing a kitchen island.
Step 1: Planning and Preparation
- Placement: Decide on the exact location for your island.
- Subfloor Inspection: Check the condition of your subfloor. Ensure it’s solid and free from rot or damage.
- Tool Gathering: Collect all necessary tools: drill, appropriate drill bits, screws/bolts, stud finder, measuring tape, level, safety glasses, and potentially a chisel or grout saw.
Step 2: Positioning the Island
- Marking the Location: Once you’ve identified where the island will go, you might want to mark its perimeter on the floor.
- Access for Screws: Ensure you can access the areas where screws will be driven. This might mean temporarily removing baseboards or planning for access through the toe kick.
Step 3: Drilling Pilot Holes
- Locate Joists: Use a stud finder to locate floor joists. Mark their positions.
- Drill Through Island Base: From inside the island’s base cabinets (or through the bottom panel), drill pilot holes that align with your joist markings.
- Drill Through Subfloor: Use a drill bit slightly smaller than your screws to drill through the subfloor and into the joists. For tiled floors, you might pre-drill the tile first if necessary, as mentioned earlier.
Step 4: Securing the Island
- Drive the Screws: Use appropriate screws (lag screws, construction screws) and drive them through the island’s base and into the floor joists. Ensure the screws are long enough for a strong grip but not so long they protrude elsewhere.
- Tighten Firmly: Tighten the screws until the island is snug against the floor and feels completely stable. Avoid overtightening, which can strip the wood or crack the subfloor.
- Check for Level: Use a level to ensure the island is perfectly level. Shims can be used if minor adjustments are needed.
Step 5: Finishing Touches
- Concealing Fasteners: If screws are visible, use screw caps or wood filler that matches the island’s finish.
- Toe Kick Installation: Install the toe kick if it was removed or if it was designed to be attached last.
- Countertop Installation: If the countertop is separate, it would be installed after the base is secured.
Table: Common Fasteners for Island Installation
| Fastener Type | Description | Best For | Considerations |
|---|---|---|---|
| Lag Screws | Heavy-duty wood screws with hexagonal heads. | Directly attaching to wooden floor joists. | Require pre-drilling. Use a socket wrench or impact driver. |
| Construction Screws | Strong, coarse-threaded screws designed for framing and structural work. | Attaching to subfloor and framing members. | Available in various lengths. Ensure they are rated for structural use. |
| Tapcon Screws | Specialized screws for concrete. | Attaching to concrete floors. | Require a specific pilot hole size drilled with a masonry bit. |
| Toggle Bolts | Bolts with a spring-loaded wing that opens behind the surface. | Securing to subfloors where joist access is difficult or for hollow materials. | Less strong than direct joist attachment; ensure the wing opens properly. |
| Heavy-Duty Brackets | L-shaped or specialized metal brackets. | Reinforcing attachment to joists or subfloor, providing lateral stability. | Screwed to both the island base and the floor structure. |
Frequently Asked Questions (FAQ)
Can I attach a kitchen island without screwing it into the floor?
While some very small, lightweight islands might be secured with heavy-duty adhesives or by being weighted down, it is generally not recommended for most kitchen islands, especially those with significant weight or usage. Screwing into the floor provides the most secure and stable mount.
What if I can’t find floor joists?
If you cannot locate floor joists directly under your desired island placement, you have a few options:
* Add Blocking: Install solid wood blocking between existing joists in the island’s location.
* Use Toggle Bolts: For less critical anchoring, toggle bolts can be used to secure through the subfloor into the cavity, but this is less robust.
* Consider a Different Location: If possible, reposition the island to align with joists.
How do I attach an island to a finished basement floor (like concrete)?
For concrete basement floors, you will need to use concrete anchors or Tapcon screws. Drill appropriate pilot holes into the concrete, then secure the island’s base using these specialized fasteners.
Do I need to remove my kitchen island flooring to attach it?
Ideally, no. The goal is to secure the island to the subfloor and ideally joists beneath the finished flooring. You will drill through the finished floor material to reach the subfloor. If you’re working with delicate flooring like tile, extra care is needed.
How far apart should my screws be when securing an island?
This depends on the size and weight of the island, but generally, you’ll want at least two to four screws per side of the island’s base, strategically placed into floor joists. Ensure the screws are distributed to provide even support.
Can I just screw into the plywood subfloor without hitting joists?
While you can screw into the plywood subfloor, it’s significantly less secure than anchoring into floor joists. Plywood can eventually loosen, especially under heavy load or movement. Always prioritize hitting joists for the strongest, most stable mount.
Conclusion
Attaching a kitchen island securely to the floor is a vital step in ensuring its safety, stability, and longevity. By carefully considering your kitchen island flooring, understanding cabinet base attachment principles, and employing appropriate island anchoring methods, you can create a robust and reliable centerpiece for your kitchen. Whether it’s a bolted kitchen island into solid joists or a carefully executed island to tile floor attachment, the focus remains on a secure mount that stands the test of time. Prioritizing a strong island support structure and proper securing island to subfloor techniques will guarantee your island provides years of functional enjoyment.