
Can you paint the space above kitchen cabinets? Yes, you absolutely can paint the space above your kitchen cabinets, whether it’s drywall, wood, or tile. Painting this often-neglected area can tie your kitchen together, add a splash of color, or create a subtle visual interest. What are the best ways to use space above cabinets? The best ways to use the space above kitchen cabinets involve maximizing functionality, enhancing aesthetics, or both. This can include adding storage, decorative elements, or architectural features.
The area above kitchen cabinets, often referred to as the “kitchen cabinet soffit” area or simply the void, can be a tricky design challenge. It’s that often-awkward gap between the top of your cabinets and the ceiling, a magnet for dust and a void in your kitchen’s visual flow. But fear not! Filling this space isn’t just about aesthetics; it’s a fantastic opportunity to inject personality, boost functionality, and truly complete your kitchen’s look. This guide explores a multitude of creative decor and easy solutions for transforming that often-underutilized space.
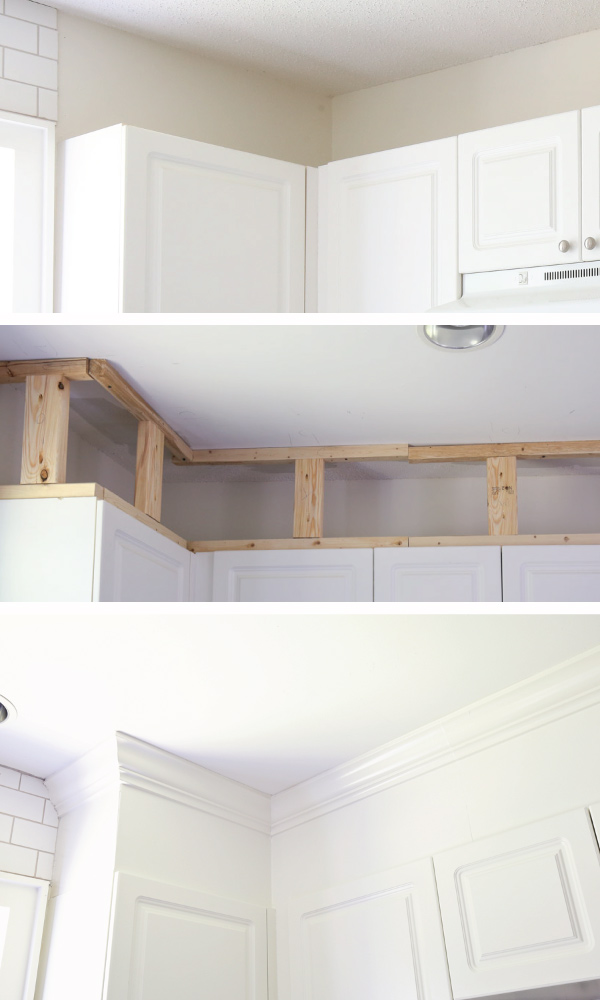
Image Source: angelamariemade.com
Why Bother Filling the Space Above Kitchen Cabinets?
Ignoring the space above your cabinets can leave your kitchen feeling unfinished. It can also lead to a build-up of grease and dust, making cleaning a chore. Addressing this area offers several key benefits:
- Improved Aesthetics: A clean, finished look that ties the cabinets into the overall room design.
- Enhanced Functionality: Opportunities for added storage or display.
- Easier Cleaning: Reduces dust and grease accumulation.
- Customization: A chance to express your personal style.
- Increased Home Value: A well-designed kitchen is always a plus.
Creative Decor Ideas for Above Your Kitchen Cabinets
Filling the space above kitchen cabinets doesn’t always mean building. Decorative elements can add immense charm and personality. Here are some fantastic above cabinet decor ideas:
1. Curated Collections & Display Items
This is one of the most popular kitchen cabinet filler ideas for adding personality. Choose items that reflect your style and complement your kitchen’s color scheme.
- Vases and Pottery: Select a few decorative vases or pottery pieces in varying heights and textures. Opt for colors that either match or provide a pleasing contrast to your cabinets and walls.
- Art and Sculptures: Small sculptures, framed prints, or even decorative plates can add an artistic touch. Consider vintage finds or pieces that have special meaning to you.
- Greenery: Artificial plants, particularly those with trailing vines, can soften the look and bring a touch of nature indoors. Ensure they are UV-resistant if they’ll be exposed to sunlight.
- Themed Displays: Group items around a theme – perhaps travel souvenirs, seasonal decor (think holiday figurines), or a collection of vintage kitchenware.
Tips for Displaying Items:
- Don’t Overcrowd: Less is often more. A few well-chosen items look more sophisticated than a jumble.
- Vary Heights: Group items of different heights to create visual interest and prevent a flat, monotonous look.
- Consider Lighting: If the space is dark, consider battery-operated LED strip lights to highlight your display.
- Balance: Distribute items evenly across the length of the cabinets.
2. Decorative Trays and Baskets
These offer a slightly more organized and contained approach to displaying items and can also be considered as part of DIY above cabinet storage.
- Woven Baskets: These add texture and warmth. Use them to hold artificial plants, decorative spheres, or even neatly rolled towels if the space is accessible.
- Metal or Wooden Trays: Great for corralling a few decorative items, such as candles, small sculptures, or a decorative clock.
3. Wallpaper or Fabric Backsplash
This is a more daring but highly impactful way to fill the space.
- Consider Washable Options: If the area is prone to grease splatter, choose a washable wallpaper or fabric that can be easily wiped down.
- Pattern Play: Use a bold pattern to create a focal point or a subtle texture to add depth.
- DIY Friendliness: This can be a relatively simple DIY project, especially if you’re comfortable with wallpaper paste or fabric adhesive.
4. Painted Design or Stencil
For a truly custom look, consider painting a design or using stencils in the space above your cabinets.
- Geometric Patterns: Stenciled geometrics can add a modern edge.
- Faux Finishes: Experiment with faux finishes like a subtle metallic sheen or a textured paint effect.
- Mural: For the artistically inclined, a small painted mural can be a stunning statement.
Functional Solutions for Filling Gaps Over Kitchen Cabinets
Beyond pure decoration, there are many ways to make the space above your kitchen cabinets work harder for you. These solutions are excellent for filling gaps over kitchen cabinets and maximizing utility.
5. Extending Cabinets Upwards (Kitchen Cabinet Extension)
This is a popular solution that creates a seamless, built-in look and significantly increases storage.
- Matching Materials: Ideally, the extension should be made from the same material as your existing cabinets for a cohesive look.
- Adding Doors: You can add doors to these upper cabinets for concealed storage, perfect for less-attractive items or to maintain a streamlined appearance.
- Open Shelving: Alternatively, you can leave the extended section open, creating display shelves.
- Professional Installation vs. DIY: While a true kitchen cabinet extension often requires professional carpentry, there are DIY kits and methods for simpler extensions.
6. Installing Cabinet Molding (Crown Molding for Kitchen Cabinets)
This is a classic and elegant way to finish the top of your cabinets, bridging the gap to the ceiling and adding architectural detail.
- Types of Molding:
- Crown Molding: This is the most common choice, featuring a decorative profile that sits at an angle between the cabinet and the wall/ceiling.
- Applied Molding: Simple trim pieces can be added to the cabinet faces for a more detailed look.
- Dentil Molding: Features a series of small, regularly spaced blocks.
- Benefits: Adds a custom, high-end feel, hides imperfections, and draws the eye upward, making the kitchen feel larger.
- DIY Considerations: Installing cabinet molding requires precise measurements, miter cuts, and careful fastening. If you’re not comfortable with woodworking, hiring a carpenter is advisable.
7. DIY Above Cabinet Storage Solutions
This is where you can get creative with practical storage.
- Open Shelving Unit: Install simple floating shelves above your cabinets. Use these for cookbooks, decorative jars, or frequently used items.
- Cabinet Risers/Extenders: Purchase or build simple wooden boxes or risers that sit on top of your existing cabinets, effectively creating a second tier of storage. You can add doors or leave them open.
- Wire Baskets: Similar to decorative baskets, but choose sturdier wire versions for holding items like picnic baskets, extra linens, or seldom-used serving dishes.
8. Lighting Integration
Well-placed lighting can transform the entire look and feel of your kitchen.
- Under-Cabinet Lighting (Indirect): While not directly above the cabinets, this is a crucial lighting element that often gets overlooked. It illuminates countertops and reduces shadows.
- Ceiling Integrated Lighting: Recessed ceiling lights positioned above the cabinets can wash the wall and cabinets with light, highlighting any decorative elements you’ve placed there.
- LED Strip Lights: Install LED strips along the top edge of your cabinets, pointing upwards towards the ceiling. This creates a beautiful ambient glow and can make the space feel more expansive. Choose color-changing options for mood lighting.
Architectural Approaches: Kitchen Cabinet Soffit Ideas and Beyond
For a more integrated and permanent solution, consider architectural modifications.
9. Building a Soffit
A soffit is a structural element that closes off the space between the cabinets and the ceiling. This is the most seamless way of filling gaps over kitchen cabinets.
- Benefits: Provides a clean, finished look, eliminates dust traps, and can integrate lighting or ventilation.
- Design Options:
- Simple Box Soffit: A straightforward drywall or wood enclosure.
- Recessed Soffit: Where the soffit is set back slightly from the cabinet face, creating a shadow line.
- Molded Soffit: Incorporates decorative molding for added elegance.
- Considerations: This is a more involved renovation project that typically requires professional contractors for framing, drywall, and finishing.
10. False Ceiling or Bulkhead
Similar to a soffit, this is a constructed element that lowers the ceiling in that specific area, creating a visually balanced and complete look.
- Integrated Lighting: Often used to house recessed lighting fixtures.
- Smooth Finish: Provides a perfectly smooth, seamless transition.
- Cost: This is generally a more significant renovation expense.
11. Extending the Cabinet Fronts (False Doors)
If you have a very large gap, you can create the illusion of taller cabinets by adding decorative panels or “false doors” to the upper section.
- Matching Style: These should mimic the style and finish of your existing cabinet doors.
- Customization: Can be designed to match your cabinet style perfectly.
- Professional Craftsmanship: This usually requires custom cabinetry work for a seamless integration.
Practical Tips for Success
No matter which solution you choose, keep these practical tips in mind:
Accessibility
- Reachability: Consider how easy it will be to place and retrieve items if you opt for accessible storage or display. A sturdy step stool or small ladder might be necessary.
- Cleaning: Think about how you’ll clean the items and the surfaces above your cabinets. Opt for materials that are easy to wipe down.
Lighting
- Natural Light: If your kitchen has a window that casts light onto the upper cabinets, consider how your chosen solution will interact with it.
- Artificial Light: As mentioned, integrated lighting can dramatically enhance the look and functionality of the space above cabinets.
Budget
- DIY vs. Professional: Be realistic about your DIY skills and budget. Simple decor items are inexpensive, while cabinet extensions or soffits will require a larger investment.
- Material Costs: Research the cost of materials like molding, wood, paint, or decorative items before you begin.
Style Cohesion
- Kitchen’s Overall Theme: Ensure your chosen solution complements the existing style and color palette of your kitchen.
- Scale and Proportion: Make sure the scale of your decorative items or architectural elements is appropriate for the size of your kitchen and cabinets.
Frequently Asked Questions (FAQ)
Q1: What is the purpose of filling the space above kitchen cabinets?
A1: Filling the space above kitchen cabinets serves multiple purposes, including improving the kitchen’s aesthetic appeal by creating a finished look, increasing storage capacity, reducing dust and grease accumulation, and allowing for personalization and style expression.
Q2: Can I use artificial plants above kitchen cabinets?
A2: Yes, artificial plants are a popular and low-maintenance option for decorating the space above kitchen cabinets. They add a touch of greenery and softness without requiring watering or sunlight.
Q3: How do I clean items placed above kitchen cabinets?
A3: The cleaning method depends on the items. Dust regularly with a microfiber duster or a vacuum cleaner with a brush attachment. For decorative items, wipe them down as needed with a damp cloth. If using wallpaper or paint, ensure they are washable and can be wiped clean.
Q4: Is it better to store or decorate above kitchen cabinets?
A4: This depends on your needs and preferences. If you require more storage, functional solutions like shelves or cabinet extensions are ideal. If your priority is aesthetics, decorative items like vases, art, or plants are a great choice. Many homeowners combine both by using decorative storage solutions.
Q5: How do I measure for crown molding for kitchen cabinets?
A5: Measure the length of each cabinet run where you plan to install molding. For mitered corners, measure the inside and outside corner lengths accurately. It’s advisable to buy slightly more molding than you calculate to account for mistakes or difficult cuts.
Q6: What are some easy DIY solutions for filling gaps over kitchen cabinets?
A6: Easy DIY solutions include placing decorative items like vases or plants, using woven baskets, applying decorative wallpaper or stencils, or installing simple floating shelves. Even painting the wall space can make a significant difference.
Q7: When should I consider building a soffit?
A7: You should consider building a soffit if you want a very clean, seamless, integrated look that hides all gaps and imperfections, or if you plan to install integrated lighting or ventilation within that space. It’s generally a more permanent and involved renovation.
Q8: What is kitchen cabinet filler?
A8: Kitchen cabinet filler refers to materials or decorative elements used to fill the void or gap between the top of your kitchen cabinets and the ceiling. This can include molding, wood panels, decorative items, or even extending the cabinets themselves.
Q9: How can I make the space above cabinets look less cluttered?
A9: To avoid a cluttered look, stick to a limited number of well-chosen decorative items, vary their heights, and consider using baskets or trays to group smaller items. For functional storage, consider closed cabinets or baskets with lids.
Q10: Can I install LED strip lights above kitchen cabinets myself?
A10: Yes, installing LED strip lights above kitchen cabinets is often a straightforward DIY project. Most kits come with adhesive backing for easy application and plug-in transformers or battery packs, requiring minimal electrical knowledge. Always follow the manufacturer’s instructions carefully.
Transforming the space above your kitchen cabinets is a rewarding project that can elevate your kitchen’s overall design. Whether you opt for simple decorative touches or more involved architectural changes, there are solutions to suit every style and budget. By carefully considering your needs and preferences, you can turn that often-forgotten space into a focal point that enhances both the beauty and functionality of your kitchen.