
Can you repaint a kitchen table? Yes, you absolutely can repaint a kitchen table! It’s a fantastic way to refresh your kitchen’s look and give an old piece of furniture new life. This guide will walk you through everything you need to know to achieve a professional-looking finish on your own.
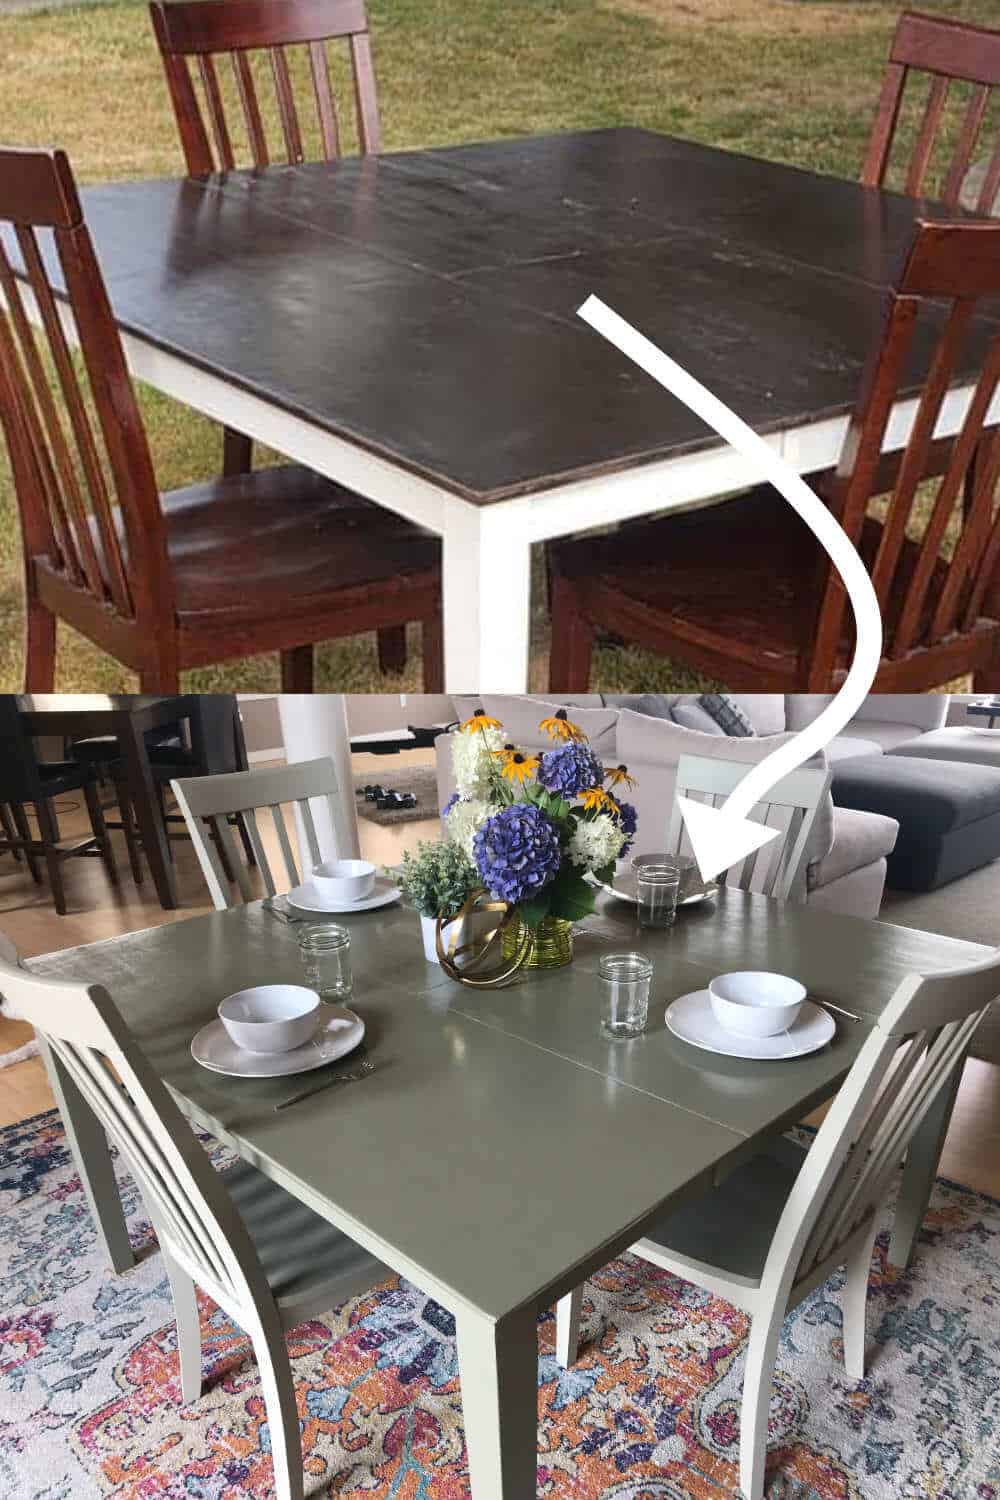
Image Source: sunshineandrainydays.com
Why Repaint Your Kitchen Table?
Your kitchen table is often the heart of your home. It’s where meals are shared, homework is done, and stories are told. Over time, even the most beloved tables can show wear and tear. Scratches, faded finishes, and outdated colors can make a beautiful piece look tired. Repainting your kitchen table is a great DIY project that offers several benefits:
- Cost-Effective: Compared to buying a new table, repainting is much cheaper.
- Customization: You can choose any color or finish you desire to match your kitchen’s current style.
- Sustainability: You’re giving an old item a new purpose, reducing waste.
- Sense of Accomplishment: There’s a real satisfaction in transforming an old piece yourself.
- Durability: With the right preparation and paint, your newly painted table can be more durable than its original finish.
This process allows you to refurbish dining table pieces that might otherwise be discarded, breathing new life into them. It’s a rewarding kitchen table makeover that can drastically change the feel of your dining area.
Planning Your Kitchen Table Repaint Project
Before you grab a paintbrush, a little planning goes a long way. This ensures a smooth process and a beautiful result.
Choosing Your Paint
The best paint for kitchen table surfaces needs to be durable and easy to clean. Kitchen tables are prone to spills, heat, and constant use.
- Chalk Paint: Popular for its matte finish and ease of use. It requires minimal prep (often no sanding) and dries quickly. It needs a protective topcoat (wax or polycrylic) for durability.
- Milk Paint: Similar to chalk paint, offering a vintage look. It can be used with or without a bonding agent. It also requires a topcoat for protection.
- Latex Paint (Acrylic Latex): A versatile option. Look for “all-in-one” paints that include primer and a durable topcoat. For extra protection, consider a water-based polyurethane or polycrylic finish.
- Enamel Paint: Known for its hard, durable finish. Oil-based enamels offer superior durability but can have strong fumes and require mineral spirits for cleanup. Water-based enamels are easier to use.
- Specialty Paints: Some paints are designed specifically for furniture, offering built-in primers and sealants for added durability.
Table Paint Ideas: Think about your kitchen’s color scheme. A crisp white, a soft grey, a bold navy, or even a fun pop of color can all work. You can also consider two-tone designs or distressed finishes.
Selecting a Finish
After painting, you’ll want to protect your work.
- Matte: Offers a soft, velvety look.
- Satin: A slight sheen, very popular for furniture as it’s easy to clean.
- Semi-Gloss: More durable and easier to clean than satin, with a noticeable shine.
- High-Gloss: Very durable and reflective, but shows imperfections more easily.
- Clear Coat (Polyurethane/Polycrylic): Adds a protective layer over paint, increasing durability and water resistance. Polycrylic is water-based and has less odor than polyurethane.
Gathering Your Supplies
Here’s a checklist of what you’ll need for DIY table refinishing:
- Drop cloths: To protect your work area.
- Screwdriver or wrench: To remove table legs or hardware if needed.
- Sanding blocks or electric sander: For surface preparation.
- Sandpaper: Various grits (e.g., 80, 120, 220).
- Tack cloth or damp cloth: For dust removal.
- Primer: (If your paint doesn’t include it, or for difficult surfaces).
- Paint: Your chosen type and color.
- Paintbrushes: High-quality synthetic brushes for water-based paints, natural bristles for oil-based paints.
- Foam rollers: For smooth surfaces.
- Paint trays or containers:
- Wood filler or putty: For repairing imperfections.
- Safety glasses and gloves:
- Mask (optional but recommended): For sanding dust or paint fumes.
- Topcoat/Sealer: (Polyurethane, polycrylic, wax, etc.).
Step-by-Step Guide to Repainting Your Kitchen Table
The process of sanding and painting table surfaces involves several key stages. Each step is crucial for a lasting, beautiful finish.
Step 1: Prepare Your Workspace
Choose a well-ventilated area, preferably outdoors or in a garage with the door open. Lay down drop cloths to protect the floor from dust and paint. Ensure you have good lighting.
Step 2: Disassemble the Table (If Necessary)
If your table has removable legs or a separate top, it’s often easier to work on each piece individually. Unscrew the legs and any other detachable parts. Store the hardware in a labeled bag so you don’t lose anything.
Step 3: Clean the Table Thoroughly
This is a critical step for good adhesion. Wash the entire table with a mild detergent and water. For greasy residue, a solution of one part TSP (trisodium phosphate) to ten parts water can be effective. Rinse thoroughly and let the table dry completely.
Step 4: Repair Imperfections
Inspect the table for any dents, gouges, or deep scratches. Fill these areas with wood filler or putty. Apply the filler with a putty knife, slightly overfilling the damaged spot. Let it dry completely according to the manufacturer’s instructions.
Step 5: Sanding for a Smooth Finish
This is arguably the most important step for a professional finish.
Sanding the Surface
- Initial Sanding: Use a medium-grit sandpaper (around 80-120 grit) to remove the old finish and smooth out any repaired areas. If the old finish is already very worn or you’re using a paint that requires good adhesion (like latex), you might need to sand down to bare wood.
- Smoothing: Once the old finish is removed or the surface is prepped, switch to a finer grit sandpaper (150-220 grit). Sand the entire surface to create a smooth, uniform texture. This helps the new paint adhere better.
- Corners and Edges: Pay attention to corners and edges. Use a sanding block to avoid rounding them too much.
Sanding Tips:
- Always sand in the direction of the wood grain.
- For curved surfaces, use flexible sanding sponges or wrap sandpaper around a soft object.
- If using an electric sander, move it constantly to avoid creating divots.
Cleaning After Sanding
After sanding, it’s essential to remove all dust.
- Use a vacuum cleaner with a brush attachment to get into crevices.
- Wipe down the entire table with a tack cloth. A tack cloth is a sticky cloth that picks up fine dust particles. Alternatively, a slightly damp cloth can work, but ensure the surface is completely dry before proceeding.
Step 6: Priming the Table
Primer is a crucial step for a lasting paint job, especially if you’re painting over a dark or glossy finish, or if you want to ensure even color.
- Choose the Right Primer: Use a primer designed for wood. If you’re painting a dark table a light color, a stain-blocking primer can prevent the old color from bleeding through.
- Application: Apply a thin, even coat of primer using a brush or roller. Avoid thick, gloppy coats, which can cause drips and an uneven finish.
- Drying Time: Let the primer dry completely according to the manufacturer’s instructions.
- Light Sanding (Optional): Once the primer is dry, you can lightly sand it with a very fine-grit sandpaper (220 grit or higher) to create an ultra-smooth surface for your paint. Wipe away dust with a tack cloth.
Step 7: Painting Your Kitchen Table
This is where your kitchen table renewal really begins to take shape.
- Stir, Don’t Shake: If using latex or enamel paint, stir the can thoroughly with a stir stick. Avoid shaking, as this can introduce air bubbles.
- First Coat: Apply your chosen paint in thin, even coats. Use a high-quality brush for details and edges, and a foam roller for larger flat surfaces. Work with the grain of the wood.
- Drying Between Coats: Allow each coat of paint to dry completely. Check the paint can for recommended drying times. Rushing this step can lead to a streaky or peeling finish.
- Second Coat: Apply a second coat. You’ll likely see better coverage and a more uniform color.
- Third Coat (If Needed): Depending on the paint and the color change, you might need a third coat for full opacity.
- Smoothness: If you notice any brush strokes or unevenness, you can lightly sand between coats with very fine-grit sandpaper (220-320 grit) and wipe with a tack cloth.
Step 8: Applying the Topcoat (Sealer)
To protect your freshly painted surface and make it durable for everyday use, a topcoat is essential.
- Choose Your Topcoat: Polycrylic or polyurethane are excellent choices for durability and water resistance. Wax is suitable for chalk paint or milk paint but offers less protection.
- Application: Apply the topcoat in thin, even coats using a clean brush or foam applicator. Avoid applying it too thickly, as this can cause clouding or yellowing.
- Drying: Allow each coat to dry completely. Lightly sand with a very fine grit (320+ grit) between coats for an exceptionally smooth finish. Wipe with a tack cloth after each sanding.
- Number of Coats: Typically, 2-3 coats of topcoat are recommended for kitchen table surfaces.
- Curing Time: While the topcoat will feel dry to the touch relatively quickly, it takes several days (often 7-30 days) to fully cure and reach its maximum hardness. Be gentle with the table during this period.
Step 9: Reassembling the Table
Once the paint and topcoat are fully dry and cured, reattach any legs or hardware you removed.
Popular Kitchen Table Refinishing Techniques
Beyond a simple repaint, there are various techniques to elevate your kitchen table makeover.
Distress Finish
This technique gives a vintage, worn-in look.
- Paint the table with your base color. Let it dry completely.
- Apply a contrasting color of paint on top.
- While the second coat is still slightly wet (or after it dries, depending on the desired effect), use sandpaper or a sanding block to gently rub away the top layer of paint in areas where natural wear would occur (edges, corners, tabletop center).
- Seal with a topcoat.
Two-Tone Finish
This involves painting different parts of the table in contrasting colors. For example, paint the tabletop one color and the legs another. This can highlight the table’s structure.
Stenciled Designs
Add decorative elements to the tabletop or apron using stencils.
- Paint the table and apply your topcoat.
- Place the stencil on the desired area.
- Lightly dab paint onto the stencil using a stencil brush or sponge. Avoid overloading the brush to prevent paint from bleeding under the stencil.
- Let the stencil paint dry completely, then apply another layer of topcoat over the stenciled design.
Whitewash Finish
This technique allows the wood grain to show through.
- Mix white paint with water (start with a 1:1 ratio and adjust as needed).
- Apply the whitewash to the table, working in sections.
- Immediately wipe away excess paint with a clean cloth, following the direction of the wood grain.
- Let it dry, then apply a topcoat.
Caring for Your Newly Painted Table
To keep your repainted kitchen table looking its best, follow these care tips:
- Clean Spills Immediately: Wipe up any spills with a soft cloth and mild soap.
- Use Placemats and Coasters: Protect the surface from heat and moisture.
- Avoid Harsh Cleaners: Stick to mild, non-abrasive cleaners.
- Gentle Cleaning: Use a soft cloth for dusting and regular cleaning.
- Waxing (if applicable): If you used chalk paint and wax, you may need to reapply wax periodically (every 6-12 months) to maintain protection and shine.
Frequently Asked Questions (FAQ)
Q: What is the best paint for a kitchen table?
A: For durability and ease of cleaning, acrylic latex paints, enamel paints, and chalk paints (with a good topcoat) are excellent choices for kitchen tables. Always ensure your chosen paint is suitable for furniture and high-traffic areas.
Q: Can I paint a laminated kitchen table?
A: Yes, you can paint a laminated table, but proper preparation is key. Lightly sand the surface to create a “tooth” for the paint to adhere to, use a good quality primer specifically for laminate or slick surfaces, and then apply your chosen paint and topcoat.
Q: How long does it take to repaint a kitchen table?
A: The actual painting time might only be a few hours, but the entire process, including drying and curing times, can take several days to a week or more. This includes prep, cleaning, sanding, priming, multiple paint coats, and topcoat application and curing.
Q: Do I need to sand before painting a kitchen table?
A: Yes, sanding is almost always recommended. It removes the old finish, smooths out imperfections, and creates a surface that the new paint can adhere to properly, ensuring a durable finish.
Q: What kind of sandpaper should I use for sanding and painting a table?
A: For initial sanding to remove old finishes, use 80-120 grit. For smoothing the surface and preparing for paint, use 150-220 grit. For sanding between coats of paint or topcoat, use very fine grits like 220-320 or even higher.
Q: Do I need to prime before painting a kitchen table?
A: It’s highly recommended to prime, especially if you’re painting over a dark color, a glossy finish, or if the wood has knots that might bleed through the paint. Primer ensures better adhesion and a more even color.
By following these steps and tips, you can successfully refurbish dining table pieces and enjoy a beautifully updated kitchen. The effort you put into preparation and proper application will pay off with a durable and attractive kitchen table makeover. This approach to painting kitchen furniture can transform your entire dining space.