
What is a leak under the kitchen sink? A leak under the kitchen sink is when water escapes from the pipes, connections, or fixtures that are located in the cabinet below your kitchen sink. This can happen for many reasons and often goes unnoticed until you spot dampness under kitchen sink or a more significant puddle, leading to water damage under sink.
A dripping pipe under the sink is a common sign that a problem exists, and ignoring it can lead to costly repairs. The good news is that with a systematic approach, kitchen sink leak detection can be straightforward. This guide will walk you through the process of finding plumbing leaks and identifying sink leaks with easy-to-follow steps.
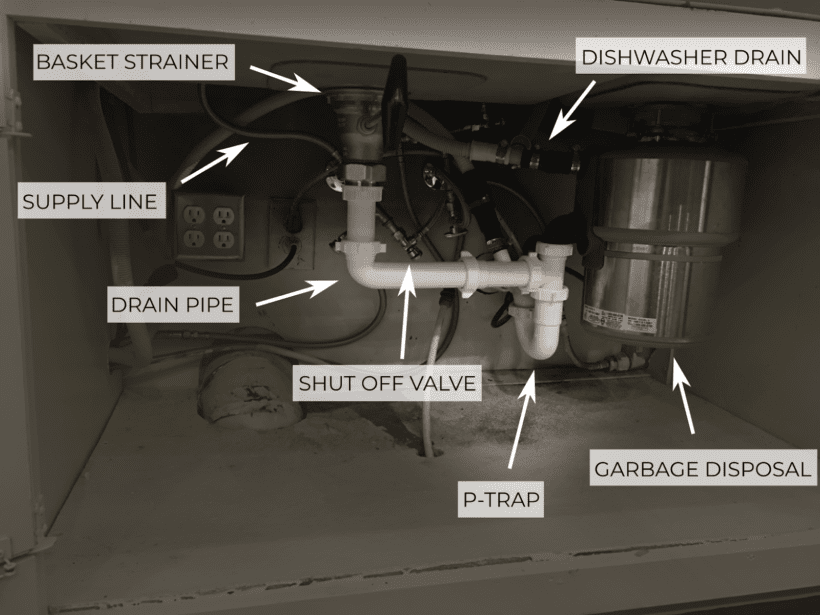
Image Source: legacyplumbing.net
Initial Checks: The First Steps in Finding Leaks
When you suspect a leak, the first step is to gather some basic tools and prepare for a thorough inspection. You don’t need to be a professional plumber to do this; it’s all about careful observation.
What You’ll Need
- Flashlight: A bright LED flashlight is crucial for seeing into dark corners.
- Dry Towels or Paper Towels: To wipe away moisture and check for new drips.
- Bucket or Container: To catch any water if you need to temporarily disconnect a pipe.
- Gloves (Optional): For hygiene and grip.
- A Camera or Smartphone: To document what you find.
Creating a Clear Workspace
Before you can start your plumbing leak investigation, you need to clear out the cabinet.
- Remove everything from under the sink: cleaning supplies, trash cans, food items, and anything else stored there.
- This will give you unobstructed access to all the pipes, hoses, and the sink basin itself.
- A clear space allows for better visibility and makes it easier to dry areas thoroughly.
Step-by-Step Leak Detection
Once your workspace is clear, you can begin the methodical process of checking for water leaks.
H3: Visually Inspecting the Visible Components
Start with a good look at everything you can see.
H4: The Sink Basin and Drain
- Check the Rim: Look for any cracks or gaps around the edge of the sink where it meets the countertop. Water can seep through these.
- Inspect the Drain Flange: This is the metal ring around the drain opening inside the sink. Ensure the sealant around it is intact.
- Examine the Sink Stopper and Strainer: Make sure they fit properly and aren’t damaged.
H4: The Faucet and Connections
- Faucet Base: Water can sometimes drip from the base of the faucet onto the countertop and then down into the cabinet.
- Supply Lines: These are the flexible hoses that connect the faucet to the hot and cold water shut-off valves. Check them for any signs of wear, cracks, or corrosion. Gently wiggle them to see if they feel loose at either connection point.
- Spray Hose (if applicable): If you have a pull-out or side sprayer, inspect the hose for damage.
H4: The P-Trap and Drainpipes
The P-trap is the U-shaped pipe directly beneath the sink drain. Its purpose is to trap water, preventing sewer gases from entering your home.
- Look for Drips: Carefully inspect the P-trap itself and all its connections. These are common places for leaks to start.
- Check the Slip Nuts: These are the large plastic or metal nuts that connect the different sections of the drainpipe. Tighten them gently if they seem loose, but don’t overtighten, as you could crack the plastic.
- Inspect the Washer: Inside the slip nuts are rubber or plastic washers that create a seal. These can become worn or dislodged.
H4: The Garbage Disposal (if applicable)
If you have a garbage disposal, it adds more potential leak points.
- Mounting Gasket: Check where the disposal connects to the sink.
- Dishwasher Drain Hose Connection: If your dishwasher drains into the disposal, inspect that connection.
- The Body of the Disposal: Look for any cracks or corrosion on the unit itself.
H3: The Water Supply System
Now, turn your attention to the pipes that bring water to your faucet.
H4: Shut-off Valves
- Location: You’ll typically find two valves under the sink, one for hot water and one for cold water, usually mounted on the wall.
- Inspect for Drips: Look closely at the stem of the valve and where it connects to the pipe. Turn the handles off and on gently to see if any water leaks from the valve stem.
- Handle Area: Sometimes, the packing nut behind the handle can loosen, causing a drip.
H4: Supply Line Connections
- To the Valve: Ensure the connection where the supply line screws onto the shut-off valve is dry.
- To the Faucet: Check where the supply line connects to the underside of the faucet body.
H3: Testing for Active Leaks
Visual inspection is good, but sometimes you need to simulate water flow to find intermittent leaks.
H4: The Fill and Drain Test
- Plug the Sink: Plug both basins of your sink (if you have a double sink).
- Fill with Water: Fill one or both basins with a few inches of water.
- Check for Leaks: While the water is sitting, go underneath and carefully check all the drainpipe connections, the P-trap, and the sink strainer for any immediate drips.
- Unplug and Drain: Now, pull the plugs and let the water drain. Watch closely for leaks as the water flows through the pipes. Pay special attention to the P-trap and any horizontal pipe sections.
- Repeat if Necessary: Sometimes, a slow leak might only appear when the pipes are under pressure from standing water or during the draining process.
H4: The Faucet Flow Test
- Turn On the Faucet: Turn on the cold water first. Let it run for a minute.
- Inspect: While the water is running, look for any drips from the supply lines, shut-off valves, or faucet connections.
- Turn Off and Listen: Turn the water off. Sometimes, you can hear a faint hissing or dripping sound if there’s a small leak.
- Repeat for Hot Water: Do the same test with the hot water.
H3: Advanced Leak Detection Techniques
If you’re still having trouble pinpointing the source, here are a few more advanced methods.
H4: Using Paper Towels and Dry Hands
- The Touch Test: After running water or letting it sit, feel all the pipe joints and connections with your dry hands or dry paper towels. Even a slight dampness will be noticeable on a dry surface.
- The Blot Test: Place dry paper towels around suspected leak areas. If a leak is present, the paper towel will show a wet spot. This can help isolate a very small drip.
H4: Checking for Condensation vs. Leaks
- Cold Water Lines: In humid environments, condensation can form on cold water pipes, especially during warm weather. This can sometimes be mistaken for a leak.
- Feel the Pipe: If a pipe feels cold and wet, and you don’t see any dripping from a joint, it’s likely condensation. Wipe it dry and monitor it. If it gets wet again, and the ambient air is humid, it’s probably condensation. If it’s consistently wet at a specific point or dripping, it’s more likely a leak.
Common Culprits for Leaks Under the Kitchen Sink
Knowing where to look is key. Here are the most frequent causes of sink cabinet leak issues.
H4: Worn Seals and Gaskets
Over time, rubber seals and gaskets in pipe connections and the faucet itself can degrade, lose their elasticity, and crack. This allows water to escape.
H4: Loose Connections
Threaded pipe fittings, especially plastic ones on drain pipes, can loosen due to vibrations or improper initial installation.
H4: Cracked or Damaged Pipes
Plastic drain pipes can become brittle and crack, especially in older homes or if subjected to harsh chemicals. Metal pipes can corrode and develop small holes.
H4: Faulty Faucet Cartridges or Washers
The internal components of a faucet, such as cartridges or washers, can wear out, leading to leaks from the faucet body or handles.
H4: Damaged Supply Lines
The flexible hoses connecting your faucet to the water supply can develop small punctures, splits, or cracks. The crimped fittings can also fail.
H4: Problems with the Garbage Disposal
If you have a garbage disposal, leaks can originate from its mounting flange, the housing, or the connections for the dishwasher drain or air gap.
H4: Clogged Drains
While not a direct leak, a severely clogged drain can cause water to back up and overflow from the sink basin, leading to water damage under sink that mimics a pipe leak.
What to Do Once You Find the Leak
Finding the leak is only half the battle. The next step is deciding how to address it.
H4: Minor Leaks and Tightening Connections
- Loose Slip Nuts: For a dripping pipe under sink at a drain connection, try gently tightening the slip nuts by hand or with channel-lock pliers. If that doesn’t work, consider replacing the rubber washer inside the joint.
- Loose Supply Line Fittings: If a supply line connection is loose at the valve or faucet, try gently tightening it. Be careful not to overtighten, as this can strip threads or damage the fitting.
H4: When to Call a Professional Plumber
- Persistent Leaks: If tightening doesn’t stop the leak, or if the leak is significant.
- Cracked Pipes or Fixtures: If you find cracks in pipes, the garbage disposal, or the faucet body, these parts will likely need replacement.
- Shut-off Valve Issues: If a shut-off valve is leaking from its stem or is difficult to turn, it’s best left to a professional.
- Uncertainty: If you are unsure about the source of the leak or how to repair it, calling a plumber is the safest option to prevent further damage.
- Significant Water Damage: If you’ve already experienced substantial water damage under sink, professional mitigation might be necessary.
H4: Temporary Fixes (Use with Caution)
For very small, slow drips, temporary fixes might buy you some time until a permanent repair can be made.
- Pipe Repair Tape/Wrap: Specialized waterproof tapes can sometimes seal small holes or cracks in pipes. Ensure the pipe is dry before applying.
- Plumber’s Putty: Can be used to reseal around a sink drain flange if it’s the source of a leak.
- Epoxy Putty: Some epoxy putties are designed for plumbing and can temporarily seal small leaks.
Important Note: These are temporary solutions and should be followed up with a proper repair. They are not a substitute for fixing the root cause of the leak.
Preventing Future Leaks
Proactive maintenance can help prevent future kitchen sink leak detection emergencies.
H4: Regular Inspections
- Monthly Checks: Take a few minutes each month to peek under your sink. Look for any signs of moisture, drips, or corrosion.
- After Heavy Use: If you’ve recently run a lot of water, or used the garbage disposal extensively, it’s a good time for a quick check.
H4: Gentle Use of Plumbing
- Avoid Harsh Chemicals: Never pour harsh drain cleaners down your sink. They can corrode pipes and seals over time.
- Don’t Over-Tighten: When connecting hoses or pipes, tighten them until snug, then give a slight extra turn. Overtightening can crack plastic fittings or damage seals.
H4: Replace Worn Parts
- Supply Lines: Consider replacing flexible supply lines every 5-10 years, even if they don’t show visible signs of wear. They are relatively inexpensive and a common failure point.
- Faucet Washers/Cartridges: If your faucet starts to drip from the spout, it’s often the internal components that need replacing.
H4: Monitor for Dampness
- Immediate Action: If you notice dampness under kitchen sink, don’t delay. Address it immediately to prevent mold growth and structural damage.
Table: Common Leak Locations and Their Causes
| Location Under Sink | Common Causes of Leaks | What to Look For |
|---|---|---|
| Sink Drain Assembly | Worn rubber gaskets, loose connections, cracked sink flange | Water dripping from the nut where the drainpipe connects to the sink strainer. |
| P-Trap | Loose slip nuts, worn washers, cracks in the trap itself | Drips from the curved section or its connections. |
| Supply Lines | Cracks, punctures, corrosion, loose fittings | Wetness at the connection to the shut-off valve or the faucet. Visible damage. |
| Shut-off Valves | Leaking valve stem, faulty seal, cracked valve body | Drips from behind the valve handle or from where the valve connects to the pipe. |
| Faucet Base | Damaged O-rings or seals within the faucet body | Water pooling on the countertop around the faucet base. |
| Garbage Disposal | Leaking housing, worn mounting gasket, faulty dishwasher hose connection | Water dripping from the disposal unit itself or its mounting point. |
| Dishwasher Drain Hose | Loose clamp, cracked hose | Water dripping from the point where the dishwasher hose connects to the sink drain or garbage disposal. |
Frequently Asked Questions (FAQ)
Q1: How often should I check for leaks under my kitchen sink?
It’s recommended to perform a quick visual inspection at least once a month. More thorough checks, including the fill-and-drain test, can be done every few months or if you notice any unusual smells or dampness.
Q2: Can a small leak under the sink cause mold?
Yes, absolutely. Even a slow drip can create a damp environment, which is ideal for mold and mildew growth. Mold can start to grow within 24-48 hours in the right conditions. Addressing dampness under kitchen sink promptly is crucial.
Q3: What are the signs of water damage under the sink?
Signs include visible water puddles, warped or discolored wood in the cabinet, peeling paint or laminate, musty odors, and the presence of mold or mildew.
Q4: Is it safe to try and fix a leak myself?
For minor issues like tightening loose connections or replacing a simple rubber washer in a drainpipe, it can be safe if you are careful. However, if the leak involves the main water supply lines, shut-off valves, or you’re not comfortable with the process, it’s always best to call a qualified plumber.
Q5: My sink cabinet smells musty, but I don’t see any obvious leaks. What could be the problem?
A musty smell often indicates hidden mold growth, which can be caused by a very slow, persistent leak that hasn’t formed a visible puddle yet. It could be seeping into the cabinet material. Continue with your plumbing leak investigation, using paper towels to check every joint and surface. Sometimes, a leak can occur in the wall behind the pipes.
Q6: What is a “dripping pipe under sink” telling me?
A dripping pipe under sink is a direct indication that a seal has failed, a fitting has loosened, or a pipe has developed a crack or hole, allowing water to escape from the plumbing system. It’s a clear signal that a plumbing leak investigation is needed.
By following these steps, you can effectively track down and address most leaks under your kitchen sink, preventing minor issues from turning into major headaches and costly repairs. Remember, consistent vigilance and prompt action are your best allies against water damage under sink.