
What is the most crucial measurement for a kitchen sink? The overall dimensions of the sink itself, which dictate its fit within your existing countertop and cabinet space, are paramount. Can I measure for a sink myself? Absolutely! With a few simple tools and this guide, you can confidently measure for your new kitchen sink.
Choosing a new kitchen sink is an exciting step in renovating or updating your culinary space. But before you fall in love with a farmhouse apron-front or a sleek undermount design, you need to ensure it will actually fit. Measuring correctly is key to avoiding costly mistakes and installation headaches. This in-depth guide will walk you through every step, ensuring you get the right sink for your kitchen.
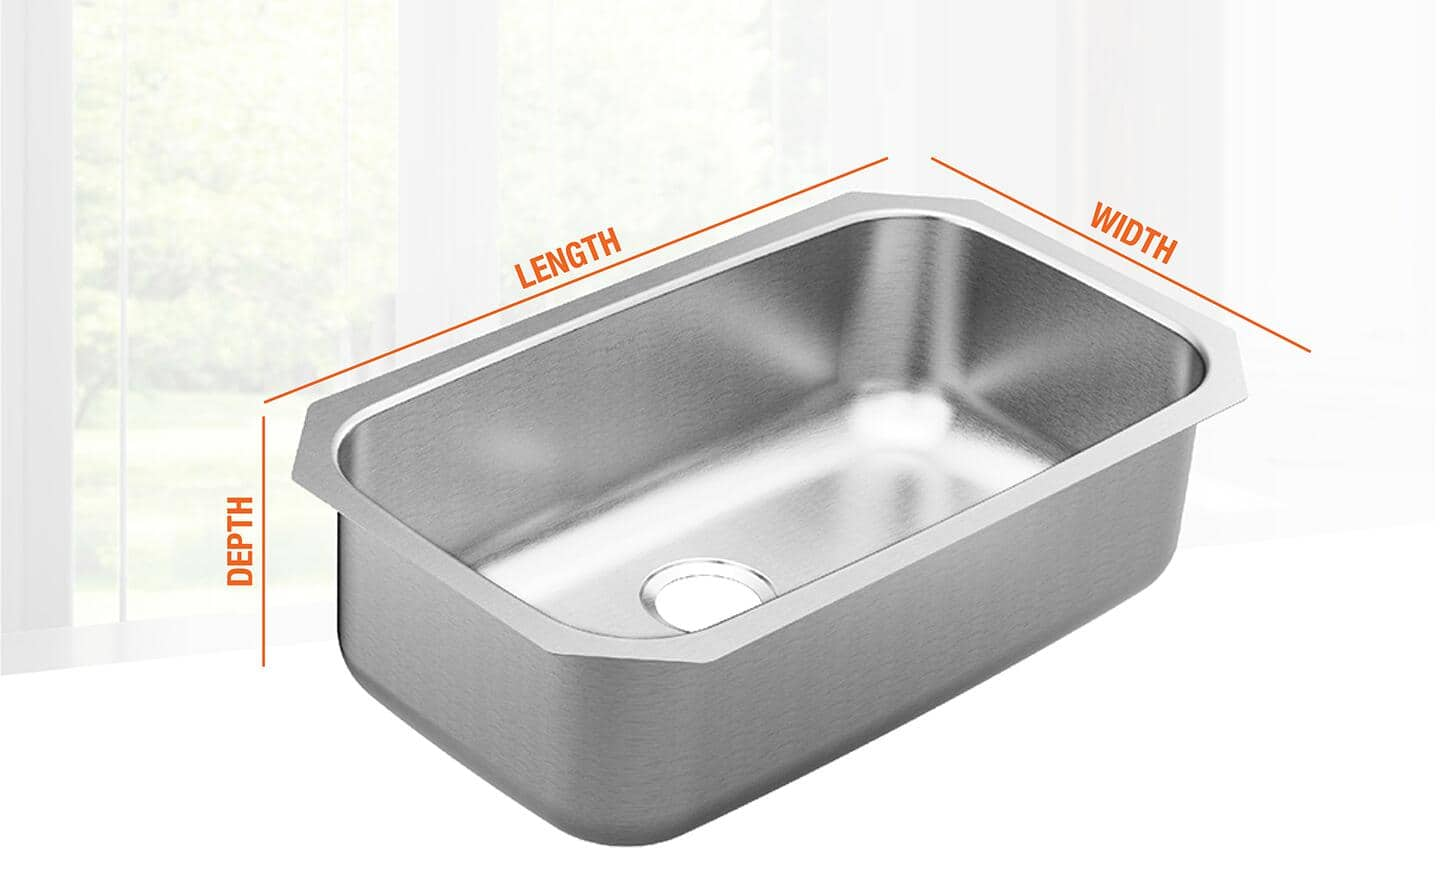
Image Source: dam.thdstatic.com
Why Accurate Sink Measurements Matter
It might seem straightforward, but precise measurements are the foundation of a successful sink installation. A sink that’s too large won’t fit into your countertop cutout, and one that’s too small might leave unsightly gaps or require extensive modifications. Similarly, the wrong sink depth can interfere with plumbing or drawer clearance. Getting it right from the start saves you time, money, and frustration.
The Impact of Incorrect Measurements
- Costly Returns: If your sink doesn’t fit, you’ll likely have to return it, incurring shipping costs or restocking fees.
- Countertop Modifications: A sink that’s too large for the opening will require cutting your countertop, a job best left to professionals and an added expense.
- Plumbing Issues: Incorrect depth measurements can lead to problems with your P-trap or drain lines.
- Cabinet Interference: A sink that’s too wide or deep can clash with your existing cabinet base, preventing proper installation.
- Aesthetic Discrepancies: A poorly fitting sink can look awkward and detract from your kitchen’s overall appearance.
Essential Tools for Measuring
Before you begin, gather these simple tools:
- Measuring Tape: A standard retractable measuring tape is essential. For longer runs, a metal tape is more accurate.
- Pen and Paper or Digital Device: To record your measurements clearly.
- Someone to Help: An extra pair of hands can be invaluable for holding the tape measure steady or confirming measurements.
Measuring for a Drop-In Sink
Drop-in sinks, also known as top-mount or self-rimming sinks, are the most common type. They are designed to rest on top of the countertop, with a rim that covers the cutout edge.
Step 1: Measuring the Existing Countertop Cutout
This is the most critical measurement for a drop-in sink. You need to know the precise size of the hole in your countertop where the sink will sit.
How to measure:
- Locate the edges of the existing sink: If your current sink is still installed, carefully identify where the countertop ends and the sink rim begins.
- Measure the length: Place the end of your measuring tape at one edge of the sink opening and extend it to the opposite edge. Record this measurement.
- Measure the width: Do the same across the sink opening, from one side edge to the other. Record this measurement.
- Measure from the back edge of the countertop to the front edge of the cutout: This helps determine how far the sink will extend into your counter space.
- Measure from the side edge of the countertop to the side edge of the cutout: This confirms the sink’s position relative to your countertop edges.
Important Considerations:
- Measure multiple points: For accuracy, take the length and width measurements at both the front and back edges of the cutout. This helps account for any slight variations or irregularities in the countertop.
- Don’t confuse sink dimensions with cutout size: The overall sink dimensions will be larger than the cutout size to allow for the rim. You are measuring the hole the sink needs to fit into.
- If replacing a sink: The existing cutout is your primary guide. However, it’s always wise to measure the actual sink you plan to buy and compare its rim dimensions to your cutout to ensure adequate overlap.
Step 2: Fathoming Cabinet Base Width
While the countertop cutout is key, you also need to ensure the sink will fit within your cabinet base.
How to measure:
- Locate your existing sink’s cabinet base: Open the cabinet directly below your sink.
- Measure the inside width of the cabinet: Place your measuring tape from the left cabinet wall to the right cabinet wall. This is your cabinet base width.
- Measure the inside depth of the cabinet: Measure from the back of the cabinet to the front face of the cabinet doors or drawers.
- Measure the internal height: Measure from the bottom of the cabinet to the underside of the countertop.
Why it matters for drop-in sinks:
- Most manufacturers recommend a minimum cabinet base width for each sink size. This ensures the sink’s mounting clips have enough space to be secured properly.
- The overall width and depth of the sink, including its rim, must be less than your countertop cutout dimensions.
Step 3: Considering Sink Depth Measurement
The sink depth measurement is crucial for both aesthetics and practicality.
How to measure:
- Measure the depth of your existing sink: If the sink is still in place, measure from the bottom of the sink basin to the top edge of the sink rim.
- Consider clearance below the sink: Look inside your cabinet. Is there plumbing, a garbage disposal, or drawer components that might interfere with a deeper sink? You need enough space for the sink basin and the drain assembly.
Typical sink depths:
- Shallow sinks (6-8 inches): Good for smaller kitchens or those who don’t do a lot of heavy pot washing.
- Standard sinks (8-9 inches): The most common depth, offering good capacity.
- Deep sinks (9-10+ inches): Ideal for washing large pots, pans, and baking sheets. Be sure to check clearance!
Measuring for an Undermount Sink
Undermount sink installation offers a seamless look, where the sink is installed below the countertop. This requires a different approach to measurement.
Step 1: Measuring the Countertop Edge Clearance
For undermount sinks, you’re measuring how much countertop edge you have available around the sink opening.
How to measure:
- Measure the distance from the front edge of the countertop to the intended front edge of the sink: This is usually dictated by the sink’s design and how far back you want it placed.
- Measure the distance from the back edge of the countertop to the intended back edge of the sink: Consider backsplash clearance and any wall cabinets.
- Measure the distance from the side edges of the countertop to the intended side edges of the sink: Ensure there’s enough support and edge for the sink to be securely mounted.
Key points for undermount sinks:
- Countertop material is vital: Stone countertops (granite, quartz, marble) are ideal for undermount sinks because they are durable and can be precisely cut. Laminate countertops are generally not suitable for undermount sinks.
- Sink overhang/reveal: Decide if you want the sink to be perfectly flush with the countertop, or if you prefer a slight “reveal” where a sliver of the countertop edge is visible around the sink opening. This is a matter of preference and depends on the installation method.
- Support brackets: Undermount sinks rely on support brackets or clips installed to the underside of the countertop. Ensure the sink’s dimensions are compatible with these mounting systems.
Step 2: Calculating the Countertop Cutout Size for Undermount
Unlike drop-in sinks where you measure an existing hole, for undermount sinks, you’ll be creating a new cutout. The cutout size is determined by the sink’s overall dimensions minus a specific allowance for the mounting clips and edge.
How to calculate:
- Get the sink’s overall dimensions: This includes the length and width of the sink itself.
- Subtract the setback: This is the distance from the sink’s outer edge to where the countertop will be cut. This setback varies depending on the sink manufacturer’s recommendations and the countertop material. Typically, it’s between 1/4 inch and 3/4 inch on each side.
- Consider sink radius: The corners of the sink might be rounded. Ensure your cutout accommodates these curves.
Example Calculation (hypothetical):
- Sink Length: 30 inches
- Sink Width: 18 inches
-
Recommended Setback: 1/2 inch on all sides
-
Cutout Length: 30 inches – (0.5 inch front setback + 0.5 inch back setback) = 29 inches
- Cutout Width: 18 inches – (0.5 inch left setback + 0.5 inch right setback) = 17 inches
Always consult the sink manufacturer’s template or specifications for the exact cutout dimensions. This is crucial for a precise fit.
Step 3: Checking Cabinet Base Width and Sink Depth Measurement
The considerations for cabinet base width and sink depth measurement are similar to drop-in sinks, but with a few nuances.
- Cabinet Base Width: The sink’s overall width, including its bowl and any adjoining features, must fit within your cabinet. Manufacturers typically specify a minimum cabinet base width required for each sink size. For undermounts, ensure the sink itself, not just the cutout, doesn’t encroach on cabinet supports or dividers.
- Sink Depth Measurement: As before, check for any obstructions in the cabinet below. Undermount sinks can sometimes be deeper than comparable drop-in models, so clearance is even more critical. The depth will also affect how your faucet and drain pipes connect.
Measuring for Faucet Holes
Your sink will likely have pre-drilled holes for your faucet, soap dispenser, or sprayer.
Step 1: Identifying Faucet Hole Spacing
Faucet hole spacing refers to the distance between the centers of adjacent holes. Standard configurations are:
- Single Hole: For faucets with integrated bases or wall-mounted faucets.
- 3-Hole (4-inch centers): Common for faucets with separate hot and cold water handles.
- 3-Hole (8-inch centers): Used for widespread faucets with handles further apart.
- 4-Hole or 5-Hole: May include a sprayer, soap dispenser, or filtered water faucet.
How to measure existing holes:
- Measure the distance from the center of the left hole to the center of the right hole. This is the most important measurement for faucet compatibility.
- If there are more than two holes, measure the spacing between all adjacent holes.
Why it matters:
- You need to ensure your chosen faucet will fit the pre-drilled holes on your sink.
- If you’re replacing a faucet, you need to match the faucet hole spacing to avoid drilling new holes in your countertop or sink.
- Some sinks are advertised as “undrilled” or “drilled to order,” giving you flexibility.
Sink Material Considerations
While not a measurement in the traditional sense, sink material considerations can influence your measurement choices, especially regarding thickness and edge profiles.
- Stainless Steel: Durable, affordable, and comes in various gauges (thickness). Thicker steel (18 gauge or lower) is generally more resistant to denting.
- Cast Iron (Enameled): Heavy, classic look. The enamel coating can chip if not cared for properly.
- Granite Composite: Durable, scratch-resistant, and available in many colors. Can be heavier than stainless steel.
- Fireclay: Similar to cast iron in appearance, but lighter and more resistant to chipping.
- Copper: A beautiful, artisanal material that develops a patina over time. Can be more expensive and require specific cleaning.
- Solid Surface: Seamless look, non-porous, but can scratch and be sensitive to heat.
The thickness of the sink material can affect how much clearance you have below the sink or how the rim sits on the countertop.
Sink Edge Profile (for Drop-In Sinks)
The sink edge profile is the design of the rim of a drop-in sink. This impacts how it sits on the countertop.
- Standard Rim: A flat, slightly raised edge that sits on the countertop.
- Offset Rim: Often has a slightly angled or decorative edge.
- Apron Front (Farmhouse): These sinks have a distinctive exposed front panel that extends down from the countertop. Measuring for an apron-front sink involves knowing the width of the cabinet opening and the depth of the apron that will be visible.
Plumbing Rough-In Measurements
While you’re measuring for the sink itself, don’t forget about the plumbing.
- Drain Location: Note the position of your existing drain pipe. Ensure the new sink’s drain will align or that you have enough flexibility for adjustments.
- Water Supply Lines: Make sure your existing or new water supply lines will reach the faucet.
- Garbage Disposal Knockout: If you plan to install a garbage disposal, check the sink’s compatibility and any necessary knockout plugs.
The plumbing rough-in measurements are more about the existing infrastructure than the sink itself, but they are vital for ensuring a functional installation.
Summarizing Your Measurements
Once you have all your measurements, it’s helpful to organize them:
| Measurement Type | For Drop-In Sink | For Undermount Sink | Notes |
|---|---|---|---|
| Countertop Cutout Size | Measure existing hole | Calculate based on sink | Critical for proper fit. |
| Sink Overall Length | N/A (measure cutout) | Measure sink base | Sink dimensions are crucial for planning the cutout. |
| Sink Overall Width | N/A (measure cutout) | Measure sink base | Sink dimensions are crucial for planning the cutout. |
| Sink Depth Measurement | Measure existing sink | Measure sink basin | Check for cabinet clearance and plumbing. |
| Cabinet Base Width | Measure inside cabinet | Measure inside cabinet | Ensure sink will fit within cabinet structure and for mounting clips. |
| Faucet Hole Spacing | Measure sink holes | Measure sink holes | Ensures faucet compatibility. |
| Countertop Edge Clearance | N/A | Measure available space | Crucial for undermount sink mounting and stability. |
| Plumbing Rough-in | Note existing position | Note existing position | Ensures drain and supply lines will connect. |
Frequently Asked Questions (FAQ)
Q: What if my countertop cutout is not a perfect rectangle?
A: If your cutout is irregular, measure the widest and longest points. Then, sketch the shape and note all dimensions carefully. Take photos to show your plumber or installer. For undermount sinks, you’ll be cutting a new, precise opening based on the sink template.
Q: Can I install a larger sink if I have a larger cutout?
A: For drop-in sinks, yes, as long as the larger sink’s rim will fully cover the existing cutout. For undermount sinks, you have more flexibility as you are creating a new cutout, but you must ensure there’s enough countertop material remaining for structural integrity and support.
Q: How do I measure for a sink if I’m renovating and there’s no existing sink?
A: In this case, you’ll start with your cabinet base. Determine the largest sink that will comfortably fit within the cabinet base width while leaving adequate space for the countertop edge (especially important for undermount sinks). Then, you’ll plan your countertop cutout size based on the chosen sink’s specifications.
Q: What is the most common sink depth?
A: The most common sink depth measurement is between 8 and 9 inches. This offers a good balance of capacity for washing dishes and avoiding excessive bending.
Q: Do I need special measurements for a farmhouse (apron-front) sink?
A: Yes. For farmhouse sinks, you’ll measure the width of your cabinet opening, as these sinks often require custom cabinetry or modifications. You’ll also measure the depth from the countertop edge to the bottom of the visible apron. The sink’s overall depth is also important for plumbing clearance.
Q: What is the sink edge profile?
A: The sink edge profile refers to the style and shape of the rim on a drop-in sink. It’s how the sink sits on top of the countertop, and different profiles offer different aesthetics and installation considerations.
By carefully following these steps, you can confidently measure for your new kitchen sink, ensuring a smooth installation and a beautiful, functional addition to your home. Happy measuring!