
Measuring for new kitchen countertops might seem like a simple task, but getting it wrong can lead to costly mistakes and delays. How do you measure for kitchen countertops accurately? You measure by being meticulous, taking multiple readings, accounting for every inch, and double-checking everything before ordering. This comprehensive guide will walk you through the entire process, turning you into a pro at countertop measurement. We’ll cover everything from basic kitchen counter dimensions to the finer points of kitchen counter overhang and even measuring for a kitchen island.
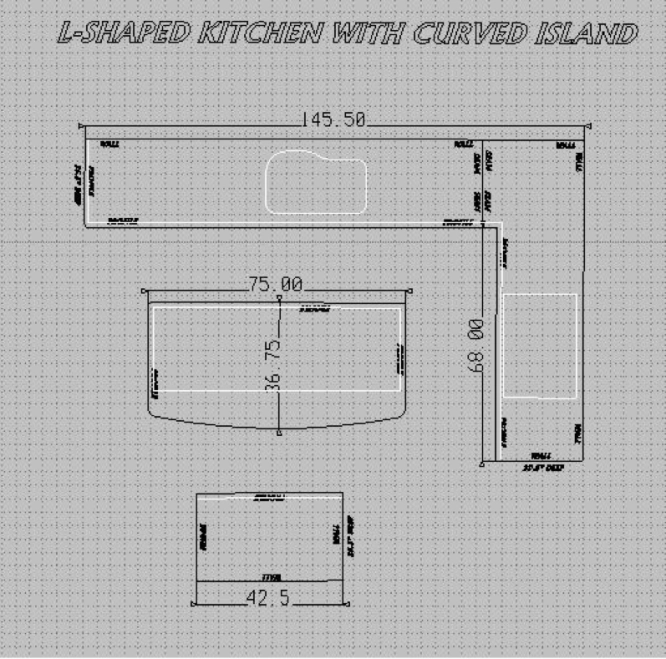
Image Source: www.archcitygranite.com
Why Precise Measurements Matter
Before diving into the “how,” let’s understand the “why.” Accurate measurements are the bedrock of a successful countertop installation.
- Cost Savings: Incorrect measurements can result in ordering too much material, leading to wasted money. Conversely, ordering too little can cause delays and necessitate additional, often expensive, rush orders.
- Seamless Fit: Countertops are designed to fit snugly against cabinets and walls. Even small discrepancies can lead to gaps, uneven edges, or issues with appliance installation.
- Aesthetic Appeal: Well-measured and installed countertops contribute significantly to the overall look and feel of your kitchen. Gaps or misalignments detract from the beauty.
- Efficient Installation: Professional installers rely on precise measurements to fabricate the countertops correctly. Providing them with accurate information streamlines the installation process.
Gathering Your Tools: What You’ll Need
To measure like a pro, you need the right tools. Thankfully, they are readily available and not overly expensive.
- Tape Measure: A good quality, sturdy tape measure is essential. Look for one with clear markings, a locking mechanism, and a decent extension length (at least 25 feet is recommended).
- Notepad and Pen/Pencil: Keep a dedicated notepad for your measurements. Use a pen or pencil that writes clearly.
- Graph Paper (Optional but Recommended): Graph paper is excellent for sketching your kitchen layout and marking measurements. It helps visualize the space.
- Calculator: For tallying up square footage and doing quick calculations.
- Someone to Help (Recommended): While you can measure solo, having a second person to hold the tape measure steady, especially for longer runs, makes the process much easier and more accurate.
- Safety Glasses: Always a good idea when working around cabinetry.
Step 1: Sketching Your Kitchen Layout
Before you pick up a tape measure, grab your notepad or graph paper. Create a simple, to-scale drawing of your kitchen.
- Basic Outline: Draw the general shape of your kitchen, including all walls, doorways, and windows.
- Cabinet Placement: Draw the locations of all your base cabinets and any upper cabinets that might influence countertop placement (though we’re primarily focused on base cabinets here).
- Appliance Locations: Mark the positions of your sink, cooktop, dishwasher, refrigerator, and any other built-in appliances.
- Island or Peninsula: If you have a kitchen island or peninsula, draw its shape and dimensions as accurately as possible.
This sketch will serve as your central reference point for all measurements.
Step 2: Measuring Cabinet Base Sections – The Foundation
The most crucial part of measuring for countertops is accurately capturing the cabinet base measurement. This dictates the actual size of the countertop needed.
Measuring the Length of Cabinet Runs
For each continuous run of base cabinets, you need to measure the total length.
- Start Point: Begin at one end of the cabinet run – usually a wall or a corner.
- Measure to End Point: Extend your tape measure to the other end of the cabinet run. This could be another wall, a corner, or the edge of an appliance (like a dishwasher or refrigerator that butts up against the cabinets).
- Multiple Readings: Take three measurements for each run:
- Top of Cabinets: Measure across the very top of the cabinets.
- Front of Doors/Drawer Faces: Measure across the front of the cabinet doors or drawer faces.
- Along the Wall (if applicable): If the cabinets are against a wall, measure the wall space they occupy. This helps identify any wall imperfections.
- Record All Measurements: Write down all three measurements for each cabinet run. The fabricator will likely use the measurement along the wall or the top of the cabinets, but having multiple readings helps identify any variations in cabinet installation.
Example:
For a run of cabinets against the wall:
* Wall measurement: 96 inches
* Top of cabinet measurement: 95.75 inches
* Front of doors measurement: 95.5 inches
In this case, you’d note all three, but the 95.75 inches is often the most relevant for the countertop edge.
Measuring the Depth of Cabinet Runs
The kitchen counter depth is typically standard, but you still need to confirm it, especially if you have custom cabinets or are using a non-standard layout.
- Standard Depth: The standard kitchen counter depth is usually 25 inches from the front of the cabinet to the back. This allows for a typical kitchen counter overhang of 1 to 1.5 inches at the front and a few inches at the back to accommodate the backsplash and wall.
- Measurement Point: Measure from the front edge of your cabinet doors/drawer fronts straight back to the wall.
- Multiple Readings: Take measurements at both ends of the cabinet run and at least one point in the middle.
- Account for Appliances: If an appliance like a dishwasher or refrigerator is integrated with the cabinets, measure to the front of that appliance.
Example:
* Cabinet depth at left end: 25 inches
* Cabinet depth in the middle: 25.25 inches
* Cabinet depth at right end: 25 inches
This indicates a slight variation, and the fabricator will likely fabricate the countertop to the average or largest depth, allowing for the standard overhang.
Measuring for Corner Sections
Corners can be tricky. You need to measure the length of each cabinet run that meets at the corner.
- Measure Each Run Separately: Measure the length of each cabinet run leading into the corner as described above.
- Note the Corner Type: Is it an internal corner (where two cabinet runs meet at 90 degrees) or an external corner (where a countertop might wrap around)?
Step 3: Accounting for Sinks, Cooktops, and Other Cutouts
Any appliance or fixture that requires a cutout in your countertop needs precise measurements.
Sink Measurement
This is one of the most critical measurements.
- Sink Type: Identify whether you have an undermount, drop-in (top-mount), or farmhouse sink. The measurement method differs slightly.
- Undermount Sinks:
- Measure Sink Dimensions: Measure the exact length and width of the sink bowl itself.
- Measure Lip/Flange: Measure the width of the lip or flange that sits on top of the cabinet or against the underside of the countertop.
- Cutout Template: The best approach is to use the manufacturer’s provided cutout template. If you don’t have it, measure the sink carefully and add a small tolerance (e.g., 1/8 inch) for clearance. The cutout is usually made slightly larger than the sink bowl.
- Drop-In (Top-Mount) Sinks:
- Measure Sink Dimensions: Measure the overall length and width of the sink.
- Measure Lip/Flange: Measure the width of the lip or flange that rests on top of the countertop.
- Cutout Measurement: Measure the exact opening size required for the sink lip to fit through. This is typically slightly smaller than the overall sink dimensions.
- Farmhouse Sinks: These often have a specific way they integrate with cabinetry. Measure the front apron width and the overall dimensions. It’s crucial to get the exact dimensions from the sink manufacturer.
- Location of Cutout: Measure the distance from the front edge of the countertop to the front edge of the sink cutout, and from the side edge of the countertop to the side edge of the sink cutout. This is vital for placement.
Cooktop Measurement
- Measure Cooktop Dimensions: Get the exact length and width of the cooktop unit.
- Measure Cutout Dimensions: Most cooktops come with a specified cutout size. Consult the manufacturer’s manual for the precise cutout dimensions.
- Location of Cutout: Measure the distance from the front edge of the countertop to the front edge of the cooktop cutout, and from the side edge of the countertop to the side edge of the cooktop cutout.
- Clearance: Ensure you leave adequate clearance around the cooktop cutout as specified by the manufacturer, especially for heat-resistant materials.
Other Cutouts (Disposals, Faucets, etc.)
- Faucets: Measure the distance between faucet holes and their diameter, if drilling is required in the countertop.
- Disposal Air Switches: Measure the diameter of the hole needed.
Always provide these measurements clearly on your diagram.
Step 4: Defining the Kitchen Counter Overhang
The kitchen counter overhang adds functionality and aesthetic appeal. It’s the portion of the countertop that extends beyond the front edge of the cabinets.
- Standard Overhang: A typical kitchen counter overhang for seating areas (like an island or peninsula) is 10-15 inches. For a standard countertop without seating, 1 to 1.5 inches is common at the front.
- Back Overhang: At the back, the overhang is usually 1 to 2 inches, allowing for the backsplash and wall.
- Side Overhang: At the ends of cabinet runs, you might have a slight overhang (e.g., 1 inch) for a more finished look.
- Measurement: When measuring your cabinets, you’ve already accounted for the depth. The overhang is what extends beyond that. If your cabinets are 24 inches deep and you want a 1.5-inch overhang at the front, your total countertop depth would be 25.5 inches.
- Specify Clearly: Clearly mark the desired overhang for all relevant edges on your diagram.
Step 5: Measuring for a Kitchen Island
Measuring for a kitchen island follows similar principles but with a few added considerations.
- Island Dimensions: Measure the exact length and width of the island base cabinet or structure.
- Overhang for Seating: If the island will have seating, measure the desired seating overhang. This is typically 10-15 inches, measured from the cabinet face. Ensure there’s enough legroom.
- Shape of Island: Islands can be rectangular, square, L-shaped, or even have curved sections. Measure each linear edge accurately.
- Cutouts: Account for any sink, cooktop, or outlet cutouts on the island.
- Edge Treatment: Consider if the overhang will be on one side, multiple sides, or all around.
Measuring for a Kitchen Island – Example Scenario
Let’s say you have a rectangular island that will have seating on one long side.
- Island Base Length: 72 inches
- Island Base Depth: 36 inches
- Seating Side Overhang: 12 inches (measured from the cabinet face along the 72-inch side). This means the countertop will extend 12 inches beyond the 36-inch cabinet depth.
- Other Sides: Assume 1-inch overhang on the two short ends and the back side.
- Total Countertop Dimensions:
- Length: 72 inches (cabinet) + 1 inch (left overhang) + 1 inch (right overhang) = 74 inches
- Depth (non-seating side): 36 inches (cabinet) + 1 inch (back overhang) = 37 inches
- Depth (seating side): 36 inches (cabinet) + 12 inches (seating overhang) = 48 inches
You would need to specify these different depths for the island.
Step 6: Measuring for a Peninsula
A peninsula is essentially a cabinet run that extends out from a wall or cabinets, typically with seating on one or more sides.
- Measure Each Run: Measure the length of each cabinet run that forms the peninsula.
- Define Overhangs: Clearly specify the overhang for any seating areas.
- Measure Thickness: Note the thickness of any existing cabinet fronts or decorative panels that might affect the overall countertop dimension.
Step 7: Backsplash Height Measurement
While not always included in the countertop measurement, it’s good practice to consider the backsplash height measurement.
- Standard Backsplash: A standard backsplash height measurement is typically 4 inches, extending from the countertop up the wall.
- Full Height Backsplash: Some people opt for a backsplash that goes all the way up to the upper cabinets or even the ceiling.
- Measure Wall Height: Measure the distance from the countertop surface up to where the backsplash will end. This is particularly important for full-height backsplashes.
- Cabinet Clearance: Note any clearances needed for outlets or switches within the backsplash area.
Step 8: Measuring for a Waterfall Edge (If Applicable)
A “waterfall” edge is when the countertop material continues vertically down the side of a cabinet or island, creating a seamless look.
- Measure Vertical Drop: Measure the exact height from the countertop surface down to the floor or the bottom of the cabinet side.
- Measure Thickness: Note the thickness of the countertop material. The waterfall edge will be fabricated to this thickness.
- Specify Sides: Clearly indicate which sides will have the waterfall edge.
Step 9: The Critical Double-Check
This is where you ensure your measurements are perfect.
- Review Your Sketch: Compare your sketch and all recorded measurements against the actual kitchen.
- Recalculate Total Lengths: Add up all the individual cabinet run lengths to get your total linear footage.
- Verify Cutout Placements: Double-check the distance of all cutouts from the edges of the countertop.
- Check Corner Measurements: Ensure corner measurements are accurate for both adjoining runs.
- Measure Diagonal Distances: For squareness and to catch subtle variations, measure diagonally across cabinet runs and the island. The diagonal measurements should be equal.
- Have Someone Else Check: Ask a friend or family member (ideally someone who hasn’t been involved in the initial measurements) to measure everything again. A fresh pair of eyes can catch errors you might have missed.
- Communicate with Fabricator: Many countertop fabricators offer a professional templating service. This is highly recommended. They will come to your home, take exact measurements using specialized tools, and create a template for your countertops. While this costs money, it’s often the most foolproof way to ensure a perfect fit, especially for complex designs or expensive materials.
Understanding Countertop Material Measurement
The countertop material measurement process might involve slight nuances depending on the material.
- Granite, Quartz, Marble (Stone): These are typically sold by the square foot. Fabricators will account for slab size, seams, and waste. When you measure, you provide the overall dimensions.
- Laminate: Usually sold by the linear foot or by pre-cut sheets. You’ll need to calculate the total linear footage of your cabinet runs, adding in any overhang.
- Solid Surface (e.g., Corian): Sold by the square foot. Similar to stone, the fabricator handles slab sizing and waste.
- Butcher Block: Sold by the square foot or by pre-cut pieces. You’ll need to measure for the total linear footage and consider any custom edge treatments.
Important Note on Seams: For long runs or complex layouts, seams are unavoidable with most materials. Your fabricator will discuss seam placement with you. Providing accurate measurements helps them minimize seams and place them in less conspicuous locations.
Common Mistakes to Avoid
- Measuring to the Wall Instead of the Cabinet Edge: Always measure to the actual front edge of your cabinets.
- Not Accounting for Existing Appliances: If a dishwasher or refrigerator is built into the cabinet line, measure to its front edge.
- Ignoring Uneven Walls: Walls are rarely perfectly straight. Measure at multiple points.
- Forgetting About Backsplashes: If you’re installing a backsplash after the countertop, account for the standard 4-inch rise if it affects your measurements.
- Not Measuring for Overhangs: Clearly define and measure your desired overhangs, especially for seating.
- Skipping the Double-Check: This is the most common and costly mistake.
Table: Measurement Checklist
Here’s a quick checklist to ensure you’ve covered all bases:
| Item | Measurement Points | Notes |
|---|---|---|
| Cabinet Runs | Length (3 points), Depth (3 points) | Measure to the front edge of cabinets. |
| Corner Sections | Length of each run leading into the corner | |
| Sink Cutout | Sink dimensions, lip dimensions, cutout dimensions, distance from edges | Use manufacturer template if possible. |
| Cooktop Cutout | Cooktop dimensions, cutout dimensions, distance from edges | Consult manufacturer’s manual. |
| Other Cutouts | Faucet hole diameter/spacing, disposal switch hole diameter | |
| Island/Peninsula | Overall length, width, overhangs (seating, sides, back) | |
| Waterfall Edge | Vertical drop height, thickness | Specify which sides. |
| Backsplash Height | Height from countertop to backsplash termination | For full-height backsplashes. |
| Diagonal Measurements | Across cabinet runs, island corners | Should be equal for squareness. |
| Overall Square Footage | Sum of all countertop areas, including islands and peninsulas | Add a buffer for waste, depending on material. |
Frequently Asked Questions (FAQ)
Q1: Do I need to measure for a backsplash?
A: While the backsplash height measurement isn’t always part of the countertop order, it’s good to know for planning. If you’re ordering a countertop with an integral backsplash or a very tall backsplash, you’ll need precise wall measurements.
Q2: Can I use my cabinet measurements from the manufacturer?
A: Cabinet manufacturer measurements are a good starting point, but it’s always best to measure the actual installed cabinets in your kitchen. Variations can occur during installation.
Q3: What is the standard kitchen counter depth?
A: The standard kitchen counter depth is 25 inches from the front to the back of the cabinet, allowing for a typical overhang and backsplash.
Q4: What is the standard kitchen counter length?
A: There isn’t a single standard kitchen counter length as it depends entirely on your kitchen layout and cabinet configuration. You measure each continuous run.
Q5: How much overhang should I have?
A: For seating areas, 10-15 inches is common. For standard countertops, 1 to 1.5 inches at the front and 1 to 2 inches at the back are typical. Always specify your desired kitchen counter overhang.
Q6: Do I need to account for seams in my measurements?
A: You don’t necessarily “measure for seams” yourself. However, by providing accurate overall dimensions and details about sink/cooktop placements, you enable your fabricator to plan for seams effectively.
Q7: What if my kitchen isn’t square?
A: This is why you take multiple measurements and diagonal measurements. Fabricators are skilled at compensating for out-of-square walls. Be sure to note any significant deviations on your diagram.
By following this detailed, step-by-step guide, you can measure for your new kitchen countertops with confidence and accuracy, ensuring a beautiful and perfectly fitted result. Remember, precision is paramount in this process!