
Designing your kitchen cabinet layout is a crucial step to maximizing your space and ensuring a functional kitchen.
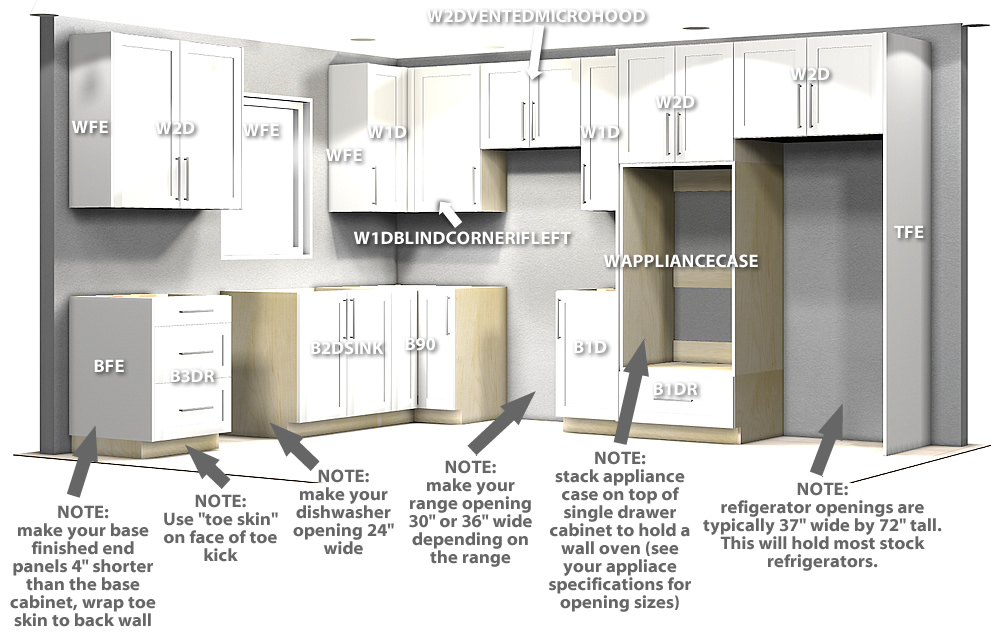
Image Source: www.barkercabinets.com
How To Design Kitchen Cabinet Layout: Maximize Your Space
A well-designed kitchen cabinet layout is the backbone of a truly functional and enjoyable kitchen. It’s not just about aesthetics; it’s about creating a space that works for you, streamlining your daily tasks, and making the most of every inch. This guide will walk you through the essential principles of kitchen layout design, from initial planning to the final kitchen cabinet installation, ensuring you achieve both beauty and practicality.
The Foundation: Kitchen Workflow and Zoning
Before you even think about specific kitchen cabinet arrangement, you need to consider how you use your kitchen. This is where the concept of kitchen workflow comes into play. Think about the journey of your food, from the grocery bag to the plate. A good workflow minimizes unnecessary steps and makes cooking more efficient and less frustrating.
The most common and effective model for kitchen workflow is the kitchen triangle, connecting the sink, the refrigerator, and the stove/cooktop.
- Sink: The primary water source, used for washing produce, dishes, and hands.
- Refrigerator: Where food is stored and retrieved.
- Stove/Cooktop: Where cooking and baking happen.
Ideally, the distance between these three points should be manageable, forming a triangle with no single leg longer than 9 feet, and the total perimeter not exceeding 26 feet. This minimizes walking back and forth.
Beyond the triangle, kitchen zoning is also vital. This involves dividing your kitchen into distinct areas based on activity:
- Prep Zone: This is where you’ll do most of your chopping, mixing, and measuring. It needs ample kitchen counter space and easy access to utensils, cutting boards, and frequently used appliances.
- Cooking Zone: Centered around the stove and oven, this zone requires easy access to pots, pans, cooking utensils, and spices.
- Cleaning Zone: Centered around the sink and dishwasher, this zone needs storage for cleaning supplies, trash cans, and drying racks.
- Storage Zone: This encompasses the refrigerator, pantry, and cabinets for dry goods, small appliances, and dishes.
Effective zoning ensures that related items are stored together and activities flow logically, preventing clutter and confusion.
Planning Your Kitchen Layout: Essential Considerations
When planning your kitchen cabinet arrangement, several key factors need careful consideration. These will form the blueprint for your entire kitchen design.
Assessing Your Space and Needs
The first step is to thoroughly assess your existing kitchen space or the space allocated for your new kitchen.
- Measurements: Accurately measure the length and width of your kitchen, including ceiling height. Note the location of windows, doors, plumbing, and electrical outlets.
- Lifestyle: How do you use your kitchen? Are you a gourmet chef who entertains often, or do you prefer quick meals? Do you have a large family, or is it just you? Your lifestyle dictates the types and amounts of storage you’ll need and the functionality required.
- Existing Appliances: Where are your current appliances located? Will you be replacing them, and will their new locations require significant plumbing or electrical work? Planning for kitchen appliance placement early can save a lot of headaches and money.
Common Kitchen Layouts and Their Benefits
Different kitchen shapes and sizes lend themselves to different layouts. Each has its own advantages for workflow and cabinet placement.
-
Galley Kitchen: Two parallel walls of cabinets and appliances.
- Pros: Very efficient for workflow, excellent for smaller spaces, good kitchen counter space if designed well.
- Cons: Can feel cramped, limited space for multiple cooks or dining.
- Cabinet Design Tip: Maximize vertical space with tall pantry cabinets or open shelving.
-
L-Shaped Kitchen: Cabinets and appliances are arranged along two perpendicular walls.
- Pros: Creates a natural kitchen triangle, opens up the space for a dining area or kitchen island design, good flow.
- Cons: Can have a less defined workflow if the corner is not utilized well.
- Cabinet Design Tip: Consider a corner lazy susan or pull-out shelves for better access in the corner cabinets.
-
U-Shaped Kitchen: Cabinets and appliances line three walls, forming a ‘U’.
- Pros: Offers extensive kitchen counter space and storage, creates a strong, efficient workflow, good for larger kitchens.
- Cons: Can feel enclosed if not designed with enough open space, may require more walking distance between zones.
- Cabinet Design Tip: Ensure adequate clearance between the opposing cabinet runs for comfortable movement.
-
Island Kitchen: Any of the above layouts can incorporate a central island.
- Pros: Adds significant kitchen counter space, extra storage, a focal point, and can serve as a dining area or workspace.
- Cons: Requires sufficient space to avoid feeling cluttered, can disrupt workflow if poorly placed.
- Island Design Tip: Consider the height and depth needed for your kitchen island design based on its intended use (prep, dining, or appliance integration).
-
Peninsula Kitchen: Similar to an island but attached to a wall or cabinet run on one end, forming an ‘L’ shape with the main cabinets.
- Pros: Offers many of the benefits of an island without requiring as much freestanding space, helps define zones.
- Cons: Can obstruct traffic flow if not placed carefully.
- Peninsula Design Tip: Ensure at least 42 inches of clearance around the peninsula for comfortable passage.
Optimizing Cabinet Placement for Functionality
The specific placement of your cabinets is where the rubber meets the road in kitchen cabinet arrangement. Each cabinet type and location should serve a purpose in your kitchen workflow.
Base Cabinets: The Workhorses
Base cabinets are your primary storage for larger items and provide the foundation for your kitchen counter space.
- Drawer vs. Door Cabinets:
- Drawers: Excellent for pots, pans, dishes, and frequently used items as they offer full access without bending over. Prioritize deep drawers for heavy items.
- Door Cabinets: Better for larger appliances, seldom-used items, or bulkier supplies.
- Corner Base Cabinets: These are notorious for wasted space. Consider these solutions:
- Lazy Susans: Revolving shelves that bring items to the front.
- Pull-Out Shelves: Make accessing items at the back easy.
- Blind Corner Pull-Outs: Specialized units that slide out from the back of the cabinet.
- Sink Base Cabinet: Always place your sink in a base cabinet. Ensure it’s large enough to accommodate plumbing and potentially a garbage disposal or trash pull-out.
Wall Cabinets: Reaching for the Sky
Wall cabinets are crucial for storing everyday dishes, glasses, and pantry staples.
- Height and Depth: Standard wall cabinets are 30-42 inches high and 12-15 inches deep. Consider your ceiling height and how easily you can reach items.
- Placement:
- Above the refrigerator for less-used items or seasonal dishes.
- Above the stove for spices and cooking oils (ensure adequate ventilation if placing directly above).
- Over the sink for glasses and mugs.
- Accessibility: If you have a lower ceiling or are shorter, consider shallower or shorter wall cabinets, or opt for open shelving for easier access.
Tall Cabinets: Maximizing Vertical Storage
Tall cabinets, often referred to as pantry cabinets or utility cabinets, are game-changers for kitchen storage solutions.
- Pantry Cabinets: Ideal for storing dry goods, canned items, and baking supplies. Pull-out shelves within these cabinets significantly improve accessibility.
- Appliance Garage Cabinets: These can house small appliances like toasters or blenders, keeping your countertops clutter-free.
- Utility Cabinets: Perfect for cleaning supplies, brooms, or even as a small home for a pet’s food bowls.
- Placement: Often placed at the ends of cabinet runs or in corners to break up visual lines and provide substantial storage.
Strategic Kitchen Appliance Placement
Your kitchen appliance placement directly impacts the kitchen workflow. Think about how each appliance fits into your zones.
-
Refrigerator:
- Kitchen Triangle: Ideally positioned to form a leg of the kitchen triangle.
- Door Swing: Ensure the refrigerator door opens in a direction that doesn’t block main traffic paths or cabinets. Consider counter-depth models to avoid the fridge protruding too far into the room.
- Near Prep Area: Placing it near your primary prep zone makes grabbing ingredients easier.
-
Stove/Cooktop and Oven:
- Central Hub: This is the heart of the cooking zone.
- Ventilation: Proper ventilation (hood or downdraft) is critical.
- Clearance: Ensure sufficient counter space on either side for placing hot dishes and ingredients.
-
Sink and Dishwasher:
- Cleaning Zone: These belong together.
- Dishwasher Placement: Ideally, place it next to the sink on the side where dirty dishes are most likely to be scraped and loaded. Leave a cabinet between the dishwasher and the corner to allow for easier access to the dishwasher door and surrounding cabinets.
-
Microwave:
- Convenience: Can be placed above the range (as part of a hood), in a dedicated wall cabinet, or built into a base cabinet or island.
- Height: Ensure it’s at a comfortable height for access.
-
Other Appliances: Consider placement for ovens, warming drawers, coffee makers, etc., based on how you use them.
Enhancing Your Kitchen with a Kitchen Island Design
A well-executed kitchen island design can transform your kitchen from functional to fantastic.
Island Functions: More Than Just a Surface
- Additional Prep Space: A large, durable countertop is perfect for chopping, rolling dough, or serving food.
- Storage Hub: Islands can house cabinets, drawers, wine racks, or even specialized appliance garages.
- Casual Dining: Incorporate a seating overhang for a breakfast bar or informal dining area.
- Workstation: Can be designed with a secondary sink, built-in microwave, or cooktop.
Island Placement Considerations
- Clearance: Crucial for safe and comfortable movement. Aim for at least 36 inches of clearance on all sides, and ideally 42-48 inches if there are multiple work zones or appliances on the island.
- Traffic Flow: The island should not obstruct primary pathways to the refrigerator, sink, or oven.
- Proportion: The island’s size should be in proportion to the overall kitchen space. A massive island in a small kitchen will feel cramped.
Island Design Elements
- Countertop Material: Choose a material that suits your needs for durability, maintenance, and aesthetics.
- Cabinetry Style: Match or complement your main kitchen cabinets.
- Features: Consider seating, sink, cooktop, electrical outlets, or specialized storage.
Maximizing Kitchen Counter Space
Ample kitchen counter space is a luxury many home cooks dream of. Here’s how to maximize it through your cabinet layout:
- Drawer Units: Replace some door cabinets with banks of drawers. They offer more accessible storage per square foot than shelves.
- Appliance Garages: Hide small appliances to free up valuable counter real estate.
- Corner Solutions: Utilize effective corner cabinet solutions (lazy susans, pull-outs) so no counter space is lost to inaccessible corners.
- Deep Drawers: For pots and pans, deep drawers eliminate the need for cumbersome lower cabinets.
- Built-in Features: Consider built-in cutting boards or trash pull-outs within cabinet structures.
The Role of Lighting in Cabinet Layout
Lighting is not just about aesthetics; it’s about functionality. Good lighting ensures you can see what you’re doing in every zone.
- Task Lighting: Under-cabinet lighting is essential for illuminating countertops during food preparation.
- Ambient Lighting: Overhead lights provide general illumination for the entire kitchen.
- Accent Lighting: In-cabinet lighting or toe-kick lighting can highlight display cabinets or add a decorative touch.
Kitchen Cabinet Installation: The Final Step
Once your layout is meticulously planned and your cabinets are chosen, the kitchen cabinet installation process begins.
- Professional Installation: For the best results, especially with custom or semi-custom cabinetry, professional installation is highly recommended. They have the tools, expertise, and experience to ensure cabinets are level, plumb, and securely fastened.
- DIY Considerations: If you opt for DIY installation, ensure you have the right tools (level, stud finder, shims, drill, screwdriver), understand how to hang cabinets securely into wall studs, and are prepared for precise measurements and adjustments.
- Sequence: Typically, base cabinets are installed first, followed by wall cabinets. Then, countertops are measured and installed, and finally, the appliance installation is completed.
Frequently Asked Questions (FAQ)
Q1: What is the ideal distance between kitchen cabinets?
A: For efficient workflow and comfortable movement, aim for at least 42 inches of clearance between opposing cabinet runs, especially if there are walkways or appliances in between. For a kitchen island, 36-48 inches is generally recommended.
Q2: Can I place a microwave directly above my stove without a hood?
A: While some over-the-range microwaves have built-in ventilation, it’s generally less effective than a dedicated range hood. If your primary concern is powerful ventilation for cooking, a separate hood is a better choice. If you choose an over-the-range microwave, ensure it’s properly installed according to manufacturer guidelines.
Q3: How do I maximize storage in small kitchen cabinets?
A: Utilize drawer inserts, pull-out shelves, tiered organizers, corner lazy susans, and vertical dividers. Store items you use less frequently in higher or deeper cabinets. Consider open shelving for frequently used items to make them more accessible.
Q4: What’s the best way to handle corner cabinets?
A: The most effective methods are using lazy susans or specialized pull-out systems that bring items from the back of the cabinet to the front, making them easily accessible and preventing wasted space.
Q5: How much counter space do I need per person?
A: While there isn’t a strict rule, a good guideline is to aim for at least 24 inches of clear counter space per person who regularly uses the kitchen for prep work. This ensures everyone has enough room to work without feeling cramped.
By carefully planning your kitchen cabinet arrangement with a focus on kitchen workflow, kitchen zoning, and strategic kitchen appliance placement, you can create a highly functional and beautiful kitchen that truly maximizes your space and enhances your cooking experience. Remember that thoughtful kitchen storage solutions, a well-considered kitchen island design, and ample kitchen counter space are all achievable with a solid plan leading up to your kitchen cabinet installation.