
Can you paint laminate kitchen cabinets? Absolutely! Refinishing laminate kitchen cabinets is a fantastic way to give your kitchen a fresh, updated look without the high cost of full replacement. This DIY laminate cabinet painting project can transform tired cabinets into a stunning focal point. With the right preparation and materials, you can achieve a professional-looking finish that breathes new life into your space. This guide will walk you through every step of your laminate cabinet makeover.
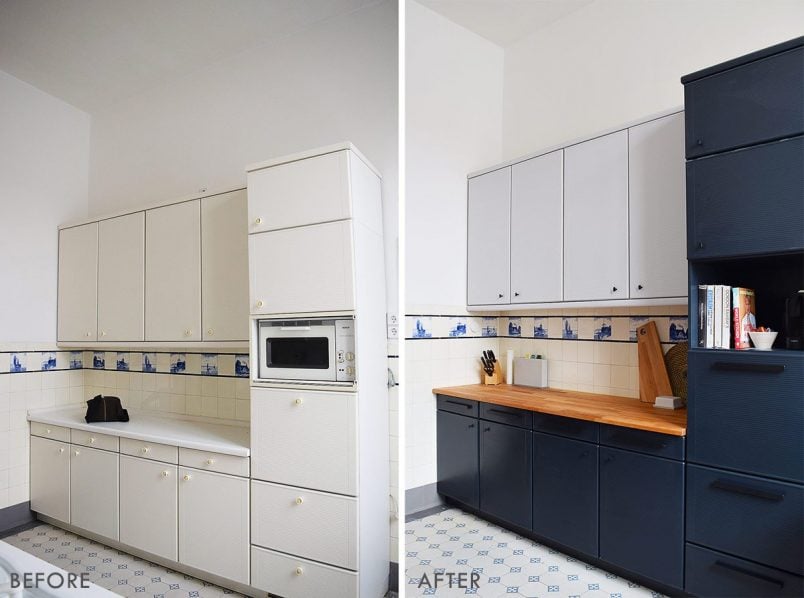
Image Source: www.littlehouseonthecorner.com
Preparing Your Laminate Cabinets for a Flawless Finish
The secret to a long-lasting paint job on laminate is thorough preparation. Skipping any of these steps can lead to peeling or chipping paint down the line. Think of it as building a strong foundation for your beautiful new cabinet color.
Cleaning is King: Removing Grease and Grime
Laminate cabinets, especially in the kitchen, are notorious for accumulating grease and grime. This sticky residue is the enemy of good adhesion. You need to get them sparkling clean before anything else.
Deep Cleaning Methods:
- Sugar Soap Solution: This is a classic for a reason. Mix a few tablespoons of sugar soap (available at hardware stores) with warm water. Use a sponge or cloth to scrub down every surface of the cabinets. Rinse thoroughly with clean water and a fresh sponge, changing the water frequently.
- Degreaser: For particularly stubborn grease, a dedicated degreaser or a solution of hot water and a strong dish soap known for its degreasing power (like Dawn) is excellent. Apply the degreaser, let it sit for a few minutes, then scrub and wipe clean. Again, thorough rinsing is crucial.
- TSP Substitute: Trisodium Phosphate (TSP) is a powerful cleaner, but its use can be restricted in some areas due to environmental concerns. TSP substitutes are readily available and work just as well for cutting through grease and preparing surfaces.
Important: Always wear gloves when working with cleaning solutions. Ensure good ventilation in your kitchen.
Sanding for Success: Creating a Tooth for Adhesion
While laminate has a smooth, non-porous surface, paint needs something to grip onto. Sanding creates a微小 (wēi xiǎo – tiny) “tooth” for the primer and paint to adhere to. This is a critical step for achieving a durable finish.
Sanding Techniques:
- Light Sanding: You aren’t trying to remove the laminate or the original finish. The goal is to lightly scuff the surface.
- Grit Selection: Use fine-grit sandpaper, typically 180 to 220 grit. You can use a sanding block or an orbital sander for larger areas if you’re comfortable with it. For doors and drawer fronts, a sanding sponge or a piece of sandpaper folded over a block works well.
- Even Coverage: Sand every surface you plan to paint, ensuring you cover all edges and corners. The surface should feel slightly rough to the touch, not slick and shiny.
Post-Sanding Cleanup:
After sanding, it’s imperative to remove all dust. Dust is the silent killer of paint adhesion.
- Tack Cloth: A tack cloth is a sticky cloth designed to pick up fine dust particles. Wipe down every surface multiple times.
- Vacuum with Brush Attachment: For larger areas or if you don’t have a tack cloth, use a vacuum cleaner with a soft brush attachment to suck up the dust. Follow up with a damp microfiber cloth.
Choosing the Right Paint and Primer for Laminate Cabinets
The “best paint for laminate cabinets” is often a combination of a high-quality primer and a durable paint. Laminate requires specific products to ensure proper adhesion and a long-lasting finish.
The Power of Primer: The Foundation of Your Laminate Cabinet Transformation
Primer is non-negotiable when painting laminate. It bridges the gap between the slick surface and your topcoat, ensuring the paint adheres properly and prevents any potential bleed-through from the original laminate color or any underlying adhesive.
Top Primer Recommendations:
- Adhesion Promoters/Bonding Primers: These are specifically formulated to stick to tricky surfaces like laminate, melamine, and vinyl. Look for primers labeled as “bonding primers,” “adhesion primers,” or primers for “difficult surfaces.”
- Zinsser B-I-N Primer: A shellac-based primer known for its excellent adhesion to slick surfaces and its ability to block stains. It dries quickly but has strong fumes, so ventilation is key.
- Benjamin Moore Ultra Spec Primer: A water-based primer that offers good adhesion and leveling.
- Sherwin-Williams Extreme Bond Primer: Another strong contender for its ability to adhere to challenging substrates.
- Water-Based vs. Oil-Based: While oil-based primers often offer superior adhesion, high-quality water-based bonding primers are now very effective and easier to clean up.
Primer Application Tips:
- Thin, Even Coats: Apply 1-2 thin, even coats of primer. Avoid applying it too thickly, as this can lead to drips and an uneven surface.
- Drying Time: Allow the primer to dry completely according to the manufacturer’s instructions. This is crucial for proper bonding.
Selecting Your Topcoat: Durability and Aesthetics
Once your primer is dry and you’ve done a light sanding (if recommended by your primer manufacturer), it’s time to choose your paint.
Best Paint Types for Laminate Cabinets:
- Water-Based Alkyd Enamels (Hybrid Enamels): These offer the durability and hardness of oil-based paints with the easier cleanup of water-based paints. They are a popular choice for cabinets.
- Acrylic Enamels: High-quality acrylic enamels are also a good option, providing good durability and flexibility.
- Cabinet Paints: Some brands offer paints specifically formulated for cabinets, which often have a built-in primer or enhanced adhesion properties.
Sheen Matters:
- Satin or Semi-Gloss: These sheens are generally recommended for kitchen cabinets. They are more durable, easier to clean, and resist moisture better than matte or eggshell finishes. Satin offers a soft sheen, while semi-gloss provides a more reflective, higher-durability finish.
Paint Application: Brush, Roller, or Sprayer?
This is a key decision in your laminate cabinet transformation. Each method has pros and cons.
- Spraying: This method yields the smoothest, most professional finish. It’s ideal for achieving a factory-like look. However, it requires specialized equipment (a paint sprayer), practice, and significant prep to protect surrounding areas from overspray.
- Rolling: Using a high-quality foam roller designed for cabinets can give a very smooth finish with minimal brush marks. This is a popular DIY method for a laminate cabinet paint tutorial.
- Brushing: Brushing is necessary for cutting in edges and details. Use high-quality synthetic brushes for the best results.
The Step-by-Step Laminate Cabinet Painting Process
This detailed guide will help you achieve that professional finish for your laminate cabinet makeover.
Step 1: Demolition and Preparation (The Foundation of Your Laminate Cabinet Transformation)
- Remove Doors and Drawers: Take off all cabinet doors and drawer fronts. This allows you to paint them flat, leading to a much smoother finish and easier access to corners.
- Remove Hardware: Unscrew all hinges, knobs, and pulls. Keep them organized, perhaps in labeled baggies, so you know exactly where they go back.
- Protect Your Workspace: Lay down drop cloths or plastic sheeting to protect your floors and countertops from paint drips. Tape off any areas you don’t want to paint, such as walls or appliance fronts, using painter’s tape.
Step 2: Cleaning and Degreasing (The First Layer of Success)
As mentioned earlier, this is crucial.
- Apply Cleaner: Use your chosen degreaser or sugar soap solution.
- Scrub Gently: Use a non-abrasive sponge or cloth.
- Rinse Thoroughly: Wipe down all surfaces with a clean, damp cloth. Repeat rinsing several times to ensure no residue remains.
- Dry Completely: Allow the cabinets to air dry completely. You can speed this up with a fan.
Step 3: Sanding for Adhesion (Creating the Tooth)
- Lightly Sand: Using 180-220 grit sandpaper, scuff the entire surface of the doors, drawer fronts, and cabinet frames.
- Dust Removal: Wipe down all surfaces with a tack cloth or a damp microfiber cloth. Repeat until all dust is gone.
Step 4: Priming for Perfection (The Bonding Layer)
This is where we build that strong foundation for painting laminate cabinets.
- Apply First Coat of Primer: Using your chosen bonding primer, apply a thin, even coat. If spraying, use light, overlapping passes. If rolling, use a high-quality foam roller and avoid overworking the paint. If brushing, use smooth, even strokes.
- Allow to Dry: Let the primer dry thoroughly according to the manufacturer’s instructions.
- Light Sanding (Optional but Recommended): Once dry, lightly scuff the primer coat with 220-320 grit sandpaper or a sanding sponge. This further smooths the surface and helps the topcoat adhere even better.
- Dust Removal: Again, use a tack cloth or damp cloth to remove all sanding dust.
- Second Coat of Primer (If Needed): If your laminate is a dark color or you’re painting a very light color over it, a second coat of primer may be beneficial. Follow the same steps as the first coat.
Step 5: Painting the Topcoat (The Color Transformation)
This is the exciting part of your DIY laminate cabinet painting!
- Apply First Coat of Paint: Apply your chosen topcoat in thin, even coats.
- Spraying: Maintain a consistent distance and speed. Use overlapping passes.
- Rolling: Use your foam roller, applying even pressure.
- Brushing: Use a good quality brush for edges and details. Work in sections.
- Allow to Dry: Let each coat dry completely according to the manufacturer’s recommendations. This is crucial for durability.
- Light Sanding Between Coats (Optional but Recommended): For an ultra-smooth finish, you can lightly sand between coats of paint with 320-400 grit sandpaper or a fine-grit sanding sponge. This removes any tiny imperfections or dust nibs.
- Dust Removal: Always remove dust thoroughly with a tack cloth after sanding between coats.
- Apply Subsequent Coats: Apply 2-3 coats of your topcoat, allowing adequate drying time between each. Most projects will require at least two coats for full coverage and durability.
Step 6: Reassembly and Finishing Touches (The Grand Reveal)
The final stage of your laminate cabinet transformation!
- Allow Paint to Cure: While the paint will be dry to the touch after several hours, it takes several days (sometimes up to 30 days) to fully cure and reach maximum hardness. Be gentle with your newly painted cabinets during this period. Avoid slamming doors or drawers.
- Reattach Hardware: Once the paint is fully cured, reattach your hinges, knobs, and pulls.
- Rehang Doors and Reinsert Drawers: Carefully rehang the cabinet doors and put the drawers back in place.
Troubleshooting Common Issues When Painting Laminate Cabinets
Even with the best preparation, occasional hiccups can occur. Here’s how to address them.
Peeling or Chipping Paint
- Cause: Insufficient cleaning, inadequate sanding, or using the wrong primer.
- Solution: If the peeling is minor, you may be able to carefully scrape away the loose paint, lightly sand the area, and reapply primer and topcoat. For widespread peeling, you might need to remove all paint and start over, ensuring thorough prep this time.
Brush Marks or Roller Marks
- Cause: Using a low-quality brush or roller, applying paint too thickly, or not using proper technique.
- Solution: For minor marks, you can try lightly sanding the dried paint with very fine grit sandpaper (400 grit or higher) and applying another thin coat. In the future, invest in high-quality brushes and foam rollers, and focus on thin, even coats.
Uneven Color or Streaks
- Cause: Inconsistent paint application or not enough coats.
- Solution: Ensure you are applying thin, even coats with consistent coverage. If streaks are visible, a light sanding and another thin coat can often resolve the issue.
Frequently Asked Questions About Painting Laminate Kitchen Cabinets
Q1: Do I really need to sand laminate cabinets before painting?
A: Yes, absolutely. Sanding creates a surface for the primer and paint to adhere to. Without sanding, the paint is likely to peel or chip.
Q2: What is the best paint for laminate cabinets?
A: The best approach is a high-quality bonding primer followed by a durable topcoat like a water-based alkyd enamel or a quality acrylic enamel in a satin or semi-gloss finish.
Q3: How many coats of paint do I need?
A: You’ll typically need 2-3 coats of your topcoat, applied in thin, even layers, for full coverage and a durable finish. Always allow adequate drying time between coats.
Q4: Can I paint over laminate without sanding?
A: While some “no-sand” primers exist, it’s generally not recommended for laminate kitchen cabinets. The risk of poor adhesion and premature failure is much higher. Proper sanding is the most reliable method for a long-lasting finish.
Q5: How long does it take for laminate cabinets to cure?
A: Paint is usually dry to the touch within a few hours, but it can take 7 to 30 days to fully cure and reach its maximum hardness. Be gentle with your newly painted cabinets during this time.
Q6: What if my laminate has a wood grain pattern?
A: The preparation process remains the same. Ensure you sand lightly along the grain to create adhesion. Your chosen primer and paint will cover the grain, but the texture of the grain might still be slightly visible depending on the paint finish.
Q7: Can I use chalk paint on laminate cabinets?
A: While chalk paint can be used on laminate, it requires a specific primer and a very durable topcoat (like polycrylic) to withstand the moisture and wear of a kitchen environment. Many people find hybrid enamels or cabinet-specific paints to be more durable for kitchen use.
Conclusion: Your Path to a Stunning Laminate Cabinet Transformation
Painting laminate kitchen cabinets is a rewarding project that can dramatically update your kitchen. By following these detailed steps, focusing on thorough preparation, and choosing the right materials, you can achieve a professional-looking, durable finish. This laminate cabinet transformation will not only improve the aesthetics of your kitchen but also increase your home’s value and your enjoyment of your cooking space. Happy painting!