
Can I measure for a kitchen faucet myself? Yes, you can measure for a kitchen faucet yourself with a few simple tools and by following these steps. What is the most important measurement for a kitchen faucet? The faucet hole configuration on your sink or countertop is the most critical measurement to ensure a proper fit.
Getting the right kitchen faucet for your sink and countertop is key to a smooth kitchen faucet installation and a beautiful, functional kitchen. A faucet that’s too big, too small, or has the wrong number of holes will cause headaches and may even require you to replace your sink or countertop. This guide will walk you through everything you need to know to measure for your new kitchen faucet accurately.
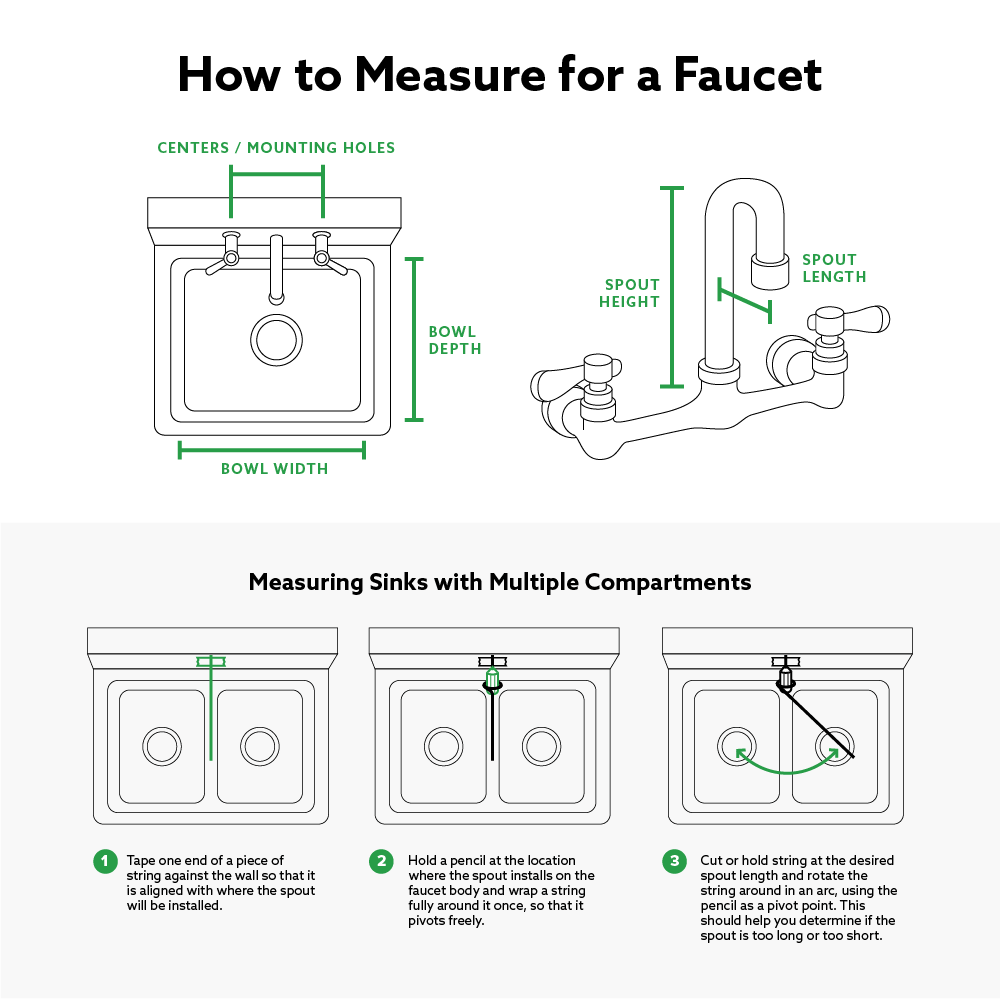
Image Source: lirp.cdn-website.com
Deciphering Your Sink’s Hole Setup
The first and most vital step is to determine how many holes your sink or countertop has and how they are spaced. This will dictate the type of faucet you can install.
Counting the Holes
- Single-hole faucets: These require only one hole. The spout and handle(s) are integrated into a single unit. This is common with modern, minimalist designs.
- Two-hole faucets: Less common, these might have a single-handle faucet with a separate sprayer, or a faucet with a dedicated soap dispenser.
- Three-hole faucets: These are very common and typically accommodate a faucet with two handles (hot and cold) and a separate sprayer, or a single-handle faucet with a separate soap dispenser and/or filtered water dispenser.
- Four-hole faucets: These usually include a faucet, two handles, a soap dispenser, and a side sprayer, or a filtered water faucet.
- Five-hole faucets: These are less standard but might be found in specialized sink setups, perhaps including a pot filler or additional accessories.
Measuring Sink Hole Spacing
This is where accuracy is paramount. You’ll need to measure the distance between the centers of each hole.
For Standard Spacing (8-inch centers):
Many three-hole sinks are designed with a standard 8-inch center-to-center measurement for the faucet holes. This means the distance from the middle of the hot water handle hole to the middle of the cold water handle hole is 8 inches. The spout hole is typically in the middle of these two.
- What to measure: Lay a tape measure across your sink or countertop.
- How to measure: Place the tape measure’s zero mark at the center of one mounting hole and read the measurement to the center of the adjacent hole you plan to use for your faucet.
- Common configurations:
- Single-hole: Measure the diameter of the single hole.
- 3-hole (8-inch spread): Measure from the center of the left hole to the center of the right hole. This should be 8 inches.
- 3-hole (4-inch spread): Measure from the center of the left hole to the center of the right hole. This should be 4 inches.
- Other spreads: If your holes aren’t standard, you’ll need to measure the exact center-to-center distance for all holes you intend to use.
For Single-Hole Faucets
If you have a single hole, you need to measure its diameter.
- What to measure: The diameter of the single mounting hole.
- How to measure: Use a ruler or the tape measure to find the widest point across the center of the hole.
What If My Sink Has More Holes Than I Need?
Most modern faucets come with an optional deck plate (also called a escutcheon). This is a decorative plate that covers unused holes. If your sink has a 3-hole setup and you want to install a single-hole faucet, a deck plate is your solution. Measure the spacing of the holes your deck plate needs to cover.
Gauging Your Countertop’s Thickness
Beyond the holes, the thickness of your countertop material is another crucial measurement. This affects the type of mounting hardware you’ll need and how securely the faucet will attach.
Why Countertop Thickness Matters
- Mounting Hardware: Faucets come with mounting shanks and hardware designed for specific countertop thicknesses. If your countertop is thicker than standard, you might need an extended shank or different mounting hardware to ensure the faucet is securely fastened.
- Stability: A faucet that isn’t properly secured to a thick countertop can feel wobbly.
How to Measure
- What to measure: The thickness of the material from the top surface of your countertop down to the underside where the faucet will be mounted.
- How to measure:
- If you have an existing faucet, you might be able to see the edge of the countertop where it meets the sink or faucet base.
- Use a ruler or tape measure to measure the visible edge.
- If you can’t see the edge easily, carefully measure from the top surface down to the underside of the countertop where the faucet will be installed. For granite or quartz, this might require a bit of careful probing or estimation if you can’t access the underside easily.
- For very thick countertops (e.g., solid stone over a certain thickness), you may need to look for faucets specifically designed for thicker installations or inquire about extended mounting kits.
Fathoming the Reach and Height Requirements
The physical dimensions of the faucet itself are important for both usability and aesthetics.
Faucet Height
- What to measure: The distance from the base of the faucet (where it sits on the sink/countertop) to the highest point of the faucet spout or any integrated sprayers.
- Why it matters:
- Clearance: Ensure the faucet isn’t too tall for any overhead cabinets or shelves. Measure the distance from your sink to the underside of any obstructions above it.
- Ergonomics: A taller faucet can make it easier to wash large pots and pans, while a shorter one might be preferred for aesthetic reasons or in kitchens with low ceilings.
Faucet Spout Reach
- What to measure: The distance from the center of the faucet base to the end of the spout.
- Why it matters:
- Sink Coverage: You want the spout to reach comfortably into your sink basin. Measure from the faucet’s mounting hole to the center of your sink drain. Choose a faucet with a reach that comfortably extends over the drain.
- Two-Basin Sinks: If you have a double-basin sink, ensure the spout’s reach can comfortably access both basins.
Inspecting the Plumbing Connections
Before you buy, it’s essential to know what you’re connecting to. This involves looking at your existing water supply lines and valves.
Water Supply Lines
- What to look for: The diameter and type of threading on your current water supply lines that connect to your old faucet.
- Common sizes: Most modern kitchen faucets use 1/2-inch IPS (Iron Pipe Size) connections. However, older homes might have different plumbing sizes.
- How to check:
- Turn off the water supply using the shut-off valves under the sink.
- Carefully disconnect the existing water supply lines from the faucet.
- Examine the end of the supply line that connected to the faucet. Note the threading size.
- New faucets typically come with new supply lines, but it’s good to know if you’ll need adapters or if your existing lines are compatible.
Shut-Off Valves (Angle Stops)
- What to check: The type and condition of your existing shut-off valves under the sink. These are crucial for future kitchen faucet installation and maintenance.
- Common types:
- Compression fittings: These are common and have a nut that tightens onto a ferrule.
- Quarter-turn ball valves: These are generally more reliable and easier to operate. They have a lever that turns 90 degrees to shut off or open the water.
- If they need replacing: If your shut-off valves are old, corroded, or difficult to turn, it’s highly recommended to replace them before installing a new faucet. This ensures you can easily shut off the water in the future.
Identifying the Valve Type for Your Faucet
The internal mechanism that controls water flow and temperature is the valve type. While you don’t typically measure this, knowing the common types helps you choose a faucet.
Common Valve Types
- Ceramic Disc: This is the most common and durable type. Two ceramic discs rotate against each other to control water flow. They are highly resistant to wear and tear and are less likely to leak.
- Ball Valve: An older design that uses a metal or plastic ball with holes to control water flow. They can be prone to wear over time.
- Cartridge Valve: These use a self-contained cartridge that moves up and down or rotates to control water. They are generally reliable but can be more expensive to replace if they fail.
Considering Faucet Mounting Styles
How a faucet attaches to your sink or countertop is another important consideration.
Types of Faucet Mounting
- Deck Mount: This is the most common type, where the faucet attaches directly to the sink deck or countertop through pre-drilled holes.
- Wall Mount: Less common for standard kitchen faucets, but sometimes seen with pot fillers or specialized designs. These mount directly to the wall above the sink. You’ll need to ensure your wall plumbing is set up correctly for this.
- Undermount Sink Considerations: If you have an undermount sink, the faucet will be mounted through the countertop directly above the sink. This is a common deck mount scenario.
Faucet Height and Handle Operation
These are ergonomic and stylistic considerations that impact daily use.
Faucet Height and Clearance
As mentioned earlier, measuring the vertical space available is crucial.
- Check Overhead Cabinets: Measure from the top of your sink to the bottom of any cabinets or shelves directly above. Ensure your chosen faucet’s height, especially when the handle is lifted, will clear these obstructions.
- Consider Sprayer Height: If your faucet has an integrated or separate side sprayer, consider where it will be stored and if there’s enough clearance for its operation.
Handle Operation
- Side Clearance: Think about how you’ll operate the faucet handles.
- Single-handle faucets: These usually require less clearance. You can operate them with a flick of the wrist.
- Two-handle faucets: You’ll need enough space on either side of the faucet for comfortable handle operation. Measure the space available between the faucet and any backsplashes or wall elements.
- Backsplash Clearance: If you have a backsplash, ensure the faucet handles (especially for two-handle faucets) won’t hit the backsplash when you open them.
Putting It All Together: A Measurement Checklist
To make sure you don’t miss anything, here’s a handy checklist:
- Number of Holes: Count the holes in your sink or countertop.
- Hole Spacing: Measure center-to-center for all holes you plan to use.
- Single Hole Diameter: Measure the diameter if you have a single hole.
- Countertop Thickness: Measure the thickness of your countertop material.
- Reach: Measure from the faucet mounting hole to the center of the sink drain.
- Height Clearance: Measure from the sink to any overhead cabinets or obstructions.
- Handle Clearance: Ensure enough space for handle operation, especially for two-handle faucets.
- Water Supply Line Size: Note the size of your existing supply line connections (usually 1/2-inch IPS).
- Shut-Off Valve Type: Check the type and condition of your under-sink valves.
Common Faucet Measurement Scenarios and Solutions
Let’s look at some typical situations:
Scenario 1: Replacing an Old Faucet in an Existing Sink
- What to do:
- Identify the current setup: Note the number of holes and their spacing in your sink. This is your starting point.
- Measure existing holes: Use a tape measure to confirm the hole spacing (e.g., 8-inch centers).
- Check faucet reach and height: Measure your old faucet’s reach and height to ensure your desired new faucet will fit your sink basin and any overhead obstructions.
- Inspect plumbing: Look at your water supply lines and shut-off valves.
- Solution: Choose a new faucet that matches the hole configuration of your sink. If you want a different configuration (e.g., a single-hole faucet on an 8-inch spread sink), you’ll need a faucet with an appropriate deck plate.
Scenario 2: Installing a New Sink and Faucet Simultaneously
- What to do:
- Choose your sink first: Decide on the sink style and material. The sink will dictate the number and spacing of faucet holes.
- Choose your faucet based on the sink: Select a faucet that matches the hole configuration of your chosen sink.
- Measure countertop clearance: Even though you’re installing a new sink, measure your countertop thickness and any overhead clearances.
- Plan plumbing connections: Ensure your plumbing can accommodate the new faucet’s connections.
- Solution: This offers the most flexibility. You can choose a sink with the exact number of holes required for your desired faucet style.
Scenario 3: Upgrading to a Pull-Down or Pull-Out Faucet
- What to do:
- Check for a single hole: Most modern pull-down and pull-out faucets are designed for single-hole installations, often with an optional deck plate to cover 3-hole setups.
- Measure the hole: If you have a single hole, measure its diameter.
- If you have 3 holes: You’ll likely need a faucet with a deck plate that covers the two outer holes. Measure the 4-inch or 8-inch spread to ensure the deck plate fits correctly.
- Consider sprayer hose length: While not a measurement for purchase, ensure the pull-down/pull-out hose length is sufficient for your sink. This is usually specified by the manufacturer.
- Solution: Select a single-hole faucet and use the included deck plate if your sink has multiple holes.
Important Considerations for a Smooth Kitchen Faucet Installation
- Manufacturer Specifications: Always check the manufacturer’s installation guide for the specific faucet you are interested in. They will provide detailed measurement requirements and compatibility information.
- Tools: Gather your tools before you start. You’ll likely need a tape measure, adjustable wrench, basin wrench (especially for tight spaces under the sink), bucket, and towels.
- Water Shut-Off: Always turn off the main water supply or the individual shut-off valves under the sink before starting any work.
- Professional Help: If you’re unsure about any of these measurements or the plumbing aspects, don’t hesitate to consult a qualified plumber. They can help ensure everything is measured correctly and installed safely.
By taking the time to measure carefully and consider these factors, you’ll be well-equipped to choose the perfect kitchen faucet that fits your sink, countertop, and lifestyle, leading to a successful and satisfying kitchen faucet installation.
Frequently Asked Questions (FAQ)
Q: What if my sink has 4 holes and I only want to use 3 for a faucet with a sprayer?
A: Most faucets designed for 3 holes (with a separate sprayer) can be installed on a 4-hole sink. You’ll simply have an extra hole left uncovered. You can either leave it as is, or if it’s aesthetically bothersome, you might find a decorative plug or cap designed for sink holes.
Q: Can I install a single-hole faucet on a 3-hole sink?
A: Yes, most single-hole faucets come with an optional deck plate (escutcheon) that covers the two outer holes of a 3-hole sink. Ensure the deck plate is designed for your sink’s hole spread (typically 4-inch or 8-inch centers).
Q: How do I measure the reach of a faucet if it has a pull-down or pull-out sprayer?
A: For pull-down or pull-out faucets, the “reach” measurement usually refers to the spout’s fixed reach before the hose extends. Measure this fixed length from the center of the faucet base to the aerator. You also need to consider the hose length provided by the manufacturer, which is usually sufficient for most standard sinks.
Q: What is the standard spacing for kitchen faucet holes?
A: The most common standard spacing for 3-hole kitchen faucets is 8 inches from the center of the left hole to the center of the right hole. However, 4-inch spacing is also common, especially for faucets with handles that are closer together or for certain styles of sinks. Always measure your specific sink.
Q: Do I need to measure the size of my water supply lines?
A: It’s good practice to check. Most modern kitchen faucets use 1/2-inch IPS connections. New faucets usually come with compatible water supply lines. However, if your home has older plumbing, you might need adapters. Knowing the size of your existing lines can prevent compatibility issues.
Q: How important is countertop thickness when measuring for a faucet?
A: Countertop thickness is important for ensuring the faucet’s mounting hardware can securely attach the faucet. Most faucets are designed for standard countertop thicknesses (typically up to 1.5 inches). If you have a very thick countertop (e.g., solid granite or concrete), you may need to purchase an extended mounting kit or select a faucet specifically designed for thicker installations. Always check the faucet’s specifications.