
Can you add crown molding to kitchen cabinets? Yes, you can add crown molding to kitchen cabinets, and it’s a fantastic way to elevate the look of your kitchen and make your cabinets appear taller and more custom. This guide will walk you through the entire process, from choosing the right molding to the final touches.
Adding crown molding to your kitchen cabinets is a rewarding DIY project that can significantly upgrade your kitchen’s aesthetic. It’s a great way to achieve a custom kitchen cabinet molding look without the custom price tag. This comprehensive guide will cover everything you need to know about kitchen cabinet crown molding installation, from selecting the perfect types of kitchen cabinet molding to the precise methods for attaching crown molding to cabinets. Whether you’re a seasoned DIYer or new to home improvement, you’ll find the steps clear and actionable for successfully completing your DIY crown molding kitchen cabinets project.
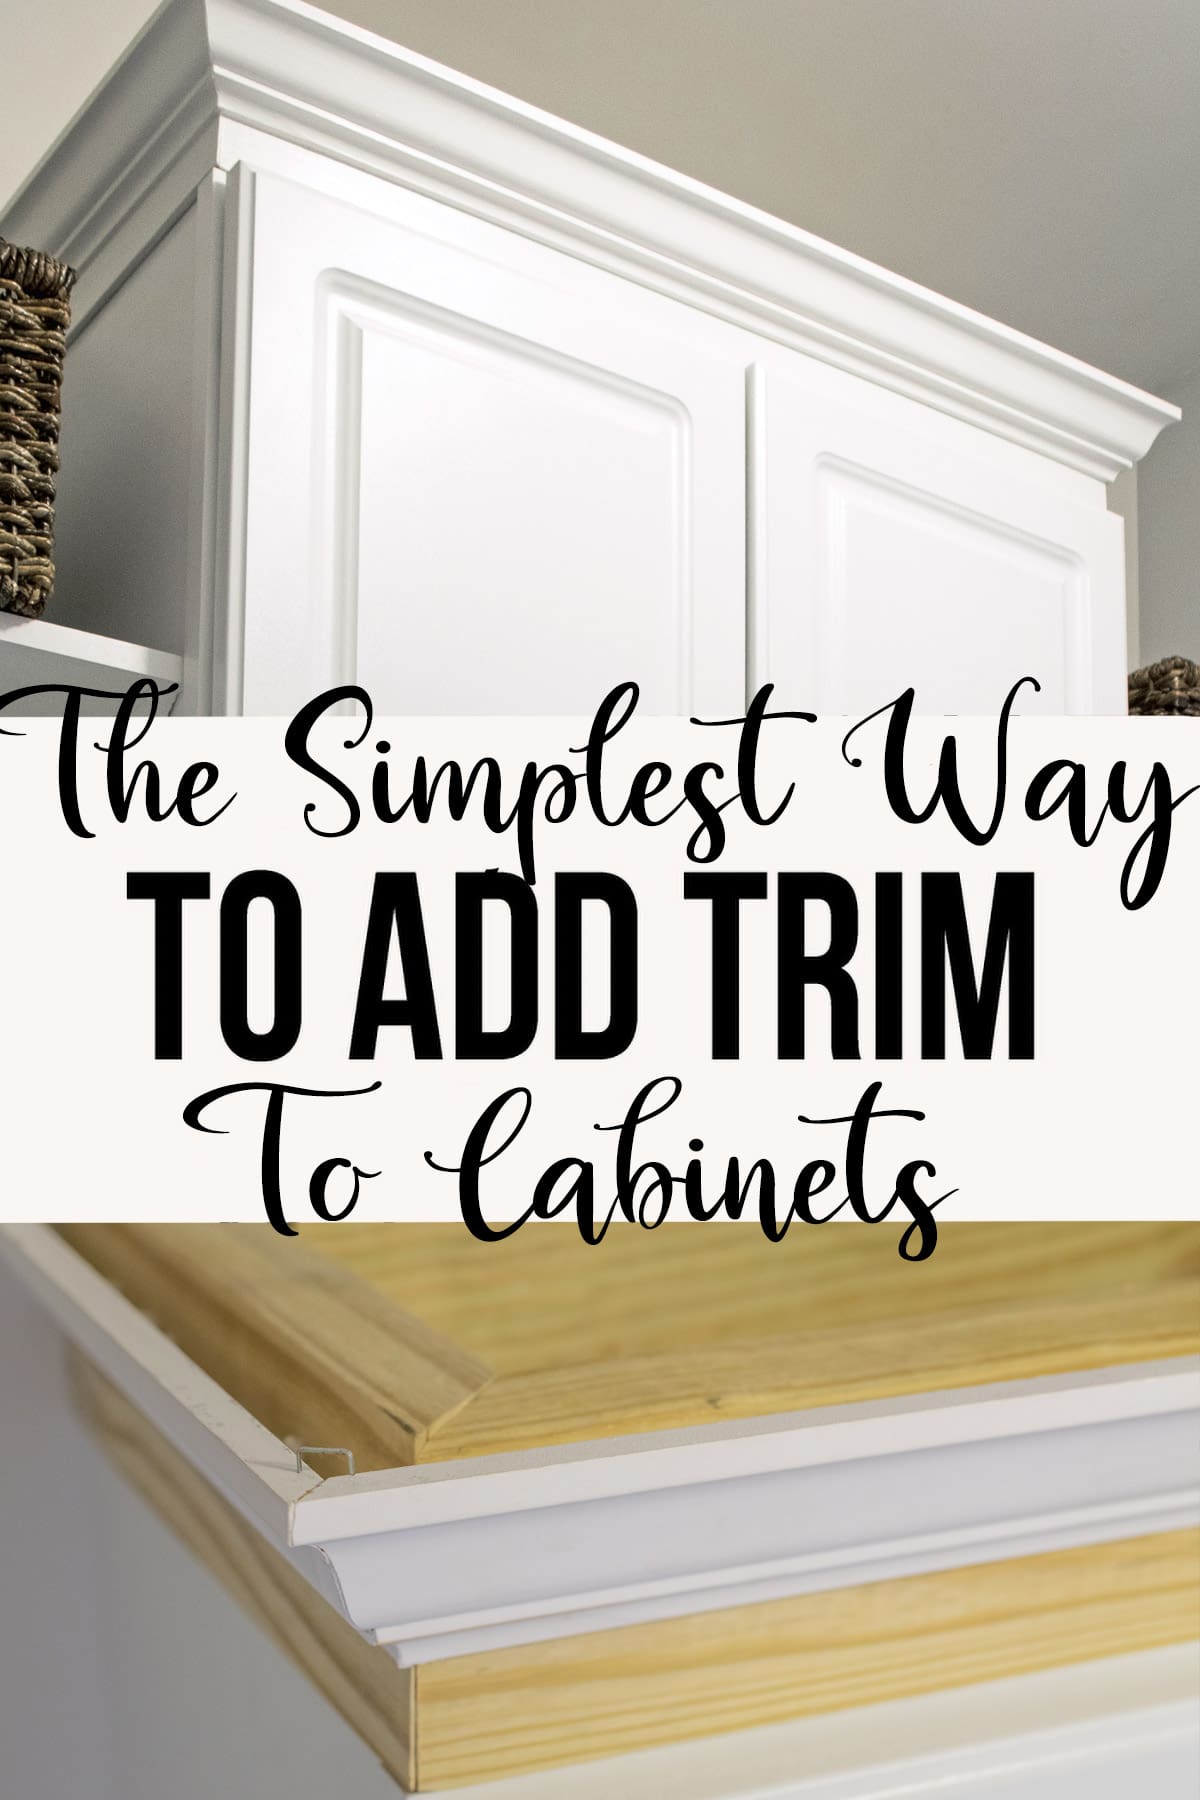
Image Source: www.cravingsomecreativity.com
Preparing for Your Kitchen Cabinet Molding Project
Before you start cutting and fastening, proper preparation is key. This stage ensures a smooth installation process and a professional-looking finished product.
Choosing the Right Crown Molding for Your Kitchen
The style and size of your kitchen cabinet trim options can dramatically impact your kitchen’s overall feel. Here are some popular types of kitchen cabinet molding and considerations:
- Simple Colonial or Ogee: These are classic choices that work well in many kitchen styles, from traditional to transitional. They offer a clean, elegant line.
- Cove Molding: This type has a concave profile, offering a softer, more rounded transition. It’s great for a more understated look.
- Craftsman or Mission Style: These often feature bolder profiles and can include stepped designs. They are excellent for kitchens with a more rustic or Arts and Crafts influence.
- Modern or Contemporary: Look for simpler, sleeker profiles, sometimes with sharp angles or minimal ornamentation.
Factors to Consider When Choosing Molding:
- Cabinet Style: Match the molding to the overall style of your cabinets and kitchen. A very ornate molding might look out of place on minimalist cabinets, and vice-versa.
- Ceiling Height: For higher ceilings, consider a slightly larger or more substantial molding profile. For lower ceilings, a slimmer profile can help prevent the cabinets from feeling too weighed down.
- Cabinet Proportions: Ensure the molding’s width and projection are in scale with your cabinets.
- Material: Most crown molding is made from wood (pine, poplar, oak), MDF, or polyurethane. Wood is versatile for painting or staining. MDF is budget-friendly but needs careful handling to avoid moisture damage. Polyurethane is lightweight, durable, and resistant to moisture and insects, making it a good choice for kitchens.
Gathering Your Tools and Materials
Having everything ready before you begin will save you time and frustration.
Essential Tools:
- Miter Saw: Crucial for making accurate angled cuts. A compound miter saw is ideal for angled and bevel cuts.
- Measuring Tape: For precise measurements.
- Pencil: For marking cuts and locations.
- Safety Glasses: Protect your eyes from sawdust and debris.
- Stud Finder: To locate wall studs for secure fastening.
- Level: To ensure your molding is installed straight.
- Caulking Gun: For applying caulk for a seamless finish.
- Putty Knife: For applying wood filler and putty.
- Sanding Block or Electric Sander: For smoothing edges and surfaces.
- Hammer: For tapping pieces into place or for using finishing nails.
- Pneumatic Brad Nailer or Finish Nailer: Highly recommended for efficiently attaching molding. If you don’t have one, finishing nails and a hammer will work, but it will be more time-consuming.
- Drill/Driver: For pre-drilling holes if needed or for attaching screws.
- Paint Brushes or Rollers: For finishing.
- Ladder or Sturdy Step Stool: For reaching cabinets.
Materials:
- Crown Molding: Calculate the total linear footage needed, plus 10-15% extra for cuts and mistakes.
- Wood Glue: For reinforcing joints.
- Brad Nails or Finish Nails: Appropriate length for your molding thickness.
- Wood Filler or Spackle: For filling nail holes and small gaps.
- Caulk: Paintable caulk to fill any gaps between the molding and the cabinet or ceiling.
- Primer and Paint or Stain and Sealer: To match your cabinets or create a desired contrast.
Measuring and Planning Your Cuts
Accurate measurements are the backbone of a successful cabinet top trim installation.
- Measure Cabinet Runs: Measure the length of each cabinet run where you plan to install molding.
- Account for Corners: If your cabinets have inside or outside corners, you’ll need to make angled cuts (miter cuts).
- Inside Corners: The molding pieces will meet at a 45-degree angle, with the back of one piece touching the face of the other.
- Outside Corners: The molding pieces will also meet at a 45-degree angle, but they will project outwards.
- Consider Projections: If you have cabinet doors or drawer fronts that project beyond the cabinet box, you might need to account for this by creating a “return” on the end of the molding, or by using a specific cabinet door molding techniques to ensure a clean transition.
- Calculate Total Length: Add up all your measurements. Remember to add that extra 10-15% for waste.
Step-by-Step Guide to Installing Crown Molding on Kitchen Cabinets
With your tools and materials ready, it’s time to get started on the kitchen cabinet crown molding installation.
Step 1: Cutting the Crown Molding
This is arguably the most critical step for a professional finish. Precision is paramount.
Making Miter Cuts for Corners
A miter saw is essential here. Most crown molding is installed at a 45-degree angle against the cabinet and ceiling. However, the actual molding itself is typically cut with a compound angle (a bevel cut combined with a miter cut) to fit snugly.
-
Inside Corners:
- Set your miter saw to 45 degrees.
- For the molding piece that will go on the left, the longest point should be on the outside. You’ll cut the molding so the “face” of the molding is on the inside of the corner.
- For the molding piece that will go on the right, the longest point should also be on the outside. The cut will be a mirror image of the first.
- Important Tip: To make cutting easier, you can place the molding upside down on the saw, just as it will be installed against the cabinet and ceiling. Then, set the miter angle to 45 degrees and the bevel angle to 45 degrees. (Consult your saw’s manual for specific settings for crown molding).
-
Outside Corners:
- Set your miter saw to 45 degrees.
- For an outside corner, you want the molding to return to itself. The longest point will be on the outside.
- The cut will be a 45-degree miter. The bevel angle depends on the specific profile of your molding. Again, placing the molding upside down on the saw can help you visualize and set the correct angles.
Cutting for Straight Runs
For straight sections between corners, you’ll make simple square (90-degree) cuts at each end. However, if you’re joining two pieces of molding in a long run, you’ll need to use a mitered splice (usually a 45-degree cut on each piece, joined together). This creates a less visible seam than a butt joint.
Test Fit Your Cuts
Before applying glue or nails, hold your cut pieces up to the cabinets to ensure they fit snugly against the cabinet face and ceiling. Make minor adjustments with a sanding block if needed.
Step 2: Attaching Crown Molding to Cabinets
This is where the attaching crown molding to cabinets magic happens.
Securing to the Cabinet Box
The primary method for attaching crown molding to cabinets is by nailing it securely to the cabinet boxes.
- Position the Molding: Place the first piece of molding against the cabinet, ensuring it’s flush with the front edge of the cabinet box (or how you’ve planned it).
- Nail into the Cabinet Frame: Use your brad nailer or finishing nails to secure the molding. Aim to drive nails through the molding and into the solid wood parts of the cabinet frame (the face frame, top rails, and side panels).
- Nail through the widest part of the molding first.
- If your molding has a complex profile, aim for nails that go into the cabinet’s structural elements.
- Use Appropriate Nail Length: The nails should be long enough to go through the molding and at least 1/2 inch into the cabinet structure.
- Space Nails Appropriately: Drive nails every 12-16 inches along the length of the molding, and at least two nails into the end of each piece where it meets another piece or a corner.
- Nail into the Ceiling: If your molding also meets the ceiling, secure it there as well. Look for ceiling joists with a stud finder if possible, or use longer nails if the ceiling material is thick.
Using Wood Glue for Strength
For added strength, especially at mitered joints and splices, apply a thin bead of wood glue to the cut edges before bringing them together. Wipe away any excess glue immediately with a damp cloth.
Step 3: Working with Interior and Exterior Corners
This is where the mitered cuts come into play.
-
Installation:
- Place the first piece with its mitered end against the corner.
- Gently push it into place.
- Nail it securely into the cabinet structure.
- Take the next piece, align its mitered end with the first piece in the corner, and ensure it sits flush against the cabinet and ceiling.
- Nail the second piece into place.
-
Creating a Tight Fit: If your mitered corners aren’t perfectly tight (a small gap is common), you can sometimes use a small clamp to pull them together while you nail.
Step 4: Finishing Touches and Sealing Gaps
Once the molding is attached, it’s time to make it look like it’s always been there.
- Filling Nail Holes: Use wood filler or spackle to fill all nail holes. Overfill slightly, as the filler may shrink as it dries. Once dry, sand the filler smooth with the molding surface.
- Caulking Gaps: This is crucial for a seamless, professional look.
- Apply a bead of paintable caulk along the top edge where the molding meets the ceiling.
- Apply another bead along the side edge where the molding meets the cabinet side (if applicable).
- Smooth the caulk with a damp finger or a caulk smoothing tool. Wipe away any excess.
- Allow the caulk to dry completely.
Step 5: Sanding and Painting/Staining
The final step to achieve that polished look.
- Sanding: Lightly sand all the filled nail holes and any rough spots on the molding. You can use a fine-grit sandpaper (180-220 grit) for this. Wipe away all dust with a tack cloth.
- Priming: Apply a coat of primer to the molding. This ensures even paint absorption and a smooth finish, especially if you’re painting over stained wood or if your molding is MDF.
- Painting or Staining:
- For Painted Finishes: Apply two or more thin coats of your chosen paint color. Allow each coat to dry thoroughly before applying the next. Sand lightly between coats for an extra-smooth finish.
- For Stained Finishes: Apply your stain according to the manufacturer’s instructions. Once the stain is dry, apply a clear protective topcoat (polyurethane or varnish) to seal and protect it.
Exploring Different Cabinet Crown Molding Ideas and Techniques
Beyond the basic installation, there are ways to enhance your kitchen with creative cabinet crown molding ideas and specific cabinet door molding techniques.
Combining Molding Profiles
For a more elaborate and luxurious look, consider layering two different molding profiles. This is often done with a simpler molding against the cabinet and a more decorative profile on top, creating a stepped effect.
- How it works:
- Install a narrower, simpler molding (like a small cove or astragal) directly against the cabinet box.
- Install a wider, more decorative crown molding above it, so it butts up against the ceiling and the lower molding.
- This requires careful measurement and cutting to ensure the profiles meet cleanly.
Using Shims for Uneven Ceilings or Cabinets
If your ceiling isn’t perfectly flat or your cabinet tops aren’t perfectly level, you might need shims.
- Process:
- After cutting your molding to length, place it in position.
- If there’s a gap between the top of the molding and the ceiling, you can insert thin wood shims at the nailing points.
- Nail through the molding and the shim into the cabinet.
- Once the molding is secure, carefully trim the shim flush with the molding using a utility knife.
- Caulk the gap to hide the shim.
Installing Decorative Molding on Cabinets
Beyond standard crown molding, you can add decorative molding elements to cabinet doors and drawer fronts for added detail. This is a more involved process but can significantly enhance the custom feel.
- Techniques:
- Applied Molding: This involves purchasing decorative molding pieces (like bead molding, rope molding, or carved wood appliques) and adhering them to the flat surfaces of cabinet doors or drawer fronts using adhesive and brad nails.
- Frame and Panel: This is more akin to traditional cabinetry but can be mimicked by adding thin decorative trim around the edges of cabinet doors to create a raised panel effect.
- Molding on Edges: Sometimes, a simple quarter-round or ogee molding can be added to the exposed edges of cabinet boxes or the top edges of doors for a subtle detail.
Creating a “Stacked” Molding Effect
This is a popular technique that gives the impression of multiple moldings stacked together, creating a grander look. It involves installing two or more molding profiles with different depths and projections to create a layered effect. This often requires precise joinery and careful alignment.
Frequently Asked Questions (FAQ)
Here are some common questions about installing crown molding on kitchen cabinets.
Q1: Do I need to remove my cabinet doors before installing crown molding?
While not strictly necessary, removing cabinet doors can make the installation process much easier and allow for more accurate cuts and fastening. It also prevents accidental damage to the doors. If you do remove them, label them carefully so you can reattach them correctly.
Q2: How do I deal with cabinets that don’t reach the ceiling?
If your cabinets are shorter than your ceiling height, you have a few options:
- Standard Crown Molding: Install the crown molding as usual, directly above the cabinets. This will create a gap between the top of the cabinets and the molding.
- Extended Cabinet Box: You can build up the cabinet boxes with a filler panel to extend them to the ceiling before installing the crown molding. This gives a more integrated look.
- Decorative Filler Panel: Install a decorative filler panel between the cabinet and the crown molding for a more custom appearance.
Q3: Can I use a coping saw for corner joints?
A coping saw is typically used for interior trim work where one piece is cut to fit the profile of another, creating a seamless joint. While it’s a great tool for crown molding, it’s generally more challenging for beginners compared to using a miter saw for 45-degree cuts. However, experienced DIYers can achieve excellent results with a coping saw.
Q4: What kind of nails should I use?
For most crown molding, 18-gauge brad nails or 16-gauge finish nails are recommended. Ensure the nails are long enough to penetrate the molding and securely anchor into the cabinet structure (at least 1 inch total penetration into the wood).
Q5: How do I get a seamless look when joining molding pieces in a long run?
When joining two pieces of molding in a straight run, use a 45-degree miter cut on both ends, angled so that the pieces meet at a point. This is called a “scarf joint” or “mitered splice.” When you nail these pieces together, the joint will be less noticeable than a straight butt joint. Wood glue on the mitered edges will also strengthen the joint and help create a flush connection.
Q6: Can I install crown molding on cabinets that are not flush with the wall?
Yes, you can. You will need to adjust your cuts and installation to account for the cabinet’s projection from the wall. This might involve using a longer backer board or adjusting the angle of your molding to sit flush against the wall and cabinet front.
Q7: What if my molding doesn’t sit perfectly flush against the ceiling?
This is common with older homes or less than perfect construction. You can address this by:
- Using Shims: As mentioned earlier, shims can help fill small gaps.
- Caulking: A generous bead of paintable caulk is your best friend here. Smooth it carefully to create a clean line.
- Backer Board: For larger gaps, you might consider installing a thin backer board (like 1/4-inch plywood or lattice) against the ceiling first, then installing the molding against that.
Adding crown molding to your kitchen cabinets is a project that can transform the look and feel of your kitchen. By carefully planning, measuring, and executing each step, you can achieve a professional, custom finish that enhances your home’s value and your enjoyment of your kitchen.