
Sure, here is a blog post about how to paint floor tiles in a kitchen:
Yes, you can paint floor tiles in your kitchen! It’s a fantastic way to give your kitchen a fresh new look without the expense and hassle of replacing the entire floor. This DIY kitchen tile floor makeover can truly transform your space.
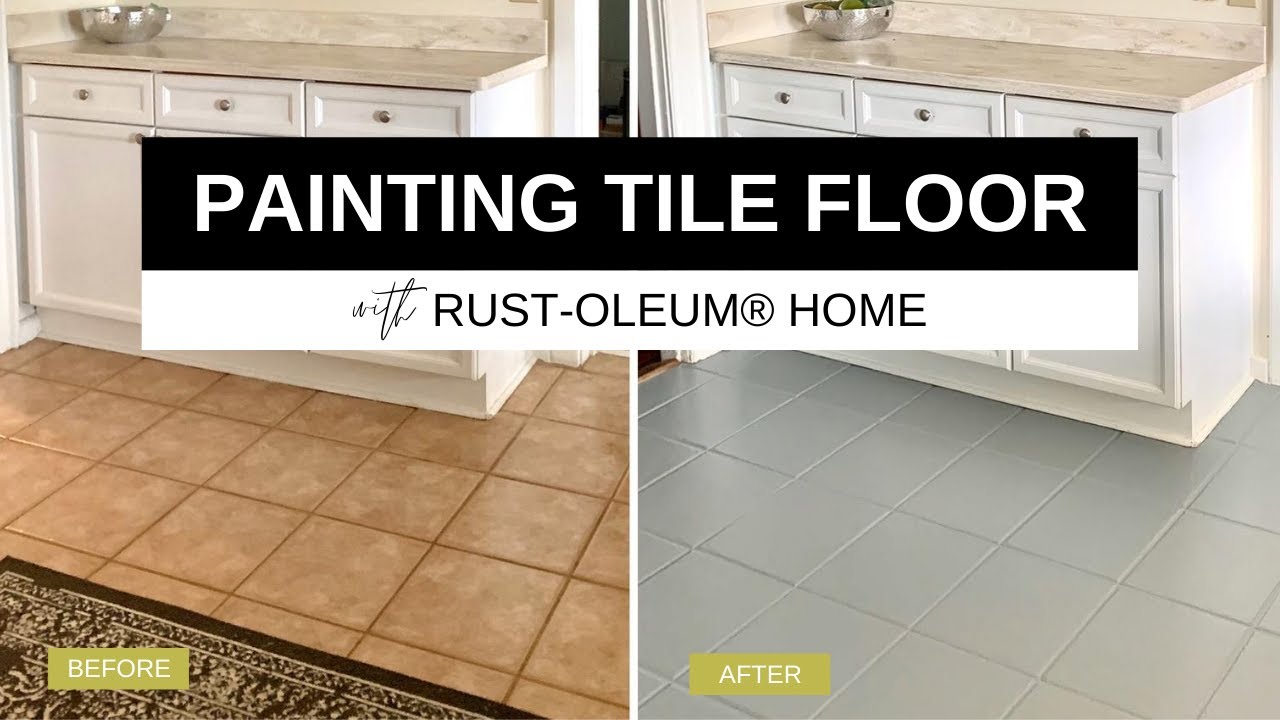
Image Source: i.ytimg.com
Refreshing Your Kitchen Floor with Paint
Are your kitchen floor tiles looking a bit tired, outdated, or just not your style anymore? Before you consider a costly and time-consuming full replacement, explore the magic of tile painting kitchen. It’s an achievable project that can breathe new life into your cooking space. This guide will walk you through everything you need to know about painting ceramic floor tiles and give your kitchen a whole new vibe. We’ll cover how to get the best results, making sure your new look lasts.
Why Choose to Paint Your Kitchen Floor Tiles?
There are many great reasons to choose updating kitchen floor with paint as your renovation strategy:
- Cost-Effective: Compared to ripping out old tiles and installing new ones, painting is significantly cheaper.
- Time-Saving: A tile painting project typically takes much less time than a full floor replacement.
- DIY Friendly: With the right preparation and materials, painting your kitchen floor is a project many homeowners can tackle themselves.
- Customization: You have complete control over the color and finish, allowing you to match your kitchen’s decor perfectly.
- Temporary Solution: If you’re renting or planning a larger renovation down the line, painted tiles offer a stylish temporary fix.
Getting Started: What You Need to Know
Embarking on a kitchen tile floor renovation project by painting requires careful planning and the right approach. It’s not just about slapping on some paint; it’s about creating a durable and beautiful finish.
What is the best paint for kitchen floor tiles?
The best paint for kitchen floor tiles is typically a specialized floor coating or an epoxy-based paint designed for high-traffic areas. These paints are formulated to adhere well to tile surfaces and withstand wear and tear, moisture, and cleaning. Look for products that specifically state they are for floors and can be used on tile.
What kind of paint lasts on tile floors?
For longevity, a durable paint for tiled floors is essential. This usually means using a primer specifically designed for tile, followed by a high-quality, durable enamel or epoxy paint. Topcoats or sealers are also crucial for adding a protective layer.
Preparing Your Floor Tiles for Painting: The Crucial First Steps
Proper preparation is the cornerstone of a successful tile painting kitchen project. Skipping these steps can lead to paint peeling, chipping, or an uneven finish. This is how to prep floor tiles for painting effectively.
Step 1: Clear the Area
- Remove all furniture, rugs, appliances, and anything else that is on the floor. You need a completely clear workspace.
- Take note of where items were placed, especially if you might want to paint around them instead of moving them entirely.
Step 2: Thorough Cleaning
This is arguably the most critical step. Any grease, dirt, soap scum, or adhesive residue will prevent the paint from sticking.
- Deep Clean: Start with a good scrub. Use a stiff-bristled brush and a strong degreaser or a solution of hot water with a few tablespoons of trisodium phosphate (TSP). TSP is a powerful cleaner that cuts through grease and grime effectively. Ensure good ventilation when using TSP and wear gloves and eye protection.
- Rinse Well: After scrubbing, rinse the floor thoroughly with clean water multiple times. You don’t want any cleaning residue left behind.
- Check for Residue: Wipe the floor with a clean, damp cloth. If the cloth picks up any residue or grime, clean again.
- Allow to Dry Completely: The floor must be bone dry before you proceed. This might take 24 hours or more, depending on humidity and ventilation.
Step 3: Repair Any Damage
- Inspect your tiles for any chips, cracks, or loose grout.
- Use a suitable tile repair epoxy for chips and cracks.
- For loose grout, remove it carefully with a grout saw or utility knife and then re-grout the areas. Let the new grout cure completely according to the manufacturer’s instructions before painting.
Step 4: Sanding (Optional but Recommended)
For maximum adhesion, a light sanding can create a better surface for the paint to grip.
- Type of Sandpaper: Use fine-grit sandpaper (180-220 grit).
- Method: You can sand by hand or use a pole sander. The goal isn’t to remove the tile glaze, but to scuff the surface slightly.
- Clean Dust: After sanding, vacuum all the dust thoroughly. Then, wipe the floor down with a damp cloth to remove any remaining dust particles.
Step 5: Deglossing or Etching (For Very Shiny Tiles)
If your tiles have a very glossy finish, a deglosser solution can help the primer adhere better. Follow the product instructions carefully, and ensure good ventilation.
Priming Your Kitchen Floor Tiles
Priming is non-negotiable for a professional and long-lasting finish when painting ceramic floor tiles. It seals the tile surface, improves adhesion, and provides a uniform base for your topcoat.
Choosing the Right Primer
- Bonding Primer: Look for a high-quality bonding primer or a primer specifically formulated for slick surfaces like tile or laminate. These are designed to stick to challenging materials.
- Moisture Resistance: Ensure the primer offers some moisture resistance, as kitchens can be humid environments.
Application Process
- Apply Thin Coats: Apply the primer in thin, even coats using a high-quality roller (a short-nap roller is usually best for smooth surfaces) or a brush for edges and corners.
- Work in Sections: It’s often easier to work in manageable sections.
- Allow Drying Time: Let each coat of primer dry completely according to the manufacturer’s instructions. This is crucial for adhesion.
- Second Coat (If Needed): Some may require a second coat of primer for optimal coverage, especially if you’re painting over very dark tiles with a light color.
Painting the Tiles: Bringing Your Vision to Life
Now for the fun part – applying the color! This is where you start seeing the results of your DIY kitchen tile floor makeover.
Selecting Your Paint
As mentioned, the best paint for kitchen floor tiles is a durable floor coating or epoxy paint.
-
Types of Paint:
- Epoxy Floor Paint: Known for its extreme durability, resistance to chemicals, and often glossy finish. It usually comes in a two-part system that you mix.
- Urethane Floor Paint: Offers good durability and abrasion resistance, often with a slightly more flexible finish than epoxy.
- Porch and Floor Enamel: A more traditional option, but ensure it’s specifically rated for floors and can handle foot traffic and moisture.
-
Consider the Finish: You can choose from matte, satin, or high-gloss finishes. Satin or semi-gloss are often popular for kitchens as they are easier to clean than matte finishes and less prone to showing scuffs than high gloss.
Application Techniques
- Stir Thoroughly: Always stir your paint well before and during use. If using a two-part epoxy, mix it precisely according to the instructions.
- Use the Right Tools:
- Roller: A high-quality, short-nap roller designed for smooth surfaces is ideal for the main tile areas.
- Brush: An angled paintbrush is perfect for cutting in edges and painting grout lines.
- Tray: Use a paint tray for even loading of your roller.
- Apply Thin, Even Coats: Just like with primer, thin, even coats are key. Avoid overloading your roller or brush.
- Paint the Grout Lines: You have a few options for painting grout lines kitchen tiles:
- Paint Grout First: Some people prefer to paint the grout lines with a brush before painting the tiles. This can be tedious but ensures a clean separation of color.
- Paint Grout with Tiles: If you’re using a color similar to the grout, you can often paint over it.
- Use a Grout Pen: For a contrasting grout color, a grout pen can be used after the tile paint has dried. This offers precise control.
- Tape Off Grout Lines: You can meticulously tape off grout lines if you want to keep them their original color, but this is very time-consuming.
- Work in Sections: Continue working in manageable sections to maintain a wet edge, which helps prevent lap marks.
- Allow Drying Time Between Coats: This is crucial. Refer to the paint manufacturer’s instructions for recommended drying times between coats. Rushing this step can ruin your finish.
- Apply Multiple Coats: Most projects will require at least two coats of your chosen paint for good coverage and durability. Some light colors over dark tiles might need three.
Sealing Painted Floor Tiles: The Protective Finish
This step is vital for ensuring the longevity and durability of your painted kitchen floor. Sealing protects the paint from wear, spills, and cleaning.
How to Seal Painted Floor Tiles
- Choose a Sealer: Use a clear, durable floor sealer or a topcoat specifically designed for use over painted surfaces and high-traffic floors. Polyurethane or polycrylic sealers are common choices. Ensure it’s compatible with your paint type (e.g., water-based or oil-based).
- Ensure Paint is Fully Cured: The paint must be fully cured, not just dry to the touch, before applying a sealer. This can take several days to a week, depending on the paint and conditions. Check the paint can for cure times.
- Apply Thin, Even Coats: Apply the sealer with a high-quality roller or brush, just as you did with the paint and primer. Thin, even coats are best.
- Allow Drying Time: Let each coat of sealer dry completely according to the manufacturer’s instructions.
- Apply Multiple Coats: Two to three coats of sealer are usually recommended for maximum protection in a kitchen environment.
- Final Cure Time: After the final coat of sealer, allow the floor to cure for the time recommended by the manufacturer before placing furniture back or walking on it extensively. This can be several days.
Maintaining Your Newly Painted Kitchen Floor
Once your DIY kitchen tile floor makeover is complete, proper maintenance will keep it looking its best for years to come.
- Gentle Cleaning: Use mild soap or a pH-neutral floor cleaner. Avoid harsh chemicals, abrasive cleaners, or abrasive scrubbing pads, as these can damage the paint and sealer.
- Wipe Spills Immediately: Don’t let spills sit on the floor. Wipe them up promptly to prevent staining or damage.
- Use Area Rugs: Consider placing rugs in high-traffic areas or in front of the sink and stove to protect the painted surface from excessive wear.
- Furniture Pads: Put felt pads on the legs of all furniture to prevent scratches.
- Avoid Dragging: Always lift furniture when moving it, never drag it.
What to Expect: Durability and Longevity
When done correctly with the right products and thorough preparation, painted floor tiles can be surprisingly durable. They can last anywhere from 3 to 10 years depending on traffic, how well they are maintained, and the quality of the products used. It’s a significantly longer lifespan than many might expect from a DIY paint job.
Common Pitfalls to Avoid
- Skipping Preparation: This is the number one mistake. Inadequate cleaning or degreasing will lead to paint failure.
- Not Using a Suitable Primer: Using the wrong primer or no primer at all will compromise adhesion.
- Using the Wrong Paint: Standard interior paint is not designed for floor traffic and will wear away quickly.
- Rushing the Drying/Curing Process: Applying new coats before the previous ones are dry or using the floor before it’s fully cured will lead to imperfections and premature wear.
- Using Harsh Cleaning Products: These can strip the sealer and damage the paint finish.
Creative Ideas for Your Tile Painting Project
- Two-Tone: Paint the tiles one color and the grout lines a contrasting color.
- Stenciled Designs: Use stencils to add patterns or motifs to your floor for a unique look.
- Checkerboard Pattern: A classic choice that can be achieved with careful taping.
- Ombre Effect: Blend colors from one end of the kitchen to the other.
- Gloss vs. Matte: Use a gloss paint for the tiles and a matte sealer for a sophisticated contrast.
When Painting Isn’t the Best Option
While painting is a great solution, there are times when it might not be ideal:
- Severely Damaged Tiles: If many tiles are cracked, chipped, or have significant lifting, a full replacement might be more practical.
- Very Textured Tiles: Tiles with deep textures can be difficult to paint evenly and may require more coats and careful application.
- High-End Finishes: If you have very expensive or intricate tile work that you don’t want to cover up, painting isn’t the right choice.
Frequently Asked Questions (FAQ)
Q1: Can I paint over vinyl floor tiles?
A1: Yes, you can paint over vinyl floor tiles, but ensure they are clean, dry, and in good condition. You’ll likely need a primer specifically designed for vinyl or laminate surfaces.
Q2: Will painted grout lines chip easily?
A2: Grout lines can be more prone to wear than the tiles themselves, especially if not sealed properly. Using a good quality grout pen or carefully painting and sealing the grout with the tile can improve its durability.
Q3: How many coats of paint do I need for kitchen floor tiles?
A3: Typically, two to three thin, even coats are needed for good coverage and durability. The number of coats can vary depending on the color of the original tiles and the color of your paint.
Q4: Can I use regular house paint on my kitchen floor tiles?
A4: No, it’s not recommended. Regular interior wall or ceiling paint is not formulated to withstand foot traffic, moisture, and abrasion, and will wear out very quickly. You must use specialized floor paint or an epoxy coating.
Q5: How long does it take for painted floor tiles to cure completely?
A5: While the paint may be dry to the touch in a few hours, it often takes several days (3-7 days typically) for the paint to fully cure before it can withstand heavy traffic and cleaning. The sealer also needs time to cure. Always check the product labels for specific curing times.
By following these steps and using the right products, you can successfully transform your kitchen floor with paint, achieving a beautiful and updated look that you’ll love. This kitchen tile floor renovation is a rewarding project that can save you money and give your kitchen a fresh, new personality.