
Can you paint laminate kitchen cabinets? Yes, you absolutely can paint laminate kitchen cabinets, but it requires a specific approach to ensure the paint adheres properly and lasts. This comprehensive DIY guide will walk you through the entire process, from preparing your cabinets to applying the final coat of paint. Whether you’re looking for a full laminate cabinet makeover, considering refinishing laminate cabinets, or just want to update your laminate cabinets, this tutorial is for you. We’ll cover the cabinet painting pros and cons, the best primer for laminate, and how to prep laminate cabinets for a beautiful, lasting finish.
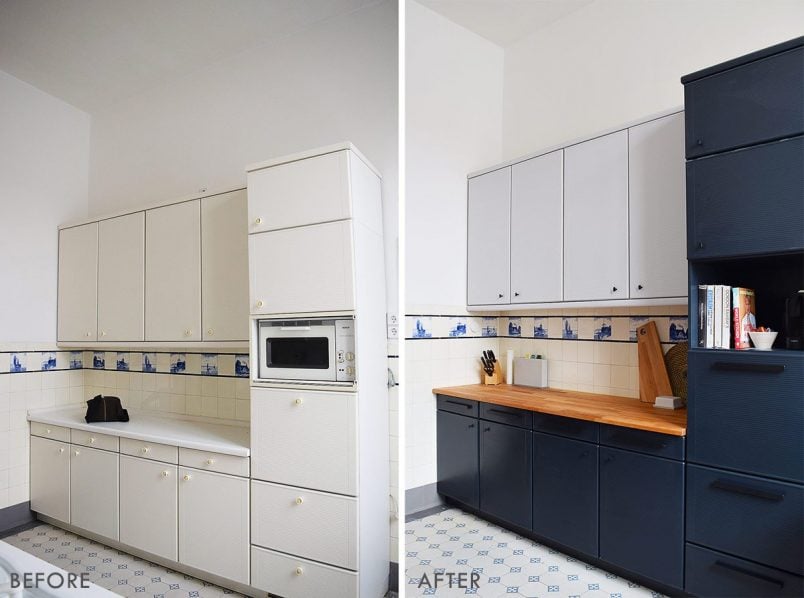
Image Source: www.littlehouseonthecorner.com
Why Paint Laminate Kitchen Cabinets?
Laminate cabinets are a popular choice for kitchens due to their affordability and durability. However, over time, the faux wood grain or solid color can become dated or worn. Painting offers a cost-effective way to completely transform your kitchen’s look without the expense of replacing the cabinets entirely. It’s a fantastic way to give your kitchen a fresh, modern feel or a cozy, traditional vibe, depending on your color choice and finish.
Cabinet Painting Pros and Cons: Is it Right for You?
Before diving in, it’s helpful to weigh the advantages and disadvantages of painting laminate cabinets.
Pros of Painting Laminate Cabinets
- Cost-Effective: Significantly cheaper than replacing cabinets.
- Dramatic Transformation: Can completely change the look and feel of your kitchen.
- Customization: Allows you to choose any color and finish to match your decor.
- DIY Friendly: Achievable for most homeowners with patience and the right materials.
- Extends Lifespan: A fresh coat of paint can revitalize worn-out cabinets.
Cons of Painting Laminate Cabinets
- Time-Consuming: Preparation and painting can take several days.
- Durability Concerns: If not done correctly, paint can chip or peel, especially in high-traffic areas.
- Requires Meticulous Prep: Proper adhesion depends heavily on thorough cleaning and priming.
- Potential for Imperfect Finish: Achieving a factory-smooth finish can be challenging for beginners.
What You’ll Need: Your Laminate Cabinet Painting Toolkit
Gathering all your supplies before you start will make the process much smoother. Here’s a comprehensive list:
- Cleaning Supplies:
- Degreaser (e.g., TSP substitute, Krud Kutter, or a strong dish soap solution)
- Clean rags or microfiber cloths
- Bucket
- Sponge
- Preparation Tools:
- Screwdriver (for removing hardware)
- Orbital sander or sanding blocks (various grits: 100, 150, 220)
- High-quality painter’s tape (e.g., FrogTape or ScotchBlue)
- Drop cloths or plastic sheeting
- Gloves
- Safety glasses
- Dust mask or respirator
- Denatured alcohol or rubbing alcohol (for final wipe-down)
- Priming and Painting Supplies:
- Best Primer for Laminate: A high-adhesion bonding primer (see section below for details).
- High-quality paint (e.g., cabinet-grade enamel, furniture paint for laminate, or acrylic latex paint specifically designed for cabinets).
- Paint rollers (small foam rollers for smooth finishes, ideally ¼ inch nap)
- Paint brushes (high-quality angled brushes for edges and corners)
- Paint trays
- Stir sticks
- Optional:
- Spray paint for cabinets (requires a sprayer and more practice)
- Cabinet refinishing kit (can be a good starting point)
Deciphering the Best Primer for Laminate
Choosing the right primer is crucial for a successful laminate cabinet painting project. Laminate is non-porous, meaning paint and primer don’t easily bond to it. You need a primer specifically designed to stick to slick surfaces.
Top Primer Choices for Laminate:
- Adhesion-Promoting Primers: Brands like Zinsser B-I-N Shellac-Based Primer or Kilz Adhesion are excellent choices. Shellac-based primers are known for their superior adhesion to difficult surfaces like laminate, plastic, and metal. They also block stains effectively.
- Water-Based Bonding Primers: Some water-based primers are formulated for high-adhesion. Look for primers that explicitly state they are for “difficult surfaces” or “laminate.” These are often easier to clean up than shellac-based primers.
Why is Primer So Important for Laminate?
Without the correct primer, your paint will likely peel or chip off the laminate surface very quickly, especially with the daily wear and tear kitchens experience. The primer acts as a bridge, creating a surface that the topcoat of paint can adhere to securely.
How to Prep Laminate Cabinets: The Foundation of Your Project
This is arguably the most important stage. Skipping or rushing the prep work will lead to a poor and short-lived finish.
Step 1: Remove Doors and Hardware
- Tag Everything: As you remove cabinet doors, drawers, and hinges, label them with masking tape to remember which door goes where. This will save you a lot of frustration during reassembly.
- Remove Hardware: Unscrew and remove all knobs, pulls, and hinges. Store them in a safe place, perhaps in labeled bags.
Step 2: Clean Thoroughly
Laminate surfaces can accumulate grease, grime, and cooking splatters. Even if they look clean, a thorough degreasing is essential for paint adhesion.
- Use a Degreaser: Mix a strong degreaser solution with warm water in a bucket. Alternatively, use a dedicated cabinet cleaner or a solution of TSP substitute.
- Scrub Gently: Using a sponge or soft cloth, scrub down all surfaces of the cabinets, doors, and drawer fronts. Pay extra attention to areas around the stove and sink.
- Rinse Well: Wipe down all surfaces with a clean, damp cloth to remove any degreaser residue. Repeat this rinsing step a couple of times to ensure no cleaning agents are left behind.
- Dry Completely: Allow the cabinets to air dry thoroughly or wipe them down with clean, dry cloths.
Step 3: Light Sanding (Crucial for Adhesion)
Even though you’re painting, a light sanding creates a “tooth” for the primer to grip onto.
- Choose Your Grit: Start with a medium-grit sandpaper, like 100 or 150 grit, if the laminate is very smooth or glossy. If it’s already a bit dull, you might start with 220 grit.
- Sand Lightly: The goal is not to remove the laminate but to scuff up the surface just enough to break the sheen. You want to create a dull, matte finish.
- Use a Sanding Block or Orbital Sander: For flat surfaces, an orbital sander with a sanding pad is efficient. For edges and details, use a sanding block or a sanding sponge.
- Work in Sections: Sand each door and cabinet frame thoroughly.
- Clean Off Dust: After sanding, use a vacuum cleaner with a brush attachment to remove most of the dust. Then, wipe down all surfaces with a clean, dry cloth. For a superior clean, follow up with a wipe-down using denatured alcohol or rubbing alcohol. This removes any lingering dust or oils and helps the primer adhere even better.
Step 4: Tape and Cover
Protect areas you don’t want to paint.
- Apply Painter’s Tape: Use high-quality painter’s tape to mask off any adjacent walls, countertops, backsplashes, or the inside of the cabinet frames if you’re not painting them. Ensure the tape is pressed down firmly to prevent paint bleed.
- Use Drop Cloths: Lay drop cloths or plastic sheeting over your countertops and floors to catch any drips or overspray.
Painting Laminate Cabinets: Step-by-Step
Now that your cabinets are prepped, it’s time to paint!
Step 1: Apply the Primer
This is where the magic begins, creating a bond for your paint.
- Stir the Primer: Always stir your primer thoroughly, don’t just shake it.
- Apply a Thin, Even Coat: Using a high-quality brush or foam roller, apply a thin, even coat of your chosen primer. Avoid applying it too thickly, as this can lead to drips and an uneven finish.
- Work in Sections: Prime one door or cabinet section at a time.
- Brush Edges First: Use an angled brush to apply primer to the edges and any intricate details. Then, use a foam roller to cover the larger flat surfaces.
- Allow Proper Drying Time: Let the primer dry completely according to the manufacturer’s instructions. This is usually a few hours, but check the can. Some primers recommend a specific cure time before painting.
- Light Sanding Between Coats (Optional but Recommended): Once the primer is dry, you can lightly scuff it with a fine-grit sandpaper (220 grit) or a sanding sponge. This helps create an even smoother surface for the paint. Wipe away any dust with a tack cloth or a damp cloth followed by a dry cloth.
Step 2: Apply the Paint
You’re ready for your chosen color!
- Choose Your Paint: For laminate cabinets, a high-quality cabinet enamel or a durable acrylic latex paint formulated for cabinets is recommended. These paints offer excellent adhesion, durability, and a smooth finish. Many brands offer “furniture paint for laminate” that can simplify the process.
- Stir the Paint: Stir your paint thoroughly.
- Apply Thin, Even Coats: Just like with the primer, apply thin, even coats of paint. This is key to a smooth, professional-looking finish that won’t drip or peel.
- Use a Roller for Flat Surfaces: For large, flat areas, use a foam roller with a low nap (like ¼ inch). Roll in a consistent direction to avoid lap marks.
- Use a Brush for Edges and Details: Use a high-quality angled brush for the edges, corners, and any trim work.
- Work Methodically: Paint one door or cabinet section at a time.
- Allow Drying Time Between Coats: Let each coat of paint dry completely before applying the next. This is crucial for durability. Check the paint can for recommended drying times. For most cabinet paints, this is at least 4-6 hours, but it’s best to wait longer if possible.
- Apply Multiple Coats: Most cabinet painting projects require at least two coats of paint, and sometimes three, to achieve full coverage and a rich color.
- Light Sanding Between Coats (Optional but Highly Recommended): After the first coat of paint is dry, very lightly sand the surface with 220-grit sandpaper or a fine-grit sanding sponge. This removes any tiny bumps or imperfections and ensures a super-smooth finish. Wipe away dust with a tack cloth.
Step 3: Apply a Topcoat (Optional but Recommended for Durability)
For added protection against wear and tear, especially in a busy kitchen, a clear topcoat or sealant is a good idea.
- Choose a Clear Coat: Opt for a water-based polyurethane or a clear acrylic sealer. Look for one that is non-yellowing.
- Apply Thinly and Evenly: Apply one or two thin, even coats of the clear topcoat using a foam roller or a high-quality brush.
- Allow Drying Time: Let each coat dry completely before applying the next.
Step 4: Reassemble
Once the paint and topcoat are fully cured (this can take several days to a week, depending on the product), you can reassemble your cabinets.
- Reattach Hardware: Screw the knobs, pulls, and hinges back onto the doors and drawer fronts.
- Hang Doors and Install Drawers: Carefully rehang the cabinet doors and reinstall the drawers.
Popular Paint Finishes for Laminate Cabinets
The finish you choose can greatly impact the final look.
- Satin: Offers a slight sheen that is durable and easy to clean. It’s a popular choice for kitchens.
- Semi-Gloss: Provides a higher sheen and is very durable and washable, making it excellent for high-traffic areas.
- Matte: Offers a very subtle, non-reflective finish. While beautiful, it can be less forgiving with wear and tear and may be harder to clean.
Can You Use a Laminate Cabinet Refinishing Kit?
Yes, laminate cabinet refinishing kits can be a convenient option. These kits typically include the necessary primers, paints, and sometimes even specialized tools designed for laminate surfaces. They can simplify the process by ensuring you have compatible products. However, always read reviews and ensure the kit contains high-quality materials. The prep work remains just as critical, regardless of whether you use a kit or individual products.
Updating Laminate Cabinets: Beyond Paint
While painting is a fantastic way to update laminate cabinets, consider these additional touches:
- New Hardware: Swapping out old knobs and pulls for new ones can instantly modernize your cabinets.
- Cabinet Organizers: Adding pull-out shelves or drawer dividers can improve functionality.
- Under-Cabinet Lighting: This adds ambiance and improves task lighting.
Painting Laminate: Tips for Success
- Ventilation is Key: Ensure good airflow in your workspace by opening windows and using fans.
- Work in Good Light: Adequate lighting helps you spot imperfections and ensures even coverage.
- Patience is a Virtue: Don’t rush the drying times between coats. This is essential for a durable finish.
- Test in an Inconspicuous Area: If you’re unsure about a primer or paint, test it on the back of a door or an inside surface first.
Frequently Asked Questions (FAQ)
Q1: How long will painted laminate cabinets last?
With proper preparation and high-quality paint, your painted laminate cabinets can last for many years. Typically, you can expect a durable finish for 5-10 years or even longer with good care.
Q2: Can I use spray paint on laminate cabinets?
Yes, you can use spray paint designed for cabinets or furniture. However, spray painting requires a spray gun and more practice to achieve an even, professional finish. It also requires more masking and ventilation.
Q3: Do I need to seal laminate cabinets after painting?
While not strictly mandatory for all paints, applying a clear topcoat or sealer is highly recommended for laminate cabinets. It adds an extra layer of protection against moisture, scratches, and general wear and tear, extending the life of your painted finish.
Q4: What if my laminate cabinets are already peeling?
If your laminate is peeling or delaminating, you’ll need to address that first. Carefully remove any loose laminate using a putty knife or scraper. Sand the edges smooth. You might need to use a wood filler or epoxy for any damaged areas before proceeding with cleaning, priming, and painting.
Q5: How do I clean my newly painted laminate cabinets?
Clean your painted cabinets with a soft, damp cloth and a mild dish soap solution. Avoid abrasive cleaners or scrubbers, as they can damage the paint. Wipe dry with a clean, soft cloth.
This detailed guide should equip you with the knowledge and confidence to tackle your laminate cabinet painting project. With careful preparation and the right materials, you can achieve a beautiful, long-lasting transformation for your kitchen.