
Can you paint kitchen cabinets a different color? Yes, absolutely! Changing your kitchen cabinet color is one of the most impactful and cost-effective ways to transform your kitchen’s look. This DIY guide will walk you through every step of the process, from planning to the final coat. Whether you’re aiming for a sleek modern update or a cozy farmhouse feel, a fresh coat of paint or a new stain can breathe new life into your kitchen. This comprehensive guide covers everything you need to know for a successful kitchen cabinet painting project.
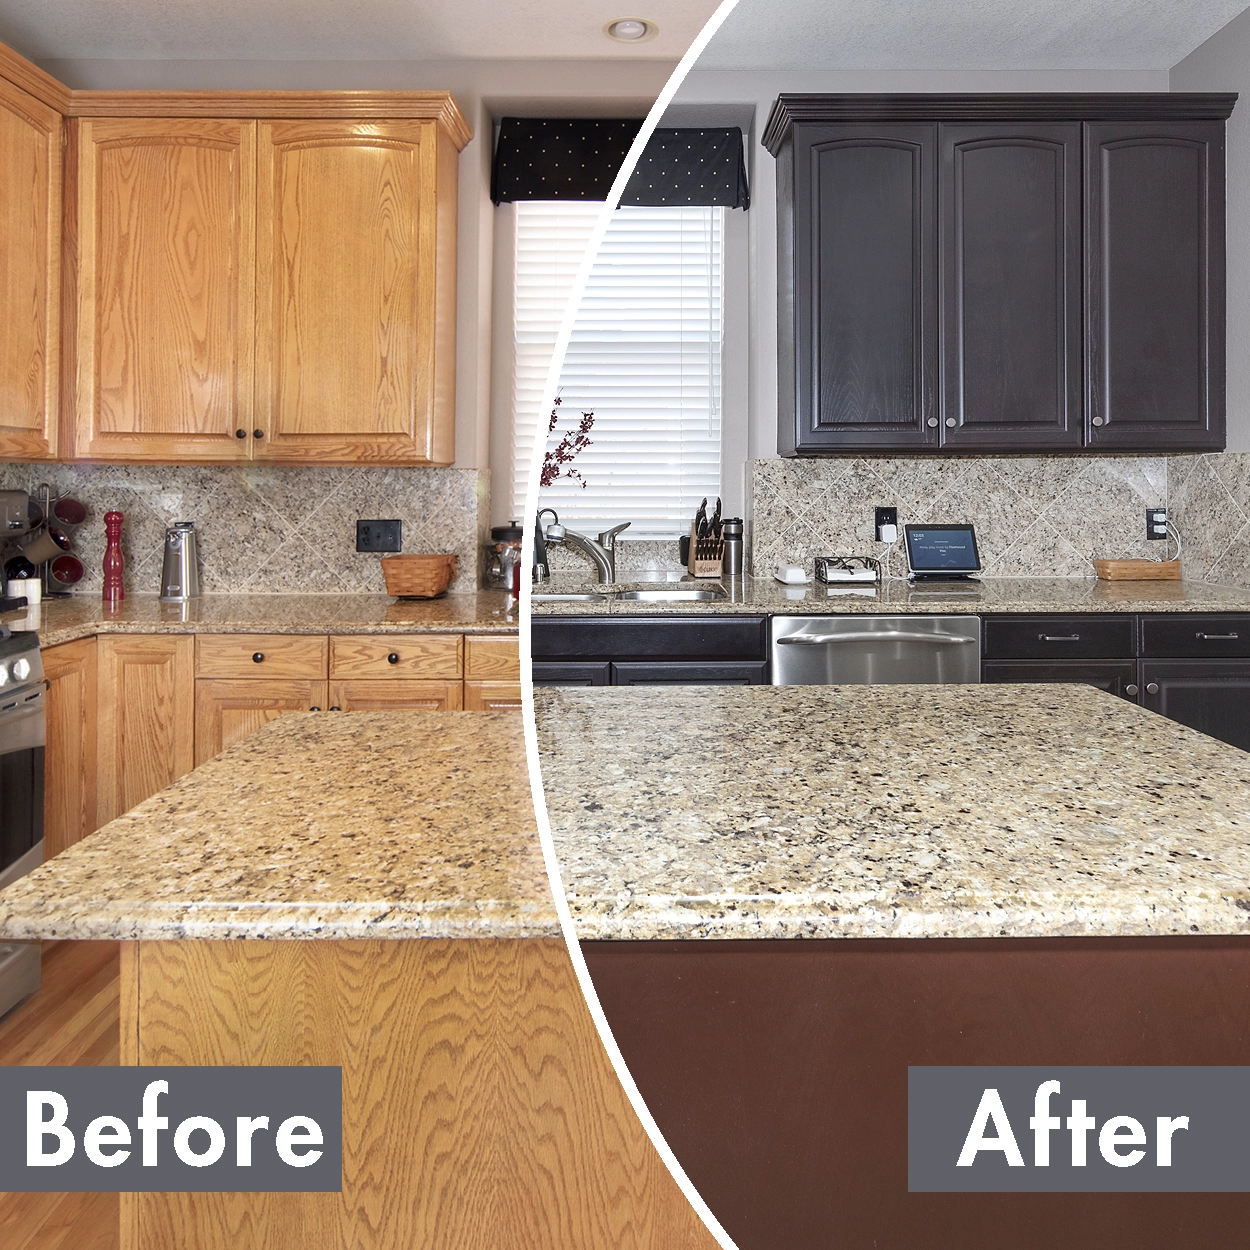
Image Source: www.nhance.com
Why Change Your Kitchen Cabinet Color?
Outdated or worn-out cabinet colors can make your entire kitchen feel dull and uninviting. A cabinet update ideas spree often starts with the cabinets themselves. Here’s why a color change is a great idea:
- Boosts Aesthetics: A new color can dramatically change the style and mood of your kitchen. Light colors can make a small kitchen feel larger, while darker hues add warmth and sophistication.
- Increases Home Value: A modern, updated kitchen is a major selling point. Investing in kitchen renovation ideas like cabinet painting can provide a significant return on investment.
- Cost-Effective: Compared to replacing cabinets entirely, painting is a fraction of the cost. It’s a budget-friendly way to achieve a high-end look.
- Personalization: You can perfectly match your cabinets to your personal style and existing decor.
Planning Your Kitchen Cabinet Makeover
Before you grab a paintbrush, careful planning is key to a successful DIY cabinet makeover.
Choosing Your Color
This is the most exciting part! Consider the overall style of your home and kitchen.
- White/Off-White: Classic, bright, and makes spaces feel larger. Works with almost any decor.
- Gray: Modern and versatile, ranging from light, airy tones to deep, dramatic charcoal.
- Blue: Popular for a coastal or farmhouse look. Navy or deep blues can add sophistication.
- Green: Sage or forest greens offer a natural, calming vibe.
- Black: Bold and dramatic, creates a chic, modern statement.
- Wood Tones (Staining): If your cabinets are solid wood, cabinet staining can reveal beautiful natural grain and add warmth.
Table 1: Popular Cabinet Color Schemes
| Color Family | Mood/Style | Best For |
|---|---|---|
| White | Bright, Clean, Airy | Small kitchens, modern, traditional |
| Gray | Modern, Sophisticated | Contemporary, minimalist, transitional |
| Blue | Calm, Coastal, Bold | Farmhouse, nautical, transitional |
| Green | Natural, Relaxing | Farmhouse, bohemian, rustic |
| Black | Dramatic, Chic | Modern, industrial, high-contrast |
| Wood Tones | Warm, Natural | Traditional, rustic, farmhouse |
Paint vs. Stain
- Painting: Offers a vast array of color choices. Provides a solid, opaque finish. Excellent for laminate or previously painted cabinets.
- Staining: Reveals the wood grain. Offers a warm, natural look. Only suitable for solid wood cabinets in good condition. Cabinet staining requires different techniques than painting.
Deciding on Your Finish (Paint)
- Matte/Flat: No sheen. Hides imperfections well but is less durable and harder to clean.
- Eggshell/Satin: Slight sheen. Durable and washable, making them popular for kitchens.
- Semi-Gloss: Noticeable sheen. Very durable and easy to clean, but can highlight imperfections.
- High-Gloss: Very shiny. Modern and sleek, but shows every smudge and imperfection.
For kitchen cabinet painting, satin or semi-gloss finishes are generally recommended for their durability and ease of cleaning.
Consider Your Cabinet Material
The material of your cabinets will influence your prep work and product choices.
- Solid Wood (Oak, Maple, Cherry, etc.): Can be painted or stained. Wood grain will show through stain. Requires good priming for paint.
- MDF (Medium-Density Fibreboard): Paints well, but can be porous and requires thorough priming.
- Veneer: Thin layer of wood over particleboard or MDF. Treat carefully during sanding to avoid damaging the veneer. Usually best to paint.
- Laminate/Thermally Fused Laminate (TFL): These are the trickiest. Special primers and paints designed for laminate are essential for adhesion.
Gathering Your Supplies
Having the right tools and materials is crucial for a professional-looking finish.
Essential Materials
- Cabinet Cleaner/Degreaser: TSP substitute or a good quality degreaser.
- Sanding Sponges or Sandpaper: Grits from 100 to 220.
- Wood Filler: For any dings or scratches.
- Primer: High-quality bonding primer is essential, especially for laminate or slick surfaces. Cabinet priming is a vital step.
- Paint or Stain: Choose high-quality cabinet paint (enamel or acrylic latex) or wood stain.
- Topcoat/Sealer (Optional but Recommended for Paint): Polyurethane or a clear topcoat for added durability.
- Painter’s Tape: For masking off areas.
- Drop Cloths/Plastic Sheeting: To protect your floors and countertops.
Essential Tools
- Screwdriver: To remove cabinet doors and hardware.
- Orbital Sander or Sanding Blocks: For a smooth surface.
- Tack Cloths: To remove dust after sanding.
- Paint Brushes: High-quality angled brushes for cutting in and details.
- Foam Rollers: For smooth, even coverage on flat surfaces.
- Paint Tray or Bucket: For holding paint.
- Rags: For cleanup.
- Safety Glasses: Protect your eyes.
- Dust Mask or Respirator: Especially important when sanding or spraying.
- Gloves: To protect your hands.
- Spray Gun (Optional): For spray painting kitchen cabinets, which offers a very smooth, professional finish.
The Step-by-Step DIY Cabinet Makeover Process
This detailed guide breaks down the kitchen cabinet painting process into manageable steps.
Step 1: Demolition and Preparation
This is the most crucial step. Skipping or rushing prep work will lead to a poor finish.
- Empty Cabinets: Remove all items from your cabinets and drawers.
- Remove Doors and Drawers: Unscrew and carefully label each door and drawer front. Numbering them helps ensure they go back in the right place. Place hardware in labeled bags.
- Remove Hardware: Unscrew hinges, knobs, and pulls. If you plan on cabinet hardware replacement, set the old hardware aside.
- Clean Thoroughly: Use a degreaser or TSP substitute to thoroughly clean all cabinet surfaces, doors, and drawer fronts. This removes grease, grime, and old polish that can prevent paint or stain from adhering. Rinse with clean water and allow to dry completely.
Step 2: Repair and Sanding
Prepare the surfaces for a smooth finish.
- Fill Imperfections: Use wood filler to fill any holes, dents, or scratches. Let it dry completely according to the product instructions.
- Sand Surfaces:
- For Painted Cabinets: Lightly sand all surfaces with 150-grit sandpaper or a sanding sponge. The goal is to scuff up the existing finish so the primer can adhere. If cabinets are already painted and in good condition, a light sanding is usually enough. If they are laminate or have a high-gloss finish, you might need a slightly coarser grit (120-150) to create a good profile for the primer.
- For Stained Cabinets: Sand with 100-120 grit to remove the old finish, then progress to 150-180 grit for a smooth surface.
- Clean After Sanding: Use a shop vac with a brush attachment to remove as much dust as possible. Then, wipe down all surfaces with a tack cloth to pick up any remaining fine dust. This is critical for a smooth paint finish.
Step 3: Priming for a Flawless Finish
Cabinet priming is essential for good adhesion and color coverage.
- Apply Primer: Apply one to two thin, even coats of a high-quality bonding primer. Use a brush for edges and detailed areas, and a foam roller for larger, flat surfaces. If you’re using a spray gun, this is where you’d apply your primer.
- Tip: For very dark or bright colors, consider a tinted primer. Gray primer works well under most colors, and white primer is good for lighter shades.
- Dry and Sand: Let the primer dry completely according to the manufacturer’s instructions. Once dry, lightly sand any rough spots or drips with 220-grit sandpaper or a fine-grit sanding sponge. Wipe away dust with a tack cloth.
Step 4: Painting or Staining
Now for the main event!
Option A: Painting
- Apply First Coat of Paint:
- Brush and Roller: Apply thin, even coats of your chosen cabinet paint. Work in the direction of the wood grain if applicable. Avoid overloading your brush or roller, as this can lead to drips.
- Spray Painting Kitchen Cabinets: If using a spray gun, follow the manufacturer’s instructions for your specific sprayer. This method provides the smoothest, most professional finish. Ensure you have good ventilation and wear a respirator.
- Dry and Sand (Optional): Let the first coat dry completely. Lightly sand with 220-grit sandpaper or a fine sanding sponge if needed to smooth out any imperfections. Wipe with a tack cloth.
- Apply Subsequent Coats: Apply second and third coats as needed, allowing adequate drying time between each. Two to three thin coats are better than one thick coat.
- Apply Topcoat (Optional but Recommended): If using a topcoat, apply 1-2 thin coats of your chosen sealant (like polyurethane) for extra durability and protection, especially in high-traffic areas like kitchens.
Option B: Staining
- Apply Wood Stain:
- Application: Apply the stain evenly with a foam brush or rag, working in the direction of the wood grain. Work in small sections.
- Wipe Off Excess: Immediately after application, wipe off the excess stain with a clean, lint-free rag, again following the grain. The longer you leave the stain on, the darker the finish will be.
- Allow to Dry: Let the stain dry completely according to the product instructions.
- Apply Second Coat (Optional): For a deeper color, apply a second coat of stain, repeating the application and wiping process.
- Apply Topcoat: Once the stain is completely dry, apply 2-3 thin coats of a clear polyurethane or polycrylic topcoat for protection and durability. Lightly sand with 220-grit sandpaper between coats and wipe with a tack cloth.
Step 5: Reassembly and Finishing Touches
The final stage of your DIY cabinet makeover.
- Reattach Hardware: Once the paint or stain and topcoat are fully cured (this can take several days to a week, check product instructions), reattach your original cabinet hardware replacement.
- Install Doors and Drawers: Carefully rehang the cabinet doors and reinsert the drawers.
- New Hardware (Optional): This is the perfect time to install new knobs, pulls, or hinges if you chose to upgrade. This can further enhance your cabinet update ideas.
- Clean Up: Remove all painter’s tape, drop cloths, and clean your tools.
Alternative Cabinet Update Ideas
Beyond a full paint or stain job, consider these other ways to refresh your cabinets:
- Refinishing: This involves stripping the old finish and reapplying a new stain or clear coat. It’s more labor-intensive than painting but can bring back the beauty of natural wood. Cabinet refinishing is a great option for solid wood cabinets with a damaged or dated finish.
- Glazing: Applying a glaze over a painted or stained finish can add depth, antiquing, or a unique textural element.
- Adding Decorative Moulding: Trim and moulding can add architectural interest and a custom look.
- Updating Cabinet Hardware: Even just changing knobs and pulls can make a significant difference. This is a quick and easy update.
- Contact Paper or Peel-and-Stick Wallpaper: For a temporary or very budget-friendly update, consider applying decorative contact paper to cabinet doors or interiors.
Frequently Asked Questions (FAQ)
Q: How long does it take to paint kitchen cabinets?
A: The entire process, including drying times between coats and curing, can take anywhere from a few days to a week or more, depending on your schedule and the number of coats. The actual active working time might be around 8-12 hours.
Q: Can I spray paint kitchen cabinets myself?
A: Yes, you can achieve professional results with spray painting kitchen cabinets, but it requires practice, the right equipment, and good ventilation. If you’re new to spraying, practice on scrap wood first.
Q: Is chalk paint good for kitchen cabinets?
A: Yes, chalk paint cabinets is a popular choice for a vintage or farmhouse look. It adheres well to most surfaces with minimal prep (often no sanding needed) and dries quickly. However, chalk paint requires a durable topcoat (like wax or polycrylic) for protection in a kitchen environment.
Q: How do I prepare laminate cabinets for painting?
A: Laminate is slippery and can be challenging. Thorough cleaning and degreasing are essential. Use a high-adhesion bonding primer specifically designed for laminate or slick surfaces. Lightly scuff-sanding with fine-grit sandpaper (220) before priming can also help.
Q: What is the best way to clean cabinets before painting?
A: Use a strong degreaser like TSP (trisodium phosphate) substitute or a dedicated cabinet cleaner. Scrub all surfaces thoroughly, then rinse with clean water and let them dry completely.
Q: Do I need to sand cabinets before priming if they are already painted?
A: Yes, a light scuff-sanding with 150-220 grit sandpaper or a sanding sponge is recommended to create a surface for the primer to adhere to, even if the cabinets are already painted.
Q: Can I paint over stained cabinets?
A: Yes, you can paint over stained cabinets. You’ll need to clean them thoroughly, sand them to dull the finish, and apply a good quality primer before painting.
Q: How many coats of paint do kitchen cabinets need?
A: Typically, two to three thin coats of paint are recommended for even coverage and durability.
Q: How long should I wait between paint coats?
A: Follow the paint manufacturer’s recommendations. Generally, wait at least 4-6 hours between coats for latex-based paints. Ensure the surface is dry to the touch.
Q: When can I put my cabinets back together?
A: Allow the final coat of paint or topcoat to cure fully before reassembling. Curing can take several days to a week, depending on the product. Putting them back too soon can cause chipping or damage.
Q: What is cabinet refinishing?
A: Cabinet refinishing involves removing the existing finish (paint or stain) down to the bare wood, making any necessary repairs, and then applying a new stain or clear protective coating. It’s a more intensive process than painting but can restore cabinets to their original beauty or give them a completely new wood tone.
Changing your kitchen cabinet color is a rewarding DIY project that can dramatically improve your kitchen’s appearance and value. By following these detailed steps, you can achieve a professional-looking finish and enjoy your newly transformed space. Happy painting!