
Knowing how to measure a kitchen sink is crucial for a successful renovation or replacement project, ensuring a perfect fit and avoiding costly mistakes. When measuring your kitchen sink, you’ll need to determine its overall length, width, and depth, taking into account the specific installation type, whether it’s an undermount, farmhouse, or drop-in sink.
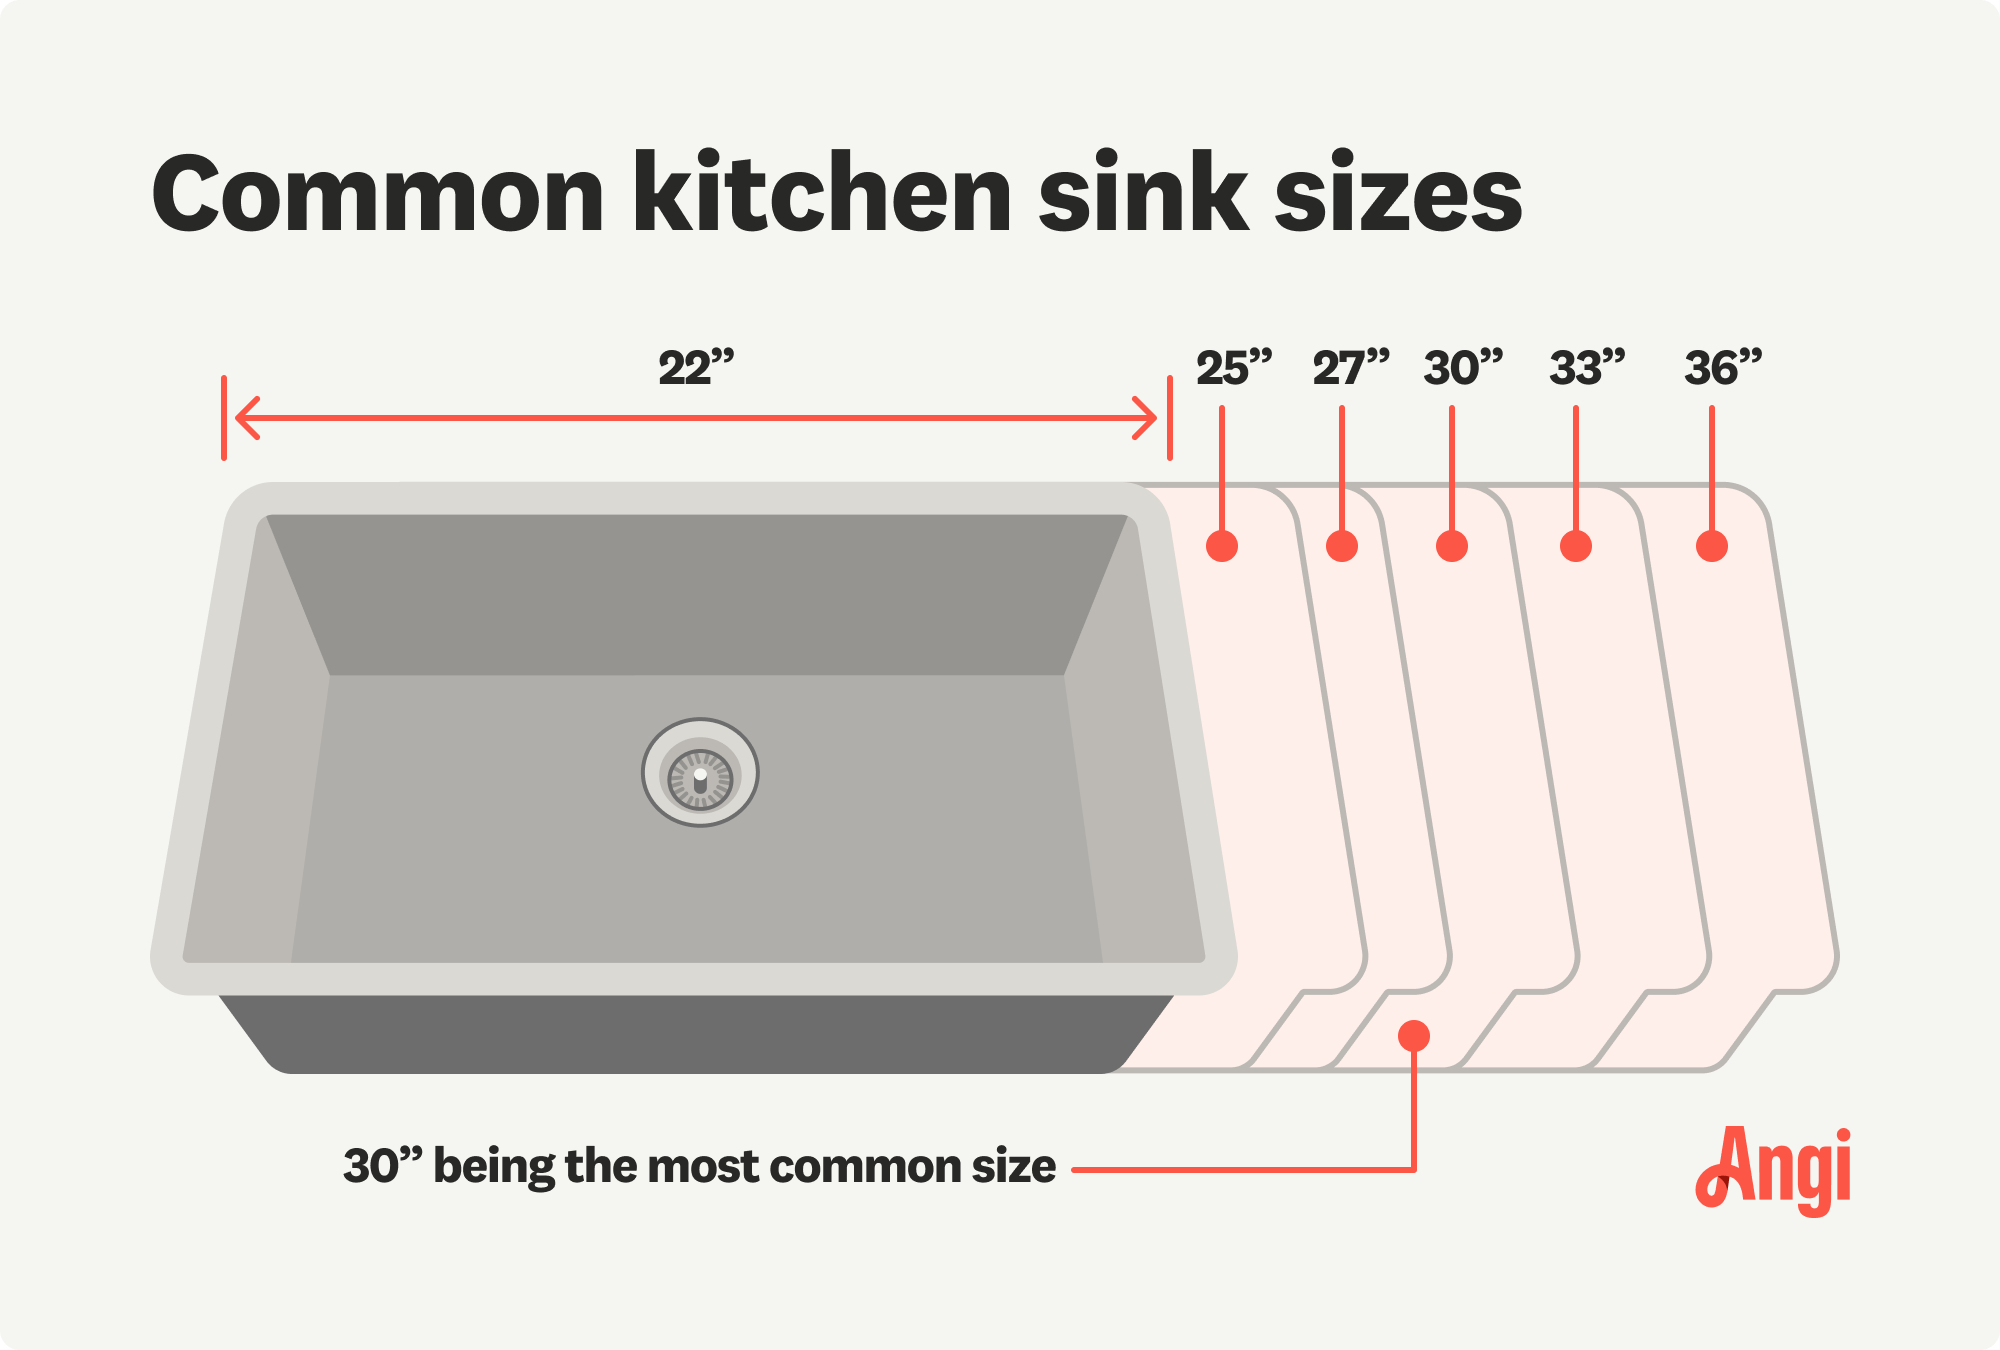
Image Source: media.angi.com
Deciphering Your Sink’s Footprint: A Comprehensive Guide to Accurate Measurements
Embarking on a kitchen remodel or simply replacing your current sink can be an exciting endeavor. However, the success of this project hinges on one critical aspect: accurate measurements. A miscalculation here can lead to significant frustration, delays, and unexpected expenses. This guide will walk you through the precise steps to measure your kitchen sink, ensuring you select the perfect replacement or design a seamless installation. We’ll cover everything from basic sink dimensions to the nuances of different sink styles, empowering you with the knowledge to confidently tackle this task.
The Core of the Matter: Basic Sink Measurements
Before diving into specialized types, let’s establish the fundamental sink measurements you’ll need to record. These are the building blocks for any sink selection.
Measuring the Sink’s Length and Width
The length and width are the most apparent dimensions of your sink. These refer to the overall exterior measurements of the sink basin itself.
- How to Measure Length: Place your measuring tape across the longest external edge of the sink, from one side to the other. Ensure the tape is held straight and flat against the sink’s surface.
- How to Measure Width: Now, place your measuring tape across the widest external edge of the sink, from the front to the back. Again, keep the tape straight and flat.
These measurements are vital for determining if a new sink will physically fit into your existing countertop opening or cabinet space.
Determining the Sink’s Depth
The sink depth is often overlooked but plays a significant role in functionality and your ability to wash large pots and pans.
- How to Measure Depth: Measure from the top rim of the sink down to the very bottom of the basin. Be consistent in where you place the tape measure, ideally in the center of the basin for a representative measurement.
Remember to consider that sink depths can vary significantly, impacting how much water it can hold and how comfortably you can work within it.
Beyond the Basics: Accounting for Installation Types
The way your sink is installed dramatically influences how you should take your sink measurements. Each installation method has specific requirements that must be met.
Undermount Sink Measurements: Precision is Key
Undermount sink measurements require a slightly different approach because these sinks are installed beneath the countertop. This means the countertop dictates the visible edge, and the sink needs to fit perfectly within its cut-out.
Measuring the Sink Basin (Interior Dimensions)
For an undermount sink, the interior dimensions of the basin are paramount. These are the usable space within the sink.
- Interior Length: Measure the inside length of the sink basin, from one interior wall to the opposite interior wall.
- Interior Width: Measure the inside width of the sink basin, from the front interior wall to the back interior wall.
- Interior Depth: Measure the inside depth from the bottom of the basin to the underside of the countertop.
Measuring the Countertop Cutout
This is arguably the most critical measurement for undermount sinks. The sink cutout dimensions in your countertop must be precise.
- Cutout Length: Measure the length of the opening in your countertop.
- Cutout Width: Measure the width of the opening in your countertop.
- Reveal (Edge Measurement): This refers to the amount of countertop edge visible around the sink. For undermount sinks, you’ll want to measure the distance from the edge of the sink opening to the edge of the countertop. This is crucial for ensuring a clean and proper fit.
Important Note: Always verify the manufacturer’s specifications for undermount sink measurements. They often provide precise templates for cutouts.
Farmhouse Sink Measurements: Distinctive Features
Farmhouse sinks, also known as apron-front sinks, have a unique design with an exposed front panel. This design impacts how you measure and what to consider.
The Overall Footprint of a Farmhouse Sink
The farmhouse sink measurements will include the entire unit, including the apron front.
- Overall Length: Measure the entire length of the sink from the outermost edge of one side to the outermost edge of the other. This includes any decorative or functional overhang of the apron.
- Overall Width (Front to Back): Measure from the very front of the apron to the back of the sink where it meets the wall or backsplash.
- Apron Height: Measure the height of the exposed apron front. This is important for cabinet compatibility and visual appeal.
Cabinet and Countertop Considerations for Farmhouse Sinks
Farmhouse sinks often require specific cabinet modifications and countertop adjustments.
- Cabinet Width: Measure the width of the cabinet where the sink will be installed. Farmhouse sinks are typically installed in dedicated base cabinets or modified existing ones.
- Countertop Cutout (if applicable): While many farmhouse sinks sit on the cabinet base, some may have a cutout at the back for plumbing or to recess slightly into a backsplash. If there’s a cutout, measure its length and width carefully.
Tip: For farmhouse sinks, ensure you have enough clearance for the faucet and any accessories you plan to use.
Drop-In Sink Measurements: Simplicity and Standard Practices
Drop-in sinks, also known as top-mount or surface-mount sinks, are the most common type. They are installed from above and rest on the countertop.
Standard Drop-In Sink Measurements
The primary measurements for drop-in sinks are the exterior dimensions and the size of the hole needed in the countertop.
- Exterior Length: Measure the longest outside edge of the sink.
- Exterior Width: Measure the widest outside edge of the sink, from front to back.
- Sink Depth: Measure from the top rim to the bottom of the basin.
The Countertop Opening for Drop-In Sinks
This is the hole cut into your countertop to accommodate the sink.
- Opening Length: Measure the length of the countertop hole.
- Opening Width: Measure the width of the countertop hole.
Key Difference: For drop-in sinks, the countertop opening is typically slightly smaller than the overall sink dimensions. This allows the sink rim to rest securely on the countertop. Always consult the sink manufacturer’s specifications for the exact sink cutout dimensions.
Advanced Considerations for Precise Sink Sizing
Beyond the basic length, width, and depth, several other factors contribute to a perfect sink fit.
The Importance of the Faucet Deck
The faucet deck is the flat surface on the sink or countertop where the faucet is mounted.
- Measuring the Faucet Deck: If the faucet is mounted on the sink itself, measure the length and width of the designated faucet mounting area. This ensures your chosen faucet will fit without obstruction.
Rim Thickness and Overhang
The rim of a sink provides support and aesthetic appeal. Its thickness and how it overhangs the countertop are important.
- Rim Thickness: Measure the thickness of the sink’s rim. This can affect the overall appearance and how the sink sits in the countertop.
- Overhang: For drop-in sinks, measure how much the sink rim extends beyond the countertop opening. This is crucial for ensuring a clean transition.
Radius Measurements
The corners of your sink may be rounded. Measuring this radius can be important for aesthetics and sometimes for fit, especially if you’re matching an existing countertop cutout.
- Measuring Corner Radius: You can use a radius gauge or a flexible measuring tape to estimate the curve of the sink’s corners.
Tools of the Trade: What You’ll Need
To ensure accuracy, gather these essential tools before you begin measuring:
- Measuring Tape: A sturdy, flexible metal measuring tape is ideal.
- Pen and Paper: For recording your measurements.
- Notepad or Digital Device: To keep your notes organized.
- Optional: Sink Template: Many sink manufacturers provide printable templates that can be helpful for marking countertop cutouts.
A Step-by-Step Approach to Measuring Your Current Sink
Let’s consolidate the process into a clear, actionable plan.
Step 1: Identify Your Sink Type
Before you pick up a measuring tape, determine if you have an undermount, farmhouse, or drop-in sink. This will guide which measurements are most critical.
Step 2: Measure the Exterior Dimensions
- Measure the sink length (longest exterior edge).
- Measure the sink width (widest exterior edge, front to back).
- Measure the sink depth (from rim to basin bottom).
Step 3: Measure Countertop Cutout (If Applicable)
- For undermount and drop-in sinks, carefully measure the length and width of the existing opening in your countertop. This is the sink cutout dimensions.
Step 4: Measure Specific Features
- Farmhouse Sinks: Measure apron height and cabinet clearance.
- Undermount Sinks: Measure interior basin dimensions and the reveal (edge clearance).
- Faucet Deck: Note the space available for faucet installation.
Step 5: Record Everything Meticulously
Write down all your measurements clearly, noting units (inches or centimeters). It’s often helpful to sketch a simple diagram of your sink and mark the dimensions on it.
Measuring for a New Sink: What to Consider
When selecting a new sink, your measurements are your guide, but some additional factors come into play.
Cabinet Size Compatibility
The internal dimensions of your base cabinet are crucial.
- Cabinet Width: Ensure the new sink’s overall dimensions, including any overhang or rim, will fit within the cabinet’s opening. Many manufacturers specify the minimum cabinet size required for their sinks. For instance, a 30-inch sink might require a 33-inch cabinet.
Countertop Material and Thickness
The material of your countertop can influence the installation method and the types of sinks you can choose.
- Granite, Quartz, Marble: These materials are durable and suitable for undermount and drop-in sinks. Undermount sinks are particularly popular with these materials for a sleek look.
- Laminate: Drop-in sinks are typically the most practical choice for laminate countertops as they are easier to install and don’t require exposing the laminate’s edge.
- Butcher Block: Both drop-in and farmhouse sinks can work well, but you’ll need to ensure proper sealing to protect the wood.
Faucet and Accessory Placement
Think about your faucet, soap dispenser, and other accessories.
- Number of Holes: Does your current sink have pre-drilled holes for your faucet? Do you need them for your new sink?
- Hole Spacing: If you have a specific faucet in mind, ensure the spacing of the holes on the sink or countertop is compatible.
Common Pitfalls to Avoid
Even with careful planning, mistakes can happen. Here are some common errors to steer clear of:
- Measuring the Wrong Thing: Don’t confuse interior basin dimensions with exterior overall dimensions, especially for drop-in sinks.
- Not Accounting for the Rim: For drop-in sinks, the rim sits on the countertop, so the countertop cutout must be smaller than the sink’s total size.
- Ignoring Cabinet Space: A beautiful sink is useless if it doesn’t fit in your cabinet. Always check the minimum cabinet requirements.
- Forgetting the Apron: For farmhouse sinks, the apron’s projection needs to be considered for cabinet and dishwasher clearance.
- Not Verifying Manufacturer Specs: Always cross-reference your measurements with the sink manufacturer’s technical drawings and specifications. They are the definitive source.
Tables for Clarity
Let’s summarize the key measurements for each sink type in a clear table format.
Table 1: Key Sink Measurements by Installation Type
| Measurement Type | Undermount Sink | Farmhouse Sink | Drop-In Sink |
|---|---|---|---|
| Overall Length | Exterior basin length | Exterior length (including apron) | Exterior length |
| Overall Width | Exterior basin width | Exterior width (front to back, including apron) | Exterior width |
| Sink Depth | Interior depth (bottom to countertop underside) | Interior depth | Interior depth (rim to basin bottom) |
| Countertop Cutout | Precise length and width of opening | May have minimal rear cutout; measure carefully | Precise length and width of opening (smaller than sink) |
| Interior Basin | Length and width (usable space) | Length and width (usable space) | Length and width (usable space) |
| Apron Height | N/A | Height of exposed front panel | N/A |
| Faucet Deck Space | On countertop or sink | On sink or countertop | On sink or countertop |
| Rim/Edge Detail | Edge detail under countertop | Apron edge detail | Rim that rests on countertop |
Table 2: Essential Tools for Accurate Sink Measurement
| Tool | Purpose |
|---|---|
| Measuring Tape | Accurate measurement of length, width, and depth. |
| Pen & Paper | Recording all dimensions and notes. |
| Digital Camera | Documenting the current setup for reference. |
| Sink Template | (Optional) Manufacturer-provided guide for countertop cutouts. |
| Level | Ensuring measurements are taken on a flat plane. |
| Pencil/Marker | Marking measurements on the countertop (if needed and permitted). |
Final Thoughts on Securing the Perfect Fit
Measuring a kitchen sink isn’t just about getting numbers; it’s about ensuring a harmonious integration of a vital kitchen fixture. Whether you’re selecting a sleek undermount sink, a charming farmhouse sink, or a practical drop-in sink, accurate sink dimensions are your most powerful tool.
Take your time, double-check your figures, and always refer to the manufacturer’s specifications. By following these guidelines, you can approach your kitchen sink project with confidence, knowing that your measurements will lead you to the perfect fit, transforming your kitchen into a more functional and beautiful space.
Frequently Asked Questions (FAQ)
Q1: What is the most important measurement for a drop-in sink?
A1: The most important measurement for a drop-in sink is the sink cutout dimensions – the precise length and width of the hole in your countertop. This opening needs to be slightly smaller than the overall sink dimensions to allow the sink’s rim to rest securely on the countertop.
Q2: Can I measure my sink without removing it?
A2: Yes, absolutely! All the essential measurements for selecting a replacement sink can be taken with the sink still installed. For undermount sinks, you’ll measure the countertop opening and the exposed sink edges. For drop-in sinks, you’ll measure the sink’s exterior and the countertop opening. For farmhouse sinks, you’ll measure the visible exterior of the sink and its apron.
Q3: How do I measure the depth of a sink?
A3: To measure the sink depth, place your measuring tape from the top edge (rim) of the sink down to the very bottom of the basin. For undermount sinks, this measurement is taken from the underside of the countertop down to the bottom of the basin.
Q4: What is the difference between sink length and sink width?
A4: Sink length typically refers to the measurement across the longest exterior edge of the sink basin from one side to the other. Sink width is the measurement across the widest exterior edge, usually from the front of the sink to the back.
Q5: Do undermount sink measurements differ significantly from drop-in sink measurements?
A5: Yes, undermount sink measurements focus more on the interior basin dimensions and the precise countertop cutout, as the sink sits below the counter. Drop-in sink measurements involve the overall exterior dimensions and the slightly smaller countertop opening needed for the rim to sit on top of the counter. Both require accurate sink dimensions, but the critical reference point shifts.
Q6: What does “sink size” usually refer to?
A6: “Sink size” often refers to the overall exterior dimensions (length and width) of the sink basin, or sometimes the minimum cabinet size it’s designed to fit into. It’s always best to check the manufacturer’s specifications for a complete breakdown of sink dimensions.
Q7: How do I measure for a farmhouse sink?
A7: For farmhouse sink measurements, you’ll need to measure the overall length and width of the unit, including the apron front. Crucially, you’ll also measure the height of the apron itself and the width of the cabinet it will occupy, as these sinks often require specific cabinet configurations.
Q8: What are “sink cutout dimensions”?
A8: Sink cutout dimensions are the precise measurements of the hole that needs to be cut into your countertop to accommodate the sink. For drop-in sinks, this opening is usually slightly smaller than the sink’s outer edge. For undermount sinks, the cutout dimensions are critical and must match the sink’s exterior basin dimensions precisely.
Q9: Is it okay if the new sink’s measurements are slightly larger than the old sink’s?
A9: For drop-in sinks, if the new sink’s overall dimensions are larger than the existing cutout, you will likely need to have your countertop professionally modified. For undermount sinks, the cutout in the countertop is paramount; the new sink must fit within these exact specifications. Always err on the side of caution and choose a sink that matches or is slightly smaller in critical dimensions if modifications are not planned.