
So, how many can lights do you need in your kitchen? The general rule of thumb for determining can light quantity is to place one light for every 4 to 6 feet of ceiling space, accounting for room dimensions and task areas. This guide will help you navigate the world of recessed lighting kitchen to create the perfect kitchen lighting layout.
Lighting your kitchen is more than just flipping a switch; it’s about creating an inviting, functional, and safe space. Can lights, also known as recessed lights, are a popular choice for kitchen ceiling lights due to their sleek, unobtrusive design. They provide ambient, task, and accent lighting, contributing significantly to the overall kitchen lighting design. But figuring out how many recessed lights to install can be a bit of a puzzle. Let’s break down the process of determining can light quantity and achieving optimal recessed lighting placement.
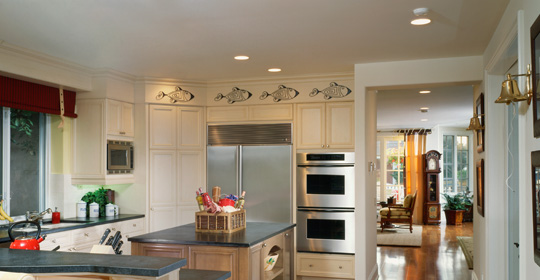
Image Source: www.lampsplus.com
The Science Behind Can Light Spacing
When we talk about can light spacing, we’re referring to the distance between each recessed fixture. Proper spacing ensures even light distribution, preventing dark spots and overly bright areas. The goal is to illuminate your kitchen effectively without any glare or shadows that could hinder your cooking or cleaning tasks.
Calculating Your Kitchen’s Lighting Needs
Before diving into specific numbers, it’s essential to consider the size and layout of your kitchen. No two kitchens are identical, and your lighting plan should reflect your unique space.
Factors Influencing Can Light Quantity
- Room Size: The most obvious factor is the square footage of your kitchen. Larger kitchens will naturally require more lights than smaller ones.
- Ceiling Height: Higher ceilings mean light needs to travel further, potentially requiring more or brighter fixtures to achieve the same level of illumination. Conversely, lower ceilings can sometimes feel overwhelmed by too many lights.
- Purpose of Lighting: Are you aiming for general ambient light, focused task lighting over countertops and the stove, or accent lighting to highlight specific features? This will dictate where your lights are placed and how many you need.
- Type of Fixture: The beam angle and lumen output of your chosen can lights will affect how much space each light can cover effectively. Wider beam angles spread light further.
- Cabinetry and Obstructions: If you have extensive upper cabinets, you’ll need to plan your recessed lighting placement carefully to avoid shadows cast by the cabinets. Under-cabinet lighting is often used in conjunction with overhead recessed lighting kitchen for this very reason.
- Personal Preference: Ultimately, how bright you like your kitchen is a personal choice. Some people prefer a brighter, more energized space, while others opt for a softer, more subdued ambiance.
The 4-to-6-Foot Rule of Thumb
A widely accepted guideline for general ambient lighting with can lights is to place them about 4 to 6 feet apart. This spacing is a good starting point for achieving even illumination across the ceiling.
How to Apply the 4-to-6-Foot Rule:
- Measure Your Room: Get the length and width of your kitchen in feet.
- Divide by Spacing: Divide the length of your kitchen by your chosen spacing (e.g., 5 feet). Do the same for the width.
- Calculate Lights per Row/Column: The results from step 2 will give you an approximate number of lights needed for each row or column running across your kitchen.
- Total Lights: Multiply the number of lights per row by the number of rows needed to cover the entire ceiling.
Example:
Imagine a kitchen that is 12 feet wide and 16 feet long.
- Width: 12 feet / 5 feet (spacing) = 2.4. You’ll likely need 3 lights along the width.
- Length: 16 feet / 5 feet (spacing) = 3.2. You’ll likely need 4 lights along the length.
- Total Lights: 3 lights (width) * 4 lights (length) = 12 can lights.
This is a simplified calculation. We’ll refine this with more nuanced placement strategies.
Advanced Strategies for Kitchen Lighting Layout
While the 4-to-6-foot rule is a solid foundation, a truly effective kitchen lighting layout considers the specific functions of different areas within your kitchen. This is where recessed lighting placement becomes an art as much as a science.
Zone Lighting for Functionality
Your kitchen isn’t just one large space; it’s a collection of zones, each with its own lighting requirements.
Task Lighting Zones:
- Countertops: This is arguably the most critical task area. You need bright, shadow-free light for chopping, mixing, and preparing food. Typically, lights are placed 2 to 3 feet from the wall and about 2 to 3 feet apart along the length of the counter. This ensures that your body doesn’t cast shadows on your work surface.
- Stovetop/Range: Adequate lighting here is essential for safe cooking. Consider placing can lights strategically to illuminate the entire cooking surface. If you have a range hood with built-in lighting, you might need fewer overhead lights directly above the stove.
- Sink Area: Similar to countertops, the sink requires good lighting for washing dishes and general cleanup.
Ambient Lighting:
- General Illumination: This is the base layer of light that provides overall brightness to the room. The 4-to-6-foot rule is primarily for ambient lighting. These lights are usually placed in a grid pattern across the ceiling, avoiding direct placement over major task areas which are handled by more targeted lighting.
Accent Lighting:
- Highlighting Features: This could include illuminating artwork, plants, or architectural details. For accent lighting, you might use narrower beam angle fixtures and place them closer to the object being highlighted.
Placement Considerations for Different Ceiling Heights
The height of your ceiling plays a crucial role in determining both the number and type of can lights you’ll need.
Standard Ceilings (8-10 feet):
- Spacing: The 4-to-6-foot rule is generally effective here.
- Fixture Type: Standard 6-inch or 4-inch recessed housings work well. Choose trims with appropriate beam angles to avoid harsh light or overly concentrated beams.
High Ceilings (10 feet and above):
- Spacing: You might need to reduce the spacing slightly, perhaps to 3 to 5 feet, to ensure adequate light reaches the working surfaces.
- Fixture Type: Consider using larger aperture (6-inch or even 8-inch) housings with higher lumen output bulbs. Alternatively, you can use more of the standard-sized fixtures. Using adjustable or gimbal trims can also help direct light downwards more effectively.
Low Ceilings (8 feet and below):
- Spacing: You may be able to use slightly wider spacing, perhaps 5 to 7 feet, but it’s crucial to test a few locations to ensure even coverage.
- Fixture Type: Opt for smaller aperture (4-inch or even 3-inch) recessed housings. These create a less imposing presence and can provide focused light without making the ceiling feel cluttered. Lower wattage bulbs are often sufficient.
The Role of Beam Angle
The beam angle of your recessed light bulb (or integrated LED fixture) determines how wide or narrow the light cone is.
- Wide Beam Angle (90-120 degrees): Excellent for general ambient lighting, covering a larger area.
- Medium Beam Angle (60-90 degrees): A good all-rounder, suitable for ambient and some task lighting.
- Narrow Beam Angle (30-50 degrees): Ideal for accent lighting or focused task lighting where you need a more directed beam.
When calculating can light spacing, you need to consider the beam angle to ensure the light cones overlap sufficiently to create even illumination.
Using a Can Light Calculator
To simplify the process, many online tools and can light calculators are available. These calculators typically ask for your room dimensions, ceiling height, and desired light level (foot-candles), then suggest the number and placement of lights.
How Can Light Calculators Work:
- Input Room Dimensions: Enter the length, width, and ceiling height of your kitchen.
- Specify Desired Brightness: You might choose a general brightness level or specify foot-candle requirements for different tasks (e.g., 50-75 foot-candles for countertops).
- Select Fixture Type: Some calculators allow you to input the lumen output and beam angle of the specific can lights you plan to use.
- Get Recommendations: The calculator will then provide a suggested number of lights and often a diagram showing optimal recessed lighting placement.
While a calculator is a great tool, it’s important to remember that it’s a guide, not a rigid rule. Always consider your specific kitchen’s layout and your personal preferences.
Determining the Average Number of Can Lights
So, what’s the average number of can lights you might find in a kitchen? For a standard-sized kitchen (say, 10×12 feet to 15×20 feet) with 8-foot ceilings, you might typically see anywhere from 8 to 16 can lights. However, this number can vary significantly based on the factors we’ve discussed.
Factors that Increase the Number of Lights:
- Larger kitchen dimensions.
- Higher ceilings.
- Desire for brighter overall lighting.
- Need for more focused task lighting in multiple areas.
- Complex kitchen layouts with many nooks and crannies.
Factors that Decrease the Number of Lights:
- Smaller kitchen dimensions.
- Lower ceilings.
- Preference for a softer ambiance.
- Reliance on other light sources like pendant lights or under-cabinet lighting.
- Open-concept living spaces where the kitchen lighting needs to blend with adjacent areas.
Creating the Perfect Kitchen Lighting Design
Achieving the ideal kitchen lighting design involves layering different types of light. Can lights are excellent for ambient and some task lighting, but they often work best in conjunction with other fixtures.
Layering Your Kitchen Lights:
- Ambient Layer: This is your primary illumination, often provided by your recessed lighting kitchen grid.
- Task Layer: Focused lighting for specific activities. This can include under-cabinet lights, pendant lights over an island or peninsula, or a spotlight over the stove.
- Accent Layer: Used to draw attention to decorative elements or architectural features. This might be dimmable spotlights or wall sconces.
The Impact of Can Light Size
The size of the can itself (housing diameter) influences the aesthetics and light spread.
- 6-inch cans: The most common size, offering a good balance of light output and coverage for most kitchens.
- 4-inch cans: Better suited for smaller kitchens, lower ceilings, or for more focused task lighting. They create a less visually dominant ceiling.
- 3-inch cans: Excellent for very small kitchens, narrow hallways within the kitchen, or for precise accent lighting.
- 8-inch cans: Generally too large and overpowering for most residential kitchens, but might be considered for very large, open-plan areas with high ceilings.
Dimmers: Your Best Friend for Versatility
Installing dimmer switches on your can lights is a game-changer. Dimmers allow you to adjust the light intensity, transforming the mood of your kitchen from bright and functional for cooking to soft and inviting for dining or relaxing. This adds a significant layer of flexibility to your kitchen lighting design.
Common Pitfalls to Avoid
Even with thorough planning, it’s easy to make mistakes when installing recessed lighting kitchen. Being aware of common errors can help you achieve a superior outcome.
Over-Lighting or Under-Lighting
- Over-lighting: Installing too many lights can make the kitchen feel harsh, clinical, and energy-inefficient. It can also create a visually cluttered ceiling.
- Under-lighting: Not enough light leads to dim corners, shadows on work surfaces, and a generally uninviting atmosphere. This is particularly problematic for task areas.
Incorrect Spacing and Placement
- Lights too close to walls: Can cast unflattering shadows on cabinets or appliances.
- Lights too far from walls: Can leave the perimeter of the room in darkness.
- Lights directly over cabinets: Can create glare and unappealing light patterns on the cabinets themselves.
Ignoring Other Light Sources
Relying solely on can lights can lead to a flat, uninspired lighting scheme. Integrating pendants, under-cabinet lighting, and even decorative ceiling fixtures creates depth and visual interest.
Choosing the Wrong Bulb Type
- Color Temperature: Warm white (2700K-3000K) is generally best for kitchens to create a welcoming atmosphere. Cooler temperatures (4000K+) can feel sterile.
- Brightness (Lumens): Ensure your bulbs provide sufficient lumens for the task without being overly bright.
- Beam Angle: As discussed, the beam angle must match the intended use of the light.
Frequently Asked Questions About Kitchen Can Lights
Q1: What is the ideal distance between can lights in a kitchen?
A1: For general ambient lighting, aim for a distance of 4 to 6 feet between can lights. For task lighting over countertops, reduce the spacing to 2 to 3 feet from the wall and 2 to 3 feet apart along the length of the counter.
Q2: How do I calculate how many recessed lights I need?
A2: Measure your kitchen’s length and width. A common method is to divide these dimensions by your desired spacing (e.g., 5 feet) to get the approximate number of lights needed per row or column. Use online can light calculators for more precise recommendations based on your specific room dimensions and desired brightness.
Q3: Can I put can lights directly over kitchen cabinets?
A3: It’s generally not recommended to place can lights directly over upper cabinets, as this can create distracting glare on the cabinet doors and cast unwanted shadows on the countertop below. It’s better to place them closer to the edge of the countertop (about 2-3 feet from the wall) for optimal task lighting.
Q4: What is the average number of can lights for a standard-sized kitchen?
A4: For a typical kitchen (around 150-200 sq ft) with 8-foot ceilings, the average number of can lights is usually between 8 and 16, depending on the desired brightness and the inclusion of task lighting.
Q5: Should I use 4-inch or 6-inch can lights in my kitchen?
A5: 6-inch cans are standard and good for general illumination in most kitchens. 4-inch cans are ideal for smaller kitchens, lower ceilings, or for more targeted task lighting, as they create a less obtrusive visual presence and can be spaced closer together if needed.
Q6: How do I avoid shadows with my recessed lighting kitchen layout?
A6: Proper recessed lighting placement is key. For countertops, position lights closer to the edge of the cabinets (2-3 feet from the wall) and space them evenly. Consider using wider beam angle bulbs for ambient lighting. Under-cabinet lighting is also highly effective at eliminating shadows on countertops.
Q7: What are the best types of bulbs for kitchen can lights?
A7: LED bulbs are highly recommended for their energy efficiency and longevity. Choose bulbs with a color temperature of 2700K-3000K (warm white) for a welcoming atmosphere. Ensure the lumen output and beam angle are appropriate for the intended use (ambient, task, or accent lighting).
Q8: Do I need a special layout for an L-shaped kitchen?
A8: Yes, an L-shaped kitchen requires a thoughtful kitchen lighting layout. Plan for ambient lighting in the center and along the corridors, and ensure task lighting is strategically placed over all countertop work areas, including both arms of the ‘L’.
Q9: How important is dimming for kitchen can lights?
A9: Dimming is very important for flexibility. It allows you to adjust the light levels to suit different activities, from bright task lighting during cooking to a softer, more ambient glow for dining or entertaining.
By carefully considering your kitchen’s dimensions, the functions of different zones, and the types of fixtures available, you can create a kitchen lighting design that is both beautiful and highly functional. Remember, proper can light spacing and thoughtful recessed lighting placement are the cornerstones of effective kitchen ceiling lights. Utilize resources like a can light calculator and consider layering your lighting for the best results.