
Can you build a kitchen counter frame yourself? Yes, you can build a kitchen counter frame yourself with basic tools and a clear plan. This guide will walk you through each step.
Building a sturdy kitchen counter frame is the foundation of a beautiful and functional kitchen. Whether you’re building a new kitchen island or replacing an old countertop, creating a solid substructure is crucial. This process involves more than just placing a slab of material; it requires careful planning and construction. This detailed guide will cover everything from initial measurements to final touches, helping you achieve a professional-looking result. We’ll explore framing kitchen base cabinets, building a DIY kitchen island frame, and ensuring proper wood counter support.
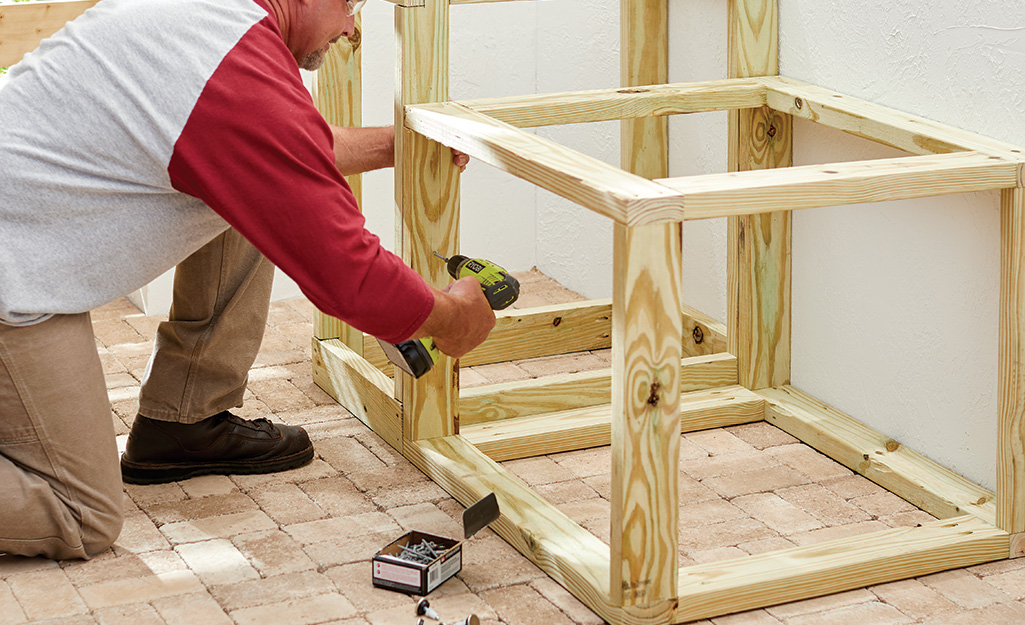
Image Source: contentgrid.homedepot-static.com
Getting Started: Planning and Preparation
Before you pick up a saw, good planning is key. This prevents mistakes and saves you time and money.
Measuring Your Space
Accurate measurements are the first step in building any kitchen feature.
- Measure the total length and depth: Use a tape measure to get the exact dimensions of where your counter will sit.
- Check for squareness: Use a large framing square or the 3-4-5 method (measure 3 feet along one wall, 4 feet along the adjacent wall, and the diagonal should be 5 feet). If it’s not square, you’ll need to adjust your frame to compensate.
- Account for appliances: If you’re building around a dishwasher, stove, or refrigerator, measure their exact dimensions and ensure your frame leaves adequate space. Remember to factor in ventilation needs for appliances like ranges.
- Note existing structures: Measure the height of any existing cabinets or walls your new frame will connect to.
Choosing Your Materials
The materials you choose will affect the durability, look, and cost of your project.
- Framing Lumber:
- 2x4s or 2x6s: These are standard for framing. 2x4s are generally sufficient for most countertops, but if you’re using a very heavy material like granite or marble, 2x6s will provide extra strength and support.
- Plywood or OSB (Oriented Strand Board): These are used for the countertop surface that the actual countertop material will sit on. Use at least ¾-inch thick plywood or OSB for good support. Moisture-resistant (MR) plywood is a good choice for kitchens.
- Fasteners:
- Wood Screws: Use quality wood screws, typically 2 ½-inch for joining 2x lumber and 1 ¼-inch for attaching plywood.
- Nails: While screws are generally preferred for their holding power, finish nails can be used for attaching the plywood surface.
- Adhesive: Wood glue is a great addition to joints for extra strength.
Gathering Your Tools
Having the right tools makes the job easier and safer.
- Measuring Tape: Essential for accurate measurements.
- Pencil: For marking cut lines.
- Safety Glasses: Always protect your eyes when cutting or drilling.
- Hearing Protection: Especially important when using power saws.
- Circular Saw or Miter Saw: For cutting lumber accurately. A miter saw will give cleaner, more precise cuts.
- Jigsaw: Useful for making cutouts for sinks or cooktops.
- Drill/Driver: For pre-drilling holes and driving screws.
- Level: To ensure your frame is perfectly horizontal.
- Speed Square or Framing Square: For marking straight lines and checking 90-degree angles.
- Clamps: To hold pieces together while you fasten them.
- Sander (optional): For smoothing rough edges.
Building the Kitchen Counter Frame: Step-by-Step
Now, let’s get into the actual construction process. This is where your measurements and chosen materials come into play.
Step 1: Constructing the Base Cabinets (if applicable)
If your counter design involves base cabinets, building these is your first major step. This is similar to building cabinet carcasses.
- Determine cabinet dimensions: Decide on the height, width, and depth of each cabinet. Standard kitchen cabinet height is typically around 34.5 inches to accommodate a 1.5-inch countertop for a total of 36 inches.
- Cut cabinet parts: You’ll need pieces for the cabinet sides, top, bottom, and back.
- Sides: Cut two identical pieces for the cabinet sides.
- Top and Bottom: Cut two pieces that match the width of your cabinet and the desired depth.
- Back: Cut a piece for the back. This can be made of plywood or hardboard.
- Assemble cabinet carcasses:
- Apply wood glue to the edges where pieces will join.
- Use screws to attach the sides to the bottom piece. Ensure the edges are flush.
- Attach the top piece in the same way.
- Secure the back panel. Pre-drilling pilot holes will prevent the wood from splitting.
- Framing kitchen base cabinets: Ensure the cabinets are plumb (vertical) and level (horizontal) before securing them. You may need to shim them against the wall.
Step 2: Creating the Base Frame (for islands or standalone counters)
For DIY kitchen island frames or counters that don’t sit on existing cabinets, you’ll build a robust base structure.
- Cut your lumber:
- Top Rails: Cut pieces to the desired length and width of your countertop. These will form the perimeter of the top of your frame.
- Vertical Supports (Legs): Cut pieces to the desired height of your counter minus the thickness of your top rails and countertop material.
- Horizontal Supports (Stretchers): Cut pieces to add stability between the vertical supports.
- Assemble the base:
- Build the perimeter: Take your top rail pieces and create a rectangular or square frame. Use wood glue and screws to join the corners, ensuring they are perfectly square.
- Add vertical supports: Place your vertical supports inside the perimeter frame at the desired intervals. These should be plumb and securely attached to the top rails. You can attach them from the outside of the top rails using screws.
- Install horizontal supports: Add horizontal supports between the vertical legs for added strength, especially if you plan to store heavy items in the base.
- Consider a toe kick: If you want a finished look, you can frame a toe kick at the bottom front of the island. This involves adding a lower horizontal piece and vertical supports to create the recessed area.
Step 3: Installing the Kitchen Counter Support System
This is where you ensure your frame can hold the weight of your chosen countertop material. This step is crucial for wood counter support and heavy stone slabs.
- Internal Bracing: Depending on the span and the weight of your countertop, you might need additional internal bracing.
- For standard granite/quartz (up to 3cm thick): The plywood/OSB subtop is usually sufficient if the underlying frame is well-built.
- For thicker slabs or very heavy materials: You may need to add solid wood blocks or even steel brackets at key support points, especially at the front edge and any overhangs.
- Adding a Plywood Subtop: Once the base frame is complete, attach a layer of ¾-inch plywood or OSB. This provides a smooth, even surface for the countertop to rest on and distributes the weight.
- Cut the plywood/OSB to the exact dimensions of your frame.
- Apply wood glue to the top edges of the frame.
- Lay the plywood/OSB in place and secure it with 1 ¼-inch screws, spaced about 6 inches apart along the edges and 10-12 inches apart in the field. Ensure the screws are countersunk slightly so they don’t interfere with the countertop.
- Reinforcing Edges: The front edge of the countertop often carries the most weight and is where people tend to lean. Reinforce this edge by doubling up on the lumber or adding an extra apron piece. This creates excellent kitchen counter support.
Step 4: Adding Support for Overhangs
Overhangs, whether on the seating side of an island or the front edge, require special attention.
- Support Brackets: For overhangs exceeding 10-12 inches, you’ll need additional support.
- L-Brackets: Heavy-duty steel L-brackets can be securely screwed to the main frame and the underside of the countertop subtop.
- Cleats: You can also add wooden cleats (strips of 2x lumber) to the underside of the frame that extend out to support the overhang.
- Cantilevered Supports: For significant overhangs, you might need to build supports that extend from the main frame outward. These can be made from thicker lumber or specialized metal supports.
- Consider Countertop Material: The type of countertop material dictates how much support is needed. Laminate is light and forgiving, while granite, quartz, and concrete are very heavy and require robust support.
Step 5: Cutouts for Sinks and Cooktops
If your design includes a sink or cooktop, you’ll need to make precise cutouts in the plywood subtop.
- Mark the Cutout: Use the template provided with your sink or cooktop to accurately mark the cutout on the plywood.
- Drill Pilot Holes: Drill a pilot hole inside the marked area, large enough for your jigsaw blade to enter.
- Cut the Opening: Carefully cut along the marked lines with a jigsaw. Use a fine-tooth blade for cleaner cuts.
- Reinforce the Edges: The cut edges of the plywood can be weak. Reinforce these areas by attaching 1×2 or 2×2 lumber strips around the inside perimeter of the cutout, flush with the top surface. This provides crucial kitchen counter support for the edges of the cutout and helps prevent the plywood from cracking.
Step 6: Finishing Touches and Leveling
Once the main frame and subtop are in place, it’s time for final checks.
- Check for Level: Place your level on top of the plywood subtop in multiple places. If it’s not perfectly level, you may need to add thin shims under the frame at specific points or sand down high spots.
- Secure to Walls/Floors: If your frame is attached to walls or cabinets, ensure those connections are secure. For island frames, anchoring them to the floor can add stability, especially in earthquake-prone areas.
- Smooth Edges: Lightly sand any rough edges on the plywood subtop to avoid snags.
Assembling Kitchen Cabinets and Countertop Framing
The process of assembling kitchen cabinets and then framing for the countertop involves a systematic approach. Once your cabinet carcasses are built and installed, you’ll then build the countertop framing that sits on top of them.
- Cabinet Placement: Ensure all base cabinets are plumb, level, and securely fastened to the wall studs or to each other.
- Header Boards: Cut 2×4 or 2×6 lumber to span the front and back of the cabinet tops. These will sit on top of the cabinets.
- Side Supports: Cut similar lumber to connect the front and back header boards on the sides of the cabinets.
- Secure Headers and Supports: Attach these header boards and side supports to the top edges of your cabinets using wood glue and screws. Ensure they are flush with the front of the cabinets and create a level surface. This forms the primary kitchen counter support structure.
- Plywood Subtop: As described in Step 3, cover this frame with ¾-inch plywood or OSB, securing it with glue and screws.
Building a DIY Kitchen Island Frame: Key Considerations
A DIY kitchen island frame requires careful planning to ensure it’s both functional and aesthetically pleasing.
- Design Flexibility: Islands offer more design freedom. You can incorporate storage, seating areas, or specific appliance housing.
- Stability: Islands are often free-standing, so stability is paramount. Ensure your base frame is robust and, if necessary, consider anchoring it to the floor.
- Mobility (Optional): If you want a movable island, build a sturdy frame and consider adding heavy-duty casters. Ensure the casters are rated for the total weight of the island and its contents.
- Appliance Integration: If you’re building an island to house a cooktop, dishwasher, or wine fridge, plan the frame’s internal dimensions precisely to accommodate these appliances, including necessary clearances and ventilation. This involves precise building kitchen cabinets with specific dimensions for integrated appliances.
Wood Counter Support: Specific Techniques
When dealing with wood counter support, especially for butcher block or solid wood countertops, a few extra steps can ensure longevity.
- Solid Wood Blocks: For very heavy wood countertops, consider filling the interior of your frame with solid wood blocking, particularly at 16-24 inch intervals. This provides a more continuous and robust support.
- Grain Direction: For butcher block countertops, ensure your frame provides even support across the width of the butcher block to prevent warping.
- Expansion Gaps: Wood expands and contracts with humidity. While the plywood subtop helps, ensure your frame doesn’t rigidly constrict the wood if it’s a solid wood countertop without a plywood layer.
Frequently Asked Questions (FAQ)
Q1: How thick should my plywood subtop be?
For most kitchen countertops, ¾-inch thick plywood or OSB is recommended. This provides a solid, stable surface for your countertop material. For very heavy materials like thick granite or concrete, you might consider ¾-inch marine-grade plywood or even doubling up the layers for extra strength.
Q2: How far apart should my support joists be in the frame?
If you are building a frame from scratch for an island or a longer span, the spacing of your vertical and horizontal supports depends on the countertop material. For standard stone or quartz, framing every 16-24 inches is usually sufficient. For heavier materials or longer overhangs, you might reduce this spacing to 12 inches or add more intermediate supports.
Q3: Can I use particle board instead of plywood for the subtop?
It is strongly discouraged. Particle board is not as strong or moisture-resistant as plywood or OSB and can sag or break under the weight of a countertop, especially in a kitchen environment where moisture is common.
Q4: How do I attach the frame to existing kitchen cabinets?
Ensure the cabinets are level and securely fastened to the wall. You can then attach your header boards and supports directly to the top edges of the cabinets using wood glue and screws. Make sure the screws are long enough to go through your frame material and securely into the cabinet structure.
Q5: What’s the best way to create a waterfall edge frame?
For a waterfall edge, the frame will need to extend down the sides of the cabinets or base structure. This requires precise cutting and assembly of the frame members to create a clean, continuous line with the countertop material. The supports for the waterfall section should be robust and integrated seamlessly with the main frame.
Q6: How do I prepare the frame for a farmhouse sink?
Farmhouse sinks are often heavy and have a specific installation method. You’ll need to build a sturdy frame that supports the front apron of the sink and the basin. This usually involves creating a reinforced opening and ensuring the front cabinet face or frame piece can bear the sink’s weight. Many designers build a dedicated cabinet carcass specifically for a farmhouse sink, often with a thicker front panel or integrated support.
Building a kitchen counter frame might seem daunting, but by following these steps, you can create a strong and stable foundation for your dream kitchen. Remember to measure twice and cut once, prioritize safety, and don’t hesitate to add extra support where needed. Happy building!