
Want to know how to caulk your kitchen backsplash? It’s a straightforward DIY project that protects your walls from moisture and adds a polished look. This guide will show you how to caulk like a pro!
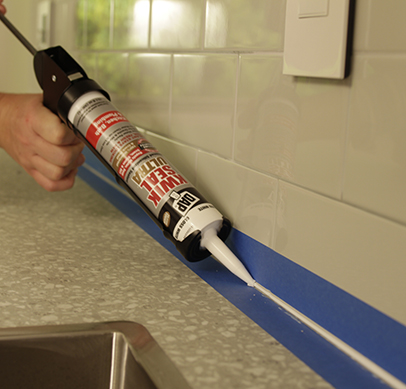
Image Source: www.dap.com
Why Caulk Your Kitchen Backsplash?
Caulking a backsplash is essential for several reasons. First, it acts as a barrier against water and grease. Without caulk, spills and splashes can seep into the grout lines and behind your backsplash, leading to mold, mildew, and even structural damage over time. This is crucial for waterproofing kitchen backsplash areas, especially around sinks and stovetops.
Secondly, caulk fills in those unsightly gaps and seams where the backsplash meets the countertop, walls, or cabinets. These gaps can trap dirt and grime, making cleaning more difficult. A clean bead of caulk provides a smooth transition and a professional finish, significantly enhancing the overall finishing kitchen backsplash aesthetic.
Finally, kitchen backsplash caulk can also help prevent tile grout from cracking or crumbling due to expansion and contraction from temperature changes. By sealing backsplash grout, you extend the life and beauty of your backsplash.
Getting Ready: Tools and Materials
Before you start caulking a backsplash, gather your supplies. Having everything ready makes the process smoother and more efficient.
Essential Tools:
- Caulk Gun: A good caulk gun backsplash application is key. Look for a dripless model with a comfortable grip. Many have a built-in cutter for the nozzle and a release lever for stopping the flow.
- Utility Knife or Caulk Removal Tool: For removing old caulk.
- Putty Knife or Scraper: To scrape away residue.
- Painter’s Tape: For creating clean caulk lines.
- Caulk Finishing Tool or Your Finger: To smooth the caulk bead.
- Damp Cloths or Sponges: For wiping away excess caulk and cleaning up.
- Bucket of Water: For rinsing tools and cleaning.
- Gloves: To protect your hands.
- Safety Glasses: Especially when removing old caulk.
Choosing the Right Caulk:
The best caulk for kitchen backsplash is typically a silicone or siliconized acrylic latex caulk.
- Silicone Caulk: Offers excellent flexibility, durability, and water resistance. It’s ideal for areas prone to moisture and movement. However, it can be a bit trickier to work with and cannot be painted over.
- Siliconized Acrylic Latex Caulk: This is a good all-around choice. It’s easier to apply and clean up than pure silicone, is paintable, and still provides good flexibility and water resistance. It’s a popular option for DIY backsplash caulking.
Consider the color: Most caulk comes in white, clear, or almond. Choose a color that blends with your backsplash or countertop for a seamless look. You can also find colored caulk options.
Step-by-Step Guide to Caulking Your Kitchen Backsplash
Follow these steps for a professional-looking caulk job.
Step 1: Prepare the Area
Proper preparation is vital for a good caulk job.
Removing Old Caulk:
- If you have old caulk, you need to remove it completely. Use a utility knife or a specialized caulk removal tool.
- Carefully cut along the edge of the old caulk bead.
- Pry the old caulk out with the tool or a putty knife.
- Use a scraper or putty knife to remove any remaining residue. Be gentle to avoid damaging the backsplash or countertop.
- Wipe the area clean with a damp cloth to remove dust and debris.
Cleaning the Seams:
- Thoroughly clean the seams where you’ll be applying new caulk. Use an all-purpose cleaner or a degreaser.
- Ensure the surfaces are completely dry before you proceed. Caulk will not adhere properly to wet or dirty surfaces.
Applying Painter’s Tape:
- For crisp, straight lines, use painter’s tape.
- Apply a strip of tape along the edge of the seam where you don’t want caulk. For example, if caulking the seam between the backsplash and the countertop, tape along the edge of the backsplash and the edge of the countertop, leaving a small gap between the tape strips where the caulk will go.
- Aim for the tape to be the desired width of your caulk bead. This creates a guide and makes cleanup much easier.
Step 2: Prepare the Caulk Tube
- Select your best caulk for kitchen backsplash.
- Use the built-in cutter on your caulk gun backsplash tool to cut the tip of the caulk tube. Start with a small opening, about 1/8 inch at a 45-degree angle. You can always cut it larger if needed, but you can’t make it smaller.
- Puncture the inner seal of the caulk tube using the long metal rod on the caulk gun.
Step 3: Apply the Caulk
This is where the backsplash sealant application happens.
- Load the caulk tube into the caulk gun.
- Place the nozzle at a 45-degree angle to the seam.
- Apply steady, even pressure to the trigger of the caulk gun.
- Move the gun along the seam at a consistent speed. The goal is to create a continuous bead of caulk that fills the gap without oozing out excessively.
- Work in manageable sections, about 2-3 feet at a time. This prevents the caulk from drying before you can smooth it.
- When you reach the end of a section or the tube, release the pressure on the caulk gun trigger and pull back slightly to stop the flow. Many caulk guns have a release lever you can push to stop the flow immediately and prevent dripping.
Step 4: Smooth the Caulk Bead
Smoothing is key to a professional finish.
-
Immediately after applying a section of caulk, smooth the bead. You have a few options for this:
- Caulk Finishing Tool: These tools come in various shapes and are designed to create a perfectly smooth bead.
- Damp Finger: Dip your finger in water and gently run it over the caulk bead. Wipe excess caulk from your finger onto a damp cloth frequently. This is a common DIY backsplash caulking technique.
- Spoon or Ice Cream Stick: The rounded edge of a plastic spoon or a craft stick can also work to create a smooth, concave bead.
-
The goal is to push the caulk into the seam and remove excess, leaving a clean, uniform line.
Step 5: Clean Up
- While the caulk is still wet, remove the painter’s tape. Pull it off slowly and at an angle away from the fresh caulk. This will leave a sharp, clean line.
- Wipe away any excess caulk or smudges with a damp cloth. For silicone caulk, use mineral spirits for cleanup; for acrylic latex, use water.
- Clean your tools with water or mineral spirits as recommended for your caulk type.
Step 6: Allow the Caulk to Cure
- Let the caulk cure according to the manufacturer’s instructions. Drying times vary, but most acrylic latex caulks are dry to the touch within an hour and fully cure in 24 hours. Silicone caulk may take longer.
- Avoid getting the caulk wet or disturbing it during the curing process.
Table: Caulk Types and Their Uses
| Caulk Type | Pros | Cons | Best For |
|---|---|---|---|
| Silicone Caulk | Excellent water resistance, very flexible, durable | Difficult to apply evenly, difficult to clean up, cannot be painted | Wet areas, areas with significant movement, high-traffic seams |
| Siliconized Acrylic Latex Caulk | Easy to apply, easy to clean up, paintable, good flexibility | Less flexible than pure silicone, may shrink slightly | General backsplash seams, areas needing paint, DIY projects |
| Acrylic Latex Caulk | Very easy to apply and clean up, paintable, low cost | Less flexible, prone to cracking in high-movement areas | Low-moisture areas, small seams, budget-friendly options |
Tips for a Flawless Finish
- Practice Makes Perfect: If you’re new to caulking, practice on a scrap piece of wood or cardboard before tackling your backsplash.
- Steady Hand: Try to maintain a consistent speed and pressure on the caulk gun.
- Don’t Over-Caulk: Applying too much caulk makes it harder to smooth and creates a mess. It’s better to apply a thin, even bead and add more if needed.
- Keep a Damp Cloth Handy: You’ll need it frequently for wiping your finger or tools.
- Work in Good Light: Proper lighting helps you see where you’re applying caulk and identify any imperfections.
- Ventilation: Ensure the area is well-ventilated, especially when using silicone caulk.
Troubleshooting Common Caulk Issues
Even with the best intentions, you might encounter a few bumps along the way.
Uneven Caulk Bead:
- Cause: Inconsistent pressure on the caulk gun, varying speed, or a poorly cut nozzle.
- Solution: Try smoothing it again immediately with a finishing tool or damp finger. If it’s really bad, remove the wet caulk and reapply.
Caulk Splatter or Smearing:
- Cause: Too much pressure, not pulling the gun away cleanly, or messy smoothing.
- Solution: Use a damp cloth to wipe away excess smearing before it dries. If it’s dried, you might need to use a scraper.
Gaps in the Caulk Line:
- Cause: Not enough caulk applied, or missed spots.
- Solution: Apply a thin bead of caulk over the gap and smooth it into the existing bead.
Caulk Not Sticking:
- Cause: Surface was not clean or dry, or old caulk was not fully removed.
- Solution: Remove the caulk that isn’t adhering and re-prepare the surface thoroughly before reapplying.
Frequently Asked Questions (FAQ)
How long does caulk take to dry?
Drying times vary depending on the type of caulk and humidity. Acrylic latex caulks are typically dry to the touch in about an hour and fully cure in 24 hours. Silicone caulks may take 24-48 hours to fully cure. Always check the manufacturer’s instructions on the caulk tube.
Can I paint over caulk?
Yes, if you use a paintable caulk, such as siliconized acrylic latex. Pure silicone caulk cannot be painted over.
How often should I re-caulk my backsplash?
This depends on the usage and environment. In high-moisture areas or areas with heavy use, you might need to re-caulk every 1-3 years. In less demanding areas, it could last much longer. Look for signs of wear, cracking, or mildew.
What is the best way to remove old caulk?
The best way is to use a utility knife or a specialized caulk removal tool to cut and peel away the old caulk. A putty knife or scraper can help remove residue.
Can I caulk over existing caulk?
It’s generally not recommended to caulk over old caulk. The new caulk may not adhere properly, and the old caulk can crack or peel, ruining the new finish. It’s best to remove all old caulk first.
What is the purpose of painter’s tape when caulking?
Painter’s tape helps create clean, straight lines by providing a guide for the caulk and protecting the surrounding surfaces from excess caulk. It makes cleanup much easier and results in a professional finish.
By following these steps and tips, you can confidently tackle the task of caulking a backsplash yourself. It’s a rewarding DIY project that significantly improves the look and longevity of your kitchen. Enjoy your beautifully finished kitchen backsplash!