
Can you chalk paint kitchen cupboards? Yes, you absolutely can! Chalk painting kitchen cupboards is a fantastic DIY project that can completely transform your kitchen with stunning results. What is chalk paint and why is it so popular for kitchen cabinet makeovers? Chalk paint is a type of decorative paint known for its matte finish and exceptional adhesion, meaning it often requires minimal prep work. This makes it a go-to for furniture and cabinet updates. This guide will walk you through everything you need to know to achieve a beautiful chalk paint kitchen makeover.
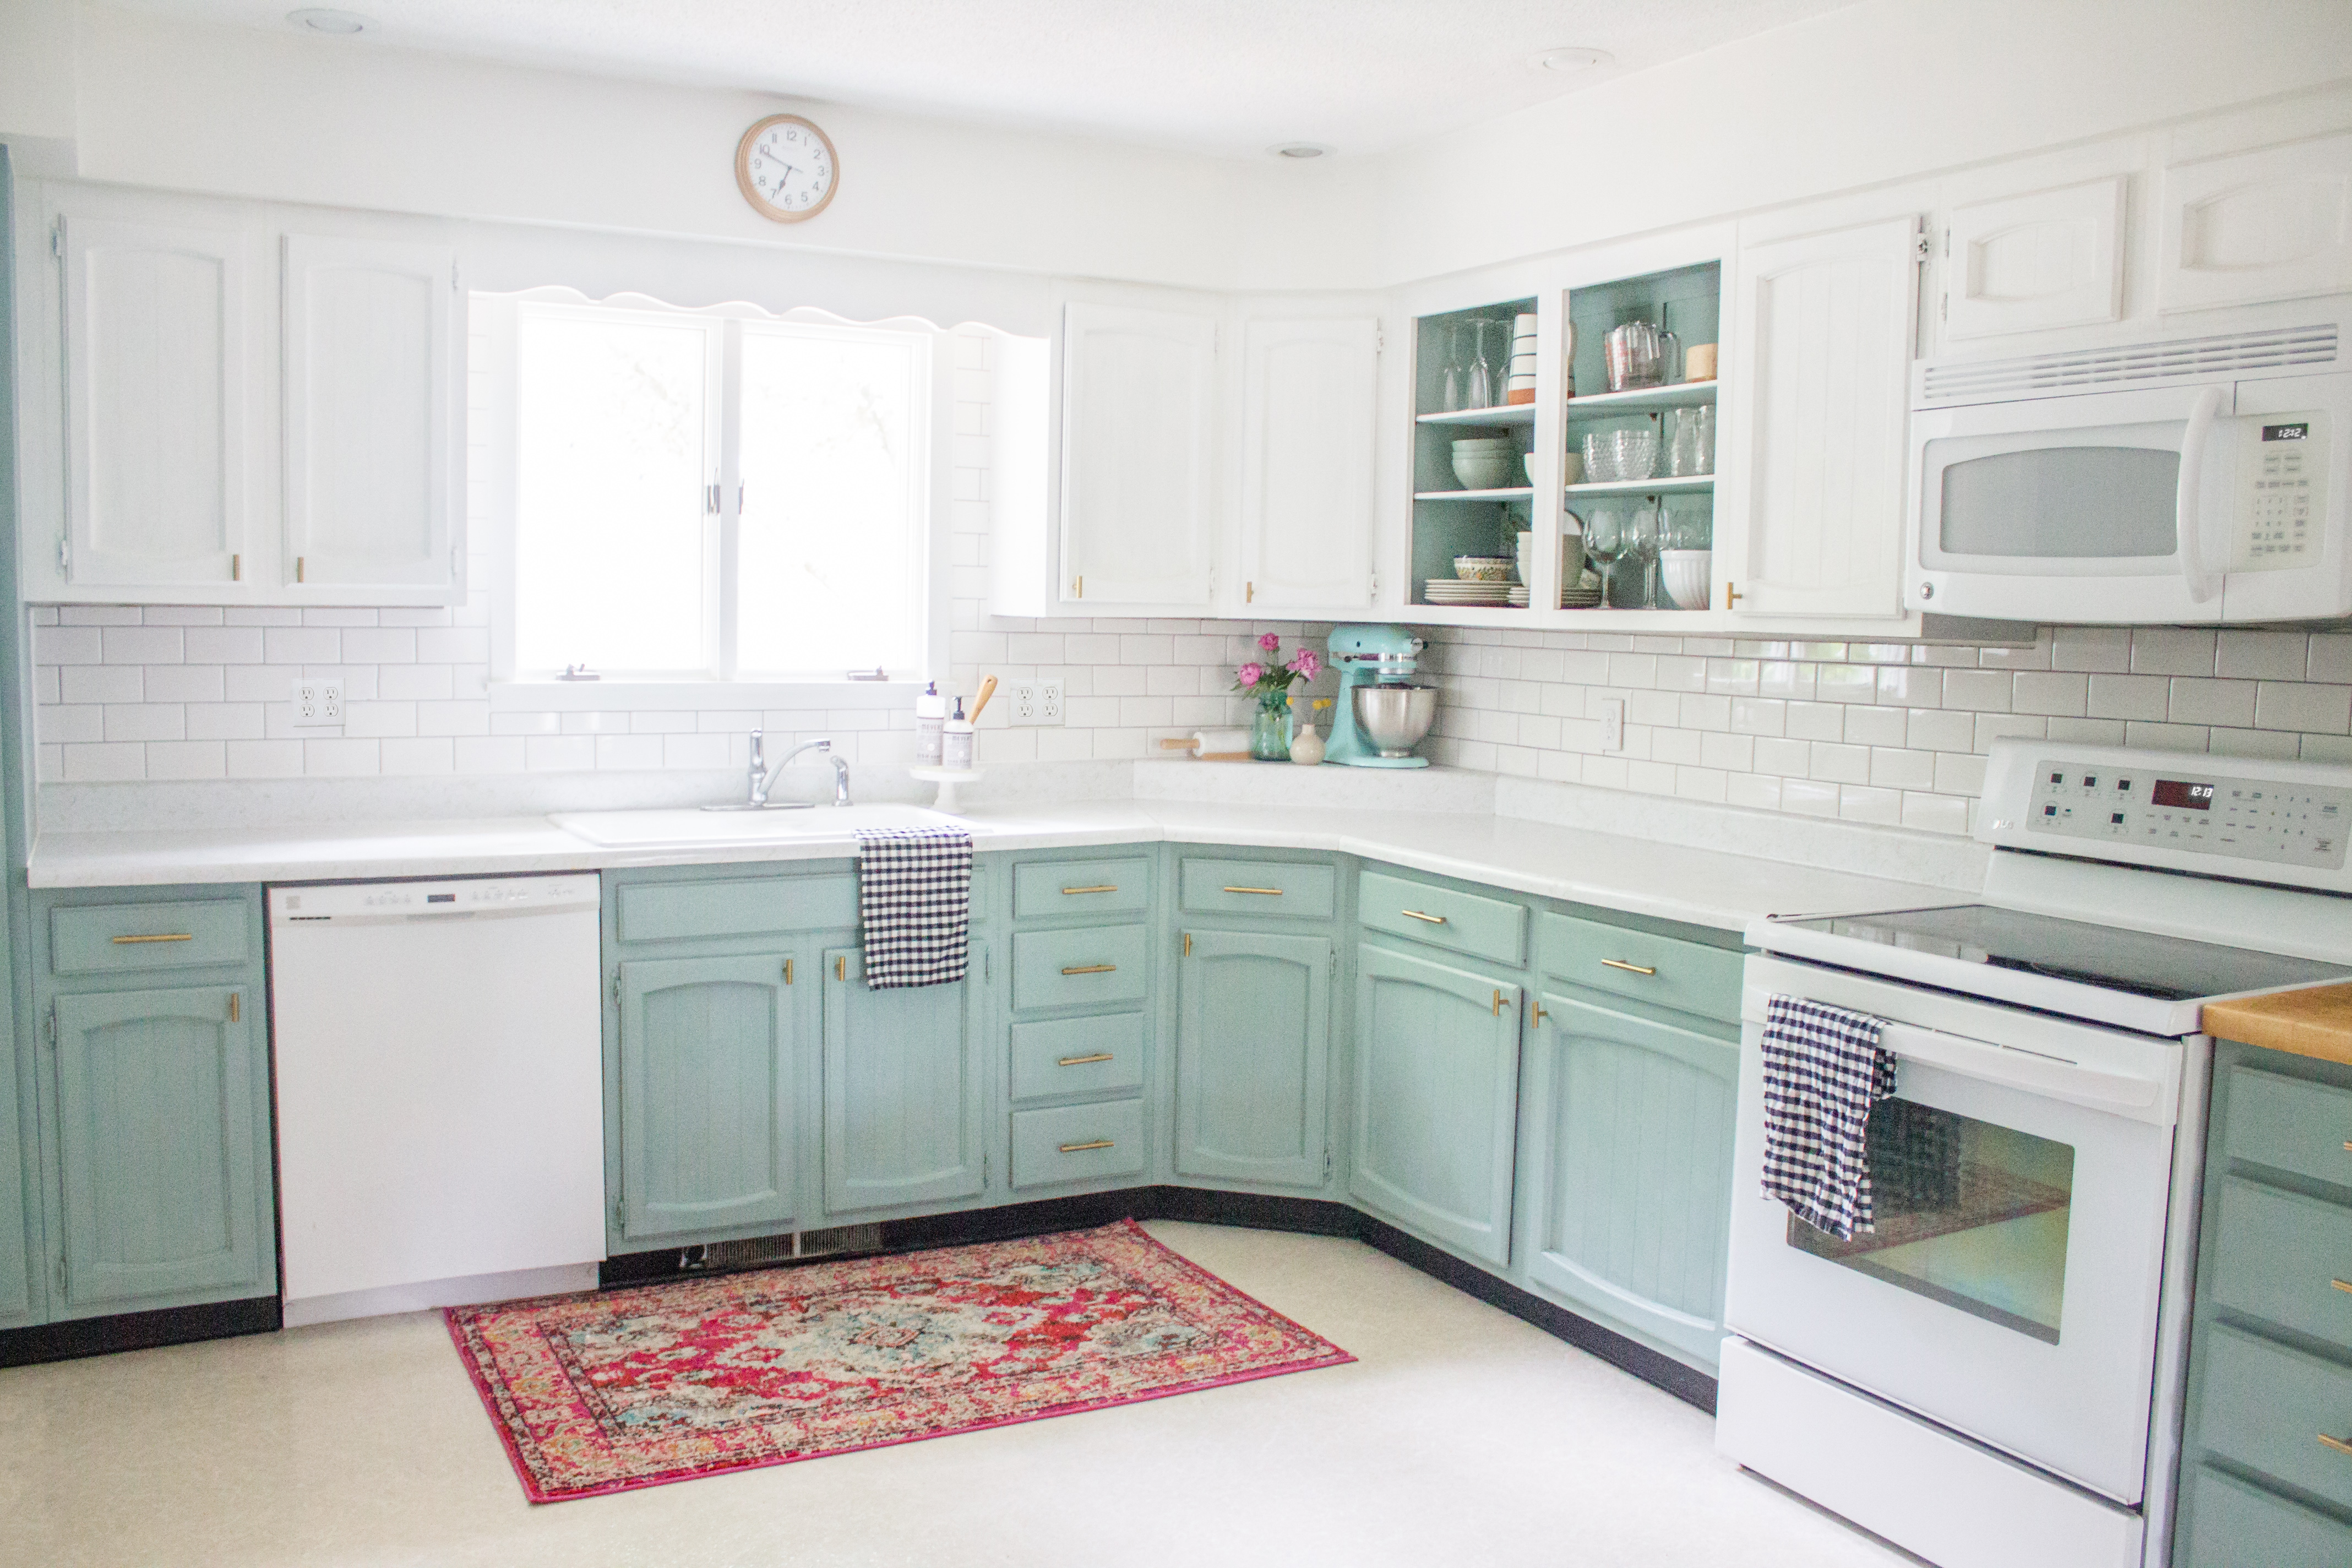
Image Source: hollandavenuehome.com
Deciphering the Appeal of Chalk Paint for Your Kitchen
Many homeowners are drawn to chalk paint for their kitchen cabinets because of its unique properties. It’s a forgiving medium, perfect for DIYers of all skill levels. The chalky finish provides a vintage or rustic aesthetic, but it can also be adapted for modern looks with the right techniques. The primary advantages include:
- Minimal Prep: Unlike traditional cabinet painting, chalk paint often doesn’t require extensive sanding or priming, saving you significant time and effort.
- Adhesion: It sticks to virtually any surface, including wood, laminate, metal, and previously painted or varnished finishes.
- Matte Finish: This creates a soft, velvety look that is highly desirable for a classic kitchen aesthetic.
- Easy to Distress: For a charming vintage or farmhouse look, chalk paint distresses beautifully, revealing the underlying layers of paint or wood.
- Versatility: It can be layered, glazed, and waxed for a multitude of finishes, allowing for endless chalk paint kitchen ideas.
Choosing the Best Chalk Paint for Cabinets
When embarking on a DIY chalk paint cupboards project, selecting the right paint is crucial. Several brands offer excellent chalk paint suitable for cabinets, each with its nuances. Consider these factors:
- Durability: Kitchen cabinets endure a lot of wear and tear. Look for chalk paints specifically formulated for high-traffic areas or those known for their hard finish.
- Coverage: Good coverage means you’ll use less paint, saving you money.
- Color Selection: Most brands offer a wide array of colors, from classic neutrals to bold statement shades.
- Ease of Use: Some paints are thicker or thinner, affecting application.
Top Chalk Paint Brands for Kitchen Cabinets
While personal preference plays a role, some brands consistently receive high marks for kitchen cabinet projects.
| Brand Name | Key Features | Best For |
|---|---|---|
| Annie Sloan | The original chalk paint; very rich pigment, buttery texture. | Classic chalky finish, extensive color range, great for layering and distressing. |
| Dixie Belle | Known for excellent coverage and a smooth, durable finish. | Achieving a flawless, contemporary chalk paint look with fewer coats. |
| Fusion Mineral Paint | Technically not chalk paint, but has similar chalky properties and excellent durability. | Those seeking chalk-like appearance with superior built-in topcoat protection. |
| Country Chic Paint | Plant-based, low VOC, and very durable once sealed. | Eco-conscious DIYers who want a tough, beautiful finish. |
| Rust-Oleum Chalked | Widely available and budget-friendly. | Budget-friendly projects and those new to chalk painting. |
What About Spray Chalk Paint Kitchen?
Yes, spray chalk paint kitchen applications are a viable option, especially for achieving a smooth, factory-like finish on cabinet doors and drawer fronts. Spray chalk paints offer speed and even coverage, reducing the risk of brush strokes. However, ensure you have proper ventilation and a spray gun or aerosol cans specifically designed for furniture.
How to Prep Cabinets for Chalk Paint: The Foundation of Success
While chalk paint is forgiving, proper preparation is still essential for a long-lasting, beautiful finish. How to prep cabinets for chalk paint might seem daunting, but it’s straightforward. Skipping these steps can lead to adhesion issues or a less-than-perfect final look.
Step 1: Detach and Disassemble
- Remove Doors and Drawers: Take off all cabinet doors, drawer fronts, and hardware (knobs, hinges). This allows for easier access and a more even finish.
- Label Everything: Use masking tape and a marker to label each door and drawer with its corresponding cabinet location. This is crucial for reassembly.
Step 2: Thorough Cleaning
This is arguably the most critical step. Grease, grime, and residue can prevent the paint from adhering properly.
- Degrease: Use a good degreaser. A common and effective solution is TSP (Trisodium Phosphate) substitute, diluted according to the package instructions. Alternatively, a mixture of warm water and dish soap can work for light grease. For stubborn grime, consider a dedicated kitchen degreaser.
- Rinse Well: After degreasing, wipe down all surfaces with a clean, damp cloth to remove any cleaning residue. Allow the cabinets to dry completely.
- Clean Hardware: While the cabinets are drying, clean your hardware. A wire brush and metal polish can restore old hardware.
Step 3: Light Scuff Sanding (Optional but Recommended)
While chalk paint adheres well without sanding, a light scuff sand can significantly improve adhesion, especially on slick surfaces like laminate or previously high-gloss painted cabinets.
- Grit: Use a fine-grit sandpaper (220-grit is ideal). You are not trying to remove the existing finish, just to create a slight “tooth” for the paint to grip.
- Technique: Sand in the direction of the wood grain, if applicable. Be gentle.
- Clean Again: After sanding, wipe down all surfaces with a tack cloth or a damp microfiber cloth to remove any dust. Ensure the surfaces are bone dry before painting.
Step 4: Repair Imperfections
- Fill Holes: Use a wood filler to patch any holes or deep scratches. Let it dry completely, then sand smooth with your fine-grit sandpaper.
- Address Dents: For minor dents, sometimes steaming them can help them pop back up, but wood filler is usually the best solution.
Mastering Chalk Paint Cabinet Techniques for a Stunning Finish
Now that your cabinets are prepped, it’s time to bring your chalk paint kitchen update to life. There are several chalk paint cabinet techniques you can employ to achieve different looks.
Technique 1: The Classic Single Color Finish
This is the most straightforward approach.
- Apply First Coat: Stir your chalk paint thoroughly. Apply a thin, even coat using a good quality chalk paint brush or a high-density foam roller. Work in the direction of the grain. Don’t worry about perfect coverage; chalk paint often looks streaky after the first coat.
- Dry Time: Allow the first coat to dry completely according to the manufacturer’s instructions.
- Apply Second Coat: Apply a second coat. Most cabinets will require two to three coats for full, even coverage.
- Drying Between Coats: Ensure each coat is dry to the touch before applying the next.
Technique 2: Layering Colors for Depth
This technique adds dimension and character, perfect for a unique chalk paint kitchen makeover.
- Apply Base Coat: Apply your chosen base color as described above. Let it dry completely.
- Apply Second Color: Apply your second color over the base coat. You can apply it evenly or in a more random fashion, allowing some of the base color to show through.
- Distress: Once the top coat is dry, use fine-grit sandpaper (220-grit) or a sanding sponge to gently distress areas that would naturally show wear, such as edges, corners, and around handles. Wipe away dust with a damp cloth.
Technique 3: Distressing for a Vintage Look
This is where chalk paint truly shines for a furniture chalk paint kitchen vibe.
- Paint as Usual: Apply your chalk paint in two to three thin coats, allowing adequate drying time between coats.
- Wet Distressing: While the paint is still slightly tacky (not wet, but not bone dry), use a damp cloth or sponge to gently rub away paint in specific areas to create a softer, more subtle distressed look.
- Dry Distressing: Once the paint is completely dry, use fine-grit sandpaper or a sanding block to gently rub away paint. Focus on edges, corners, and raised panels.
- Clean Dust: Wipe away all sanding dust with a damp cloth.
Technique 4: Glazing for an Aged Effect
Glazing adds an antique, aged patina to your cabinets.
- Paint and Seal: Paint your cabinets your desired color and allow them to dry thoroughly. Then, apply a coat of clear wax or a water-based polycrylic sealant. Let this seal coat dry completely.
- Apply Glaze: Mix your glaze (available commercially or can be made by mixing chalk paint with a glazing medium or even water for a lighter effect). Apply the glaze with a brush or cloth in thin, even layers.
- Wipe Back: Immediately (or according to glaze instructions) wipe back the excess glaze with a clean, lint-free cloth. Work in sections. The glaze will settle into the details and low spots, creating an aged appearance.
- Dry and Seal: Allow the glaze to dry completely, then seal with wax or polycrylic.
Sealing and Protecting Your Chalk Painted Cabinets
Chalk paint has a matte, porous finish that requires protection, especially in a kitchen environment where moisture and grease are prevalent. Sealing is non-negotiable for durability.
Sealing Options: Wax vs. Polycrylic
There are two main types of sealants for chalk paint:
-
Furniture Wax:
- Pros: Provides a beautiful, soft sheen and is easy to apply and repair. It’s the traditional sealant for chalk paint. Available in clear and tinted varieties (e.g., dark wax for an aged look).
- Cons: Less durable than polycrylic, especially against water and heat. May require reapplication over time. Can sometimes feel slightly sticky if not applied properly or if too much is used.
- Application: Apply in thin coats with a wax brush or lint-free cloth. Buff off excess with a clean cloth. Let it cure for at least 24 hours, ideally longer, before heavy use.
-
Water-Based Polycrylic (or Polyurethane):
- Pros: Highly durable, water-resistant, and provides excellent protection against stains and wear. Available in various sheens (matte, satin, semi-gloss).
- Cons: Can sometimes alter the chalky look slightly, making it appear a little more like a traditional paint finish. Application can be trickier to avoid brush strokes.
- Application: Apply thin, even coats with a high-quality synthetic brush or foam roller. Avoid over-brushing. Allow each coat to dry completely before applying the next. Typically, 2-3 coats are recommended.
Which Sealant is Best for Kitchen Cabinets?
For kitchen cabinets, durability and water resistance are paramount. Therefore, a water-based polycrylic or a high-quality furniture wax specifically designed for durability (like a paste wax) is usually recommended over standard furniture wax. If you opt for wax, ensure it’s a high-quality product and consider applying multiple thin coats.
Applying Sealant:
- Ensure Paint is Fully Dry: Allow your chalk paint to dry for at least 24 hours, or even longer, before sealing.
- Apply Sealant:
- Wax: Apply with a wax brush or lint-free cloth in thin, even layers. Buff off any excess with a clean cloth.
- Polycrylic: Apply with a high-quality synthetic brush or foam roller. Work in smooth, even strokes, avoiding over-brushing. Apply 2-3 thin coats, allowing complete drying between each.
- Curing Time: This is crucial! Even after the sealant is dry to the touch, it needs time to cure and reach its full hardness. This can take anywhere from 7 to 30 days, depending on the product and environmental conditions. Be gentle with your cabinets during the curing period.
Reassembly and Final Touches
Once your doors and drawers are painted, sealed, and fully cured, it’s time to reassemble.
- Reattach Hardware: Install your cleaned or new hardware.
- Hang Doors and Reinsert Drawers: Carefully reattach the doors and drawers to their original locations, referring to your labels.
- Admire Your Work: Step back and enjoy your stunning, revitalized kitchen!
Frequently Asked Questions About Chalk Painting Kitchen Cupboards
Q1: Do I really need to wax or seal chalk paint on kitchen cabinets?
Yes, absolutely. Chalk paint is porous and needs a protective topcoat to withstand the demands of a kitchen environment, including moisture, grease, and frequent cleaning.
Q2: What’s the difference between chalk paint and latex paint for cabinets?
Chalk paint is known for its matte finish and minimal prep requirements. Latex paint typically requires significant sanding and priming for proper adhesion and offers a wider range of sheens (satin, semi-gloss, gloss). Chalk paint is more forgiving for DIYers.
Q3: Can I use a paint sprayer for chalk paint?
Yes, you can use a paint sprayer. If you’re using traditional chalk paint, you may need to thin it slightly with water according to the manufacturer’s recommendations to ensure smooth spraying. Spray chalk paint kitchen applications are a great way to achieve a smooth, even finish.
Q4: My chalk paint finish feels rough. What did I do wrong?
This is usually due to the inherent chalky texture. If you prefer a smoother finish, you can lightly sand between coats with very fine-grit sandpaper (320-grit or higher) and wipe away dust with a damp cloth before applying the next coat. Ensure your final coat is applied smoothly.
Q5: How do I clean chalk painted cabinets?
Clean gently with a damp cloth and mild soap if necessary. Avoid abrasive cleaners or scrub brushes, as these can damage the paint or sealant. For tougher spots, use a soft sponge and a diluted solution of mild dish soap. Always dry the cabinets afterward.
Q6: Can I use dark wax over a light chalk paint color?
Yes, this is a popular technique to achieve an aged or antique look. Apply the dark wax in thin layers and wipe back the excess to control the intensity of the aging effect.
Q7: My chalk paint is chipping. What should I do?
Chipping is usually a sign of poor adhesion. This can happen if the cabinets weren’t cleaned thoroughly before painting, if the surface was too slick and not scuff-sanded, or if the sealant wasn’t applied properly or allowed to cure. You may need to lightly sand the affected area, re-prime if necessary, and repaint, ensuring proper sealing.
Q8: How long does chalk paint on kitchen cabinets last?
With proper prep, application, and sealing, chalk painted kitchen cabinets can last for many years. The durability largely depends on the quality of the sealant used and how well it was applied and cured. Regular gentle cleaning will also help maintain the finish.
Q9: What are some popular chalk paint kitchen ideas?
Popular ideas include classic white or cream for a farmhouse look, soft grays or blues for a coastal vibe, deep greens or blues for a sophisticated feel, and two-tone cabinets (e.g., white uppers, dark lowers). Distressing and glazing are also popular techniques to add character.
Q10: Is it better to brush or roll chalk paint on cabinets?
Both methods work. A good quality chalk paint brush will provide a slightly textured finish that is characteristic of chalk paint. A high-density foam roller can give a smoother finish, especially on flat surfaces like cabinet doors. Many people use a combination, using a brush for edges and detail work, and a roller for larger flat areas.
Embarking on a chalk paint kitchen update is a rewarding project that can dramatically alter the appearance of your kitchen without breaking the bank. By following these detailed steps, from careful preparation to skillful application and proper sealing, you can achieve stunning, durable results for your DIY chalk paint cupboards. Your chalk paint cabinets will be a testament to your DIY prowess and a beautiful centerpiece for your home.