
Sure, here’s your blog post:
Can you change the color of kitchen cabinets? Yes, you absolutely can! Changing the color of your kitchen cabinets is a fantastic way to refresh your kitchen’s look. It’s a DIY project that can dramatically update your space without the high cost of replacement. This guide will walk you through everything you need to know for a successful kitchen cabinet painting or refinishing project.
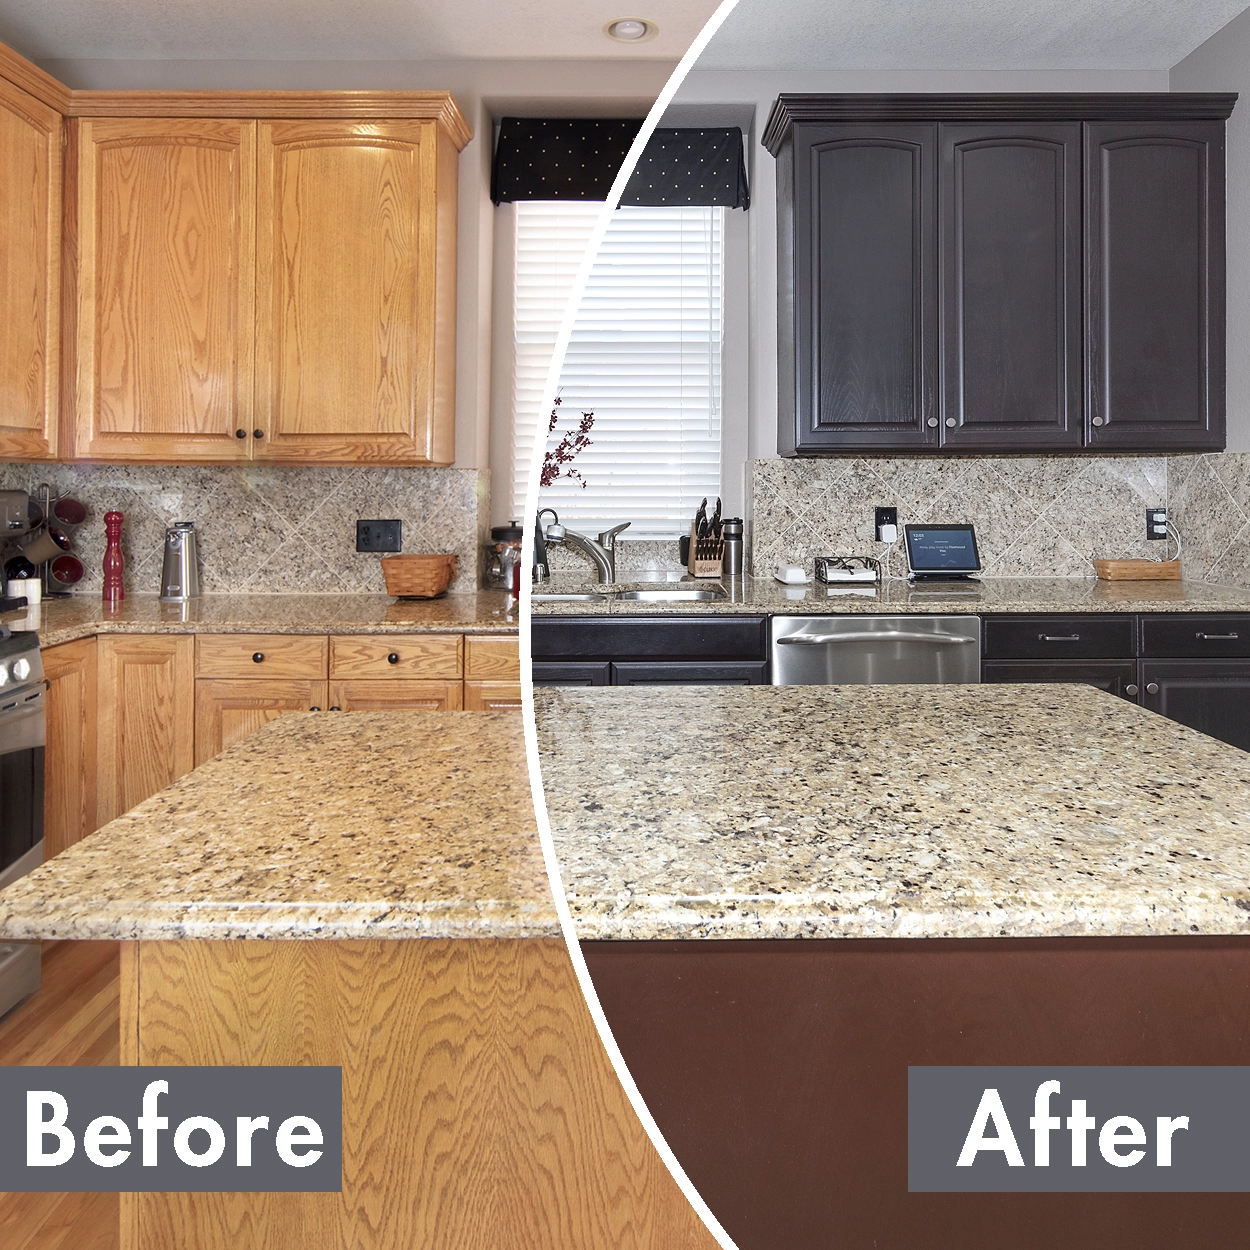
Image Source: www.nhance.com
Why Update Your Kitchen Cabinets?
Is your kitchen looking a little dated? Maybe the cabinets are chipped, worn, or just not your style anymore. Updating kitchen cabinets is one of the most impactful changes you can make. It’s more budget-friendly than a full kitchen remodel and can give your kitchen a completely new feel. Whether you’re looking for sleek modern cabinet refacing colors or a more classic kitchen cabinet refinishing, this project is achievable for most homeowners.
Benefits of DIY Kitchen Cabinet Makeovers:
- Cost Savings: Significantly cheaper than hiring professionals or replacing cabinets.
- Customization: You choose the exact color and finish you want.
- Satisfaction: The pride of transforming your own kitchen.
- Durability: Using the right products can result in a long-lasting finish.
Deciding on Your Kitchen Cabinet Color Ideas
Choosing the right color is the first exciting step! Think about the overall style of your kitchen and what mood you want to create.
Popular Kitchen Cabinet Color Trends:
- Whites and Creams: Timeless, bright, and make spaces feel larger.
- Grays: Versatile, offering a modern yet warm feel.
- Blues and Greens: Offer personality and can create a serene or vibrant atmosphere.
- Black and Dark Tones: Bold, sophisticated, and can add a dramatic touch.
- Wood Tones: Natural wood finishes can bring warmth and texture.
Factors to Consider When Choosing Colors:
- Kitchen Size: Lighter colors can make a small kitchen feel bigger. Darker colors can make a large kitchen feel cozier.
- Natural Light: How much sunlight does your kitchen get? This will affect how the color appears.
- Existing Decor: Consider your countertops, backsplash, flooring, and appliances.
- Desired Mood: Do you want a bright and airy kitchen or a cozy and dramatic one?
A great way to explore ideas is to look at kitchen cabinet color ideas online, in magazines, or even at furniture stores. You can also get small paint samples to test on your actual cabinets before committing.
Prepping for Kitchen Cabinet Painting: The Crucial First Steps
Proper preparation is key to a professional-looking finish. Rushing this stage will lead to peeling paint and a less-than-ideal outcome. This is often the most time-consuming part of how to paint kitchen cabinets.
Step 1: Remove Cabinet Doors and Hardware
- Label Everything: Use painter’s tape and a pen to label each door and drawer front. Note which cabinet it belongs to (e.g., “Upper Left Door,” “Drawer Front 3”). This is vital for reassembly.
- Store Hardware Safely: Place screws and hinges in labeled bags or containers.
- Protect Hinges (Optional): If you plan to reuse the same hinges, you can tape over the areas where the screws go to prevent paint from filling the holes.
Step 2: Clean the Cabinets Thoroughly
Grease and grime are the enemies of good paint adhesion.
- Degreaser: Use a good degreaser, like TSP (trisodium phosphate) substitute or a dedicated cabinet cleaner, to wipe down all surfaces.
- Rinse: Wipe down with a clean, damp cloth to remove any cleaner residue.
- Dry: Ensure cabinets are completely dry before moving to the next step.
Step 3: Sanding for Adhesion
Sanding removes the existing finish and creates a slightly rough surface for the new paint to grip.
- Sanding Block or Orbital Sander: For flat surfaces, an orbital sander can speed things up. For doors and detailed areas, use a sanding block or fine-grit sandpaper.
- Grit: Start with a medium-grit sandpaper (100-150 grit) to remove the old finish or any imperfections. Follow up with a fine-grit sandpaper (220 grit) for a smoother surface.
- Dust Removal: After sanding, use a vacuum with a brush attachment to remove most of the dust. Then, wipe everything down with a tack cloth or a damp microfiber cloth. This step is critical.
Step 4: Repair Imperfections
Fill any holes, dents, or cracks.
- Wood Filler: Use wood filler for dents and gouges. Apply it with a putty knife, pressing it firmly into the damaged area.
- Sanding After Filling: Once the wood filler is dry, sand it smooth so it’s flush with the cabinet surface.
- Re-Clean: Wipe away any dust from the repairs.
Step 5: Priming for a Flawless Finish
Primer is essential for even color, hiding imperfections, and ensuring paint adhesion, especially when kitchen cabinet refinishing. The best paint for kitchen cabinets will adhere much better over a good primer.
- Choose the Right Primer: Use a high-quality bonding primer. For cabinets that have been previously stained or varnished, an oil-based or shellac-based primer is often recommended to block any wood tannins from bleeding through the paint. For previously painted cabinets, a water-based bonding primer may suffice.
- Application: Apply primer in thin, even coats using a high-quality synthetic brush or a foam roller. Avoid heavy application, which can lead to drips.
- Dry Time: Allow the primer to dry completely according to the manufacturer’s instructions.
- Light Sanding: After the primer is dry, lightly sand with 220-grit sandpaper and wipe with a tack cloth. This creates an even smoother surface for your paint.
Painting Your Kitchen Cabinets: Achieving a Professional Look
Now for the fun part – applying the color! Whether you’re kitchen cabinet painting or considering spray painting kitchen cabinets, the technique matters.
Choosing the Best Paint for Kitchen Cabinets
The best paint for kitchen cabinets needs to be durable, washable, and resistant to chipping and moisture.
- Enamel Paints: These are specifically designed for cabinets and trim. They offer a hard, durable finish.
- Oil-Based Enamels: Traditionally known for their hardness and smooth finish. They have a strong odor and require mineral spirits for cleanup.
- Water-Based (Acrylic or Latex) Enamels: Modern water-based enamels are much improved and offer excellent durability, low VOCs (volatile organic compounds), and easy soap-and-water cleanup. Many professionals now prefer high-quality acrylic enamels.
- Paint Sheen:
- Satin: A popular choice for cabinets, offering a subtle sheen that’s easy to clean.
- Semi-Gloss: More durable and easier to wipe down, but the higher sheen can highlight imperfections.
- Gloss: Very durable and easy to clean, but the high shine can be unforgiving of surface flaws.
Application Methods
You have a few options for applying the paint, each with pros and cons.
Method 1: Brushing and Rolling (DIY Friendly)
This is the most accessible method for most DIYers.
- Tools:
- High-quality synthetic paint brushes (for details and edges)
- Foam rollers or high-density mini rollers (for smooth, even coverage on flat surfaces)
- Paint tray
- Painter’s tape
- Technique:
- Doors and Drawer Fronts: Lay them flat on a protected surface. Apply paint in thin, even coats. Brush with the grain of the wood. For rollers, use light, overlapping strokes.
- Cabinet Boxes: Use brushes for corners and edges, and rollers for the main surfaces. Work in small sections.
- Multiple Coats: Apply 2-3 thin coats for best coverage and durability. Allow each coat to dry thoroughly according to the paint manufacturer’s instructions.
- Sanding Between Coats: Lightly sand with 220-grit sandpaper after each coat (except the final one) and wipe with a tack cloth. This ensures a smooth finish.
Method 2: Spray Painting Kitchen Cabinets (Professional Finish)
Spray painting kitchen cabinets provides the smoothest, most factory-like finish but requires specialized equipment and practice.
- Tools:
- Paint sprayer (HVLP – High Volume Low Pressure is recommended for DIY use)
- Appropriate spray paint or thinned paint
- Spray gun cleaner (if using solvent-based paints)
- Respirator mask
- Safety glasses
- Drop cloths and plastic sheeting
- Preparation: This is even more critical with spraying. You must mask off everything you don’t want painted.
- Technique:
- Thinning Paint: Most paints need to be thinned to spray properly. Follow the paint manufacturer’s recommendations for thinning ratios.
- Test Spray: Practice on cardboard or scrap wood to get the pressure and spray pattern right.
- Application: Hold the sprayer a consistent distance from the surface (usually 8-12 inches). Move in smooth, even strokes, overlapping each pass by about 50%.
- Multiple Coats: Apply thin coats. Allow adequate flash-off time (when the solvent evaporates before applying the next coat) as recommended by the paint manufacturer.
- Ventilation: Ensure excellent ventilation when spraying.
Cabinet Refacing Colors and Finishes: Beyond Paint
While painting is a popular choice for updating kitchen cabinets, you might consider other options.
Stain and Glaze
If your cabinets are solid wood and you love the grain, you might opt for kitchen cabinet refinishing with stain.
- Staining: Enhances the natural wood grain and can change the color to a warmer or darker tone.
- Prep: Similar to painting, but you’ll want to sand to bare wood or a smooth, consistent surface.
- Application: Apply stain evenly with a brush or cloth, wipe off excess.
- Glazing: A glaze is a translucent coat applied over a base coat (paint or stain). It settles into the details and crevices, adding depth and an antiqued look.
- Application: Apply glaze, then wipe away excess to reveal the desired effect.
Cabinet Refacing Kits and Veneers
For a truly transformative change, cabinet refacing colors can be achieved with new veneers or pre-finished doors. This is a more involved process, often requiring custom sizing or professional installation.
Reassembling Your Kitchen Cabinets
Once your painted doors and drawer fronts are fully dry (allow at least 24-48 hours for curing), it’s time to put everything back together.
- Re-attach Hardware: Screw hinges back onto the doors and drawer fronts.
- Hang Doors: Carefully re-hang the doors onto the cabinet boxes.
- Install Drawer Fronts: Reattach the drawer fronts.
- Adjust Doors: Adjust the hinges as needed so doors hang straight and close properly.
Maintaining Your Newly Painted Kitchen Cabinets
Proper care will keep your cabinets looking great for years.
- Cleaning: Use a soft, damp cloth and mild soap if necessary. Avoid abrasive cleaners or scrub brushes, which can damage the finish.
- Drying: Wipe cabinets dry after cleaning.
- Avoid Harsh Chemicals: Never use harsh solvents or ammonia-based cleaners.
- Regular Touch-Ups: Keep a small amount of your paint color on hand for any minor chips or scratches.
DIY Kitchen Cabinet Makeover: Summary of Steps
Here’s a quick recap of the process for your diy kitchen cabinet makeover:
| Step Number | Action | Key Considerations |
|---|---|---|
| 1 | Remove Doors & Hardware | Label everything meticulously. |
| 2 | Clean Thoroughly | Use a degreaser to remove all grease and grime. |
| 3 | Sand | Create a surface for paint to adhere. Dust removal is crucial. |
| 4 | Repair Imperfections | Fill holes and dents, then sand smooth. |
| 5 | Prime | Use a good bonding primer for best adhesion and coverage. |
| 6 | Paint | Apply thin, even coats. Allow proper drying and light sanding between coats. |
| 7 | Reassemble | Reattach hardware and hang doors. |
| 8 | Maintain | Clean gently with mild soap and water. |
Kitchen Cabinet Restoration: Breathing New Life into Old Cabinets
Kitchen cabinet restoration is about more than just a new color. It’s about preserving the integrity and beauty of your cabinets. Sometimes, this involves more intensive repairs or a focus on bringing out the natural wood character. The steps outlined for painting can be adapted for restoration, with a greater emphasis on repair and potentially using specialized wood conditioners or finishes.
Frequently Asked Questions (FAQ)
Q1: How long does it take to paint kitchen cabinets?
A: The timeline varies greatly depending on the size of your kitchen, the number of doors and drawers, and your chosen method. For a typical kitchen, expect the process to take anywhere from a weekend (for a very small kitchen and quick drying paint) to a week or more for thorough preparation and multiple coats. Most of this time is spent on prep work and drying between coats.
Q2: What’s the difference between cabinet refacing and refinishing?
A: Cabinet refacing typically involves replacing the doors and drawer fronts with new ones, and often applying a new veneer to the cabinet boxes. Kitchen cabinet refinishing is a broader term that can include sanding, staining, painting, or applying a new protective coating to the existing cabinet surfaces.
Q3: Can I paint over stained cabinets?
A: Yes, you can paint over stained cabinets, but proper preparation is essential. You’ll need to clean, sand, and prime them thoroughly with a bonding primer to ensure the paint adheres well and doesn’t peel.
Q4: What is the best way to clean kitchen cabinets before painting?
A: The best way is to use a degreaser. TSP (trisodium phosphate) substitute or a dedicated kitchen degreaser works very well. Wipe down all surfaces, then rinse with a clean, damp cloth and allow to dry completely.
Q5: Do I need to remove cabinet doors to paint them?
A: It is highly recommended to remove cabinet doors and drawer fronts. This allows you to paint them flat, ensuring a more even finish without drips, and makes it much easier to access and paint the cabinet boxes and interior surfaces.
Q6: How many coats of paint do I need?
A: For best coverage and durability, plan on applying 2-3 thin coats of paint. Always allow adequate drying time between coats, and consider a light sanding between coats for a smoother finish.
Q7: What is the most durable paint finish for kitchen cabinets?
A: High-quality enamel paints, whether oil-based or water-based acrylic, are generally the most durable. A satin or semi-gloss sheen is often preferred for its durability and ease of cleaning.
Q8: Can I use a paint sprayer for kitchen cabinets?
A: Yes, spray painting kitchen cabinets can give a very smooth, professional finish. However, it requires practice and proper equipment, including a good quality sprayer and thorough masking to protect surrounding areas.
Q9: How do I avoid brush strokes when painting cabinets?
A: Use high-quality synthetic brushes and work with the grain of the wood. Apply paint in thin, even coats. For flat surfaces, consider using a foam roller or a mini roller designed for smooth finishes. Don’t overwork the paint.
Q10: How long should I wait before reassembling cabinets?
A: While paint may feel dry to the touch within a few hours, it takes time for the paint to cure and reach its full hardness. It’s best to wait at least 24-48 hours, and ideally a few days, before reassembling your cabinets and putting them back into use. Check the paint manufacturer’s recommendations for specific curing times.
Embarking on a diy kitchen cabinet makeover is a rewarding project that can dramatically transform your kitchen. With careful preparation, the right materials, and a bit of patience, you can achieve beautiful results and enjoy your updated kitchen for years to come. Happy painting!