
Can I disassemble my Moen kitchen faucet myself? Yes, you can disassemble your Moen kitchen faucet yourself, and this guide will show you exactly how. Whether you’re facing a persistent leak, a stiff handle, or simply want to perform some routine maintenance, knowing how to take apart your Moen faucet is a valuable skill. This detailed, step-by-step Moen faucet disassembly guide is designed to make the process clear and manageable, even for those with limited DIY experience. We’ll cover everything from identifying your faucet model to replacing common parts, and even address potential Moen faucet troubleshooting scenarios.
This guide aims to empower you with the knowledge to tackle common Moen faucet repair tasks, saving you time and money. We’ll focus on practical steps, making the process as straightforward as possible.
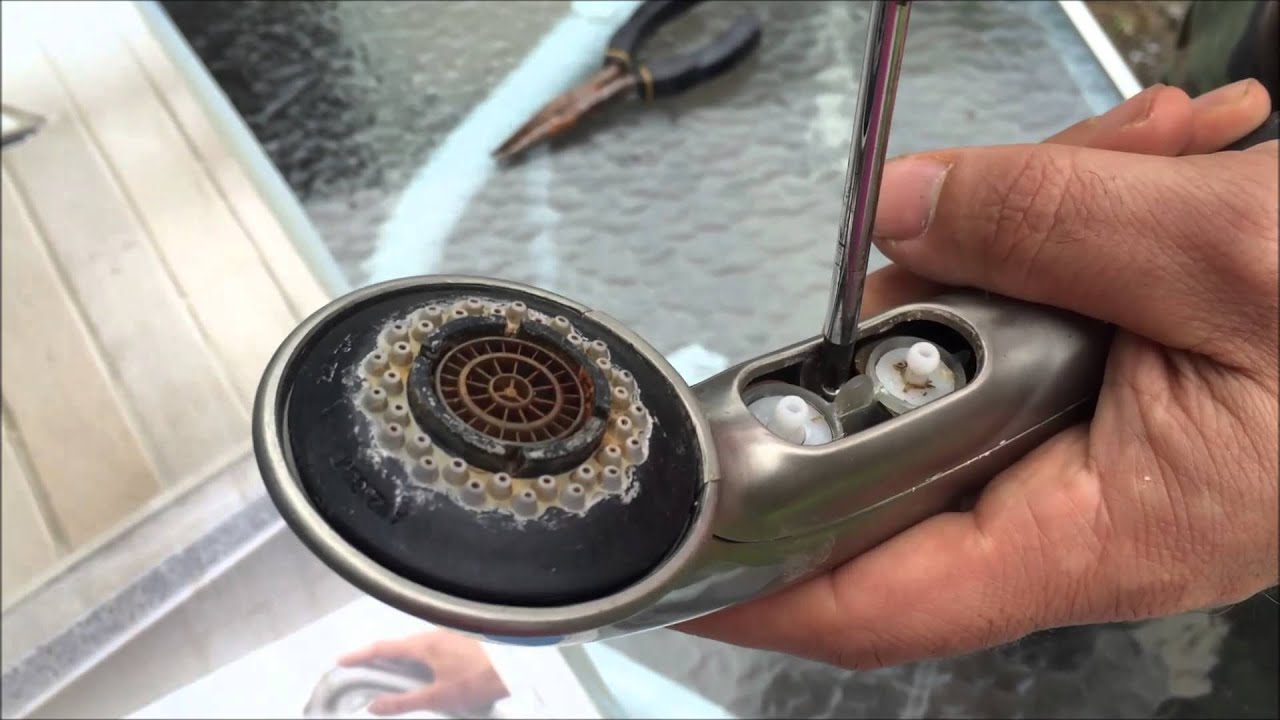
Image Source: i.ytimg.com
Gathering Your Tools and Supplies
Before you begin the disassembly process, ensure you have all the necessary tools and supplies. This preparation will make the job much smoother and prevent unnecessary trips to the hardware store.
Essential Tools:
- Adjustable Wrench: A versatile tool for loosening and tightening various nuts and fittings.
- Phillips Head Screwdriver: For removing any visible screws, often found under decorative caps.
- Flathead Screwdriver: Useful for prying off caps or gently separating components.
- Allen Wrench Set (Hex Keys): Many Moen faucets use small Allen screws to secure the handle. Ensure you have a set that includes various sizes.
- Pliers: Needle-nose pliers are particularly helpful for gripping small parts.
- Utility Knife or Small Pry Tool: For carefully removing decorative caps without scratching.
- Rags or Towels: To protect your sink and catch any dripping water.
- Bucket: To place under the faucet to catch residual water.
Helpful Supplies:
- Plumber’s Grease (Silicone-based): Essential for lubricating O-rings and moving parts during reassembly to ensure smooth operation and prevent future leaks.
- White Vinegar: Can be used to soak and clean mineral deposits from faucet parts.
- Old Toothbrush: For scrubbing away mineral buildup.
- Camera or Smartphone: To take pictures as you disassemble. This is incredibly helpful for remembering the order of parts during reassembly.
- Small Containers or Ziploc Bags: To keep screws and small parts organized. Label them as you go.
Preparing Your Workspace and Faucet
Proper preparation is key to a successful Moen faucet repair. Taking a few minutes to set up your workspace will prevent frustration and potential water damage.
Step 1: Shut Off the Water Supply
This is the most critical step. Locate the shut-off valves under your sink. There will typically be one for hot water and one for cold water.
- Turn the handles of both valves clockwise until they are completely closed.
- To ensure the water is fully off, turn on the faucet to drain any remaining water in the lines. Let it run until no more water comes out.
Step 2: Protect Your Sink and Drain
Place a rag or towel in the sink basin, especially around the drain. This will catch any dropped parts and prevent them from falling down the drain. You can also place a bucket directly under the faucet’s plumbing connections if you anticipate any significant water spillage during disassembly.
Step 3: Identify Your Moen Faucet Model
While not always strictly necessary for basic disassembly, knowing your faucet model can be extremely helpful if you need to order specific Moen faucet parts or reference a model-specific diagram. Many Moen faucets have a model number stamped on the underside of the spout or on the body of the faucet. If you can’t find it, take clear photos of your faucet and search the Moen website or consult a plumbing supply store.
Disassembling the Moen Kitchen Faucet: A Detailed Walkthrough
This section provides a general Moen faucet disassembly guide that applies to most common Moen kitchen faucet designs. Keep in mind that there might be slight variations depending on the specific model.
Step 4: Removing the Faucet Handle
The most common point of entry for Moen faucet repair is the handle. This is where you’ll often find the source of issues like a stiff handle or a leak.
4.1 Locating the Handle Screw:
- Hidden Set Screw: Most Moen faucet handles are secured by a small set screw, usually hidden beneath a decorative cap or plug.
- Finding the Cap: Look for a small plastic or metal cap on the front, side, or back of the handle. These caps often have a “H” for hot or “C” for cold indicator.
- Prying Off the Cap: Gently use a flathead screwdriver or a utility knife to pry off this cap. Be careful not to apply too much force, which could damage the handle.
4.2 Removing the Set Screw:
- Once the cap is off, you’ll see the set screw.
- Use the appropriate-sized Allen wrench to turn the screw counter-clockwise.
- Loosen the screw until the handle can be pulled free from the faucet body. You don’t need to remove the screw entirely; just loosen it enough to release the handle.
4.3 Lifting Off the Handle:
- With the screw loosened, grip the handle firmly and pull it straight up and off the faucet stem. It might require a bit of wiggling. If it’s stuck, try gently rocking it back and forth while pulling upwards. Avoid excessive force.
Step 5: Removing the Decorative Escutcheon or Cap (If Applicable)
Some Moen faucets have a decorative cap or escutcheon that covers the internal workings.
- Look for a Threaded Connection: This cap is usually threaded onto the faucet body.
- Unscrewing the Cap: Use your adjustable wrench to grip the base of the cap and turn it counter-clockwise. You may need to hold the faucet body steady with your other hand or a rag to prevent it from turning.
- Note: Some models might have a different attachment mechanism, so observe how it feels as you try to loosen it.
Step 6: Accessing and Removing the Cartridge Retaining Nut or Clip
This is the core component for Moen faucet cartridge replacement. The cartridge controls water flow and temperature.
6.1 Identifying the Retaining Mechanism:
- After removing the handle and any decorative caps, you’ll see the faucet body and the top of the cartridge.
- Moen faucets typically use one of two methods to secure the cartridge:
- Retaining Nut: A large brass nut that screws onto the faucet body, holding the cartridge in place.
- Retaining Clip: A small metal clip that fits into a slot on the faucet body and prevents the cartridge from being pulled out.
6.2 Removing the Retaining Nut:
- If your faucet has a retaining nut, use your adjustable wrench to loosen it by turning it counter-clockwise.
- Hold the faucet body steady with a rag to avoid scratching it.
- Once loosened, you can usually unscrew it the rest of the way by hand.
6.3 Removing the Retaining Clip:
- If your faucet uses a clip, you’ll see a small metal piece inserted into a slot.
- Use needle-nose pliers or a small flathead screwdriver to gently pull the clip straight out. It might be a bit tight.
Step 7: Pulling Out the Moen Faucet Cartridge
This is where you’ll access the most common Moen faucet parts for repair.
- Grasping the Cartridge: Once the retaining nut or clip is removed, you should be able to see the top of the cartridge. Many cartridges have notches or flats that allow you to grip them.
- Using Pliers or a Cartridge Puller:
- Pliers: Grip the top of the cartridge with pliers and pull it straight up. Twist gently if it seems stuck.
- Cartridge Puller: For stubborn cartridges, a Moen cartridge puller tool is highly recommended. This specialized tool is designed to grip the cartridge securely and provides better leverage. You can purchase these at most hardware stores. Follow the instructions that come with the puller.
- Note: Some cartridges might have a collar or retainer ring that needs to be loosened or removed before the cartridge can be pulled out.
Step 8: Disassembling Further (If Necessary)
Depending on the specific repair needed, you might need to go deeper into the faucet.
8.1 Removing the Spout:
- Many Moen kitchen faucets have a spout that can be lifted or unscrewed.
- Lift-Off Spouts: Some spouts are simply seated over a O-ring and can be pulled straight up after the cartridge is removed.
- Threaded Spouts: Other spouts are threaded onto the faucet body. You may need to remove a securing nut or collar from underneath the sink or at the base of the spout. Use your adjustable wrench to unscrew it counter-clockwise.
8.2 Accessing Other Internal Parts:
- Once the main components like the handle and cartridge are out, you’ll have access to other internal parts.
- O-rings: These rubber seals are a common source of leaks. Inspect them for wear, cracks, or flattening.
- Washers and Seals: Other rubber components may be present that can degrade over time.
Reassembling Your Moen Kitchen Faucet
Reassembly is essentially the reverse of disassembly. Following these steps will help ensure your faucet is put back together correctly.
Step 9: Cleaning and Inspecting Parts
Before reassembly, take the opportunity to clean all the removed parts.
- Mineral Deposits: Use white vinegar and an old toothbrush to clean any mineral buildup from the cartridge, spout, and faucet body.
- O-rings: If you’re replacing the cartridge, new O-rings are often included. If you’re reusing old ones (not recommended for leaky faucets), ensure they are clean and supple. Apply a thin layer of plumber’s grease to O-rings to help them seal and last longer.
Step 10: Installing New Moen Faucet Parts (If Replaced)
If you identified worn or damaged Moen faucet parts, now is the time to install them.
- Cartridge Replacement: Insert the new Moen cartridge into the faucet body. Ensure it is oriented correctly – there are usually tabs or notches that align with slots in the faucet body.
- O-ring Replacement: Lubricate new O-rings with plumber’s grease and install them in their respective grooves.
Step 11: Reattaching Components
Work in reverse order of disassembly.
- Reinstall the Cartridge Retaining Mechanism:
- If you had a retaining nut, screw it back on by hand, then snug it up with your adjustable wrench. Do not overtighten.
- If you had a retaining clip, slide it back into its slot until it clicks or sits securely.
- Reattach the Spout:
- If it was a lift-off spout, carefully align it over the faucet body and push it down until it seats firmly.
- If it was a threaded spout, screw it back on and tighten with your wrench.
- Reinstall the Handle: Slide the handle back onto the faucet stem, aligning it correctly. Tighten the set screw with the Allen wrench.
- Replace the Decorative Cap: Snap or screw the decorative cap back into place.
Step 12: Turning the Water Back On
- Slowly turn the hot and cold water shut-off valves back on by turning them counter-clockwise.
- Check immediately for any leaks around the handle, spout, and under the sink.
Step 13: Testing the Faucet
- Turn on the faucet to check the hot and cold water flow.
- Operate the handle through its full range of motion.
- Look for any drips or leaks. If you find any, you may need to slightly tighten a connection or re-check the cartridge installation.
Common Moen Faucet Troubleshooting Scenarios
Even with careful disassembly and reassembly, you might encounter issues. Here are some common problems and how this Moen faucet disassembly guide helps address them:
Leaky Faucet:
- Cause: Worn O-rings, a damaged cartridge, or loose connections.
- Solution: Disassemble to inspect O-rings and the cartridge. Replacing the cartridge and lubricating new O-rings is often the solution. Ensure all retaining nuts are snug.
Stiff or Hard-to-Move Handle:
- Cause: Mineral buildup, lack of lubrication, or a worn cartridge.
- Solution: Clean all parts thoroughly. Apply plumber’s grease to the cartridge and O-rings. If the problem persists, the cartridge likely needs replacement.
Low Water Pressure:
- Cause: Clogged aerator, debris in the cartridge, or a partially closed shut-off valve.
- Solution: Clean the aerator (unscrew the tip of the spout). Disassemble the faucet to check the cartridge for debris. Ensure shut-off valves are fully open.
Dripping from the Spout:
- Cause: Primarily a faulty cartridge.
- Solution: The cartridge is the most common culprit. Replace it.
Water Leaking from Under the Sink:
- Cause: Loose supply line connections or faulty seals at the base of the faucet.
- Solution: Tighten the supply line nuts. If it persists, you may need to disassemble the faucet from the sink to check the seals at its base, though this is less common for basic Moen faucet disassembly. This is more related to Moen faucet installation issues.
When to Call a Professional
While this guide provides comprehensive steps for Moen faucet disassembly and repair, there are times when professional help is advisable:
- Unidentified Faucet Model: If you cannot identify your faucet model and are unsure about the parts needed.
- Corroded or Seized Parts: If parts are heavily corroded or fused together, forcing them could cause damage.
- Persistent Leaks: If you’ve replaced the cartridge and O-rings, and the leak continues, there might be a more significant issue with the faucet body itself.
- Lack of Confidence: If you are not comfortable performing the repair, it’s always best to call a qualified plumber.
This Moen faucet maintenance guide is a starting point. Regular checks and prompt attention to minor issues can prevent more significant problems and extend the life of your faucet. Remember, successful Moen faucet repair often comes down to careful disassembly, proper part replacement, and meticulous reassembly.
Frequently Asked Questions (FAQ)
Q1: How often should I perform Moen faucet maintenance?
A1: For typical household use, it’s a good idea to check your Moen faucet for leaks or performance issues every 6-12 months. Replacing the cartridge every 5-7 years can also prevent many common problems.
Q2: Where can I find specific Moen faucet parts for my model?
A2: Moen’s official website is an excellent resource for finding diagrams and ordering genuine Moen faucet parts. You can also check with large home improvement stores or specialized plumbing supply shops. Providing your faucet’s model number will be crucial.
Q3: Can I use WD-40 to loosen stuck Moen faucet parts?
A3: While WD-40 can help with stuck metal parts, it’s generally not recommended for internal faucet components, especially rubber O-rings and cartridges, as it can degrade them over time. Plumber’s grease is the preferred lubricant for faucet parts.
Q4: My faucet handle is loose, but I can’t find a screw. What should I do?
A4: Most Moen handles are secured by a hidden set screw under a decorative cap. Carefully examine the handle for any small plug or cap. If you still can’t find it, consult your faucet’s manual or the Moen website for model-specific details.
Q5: What is the typical lifespan of a Moen faucet cartridge?
A5: The lifespan of a Moen faucet cartridge can vary significantly depending on water quality and usage. However, they generally last between 5 to 10 years. It’s common to replace them as part of routine Moen faucet maintenance or when experiencing leaks or handle issues.
Q6: I replaced the cartridge, but the faucet still leaks. What’s next?
A6: If a new cartridge didn’t fix the leak, check the O-rings on the faucet body or spout. Also, ensure the cartridge was installed correctly and the retaining nut or clip is securely fastened. Sometimes, the faucet body itself might have internal damage, which might necessitate replacing the entire faucet, rather than just individual Moen kitchen faucet parts.
Q7: Is it difficult to replace the faucet spout?
A7: Replacing the spout is usually straightforward. It’s typically either a lift-off design or threaded onto the faucet body. As detailed in this Moen faucet disassembly guide, you’ll usually need to remove the handle and cartridge first, and then unscrew or pull off the spout.
Q8: How do I know if I need to replace the entire faucet or just Moen faucet parts?
A8: If multiple parts are damaged, corroded, or if the faucet body itself has cracks or significant wear, it might be more cost-effective and practical to replace the entire faucet rather than attempting extensive repairs. For minor issues like leaks or stiff handles, replacing specific Moen faucet parts like the cartridge or O-rings is usually sufficient.
Q9: My faucet only has cold water coming out, even when the handle is turned to hot. What’s the issue?
A9: This is a common problem, and it usually points to a faulty cartridge. The hot water inlet port within the cartridge may be blocked or damaged. Disassembling to replace the cartridge is the most likely solution for this type of Moen faucet troubleshooting.
Q10: I accidentally dropped a small screw down the drain. Can I retrieve it?
A10: If you’ve used a rag or drain stopper as recommended, you might be able to retrieve it. Otherwise, you may need to carefully remove the P-trap under your sink to recover lost parts. This is part of advanced plumbing maintenance and could be considered part of troubleshooting.