
Can I fix my kitchen faucet sprayer myself? Yes, most common kitchen faucet sprayer problems can be fixed with simple tools and a little patience, often without needing to replace the entire faucet.
A leaky faucet sprayer can be frustrating, but don’t worry! This guide will walk you through how to fix your kitchen faucet with a sprayer, covering common issues and their solutions. We’ll help you get your faucet back in tip-top shape, whether it’s a simple drip or a sprayer that’s not working at all.
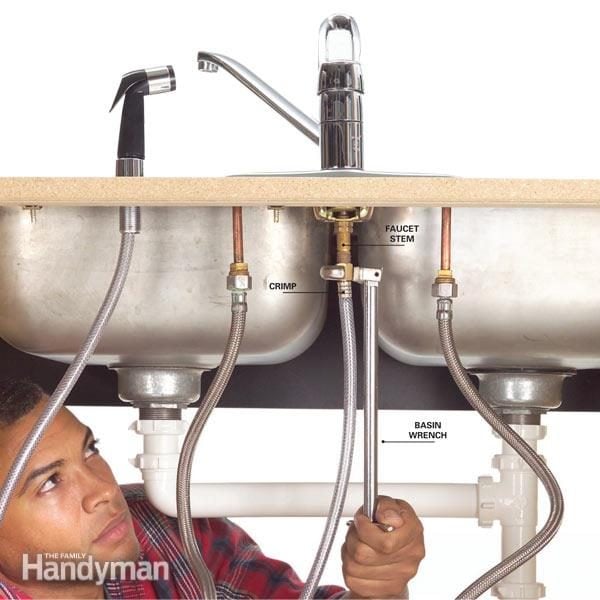
Image Source: www.familyhandyman.com
Why Your Kitchen Faucet Sprayer Might Be Acting Up
Before we dive into fixing things, let’s look at why your kitchen sink sprayer might be giving you trouble. These are the most common culprits:
- Worn-out O-rings or Seals: Over time, the rubber rings and seals inside your faucet can wear down, leading to leaks.
- Damaged Sprayer Hose: The flexible hose connecting the sprayer to the faucet body can develop cracks or kinks.
- Clogged Sprayer Nozzle: Mineral deposits from hard water can clog the tiny holes in the sprayer nozzle.
- Faulty Diverter Valve: This small valve inside the faucet directs water flow to either the spout or the sprayer. If it’s stuck or worn, the sprayer might not work.
- Loose Connections: Water connections under the sink might not be tightened properly.
Gathering Your Tools and Supplies
To tackle most kitchen faucet sprayer issues, you’ll need a few basic tools. Having these ready will make the process smoother.
Essential Tools:
- Adjustable Wrench: For loosening and tightening nuts.
- Pliers (Slip-joint or Channel-lock): Useful for gripping various parts.
- Screwdrivers (Phillips and Flathead): For removing handles and other components.
- Basin Wrench: A specialized tool for reaching nuts in tight spaces under the sink.
- Allen Wrench Set: Some faucet handles use Allen screws.
- Plumber’s Tape (PTFE Tape): For creating a watertight seal on threaded connections.
- Bucket or Towels: To catch any dripping water.
- Rag or Old Towel: For cleaning parts and wiping up spills.
- Penetrating Oil (like WD-40): Can help loosen stubborn parts.
Potential Replacement Parts:
- O-rings and Seals: It’s a good idea to have a universal faucet repair kit on hand, as specific O-ring sizes can vary by faucet brand.
- Sprayer Hose: If your hose is damaged, you’ll need a replacement. Make sure to get one compatible with your faucet model.
- Sprayer Nozzle: If the nozzle is beyond cleaning, you might need to replace it.
- Diverter Valve: If the diverter is the issue, you’ll need the correct replacement part.
Step-by-Step Guide to Fixing Your Kitchen Faucet Sprayer
Let’s get to work! Follow these steps to diagnose and fix common problems.
Step 1: Turn Off the Water Supply
This is the most crucial first step. Always turn off the hot and cold water supply to the faucet before you begin any repairs.
- Locate the Shut-Off Valves: Look under the sink for two small valves, one for hot water and one for cold. They usually have small, oval or round handles.
- Turn the Valves Off: Turn the handles clockwise until they stop.
- Test: Turn on the faucet to drain any remaining water and to confirm that the water supply is indeed off.
Step 2: Identify the Problem
Before you start taking things apart, try to pinpoint exactly what’s wrong.
- Leaky Faucet Sprayer: Is water dripping from the nozzle when the faucet is off? Is there a leak where the hose connects to the faucet body?
- Dripping Faucet Sprayer: Is the sprayer constantly dripping even when the main faucet is turned off?
- Sprayer Not Working: Does the sprayer spray weakly, or not at all, when you pull the trigger? Does water still come out of the main spout when you try to use the sprayer?
- Leaky Sprayer Hose: Is water leaking from the hose itself, or at the connection points?
Step 3: Addressing a Leaky or Dripping Faucet Sprayer Nozzle
A leaky faucet sprayer nozzle is often caused by worn-out seals within the nozzle assembly or a problem with the diverter valve.
3.1 Fixing a Leaky Sprayer Nozzle (Common Causes)
- Remove the Sprayer Head: Most sprayer heads can be unscrewed from the hose by hand. If it’s tight, use a rag to help you grip it and gently twist counter-clockwise.
- Inspect the Sprayer Head: Look for any visible damage or mineral buildup.
- Clean the Sprayer Head:
- Soak the sprayer head in a solution of equal parts white vinegar and water for a few hours or overnight. This helps dissolve mineral deposits.
- Use a small brush (like an old toothbrush) to scrub away any remaining buildup from the nozzle holes.
- Rinse the sprayer head thoroughly.
- Check and Replace O-rings:
- Inside the sprayer head, or where the hose connects to the sprayer, you’ll find rubber O-rings.
- Carefully remove the old O-rings using a small, flathead screwdriver or a pick tool. Be gentle to avoid scratching the faucet parts.
- Take the old O-rings to a hardware store to find exact matches, or use a universal faucet repair kit.
- Lubricate the new O-rings with plumber’s grease (silicone-based) before installing them. This helps them seat properly and prevents damage.
- Install the new O-rings, ensuring they are seated correctly in their grooves.
- Reassemble and Test: Screw the sprayer head back onto the hose and turn on the water supply. Check for leaks.
3.2 Troubleshooting a Dripping Faucet Sprayer
If the sprayer continues to drip even when the main faucet is off, the issue might be with the diverter valve or the internal seals of the faucet body.
-
Accessing the Diverter Valve: The diverter valve is usually located inside the faucet body, often just below where the hose connects to the spout. The exact location varies by faucet model. You might need to remove the spout to access it.
- Removing the Spout: For many faucets, the spout is held in place by a screw or a retaining nut at the back or underneath. You may need to lift a decorative cap to find the screw.
- Pulling Off the Spout: Once any fasteners are removed, the spout should pull straight up and off.
-
Inspecting the Diverter Valve:
- The diverter valve typically has a lever or a stem that moves to switch water flow between the spout and the sprayer.
- Look for any signs of wear, corrosion, or a broken spring.
- If the diverter valve itself looks damaged or worn, it’s usually best to replace it.
-
Replacing the Diverter Valve:
- Note how the old diverter valve is positioned before removing it.
- Carefully remove the old valve.
- Install the new diverter valve, ensuring it’s oriented correctly.
- Reassemble the faucet spout.
Step 4: Fixing a Leaky Sprayer Hose
If you notice water leaking from the sprayer hose itself, or at the connection points, here’s what to do.
4.1 Leaks at the Connection Points
-
Tighten Connections:
- Under the sink, find where the sprayer hose connects to the faucet body (often a metal hose or a pipe with a fitting).
- Use an adjustable wrench to gently tighten the connection. Don’t overtighten, as this can damage the threads or fittings.
- Check the connection at the sprayer head as well.
-
Replace Plumber’s Tape:
- If tightening doesn’t work, disconnect the hose at the connection point.
- Remove any old plumber’s tape from the threads.
- Wrap new plumber’s tape clockwise around the threads 2-3 times.
- Reconnect the hose and tighten.
4.2 Leaks from the Hose Itself
If the hose has cracks or is visibly damaged, it needs to be replaced.
-
Disconnect the Hose:
- Under the sink, unscrew the sprayer hose from the faucet body. You might need a basin wrench for this if the space is tight.
- Unscrew the sprayer head from the other end of the hose.
-
Choose a Replacement Hose:
- Take the old hose to the hardware store to ensure you get a compatible replacement. Look for hoses specifically designed for kitchen faucets with sprayers. Many brands have universal hoses, but it’s best to be sure.
- Consider the length and the type of connection fittings.
-
Install the New Hose:
- Wrap plumber’s tape around the threads of the faucet body connection.
- Connect the new hose to the faucet body, tightening it with a wrench.
- Connect the other end of the new hose to the sprayer head. Some sprayer heads have a quick-connect fitting, while others screw directly on.
- Make sure all connections are snug.
-
Test for Leaks: Turn the water supply back on and check all connections for leaks.
Step 5: Troubleshooting a Sprayer Not Working
If your faucet sprayer isn’t working, or if water is still coming out of the main spout when you try to use the sprayer, the diverter valve is the most likely culprit.
5.1 Diagnosing a Sprayer Not Working
- Check the Diverter: As described in Step 3.2, the diverter valve is