
Can I install a single-handle kitchen faucet with a sprayer myself? Yes, you can install a single-handle kitchen faucet with a sprayer yourself. It’s a common DIY project that many homeowners can tackle with basic tools and a little patience. This guide will walk you through the entire process, from preparing your workspace to testing your new faucet for leaks.
Replacing your old kitchen faucet with a new single-handle model that includes a sprayer can significantly update the look and functionality of your kitchen. This project is well within the reach of most DIY enthusiasts. By following these steps, you’ll be able to confidently complete a kitchen faucet replacement and enjoy your updated sink.
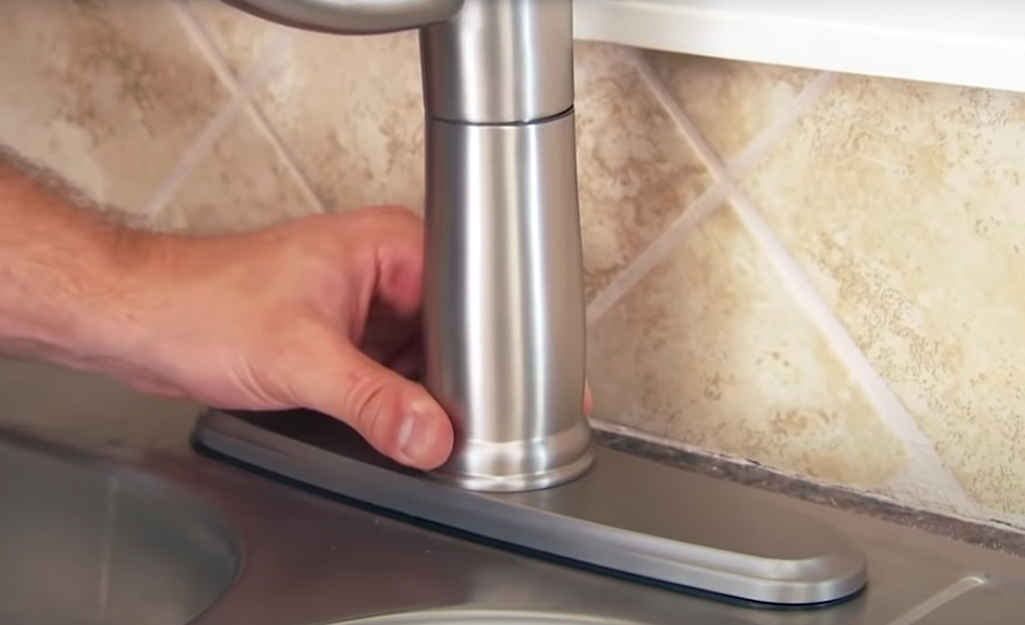
Image Source: contentgrid.homedepot-static.com
Gathering Your Tools and Supplies
Before you begin your DIY faucet installation, it’s crucial to have all the necessary tools and supplies ready. This will make the process smoother and prevent frustrating trips to the hardware store mid-project.
Essential Tools:
- Adjustable Wrench: This is your go-to tool for loosening and tightening nuts and fittings. You’ll likely need more than one size, or at least one that opens wide enough.
- Basin Wrench: This specialized tool is invaluable for reaching those tight spots under the sink to loosen or tighten the faucet mounting nuts. Its long handle and pivoting head make it a lifesaver.
- Plumber’s Putty or Silicone Caulk: This creates a watertight seal between the faucet base and the sink or countertop. Check your faucet’s instructions to see which is recommended.
- Screwdriver Set: You might need both Phillips and flathead screwdrivers for various components.
- Bucket: To catch any residual water when disconnecting the old supply lines.
- Towels or Rags: For wiping up spills and keeping your workspace dry.
- Safety Glasses: Protect your eyes from falling debris or splashes.
- Utility Knife or Putty Knife: To scrape away old putty or caulk from the sink surface.
- Flashlight or Work Light: The area under the sink is often dark, so good lighting is essential.
- Penetrating Oil (Optional): If your old fittings are corroded and difficult to loosen, a penetrating oil can help.
- New Faucet and Supply Lines: Ensure your new faucet comes with all necessary mounting hardware. It’s also a good idea to replace old supply lines with new ones for a secure connection.
Your New Faucet Kit:
Your new single-handle kitchen faucet with a sprayer will typically include:
- The faucet body
- Mounting hardware (washers, nuts)
- Supply lines (sometimes separate purchases)
- Sprayer hose and weight
- Aerator
Step 1: Preparing the Work Area and Shutting Off the Water
Safety and preparation are paramount for any DIY faucet installation. This initial step ensures a clean and controlled environment.
Shutting Off the Water Supply:
- Locate the Shut-off Valves: Underneath your sink, you’ll find two valves, one for hot water and one for cold water, connected to the existing faucet supply lines.
- Turn Off the Valves: Turn the handles of both valves clockwise until they are firmly closed. If you don’t have individual shut-off valves under the sink, you’ll need to turn on water supply to the main water shut-off for your house. This is usually located in the basement, garage, or near your water meter.
- Relieve Pressure: Open the old faucet handles (both hot and cold) to drain any remaining water in the lines and relieve any built-up pressure. Leave the faucet handles in the open position.
Preparing the Workspace:
- Clear Under the Sink: Remove everything from the cabinet beneath the sink. This will give you ample space to work and prevent items from being damaged by water or dirt.
- Place a Bucket and Towels: Position a bucket directly under the water supply connections to catch any drips when you disconnect the old lines. Lay down towels or rags to absorb spills and keep the area dry.
- Ensure Good Lighting: Use a flashlight or work light to clearly see all the connections and components under the sink.
Step 2: Removing the Old Faucet
This step involves carefully disconnecting and removing your old faucet.
Disconnecting the Water Supply Lines:
- Loosen Connections: Using your adjustable wrench, carefully loosen the nuts that connect the existing supply lines to the shut-off valves. Remember, “righty-tighty, lefty-loosey.”
- Catch Dripping Water: As you loosen the nuts, a small amount of water might drip out. This is why your bucket is essential.
- Remove Supply Lines: Once disconnected from the valves, the supply lines will still be attached to the old faucet. You’ll remove these entirely in the next step.
Detaching the Old Faucet:
- Locate Mounting Hardware: Look directly under the sink where the faucet base meets the sink or countertop. You’ll see nuts or screws securing the faucet in place.
- Use the Basin Wrench: This is where the basin wrench shines. Insert the head of the basin wrench onto the mounting nuts. Its design allows you to reach and turn these nuts even in very confined spaces.
- Loosen and Remove Nuts: Turn the nuts counterclockwise to loosen them. Be patient, as they can sometimes be corroded. Once loose, remove the nuts and any accompanying washers or mounting plates.
- Disconnect Sprayer Hose (if applicable): If your old faucet has a separate side sprayer or a pull-out sprayer, you’ll need to disconnect its hose from the faucet’s supply line. There’s usually a clip or a threaded connection.
- Lift Out the Old Faucet: With all connections and mounting hardware removed, carefully lift the old faucet assembly straight up and out of the sink holes.
Cleaning the Mounting Surface:
- Scrape Away Old Sealant: Use a putty knife or utility knife to gently scrape away any old plumber’s putty or silicone caulk from the sink or countertop surface where the old faucet was mounted.
- Clean the Area: Wipe the area thoroughly with a damp cloth to remove any residue. A clean, smooth surface is crucial for a good seal with the new faucet.
Step 3: Installing the New Faucet
Now, it’s time to mount the faucet base and connect it to the sink.
Preparing the New Faucet:
- Apply Sealant: Refer to your new faucet’s instructions. Some faucets come with a built-in gasket for sealing. If not, apply a bead of plumber’s putty or silicone caulk around the underside of the faucet base or escutcheon plate (the decorative plate that covers the sink holes).
- Thread Supply Lines: If your new faucet doesn’t have integrated supply lines, screw them into the designated ports on the faucet body. Hand-tighten first, then give them a slight turn with a wrench to snug them up. Do not overtighten.
Mounting the Faucet:
- Position the Faucet: Carefully lower the new faucet through the sink holes. Ensure it’s centered and facing the correct direction. The escutcheon plate, if used, should sit flush against the sink.
- Secure from Below: Go back under the sink. Slide any provided rubber or plastic washers onto the threaded shanks of the faucet. Then, thread on the metal mounting nuts.
- Tighten the Mounting Nuts: Use your basin wrench or the wrench provided with the faucet to tighten these nuts. Tighten them evenly, alternating between nuts if there are multiple. Ensure the faucet remains straight and centered as you tighten. Tighten until the faucet is snug and doesn’t wiggle, but avoid overtightening, which could damage the sink or faucet.
Step 4: Connecting the Water Supply Lines
This is a critical step in single handle faucet plumbing. Proper connections are key to avoiding leaks.
Connecting to the Faucet:
- Attach Supply Lines: If you haven’t already, attach supply lines to the faucet shanks under the sink. Hand-tighten first, then use an adjustable wrench to tighten them about a quarter to half a turn further.
- Check for Gaskets/Washers: Ensure any rubber gaskets or washers are properly seated in the supply line fittings before connecting them to the shut-off valves.
Connecting to the Shut-Off Valves:
- Align the Lines: Carefully align the hot water supply line with the hot water shut-off valve and the cold water supply line with the cold water shut-off valve.
- Thread the Nuts: Thread the supply line nuts onto the shut-off valve threads by hand.
- Tighten with a Wrench: Once hand-tight, use your adjustable wrench to tighten the nuts. Again, avoid overtightening. A snug fit is usually sufficient. For most flexible supply lines, about a quarter to a half turn past hand-tight is adequate.
Step 5: Installing the Sprayer and Weight
The sprayer hose is a key feature of your new faucet.
Installing the Sprayer Hose:
- Connect the Hose: Locate the connection point for the sprayer hose under the sink. This is usually a dedicated port on the faucet body or a diverter valve. Connect the sprayer hose according to the manufacturer’s instructions. This often involves a quick-connect fitting or a threaded connection.
- Install the Hose Weight: Most pull-out or pull-down sprayers come with a counterweight. This weight attaches to the sprayer hose under the sink. Find the designated spot on the hose and secure the weight using the provided clip or screw. This weight helps the sprayer head retract smoothly back into the faucet body.
Step 6: Testing for Leaks
This is the moment of truth! Careful testing prevents water damage.
Turning on the Water Supply:
- Close Faucet Handles: Ensure all handles on your new faucet are in the “off” position.
- Turn On Shut-Off Valves: Slowly turn the hot and cold water shut-off valves back on by turning them counterclockwise. If you had to shut off the main water supply, turn that back on slowly as well.
- Inspect Connections: Immediately after turning on the water, closely inspect all connections under the sink – where the supply lines connect to the shut-off valves and where they connect to the faucet. Look and feel for any drips or moisture.
Checking for Leaks:
- Run the Faucet: Turn on the new faucet, starting with cold water, then hot. Let the water run for a minute or two.
- Operate the Sprayer: Test the sprayer function. Activate it and check the hose connections.
- Re-inspect All Connections: With the water running and the sprayer in use, thoroughly re-inspect all connections under the sink. Use a dry rag or paper towel to wipe down fittings – any moisture will be immediately apparent.
- Tighten if Necessary: If you find any small drips, try tightening the corresponding connection by a quarter turn. If a leak persists, turn off the water supply again and re-check that the connection is seated correctly, or that the sealant is applied properly.
Step 7: Final Touches and Cleanup
With the faucet installed and leak-free, it’s time to tidy up.
Finishing Up:
- Check Faucet Operation: Ensure the single handle moves smoothly and controls both hot and cold water flow correctly. Verify the sprayer works as expected and retracts properly.
- Clean Up: Wipe down the faucet and sink area.
- Return Items to Cabinet: Once you’re confident there are no leaks, return the items you removed from the under-sink cabinet.
Troubleshooting Common Issues
Even with careful installation, you might encounter minor problems. Here are a few common issues and how to resolve them:
Leaking Connections:
- Cause: Connections are not tight enough, or are over-tightened, damaging seals.
- Solution: Turn off the water. Gently tighten the leaking connection a quarter turn. If over-tightened, loosen slightly. If the leak persists, disconnect, check the rubber washer or gasket, and re-seat or replace if damaged before reconnecting.
Faucet Wobbles:
- Cause: Mounting nuts under the sink are not tight enough.
- Solution: Turn off the water. Use a basin wrench to tighten the mounting nuts securely. Ensure the faucet is straight as you tighten.
Low Water Pressure:
- Cause: Shut-off valves are not fully open, or aerator is clogged.
- Solution: Ensure shut-off valves are completely open. Unscrew the aerator at the tip of the faucet and check for any debris. Clean it and screw it back on.
Sprayer Not Retracting:
- Cause: Sprayer hose is kinked, or the weight is not installed correctly or is the wrong size.
- Solution: Check the sprayer hose for any kinks under the sink. Ensure the weight is attached to the lowest point of the hose loop.
Faucet Material and Durability Considerations
When choosing a new faucet, the material plays a significant role in its longevity and appearance.
Common Faucet Materials:
| Material | Pros | Cons |
|---|---|---|
| Brass | Durable, corrosion-resistant, heavy-duty, available in finishes. | Can be more expensive. |
| Stainless Steel | Very durable, rust-proof, easy to clean, modern look. | Can be more prone to scratches than brass. |
| Zinc Alloy | More affordable, lighter weight, can be plated in various finishes. | Less durable than brass or stainless steel, can corrode. |
| Plastic (ABS) | Very affordable, lightweight, resistant to corrosion and tarnishing. | Least durable, can crack or break, less aesthetic appeal. |
For a kitchen faucet replacement that needs to withstand daily use, brass or stainless steel are generally the best choices for durability.
Maintaining Your New Faucet
Once your new faucet is installed, a little regular maintenance will keep it looking and working its best.
Regular Cleaning:
- Wipe down the faucet with a soft cloth after each use to prevent water spots.
- Use mild soap and water for cleaning. Avoid abrasive cleaners or scouring pads that can scratch the finish.
- For stubborn mineral deposits, you can use a solution of equal parts white vinegar and water. Let it soak for a few minutes, then wipe clean.
Checking Connections Periodically:
- Every few months, it’s a good idea to check the supply line connections under the sink for any signs of leaks or corrosion. A quick wipe with a dry cloth can help you spot any subtle moisture.
By following these steps, you can confidently perform a single handle faucet plumbing installation or replacement, enhancing your kitchen’s functionality and appearance. Remember to work safely and methodically for the best results.
Frequently Asked Questions (FAQ)
Q1: How long does it typically take to install a kitchen faucet?
A: For a first-time DIYer, the process can take anywhere from 1 to 3 hours. Experienced individuals might complete it in under an hour.
Q2: Do I need a plumber for this job?
A: If you are comfortable with basic plumbing tasks, have the right tools, and follow instructions carefully, you likely won’t need a plumber. However, if you encounter significant difficulties or are unsure about any step, calling a professional is always an option.
Q3: What if my old faucet is corroded and won’t come off?
A: You can try applying a penetrating oil to the threads and letting it sit for 15-30 minutes. Gentle tapping with a wrench can also help break the corrosion. If it’s severely corroded, you might need to carefully cut away the mounting nuts with a mini hacksaw or oscillating tool, being very careful not to damage the sink.
Q4: Do I need to replace my supply lines?
A: It’s highly recommended. Old supply lines can become brittle and prone to leaks. Replacing them with new, flexible braided stainless steel lines during your kitchen faucet replacement is a good preventative measure.
Q5: What is the purpose of the weight on the sprayer hose?
A: The weight acts as a counterbalance for pull-out or pull-down sprayers, ensuring the hose retracts smoothly and securely back into the faucet spout when you’re finished using it.
Q6: Can I use Teflon tape on the supply line threads?
A: Generally, Teflon tape is not recommended for faucet supply lines that have rubber gaskets or O-rings, as these are designed to create a watertight seal on their own. Using Teflon tape can sometimes interfere with the proper seating of these seals and may even cause over-tightening. Always check your faucet manufacturer’s instructions.