
What is a kitchen cabinet organization chart? It’s a visual tool that shows you where to store different kitchen items within your cabinets. Can you create a custom cabinet layout diagram? Absolutely! This guide will help you do just that.
A tidy kitchen starts with organized cabinets. It’s not just about making your kitchen look good; it’s about making it work better for you. When everything has a place, cooking becomes easier, and you can find what you need in a flash. This detailed guide will provide you with a kitchen cabinet organization chart, a clear cabinet layout diagram, and practical kitchen storage solutions visual aids to transform your kitchen storage. We’ll delve into a pantry shelf arrangement guide, explore cabinet interior design blueprint principles, and cover kitchen drawer organization layout strategies. Get ready for visual guide to pantry shelving, an organizing kitchen cupboards map, and the secrets to kitchen cabinet space optimization diagram and an effective kitchen storage plan.
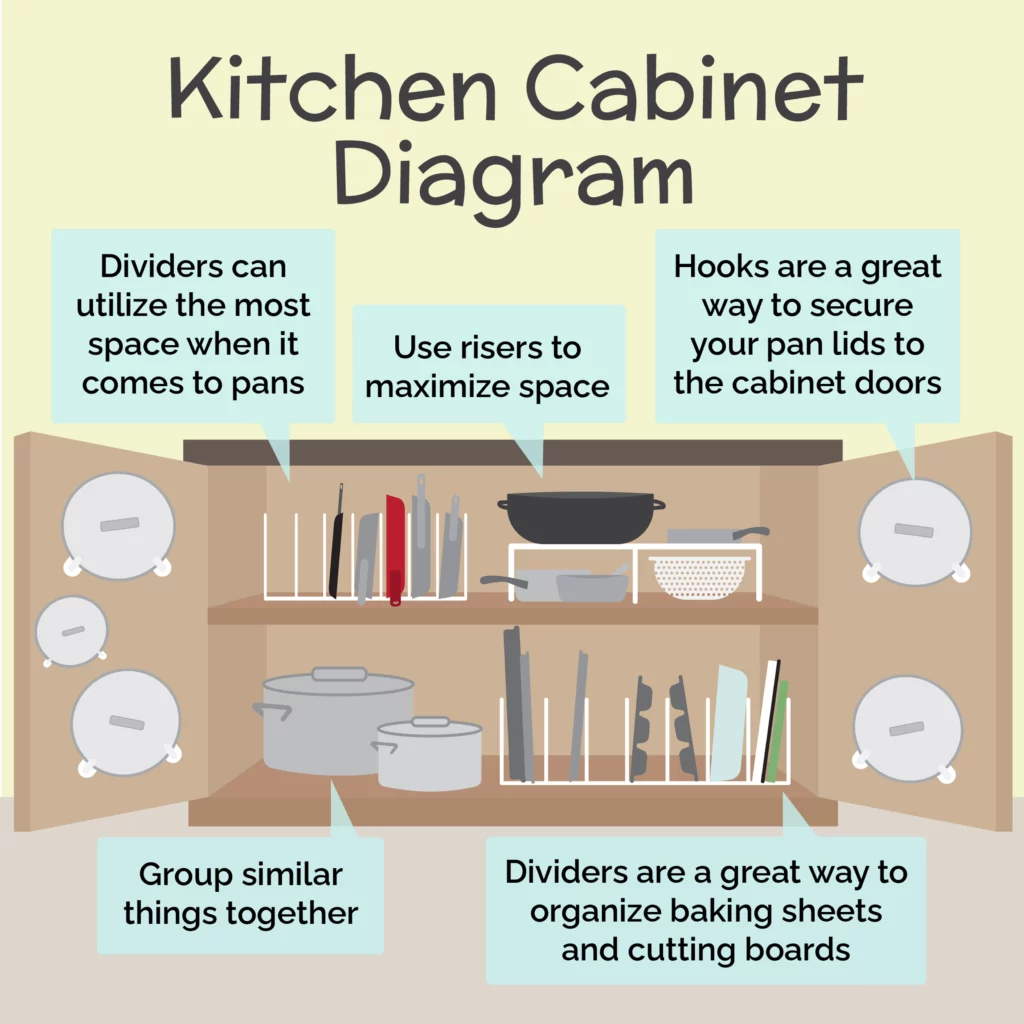
Image Source: netpayadvance.com
Why Organize Your Kitchen Cabinets?
Think about your daily kitchen routine. How much time do you spend searching for that one spice, a matching lid, or a specific utensil? Disorganized cabinets can lead to frustration and wasted time. Proper organization brings a host of benefits:
- Efficiency: Find items quickly. This saves time and makes cooking more enjoyable.
- Space Maximization: Make the most of every inch. You’ll be surprised how much more you can fit.
- Reduced Waste: Know what you have. This prevents buying duplicates and reduces food spoilage.
- Easier Cleaning: Clear counters and organized cabinets make wiping down surfaces a breeze.
- Aesthetics: A well-organized kitchen is more pleasant to be in.
Getting Started: A Pre-Organization Assessment
Before you dive in, take a moment to assess your current situation. This step is crucial for creating an effective kitchen storage plan.
Step 1: Empty Everything Out
Yes, everything! Take all the items out of your cabinets, drawers, and pantry. This gives you a clean slate and a clear view of what you own. Place items on your countertops, dining table, or floor.
Step 2: Clean Your Cabinets
While your cabinets are empty, give them a thorough cleaning. Wipe down shelves, wipe out drawers, and get rid of any crumbs or spills. This is also a good time to check for any damage or wear.
Step 3: Declutter Ruthlessly
Now, go through every item you’ve taken out. Be honest with yourself.
- Expired Items: Toss anything past its expiration date.
- Duplicates: Do you really need five can openers? Keep the best and donate or discard the rest.
- Broken or Damaged Items: If it’s chipped, cracked, or doesn’t work, it’s time to let it go.
- Unused Items: If you haven’t used something in a year, you probably won’t. Consider donating it.
- Questionable Recipes: Are there ingredients you bought for a recipe you never made and won’t make?
Categorize Items as You Declutter:
As you declutter, start grouping similar items together. This will be the foundation of your kitchen cabinet organization chart. Examples include:
- Baking Supplies
- Spices and Seasonings
- Pots and Pans
- Dishes (Plates, Bowls)
- Glasses and Mugs
- Utensils (Cooking and Eating)
- Small Appliances
- Food Storage Containers
- Canned Goods
- Dry Goods (Pasta, Rice, Flour)
- Cleaning Supplies
Creating Your Kitchen Cabinet Organization Diagram
Now comes the fun part: planning where everything goes! Think of this as designing your cabinet interior design blueprint. A good cabinet layout diagram makes all the difference.
Step 1: Zone Your Kitchen
The first step in creating a kitchen cabinet space optimization diagram is to divide your kitchen into zones based on activity. This approach makes your kitchen more functional.
- Prep Zone: Near your main countertop workspace. This is where you’ll keep knives, cutting boards, mixing bowls, and frequently used spices.
- Cooking Zone: Near your stove or oven. Store pots, pans, cooking utensils, and oven mitts here.
- Baking Zone: Often near the prep zone. Keep flour, sugar, baking pans, measuring cups, and mixers here.
- Cleaning Zone: Typically around the sink. Store dish soap, sponges, cleaning sprays, and trash bags.
- Dishware/Eating Zone: Near the dishwasher or dining area. Store everyday dishes, glasses, and cutlery.
- Pantry Zone: For food storage. This is where your pantry shelf arrangement guide comes into play.
Step 2: Assign Categories to Zones
Now, match your categorized items to the appropriate zones.
- Upper Cabinets (Eye Level to Shoulder Level): Ideal for frequently used items you want to keep within easy reach. Think everyday dishes, glasses, mugs, spices, and some dry goods.
- Upper Cabinets (Higher Shelves): Best for less frequently used items, seasonal dishes, or extra stock of pantry staples.
- Lower Cabinets: Good for heavier items and things you use often. Pots, pans, small appliances, and cleaning supplies are good candidates.
- Deep Lower Cabinets: Excellent for pots, pans, and large mixing bowls. Consider pull-out shelves or turntables to access items at the back.
- Kitchen Drawers: Perfect for utensils, cutlery, linens, and smaller gadgets. A kitchen drawer organization layout is key here.
- Pantry: For all your food items. A visual guide to pantry shelving will be invaluable.
Step 3: Visualize Your Cabinet Layout Diagram
Let’s put it on paper (or a digital tool). You can sketch a simple diagram or use online tools.
Example Cabinet Layout Diagram (Conceptual)
Imagine a standard kitchen layout. Here’s how you might map it out:
| Cabinet Type | Zone | Contents | Key Items for Reach |
|---|---|---|---|
| Upper Cabinet 1 | Dishware/Eating | Everyday plates, bowls, glasses, mugs | Glasses, Mugs |
| Upper Cabinet 2 | Prep/Baking | Spices, oils, vinegars, small mixing bowls, measuring cups, baking extracts | Spices, Oils |
| Upper Cabinet 3 | Pantry | Canned goods, dry pasta, rice, cereal boxes | Cereal, Pasta |
| Lower Cabinet 1 | Cooking | Pots, frying pans, lids, cooking utensils (spatulas, ladles), oven mitts | Cooking Utensils |
| Lower Cabinet 2 | Small Appliances | Blender, toaster, stand mixer (if small enough) | Toaster |
| Deep Lower Base | Pots & Pans | Stockpot, sauté pans, baking sheets, casserole dishes | Baking Sheets |
| Drawer 1 (Top) | Utensils/Cutlery | Forks, knives, spoons, serving spoons, whisks, measuring spoons | Everyday Cutlery |
| Drawer 2 (Mid) | Linens/Storage | Dish towels, pot holders, food storage containers, lids, plastic wrap, aluminum foil | Dish Towels |
| Drawer 3 (Deep) | Baking/Pantry | Baking pans, cookie sheets, cake tins, extra flour/sugar bags | Baking Pans |
| Pantry Shelves | Pantry | Canned goods, jarred items, cereals, snacks, baking ingredients, root vegetables | Snacks, Cereal |
This is a basic example. Your organizing kitchen cupboards map will be unique to your kitchen and your needs.
Maximizing Kitchen Storage Solutions Visual
Now, let’s talk about specific strategies and products that help implement your kitchen storage solutions visual.
Upper Cabinets: Reaching New Heights
- Shelf Risers/Expanders: These create an extra layer of shelving, instantly doubling your storage space for plates, bowls, or cans. This is crucial for kitchen cabinet space optimization diagram.
- Pros: Inexpensive, easy to use, significantly increases vertical space.
- Cons: Can sometimes make items on the lower shelf harder to access if not placed carefully.
- Turntables (Lazy Susans): Perfect for corner cabinets or for organizing spices and oils. A gentle spin brings what you need to the front.
- Pros: Excellent for accessing items in hard-to-reach places, prevents items from getting lost.
- Cons: Can take up a bit more visual space than fixed shelves.
- Stackable Bins/Containers: Use clear, stackable bins for grouping similar items like spices, packets, or small baking ingredients.
- Pros: Keeps items contained and visible, allows for stacking to maximize vertical space.
- Cons: Ensure they fit your shelf height; can be less flexible if your needs change.
- Door Racks: Mount racks on the inside of cabinet doors for spices, lids, or even cleaning supplies.
- Pros: Utilizes often-wasted door space, keeps frequently used items visible.
- Cons: Ensure items don’t obstruct the cabinet door from closing properly.
Lower Cabinets: Grounding Your Organization
- Pull-Out Shelves/Drawers: A game-changer for deep lower cabinets. They allow you to easily access items at the back without bending or rummaging. This is a key component of any cabinet interior design blueprint.
- Pros: Greatly improves accessibility and visibility in deep cabinets.
- Cons: Can be an investment, requires installation.
- Pot and Pan Organizers: Vertical or tiered organizers help store pots and pans neatly, preventing them from becoming a jumbled mess. This is part of an effective kitchen storage plan.
- Pros: Keeps cookware organized and accessible, prevents scratching.
- Cons: Some can be bulky, so measure your cabinet space.
- Under-Shelf Baskets: Clip-on baskets can add extra storage beneath existing shelves for linens or flat items.
- Pros: Adds instant storage without permanent fixtures.
- Cons: Can reduce shelf height for the items below.
Kitchen Drawers: The Art of Drawer Organization Layout
Drawers are where clutter can quickly accumulate. A smart kitchen drawer organization layout is essential.
- Drawer Dividers: Adjustable dividers are fantastic for separating cutlery, cooking utensils, and gadgets.
- Pros: Highly customizable, keeps items from shifting.
- Cons: Can sometimes be fiddly to adjust.
- Tiered Drawer Inserts: These provide multiple levels within a single drawer, perfect for maximizing space for smaller items like spices or tea bags.
- Pros: Efficient use of drawer depth, keeps small items contained.
- Cons: Limited flexibility once purchased.
- Spice Drawer Inserts: Angled inserts allow you to see spice labels easily when the drawer is opened.
- Pros: Makes finding spices effortless.
- Cons: Requires dedicating a drawer specifically for spices.
- Nesting Bowls and Measuring Cups: Choose items that nest together to save space in drawers.
Pantry Organization: Your Visual Guide to Pantry Shelving
The pantry is often a black hole. A visual guide to pantry shelving and a pantry shelf arrangement guide can transform it.
- Clear, Airtight Containers: Decant dry goods like flour, sugar, pasta, rice, and cereal into clear, airtight containers. They look neat, keep food fresh, and allow you to see quantities at a glance.
- Pros: Prevents pests, keeps food fresher, looks tidy, easy to see contents.
- Cons: Initial investment, takes time to decant.
- Categorize by Type: Group like items together – canned goods, baking supplies, breakfast items, snacks, pasta/rice. Your pantry shelf arrangement guide should reflect this.
- Tiered Risers for Cans: These allow you to see all your canned goods, creating a “first-in, first-out” system.
- Pros: Excellent visibility for canned goods, prevents items from being hidden.
- Cons: Best for standard-sized cans.
- Baskets and Bins: Use baskets to group smaller items like snack bags, seasoning packets, or individual yogurts.
- Pros: Contains loose items, makes it easy to pull out a whole category.
- Cons: Ensure they fit your shelves and are easy to lift.
- Label Everything: Once items are in containers or bins, label them clearly. This is essential for maintaining order and for guests to find things.
Implementing Your Kitchen Cabinet Organization Chart
Your kitchen cabinet organization chart is your roadmap. Here’s how to put it into action.
Placement Strategy
- Most Used Items at the Front: Place the things you use daily at the front of shelves and in easily accessible drawers.
- Heavier Items Lower Down: Store heavy pots, pans, and appliances in lower cabinets to prevent accidents and make them easier to lift.
- Group by Function: Keep all your baking supplies together, all your cooking utensils together, etc. This reinforces your zones.
- Vertical Space is Your Friend: Use shelf risers, stackable containers, and door organizers to utilize the full height of your cabinets. This is key for kitchen cabinet space optimization diagram.
Labeling for Success
- Be Clear and Concise: Label containers, bins, and even shelves if necessary.
- Use Durable Labels: Choose labels that won’t peel off or fade easily.
- Consider Font Size: Make labels easy to read.
Maintenance: Keeping It Organized
Organization isn’t a one-time event; it’s an ongoing process.
- Put Things Back Immediately: Make it a habit to return items to their designated spots after use.
- Regular Purges: Schedule a quick declutter every few months to catch expired items or things you no longer use.
- Review Your System: As your cooking habits change, you may need to adjust your cabinet layout diagram or pantry shelf arrangement guide.
Visualizing the Transformation: Before and After
Imagine opening your cabinets now. Instead of a chaotic jumble, you see neatly arranged items, clearly labeled containers, and everything in its place. Your kitchen storage solutions visual has come to life.
Before:
- Items are difficult to find.
- You have to move several things to get to what you need.
- Cans and boxes get lost in the back.
- Countertops are cluttered with items that should be stored.
After:
- Everything is easily accessible.
- You can see at a glance what you have.
- You save time and reduce stress in the kitchen.
- Your kitchen looks cleaner and more inviting.
This organizing kitchen cupboards map has led to a more functional and aesthetically pleasing kitchen. You’ve achieved kitchen cabinet space optimization diagram goals and have a truly effective kitchen storage plan.
Frequently Asked Questions (FAQ)
- Q: How often should I reorganize my kitchen cabinets?
A: It’s good practice to do a quick declutter and reorganization every 3-6 months. A deeper purge can happen annually or as needed. - Q: What if I have very limited cabinet space?
A: Focus on vertical storage with shelf risers and door organizers. Utilize wall space with shelves or magnetic strips. Prioritize nesting and stackable items. - Q: Can I use the same organization system for all kitchens?
A: While the principles are the same, your personal cabinet layout diagram and the specific products you choose will depend on the size and layout of your kitchen, as well as your cooking habits and the types of food and equipment you own. - Q: Where can I find good drawer organizers?
A: Home goods stores, department stores, and online retailers offer a wide variety of drawer organizers, including adjustable dividers, trays, and inserts. - Q: What’s the best way to organize my spices?
A: Consider a tiered spice rack on a shelf, a lazy susan in a cabinet, or a dedicated spice drawer with angled inserts. Labeling is crucial regardless of the method.
By following this guide and using your kitchen cabinet organization chart as a blueprint, you can create a beautifully organized and highly functional kitchen space. Happy organizing!