
Can you paint a kitchen table? Yes, you absolutely can paint a kitchen table! With a little preparation and the right materials, you can give your old table a stunning new look. This guide will walk you through the entire process, from choosing the best paint to applying the perfect topcoat.
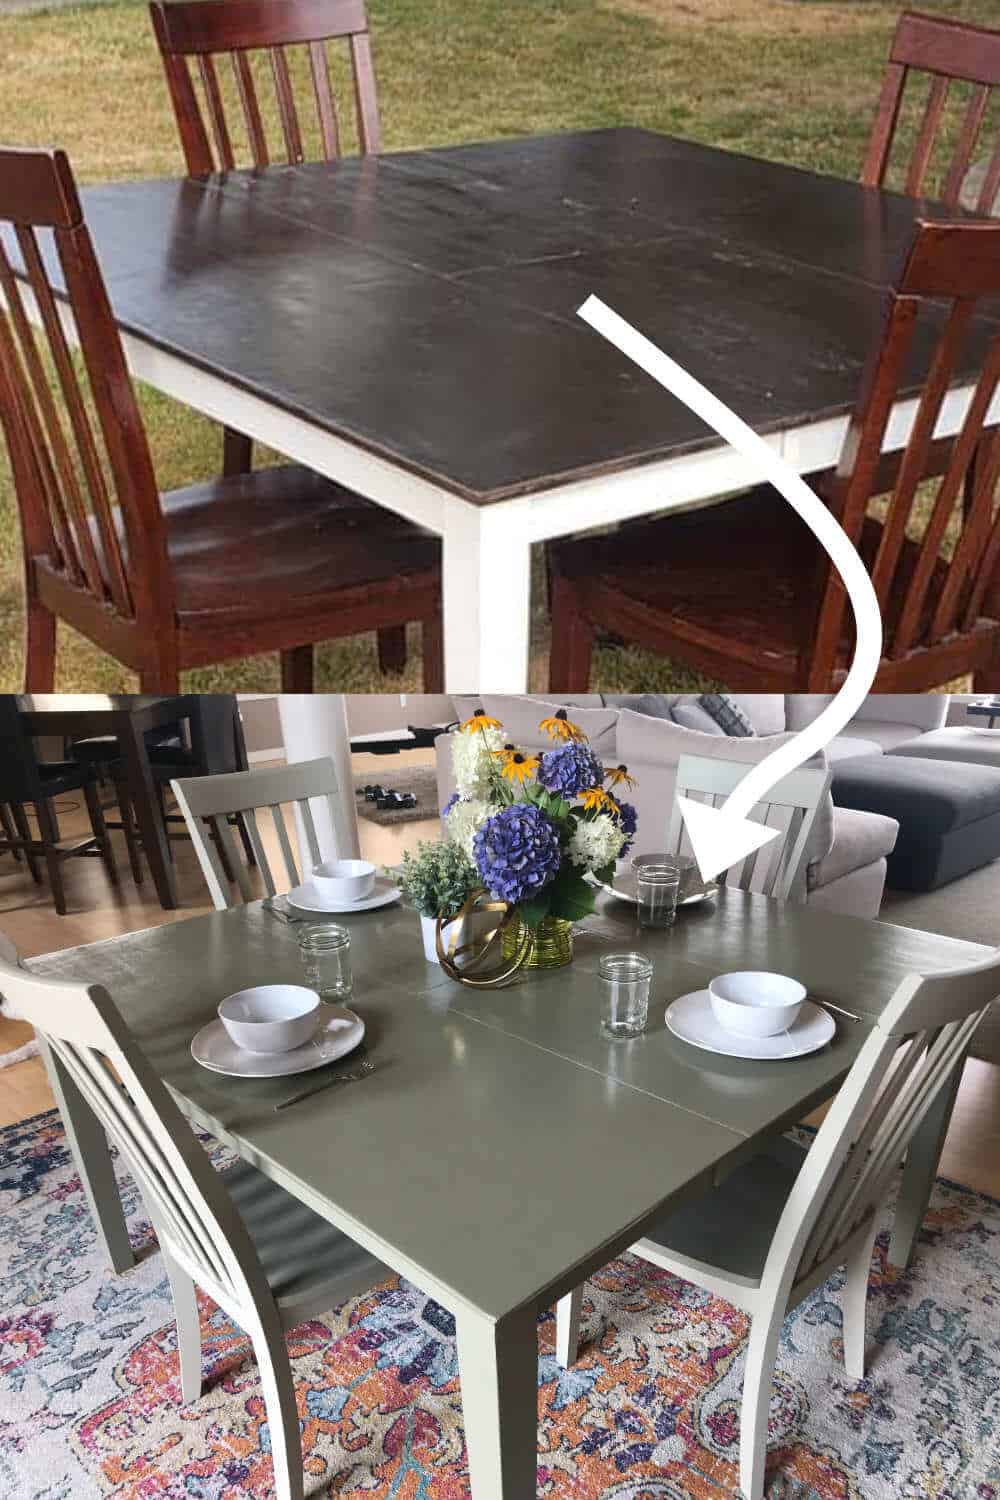
Image Source: sunshineandrainydays.com
Revitalizing Your Dining Space: A Kitchen Table Makeover
Is your kitchen table looking a bit tired? Scratched, stained, or just out of style? Don’t worry! A kitchen table makeover can be one of the most rewarding DIY projects you can tackle. Refinishing a kitchen table doesn’t have to be a daunting task. It’s an excellent way to breathe new life into your dining area and customize it to your taste. Whether you’re looking to achieve a modern farmhouse vibe, a sleek contemporary feel, or a vintage charm, painting your table is the key. This comprehensive guide is all about DIY table painting and will help you achieve a beautiful, durable finish that will last for years. We’ll cover everything you need to know to turn that old table into a showpiece.
Choosing the Right Paint: The Heart of Your Table’s New Look
Selecting the best paint for a kitchen table is crucial. Kitchen tables endure a lot of wear and tear – spills, heat, and constant use. Therefore, you need a paint that is durable, washable, and attractive.
Paint Types to Consider
- Chalk Paint: This is a popular choice for refinishing furniture because it adheres well to most surfaces with minimal prep. It creates a matte, velvety finish that can be easily distressed for a vintage look. A chalk paint kitchen table is very achievable and offers a beautiful, soft aesthetic. However, chalk paint always requires a topcoat for durability.
- Milk Paint: Similar to chalk paint in its matte finish and adhesion, milk paint can also create a chippy, aged look. It often comes in powder form, requiring mixing. It also needs a protective topcoat.
- Mineral Paint: These paints offer excellent durability and a smooth, low-sheen finish. They are generally more durable than chalk paint and can often be used without a separate primer or topcoat, depending on the brand.
- Latex Paint (Acrylic Enamel): High-quality acrylic enamel latex paints are a fantastic option for painting wood furniture. Look for formulas labeled “all-in-one” or “cabinet paint,” as these are designed for high-traffic surfaces and offer excellent adhesion and durability. Cabinet paint for tables is formulated to withstand heavy use and frequent cleaning.
- Oil-Based Enamels: These offer an extremely hard, durable finish and are very resistant to chipping and scratching. However, they have strong fumes, require mineral spirits for cleanup, and have longer drying times.
Topcoats for Protection
No matter which paint you choose (unless it’s an all-in-one paint), a topcoat is essential for protecting your newly painted table.
- Polyurethane (Water-Based): This is a versatile and durable choice. It dries clear and is available in different sheens (matte, satin, semi-gloss, gloss). Water-based polyurethane is easy to clean up with soap and water.
- Polyacrylic: Similar to polyurethane but often considered to have a clearer finish, reducing the “ambering” effect that can sometimes occur with oil-based polyurethanes on lighter colors.
- Wax: Often used over chalk paint for a soft, smooth finish. While beautiful, wax offers less protection against water and heat compared to polyurethane. It needs to be reapplied periodically.
- Water-Based Polycrylic: A good option for lighter colors as it won’t yellow over time like oil-based polyurethanes can.
Step-by-Step Guide to Painting Your Kitchen Table
Here’s a detailed breakdown of how to paint your kitchen table for a stunning result.
Step 1: Gathering Your Supplies
Having all your materials ready will make the process smoother.
Essential Supplies:
- Paint: Your chosen color and type.
- Primer: If your chosen paint doesn’t have built-in primer, or if you’re painting over a dark or glossy finish.
- Topcoat: Polyurethane, polycrylic, or wax.
- Sanding Paper: Various grits (e.g., 100, 150, 220).
- Sanding Block or Electric Sander: For faster sanding.
- Orbital Sander (optional): For larger surfaces.
- Cleaning Supplies: Mild soap, water, rags, tack cloth.
- Screwdriver or Wrench: To remove table legs if desired.
- Paint Brushes: High-quality synthetic brushes for latex/acrylic paint, natural bristles for oil-based.
- Foam Rollers or Microfiber Rollers: For smooth, even coverage on larger surfaces.
- Painter’s Tape: For masking off any areas you don’t want to paint.
- Drop Cloths: To protect your workspace.
- Safety Gear: Gloves, dust mask, safety glasses.
Step 2: Kitchen Table Prep – The Foundation for Success
This is arguably the most important step. Proper kitchen table prep ensures your paint adheres well and lasts.
Preparing the Surface
- Clean Thoroughly: Start by cleaning the entire table with mild soap and water. This removes grease, food residue, and dirt. Rinse thoroughly with clean water and let it dry completely.
- Remove Hardware: Unscrew any hardware like decorative trim or leg caps. Place them in a baggie so you don’t lose them.
- Repair Imperfections: Fill any dents, scratches, or holes with wood filler. Let it dry completely according to the product instructions, then sand it smooth.
- Sanding – The Key to Adhesion:
- Deglossing: Even if your table has a smooth finish, you need to create a surface for the paint to grip. Use 150-grit sandpaper to lightly sand the entire table. You’re not trying to remove the old finish, just dull it.
- Smoothing: If there are any rough spots or old finish remnants, use a coarser grit (like 100 or 120) to start, then move to 150-grit.
- Final Smoothness: For a really smooth finish, especially if you’re using a thin paint or a high-gloss topcoat, a final sanding with 220-grit sandpaper is recommended.
- Sanding Technique: Always sand in the direction of the wood grain. If you’re using an electric sander, keep it moving to avoid creating divots.
- Dust Removal: After sanding, it’s crucial to remove all dust.
- Vacuum: Use a vacuum with a brush attachment to get most of the dust off.
- Tack Cloth: A tack cloth is sticky and picks up fine dust particles that vacuuming might miss. Wipe down the entire table with a tack cloth. You may need to use several.
Priming – When and Why
Priming is not always necessary, but it significantly improves paint adhesion and coverage, especially in these cases:
- Dark to Light Colors: If you’re painting a dark table a light color, primer will prevent the old color from showing through.
- Laminates or Veneers: These surfaces can be tricky to paint and often benefit from a specialized bonding primer.
- High-Gloss Finishes: If you haven’t sanded thoroughly, a primer will help your paint stick.
-
Stains or Tanning: If the wood has dark stains or has been treated with wood stain, a stain-blocking primer is essential.
-
Application: Apply a thin, even coat of your chosen primer. Let it dry completely according to the manufacturer’s instructions. Lightly sand with 220-grit sandpaper and wipe with a tack cloth after the primer dries. This ensures a smooth base for your paint.
Step 3: Painting the Table – Bringing Your Vision to Life
Now for the fun part! Applying the paint.
Applying the First Coat
- Stir, Don’t Shake: Always stir your paint gently to avoid creating air bubbles. Shaking can introduce air that leads to a less smooth finish.
- Brush vs. Roller:
- Brushes: Use a good quality synthetic brush for water-based paints. Apply paint in long, even strokes, following the direction of the wood grain. Avoid overloading the brush.
- Rollers: For larger flat surfaces like the tabletop, a foam roller or a high-density microfiber roller will give a smoother finish with fewer brush marks. Apply a thin, even coat.
- Thin Coats are Best: It’s better to apply two or three thin coats of paint than one thick coat. Thick coats tend to drip, crack, and don’t cure as well.
- Drying Time: Allow each coat to dry completely according to the paint manufacturer’s instructions. This is usually a few hours. Rushing this step can lead to peeling or uneven finishes.
Applying Subsequent Coats
- Light Sanding Between Coats: Once the first coat is dry, lightly sand the entire table with 220-grit sandpaper. This “de-nibbing” process removes any small bumps or imperfections and creates a smoother surface for the next coat.
- Wipe with Tack Cloth: After sanding, use a tack cloth to remove all dust.
- Apply Next Coat: Apply your second coat of paint, following the same technique as the first.
- Repeat if Necessary: For deep colors or to ensure complete coverage, you might need a third coat. Always sand and tack cloth between coats.
Step 4: Applying the Topcoat – The Protective Shield
This step is vital for durability, especially for a kitchen table.
- Choose Your Sheen: Decide if you want a matte, satin, semi-gloss, or gloss finish. Satin and semi-gloss are popular for tables as they offer good durability and a nice sheen without being too reflective.
- Apply Thin, Even Coats: Apply your topcoat using a high-quality synthetic brush or a foam roller. Work in thin, even strokes. Over-application can lead to drips and a cloudy finish.
- Allow Adequate Drying Time: This is crucial. Polyurethane and polyacrylic need to cure fully to achieve their maximum hardness. This can take several days to a week, even if it feels dry to the touch. Avoid heavy use of the table during this curing period.
- Multiple Coats for Durability: Apply at least two to three coats of topcoat. Lightly sand with 220-grit sandpaper and wipe with a tack cloth between coats for the smoothest and most durable finish.
Step 5: Reassembling and Enjoying Your Refinished Table
Once the final coat of topcoat is completely dry and cured, you can reattach any hardware. Place your beautifully refinished kitchen table back in its spot and admire your work!
Popular Painting Techniques for Kitchen Tables
Beyond a solid color, you can use various techniques to add character to your table.
Distressing for a Vintage Look
If you love the look of antique furniture, distressing is for you.
- When to Distress: This is typically done after the final paint coat has dried but before the topcoat, or sometimes after the topcoat if you’re careful.
- How to Distress:
- Sandpaper: Use 100-150 grit sandpaper. Lightly rub areas that would naturally show wear, such as edges, corners, and where people’s arms might rest.
- Electric Sander: An orbital sander with fine-grit sandpaper can be used for a more consistent distressed look over larger areas.
- “Crackle” Finish: Apply a crackle medium between two layers of paint for a cracked, aged appearance.
- After Distressing: Always wipe away dust with a tack cloth. You can then apply your topcoat. A wax topcoat over a distressed chalk paint finish often enhances the aged look beautifully.
Two-Tone Effects
Painting the tabletop one color and the legs another creates a striking visual.
- Technique: Paint the tabletop and legs separately if possible. Use painter’s tape to create clean lines between colors if painting them while assembled. Ensure the tape is pressed down firmly to prevent bleed-through.
Stenciling
Add decorative patterns to your tabletop or apron.
- Technique: Use stencils and a stencil brush or small roller. Apply paint sparingly to avoid bleed under the stencil.
What is the best paint for kitchen table durability?
The best paint for kitchen table durability is typically a high-quality acrylic enamel or cabinet paint, often with a satin or semi-gloss finish. When paired with multiple coats of a durable water-based polyurethane or polycrylic topcoat, it can withstand daily wear and tear, spills, and cleaning.
Can I paint a laminate kitchen table?
Yes, you can paint a laminate kitchen table. The key is proper prep. You’ll need to clean it thoroughly, lightly sand it to create a bit of “tooth” for the paint to adhere to, and then use a high-quality bonding primer specifically designed for slick surfaces before applying your paint. A durable topcoat is also essential.
Frequently Asked Questions (FAQ)
Q1: Do I need to prime before painting my kitchen table?
A1: While not always necessary, priming is highly recommended, especially if you’re painting a dark color over a light one, painting over a glossy finish, or if the table has stains. Primer helps with adhesion and ensures a more even color.
Q2: What kind of brush should I use?
A2: For water-based paints like latex or acrylics, use a good quality synthetic bristle brush. For oil-based paints, use natural bristle brushes. Foam rollers are excellent for smooth finishes on larger surfaces.
Q3: How many coats of paint should I apply?
A3: It’s generally recommended to apply two to three thin coats of paint. This provides better coverage and a more durable finish than one thick coat. Always sand lightly and wipe with a tack cloth between coats.
Q4: How long does it take for a painted table to cure?
A4: While paint may feel dry to the touch within a few hours, it can take several days to a week for the paint to fully cure and reach its maximum hardness. Avoid heavy use, cleaning, or placing hot items directly on the table during the curing period.
Q5: Can I use leftover house paint on my kitchen table?
A5: While you can technically use leftover house paint, it’s generally not recommended for kitchen tables. House paint might not have the same durability or resistance to moisture and abrasion needed for a high-traffic surface like a dining table. Opt for paints specifically designed for furniture or cabinets.
Maintaining Your Newly Painted Table
To keep your kitchen table makeover looking its best:
- Use placemats and coasters.
- Wipe up spills immediately.
- Clean with a mild soap and water solution. Avoid harsh chemicals or abrasive cleaners.
- Touch up any minor chips or scratches as needed.
Painting your kitchen table is a fantastic way to update your home without buying a new piece of furniture. With careful preparation and the right techniques, you can achieve a beautiful and lasting finish. Happy painting!