
Image Source: i.ytimg.com
How To Paint Kitchen Cabinets With A Sprayer: Pro Results
Can you paint kitchen cabinets with a sprayer and get professional results? Yes, you absolutely can! Using a sprayer is the key to achieving a smooth, factory-like finish on your kitchen cabinets, far surpassing the brush-and-roller method. This guide will walk you through everything you need to know for successful cabinet spraying.
Why Spray Paint Kitchen Cabinets?
Many homeowners wonder if they can achieve a professional finish when spray painting kitchen cabinets. The answer is a resounding yes, and here’s why spraying is superior:
- Flawless Finish: Sprayers atomize paint, creating a fine mist that lays down evenly. This eliminates brush strokes and roller marks, giving you a smooth, consistent look.
- Even Coverage: Paint sprayers apply a thin, even coat of paint. This means less risk of drips and runs, and better adhesion, especially on intricate cabinet doors and drawer fronts.
- Time Savings: While preparation takes time, the actual spraying process is much faster than brushing or rolling, especially for large projects.
- Durability: A properly applied spray finish is often more durable and resistant to chipping than a brushed or rolled finish.
Choosing the Right Sprayer: The Best Paint Sprayer for Cabinets
Selecting the correct equipment is crucial for cabinet painting techniques. Not all sprayers are created equal, and for cabinets, you need something that can handle finer finishes.
HVLP Sprayer for Cabinets: The Professional Choice
An HVLP sprayer for cabinets (High Volume, Low Pressure) is the gold standard for cabinet painting. Here’s why:
- Low Overspray: HVLP sprayers use high volume air at low pressure to atomize the paint. This means more paint lands on your cabinets and less goes into the air, saving you paint and reducing mess.
- Superior Control: The low pressure gives you excellent control over the paint flow, which is essential for detailed work and achieving that smooth finish.
- Versatility: While ideal for cabinets, HVLP sprayers can also be used for furniture, trim, and other projects.
Types of HVLP Sprayers:
- Electric Turbine HVLP: These are self-contained units with a built-in turbine that provides the airflow. They are great for DIYers and smaller to medium-sized projects. They are generally easier to use and less complex than air-fed systems.
- Air-Fed HVLP: These require a separate air compressor to power the sprayer. They offer more power and control and are preferred by professionals for larger jobs and when using thicker paints. You’ll need a compressor with sufficient CFM (Cubic Feet per Minute) output.
Other Sprayer Options (and why they might not be ideal for cabinets):
- Airless Sprayers: These are powerful and fast, but they use very high pressure, leading to significant overspray. While great for walls or exteriors, they are generally too aggressive for the fine finish needed on cabinets. You can use them with specialized tips, but it’s trickier to get a perfect cabinet finish.
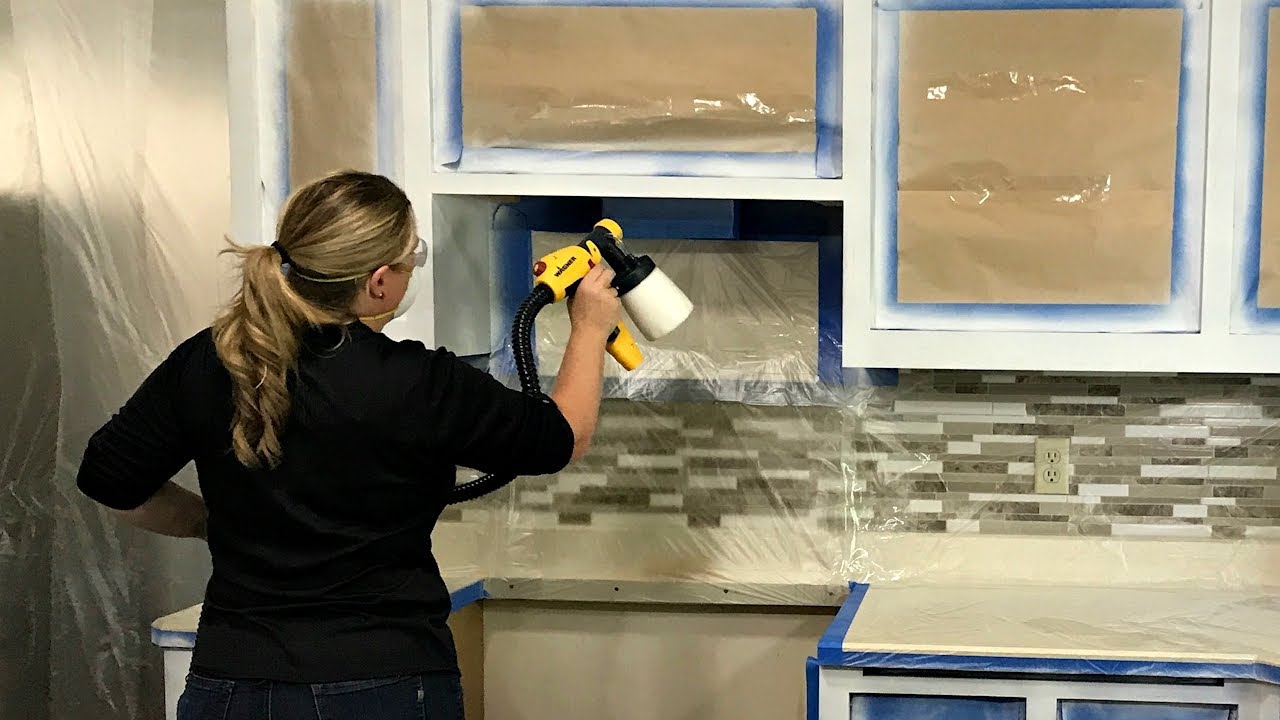
- Handheld Sprayers (e.g., Wagner Flexio): These are convenient and affordable for small touch-ups or simple projects. However, they often struggle with achieving the ultra-smooth, consistent finish that cabinet spraying requires, especially with certain types of paint. They can be a good entry point for DIYers testing the waters, but expect a slightly less professional result.
DIY Cabinet Sprayer Considerations:
If you’re a DIY cabinet sprayer looking for a good balance of performance and price, an electric turbine HVLP sprayer is often the best bet. Look for models with adjustable air pressure and flow rate, and a good quality spray gun (often referred to as a spray gun for cabinets).
Essential Supplies for Cabinet Painting Prep
Proper cabinet painting prep is paramount. Skipping steps here will show in your final finish.
Materials You’ll Need:
- Screwdrivers: To remove doors, hinges, and drawer fronts.
- Drop Cloths/Plastic Sheeting: To protect your floors, countertops, and appliances.
- Painter’s Tape: High-quality tape is essential for masking off areas you don’t want to paint.
- Degreaser/Sugar Soap: To thoroughly clean cabinets and remove grease and grime.
- Sanding Sponges/Sandpaper (120-220 grit): For scuff sanding.
- Tack Cloths: To remove dust after sanding.
- Primer: A high-quality bonding primer is crucial for adhesion.
- Paint: Specifically formulated for cabinets or furniture. Lacquers, water-based enamels, or hybrid alkyds are common choices.
- Paint Strainers: To ensure no debris is in your paint or primer.
- Cleaning Rags: For various cleaning tasks.
- Putty Knife: For scraping any old finish or imperfections.
- Wood Filler/Putty: For filling holes or imperfections.
- Caulk: For filling gaps along cabinet edges or between cabinets and walls.
- Safety Glasses: To protect your eyes from dust and paint spray.
- Respirator Mask (N95 or better): Crucial for protecting your lungs from paint fumes and fine dust.
- Gloves: To protect your hands.
Setting Up Your Spray Booth for Cabinets
A proper spray booth for cabinets is not always a professional, built-in structure. For DIYers, it’s about creating a controlled environment to minimize dust and overspray.
- Ventilation: This is the most critical aspect. You need to ensure good airflow to remove fumes and dust. Open windows are good, but fans are better. Position fans to draw air out of the space.
- Dust Control: Lay down drop cloths or plastic sheeting over everything you aren’t painting. Seal edges with tape. Consider using a plastic sheeting tent for smaller spray sessions.
- Lighting: Good lighting is essential to see imperfections and ensure even coverage.
- Workspace: You need a clean, well-ventilated area where you can spray and let the cabinets dry without being disturbed. A garage or a spare room can work, provided you can manage ventilation and dust.
The Step-by-Step Guide to Spray Painting Kitchen Cabinets
This detailed process will guide you through achieving a professional finish.
Step 1: Cabinet Painting Prep – The Foundation of Success
This is arguably the most time-consuming but vital phase.
- Remove Doors and Drawers: Carefully remove all cabinet doors and drawer fronts. Label them with masking tape on the inside so you know exactly where they go back. This is a crucial part of efficient cabinet painting prep.
- Remove Hardware: Take off hinges, knobs, and pulls. Store them safely, perhaps in labeled bags.
- Clean Thoroughly: Use a degreaser or sugar soap solution to wash down every surface of the cabinets, doors, and drawers. Grease and grime are the enemies of adhesion. Rinse well and let them dry completely.
- Repair Imperfections: Fill any holes (from old hardware, etc.) or gouges with wood filler. Let it dry according to the product instructions, then sand it smooth. Fill any cracks or gaps with paintable caulk along edges or where cabinet pieces meet walls.
- Scuff Sand: This creates a surface for the new paint to adhere to. Use a fine-grit sanding sponge (around 150-220 grit) or sandpaper. You don’t need to remove the old finish; you just need to dull the sheen. Work in the direction of the wood grain where possible.
- Dust Removal: After sanding, use a shop vacuum with a brush attachment to remove as much dust as possible. Then, wipe everything down with a clean, damp cloth (water or a mild cleaner). Follow up with a tack cloth to pick up any lingering dust particles. This step is non-negotiable for a smooth finish.
Step 2: Masking and Protecting Your Kitchen
Now it’s time to protect everything that won’t be sprayed.
- Cover Appliances and Countertops: Use drop cloths or plastic sheeting. Secure the edges with painter’s tape. Overlap sheeting and tape generously to prevent paint from seeping through.
- Tape Off Walls and Ceilings: Use high-quality painter’s tape to create clean lines between cabinets and walls, ceilings, backsplashes, or appliances. Press the tape down firmly to ensure a good seal.
- Protect the Interior: If you want to keep the inside of your cabinets the original color, mask off the interior surfaces.
Step 3: Priming for Perfect Adhesion
Primer is essential for a durable and even finish.
- Choose the Right Primer: Use a high-quality bonding primer designed for cabinets or trim. This will help the topcoat adhere well, even to slick surfaces.
- Strain the Primer: Pour primer through a paint strainer into your spray gun’s cup or your chosen container. This removes any dried bits that could clog your sprayer.
- Spray the Primer:
- Test Spray: Before spraying your cabinets, test the spray pattern on a piece of cardboard. Adjust the nozzle and airflow until you have a fine, even mist with minimal “tails” (uneven spray patterns).
- Spraying Technique: Hold the spray gun about 6-10 inches away from the surface. Move at a consistent speed, overlapping each pass by about 50%. Start spraying before you reach the edge of the cabinet and stop spraying after you pass the opposite edge. This prevents pooling at the start and end of each pass.
- Thin Coats: Apply thin, even coats. It’s better to apply two thin coats than one thick coat.
- Dry Time: Allow the primer to dry completely according to the manufacturer’s instructions.
- Light Sanding (Optional but Recommended): Once dry, you can lightly scuff sand the primed surface with a very fine-grit sandpaper (220-320 grit) if you see any imperfections or dust nibs. Wipe down again with a tack cloth.
Step 4: Spray Painting the Cabinets – The Main Event
Now for the transformative step!
- Prepare the Paint: Stir the paint thoroughly. Strain it through a paint strainer into your spray gun cup. Check the manufacturer’s recommendations for thinning. Some paints, especially water-based enamels, may need to be thinned slightly for optimal spraying. Use the recommended thinner (often water for water-based paints or a specific reducer for oil-based or lacquer paints).
- Load Your Sprayer: Fill your spray gun cup, ensuring not to overfill.
- Spray the Cabinets:
- Practice: As with primer, practice on cardboard to ensure a consistent spray pattern.
- Technique: Maintain the same distance (6-10 inches) and consistent speed as you did with the primer. Overlap each pass by 50%. Work systematically, spraying doors and drawer fronts flat on a surface (like sawhorses). For cabinet boxes, work from top to bottom, section by section.
- Thin Coats are Key: Apply multiple thin coats rather than one thick one. This is where you achieve the smooth, professional look.
- Drying Between Coats: Allow adequate drying time between coats as recommended by the paint manufacturer. This is crucial to prevent lifting or the paint not adhering properly. Lightly scuff sand with very fine grit (320+ grit) between coats if necessary, and always use a tack cloth afterward.
Step 5: Drying and Reassembly
Patience is key in this final stage.
- Curing Time: While paint may feel dry to the touch within hours, it takes days, or even weeks, for paint to fully cure and reach its maximum hardness. Be gentle with your newly painted cabinets during this period. Avoid slamming doors or drawers.
- Reassemble: Once the paint is fully dry and cured, reattach all hardware. Carefully rehang the doors and reinsert the drawers. You might need to make minor adjustments to hinges if the paint has slightly altered the fit.
- Clean Up: Remove all painter’s tape and drop cloths. Clean your spray gun thoroughly immediately after use to prevent paint from drying in it. This is critical for its longevity.
Factors Affecting Your Cabinet Spray Painting Project
Several elements can influence the outcome of your cabinet spraying project.
- Paint Choice: Different paint types have different spraying characteristics. Water-based enamels are popular for DIYers due to easier cleanup, but some oil-based paints or lacquers offer superior durability and hardness. Always check the paint’s compatibility with sprayers and follow manufacturer guidelines.
- Sprayer Settings: Correctly setting the air pressure, fluid flow, and fan pattern on your spray gun for cabinets is vital. Too much pressure or fluid can cause runs, while too little can lead to poor coverage and a rough finish.
- Environmental Conditions: Temperature and humidity can affect drying times and paint flow. Avoid spraying in direct sunlight, very humid conditions, or extremely cold temperatures.
- Cabinet Material: While most cabinet materials can be painted, some (like laminate or thermofoil) may require special primers or preparation techniques for optimal adhesion.
Common Cabinet Painting Techniques to Master
Beyond the basic spraying, advanced cabinet painting techniques can elevate your results.
- Edge Spraying: When spraying cabinet doors, a common technique is to spray the edges first, then the face. This helps avoid buildup on the edges.
- Cross-Coating: Applying paint in perpendicular directions (e.g., one coat horizontally, the next vertically) can ensure more even coverage, especially on flat surfaces.
- Preventing Runs and Sags:
- Thin Coats: This is the primary defense.
- Consistent Speed: Don’t linger in one spot.
- Proper Distance: Too close, and paint builds up; too far, and it dries before hitting the surface.
- Fluid Control: Don’t push too much paint through the gun.
- Achieving a Smooth Finish:
- Proper Atomization: Ensure your sprayer is producing a fine mist.
- Clean Equipment: Clogged nozzles or dirty air caps create poor spray patterns.
- Light Sanding Between Coats: Removing dust nibs with fine grit sandpaper is crucial.
Maintaining Your Sprayer for Longevity
To get the most out of your DIY cabinet sprayer or professional unit, proper maintenance is key.
- Immediate Cleaning: Clean your sprayer right after each use. Disassemble the parts that came into contact with paint (needle, nozzle, air cap) and clean them thoroughly with the appropriate solvent (water for water-based paints, mineral spirits or lacquer thinner for oil-based or lacquer).
- Lubrication: Lightly lubricate moving parts with the manufacturer-recommended lubricant after cleaning.
- Storage: Store your sprayer in a clean, dry place, away from dust and extreme temperatures.
Table: Paint Sprayer Comparison for Cabinets
| Sprayer Type | Best For | Pros | Cons | Ideal for Cabinet Painting? |
|---|---|---|---|---|
| HVLP Electric | DIYers, small to medium projects | Low overspray, good control, portable, easier to use | Can be slower than airless, may struggle with very thick paints | Excellent |
| HVLP Air-Fed | Professionals, large projects | Excellent finish, high control, powerful | Requires air compressor, more complex setup, higher initial cost | Excellent |
| Airless Sprayer | Walls, large exteriors, quick coverage | Fast, covers large areas quickly | High overspray, less control, can be difficult for fine finishes | Generally No |
| Handheld Sprayers | Small touch-ups, craft projects | Very portable, affordable, easy cleanup | Prone to drips/runs, less consistent finish, limited paint types | Possible for simple jobs |
Frequently Asked Questions About Spray Painting Kitchen Cabinets
Q1: What is the best paint for spray painting kitchen cabinets?
A: The best paint for spray painting kitchen cabinets is typically a high-quality acrylic enamel, a cabinet-specific lacquer, or a hybrid alkyd paint. These paints offer durability, a smooth finish, and good adhesion when properly applied. Water-based acrylic enamels are popular for DIYers due to their low VOCs and easier cleanup.
Q2: Can I use a regular household paint sprayer for cabinets?
A: While you can technically use a general household paint sprayer, such as a Wagner Flexio, it’s unlikely to achieve the same level of professional, smooth finish as an HVLP sprayer for cabinets. These sprayers often have higher pressure and can produce more overspray, making it harder to get that factory-like result on cabinet doors and drawers.
Q3: Do I need to remove my cabinet doors to spray paint them?
A: Yes, absolutely. For the best and most consistent finish, you must remove your cabinet doors and drawer fronts. This allows you to spray them flat, ensuring even coverage on all sides and edges without drips or missed spots. It also makes cabinet painting prep much more manageable.
Q4: How many coats of paint do I need for kitchen cabinets?
A: Typically, you will need at least two coats of primer and two to three coats of your chosen paint. Applying multiple thin coats is always better than one or two thick coats, as it provides a more durable and smoother finish, reducing the risk of runs and sags.
Q5: What kind of sandpaper should I use for cabinet painting?
A: For the initial scuff sanding after cleaning, a 120-150 grit sandpaper or sanding sponge is usually sufficient to dull the existing finish. If you need to smooth out imperfections or between coats, a finer grit like 220-320 grit is recommended. Always follow up sanding with a tack cloth to remove dust.
Q6: How long does it take to paint kitchen cabinets with a sprayer?
A: The actual spraying time might be just a few hours for the entire kitchen. However, the entire process, including cabinet painting prep, masking, priming, multiple paint coats, and drying/curing time, can take anywhere from 3 to 7 days, or even longer depending on drying conditions and the number of coats.
Q7: What is a good CFM requirement for a spray gun for cabinets?
A: For most HVLP spray guns used for cabinet spraying, an air compressor that provides at least 5-8 CFM (Cubic Feet per Minute) at 90 PSI is usually sufficient. Always check the specific requirements for your chosen spray gun for cabinets.
Q8: Can I spray paint cabinets without a spray booth?
A: Yes, you can spray paint cabinets without a dedicated spray booth for cabinets. However, you must create a controlled environment. This involves meticulous masking of surrounding areas with drop cloths and plastic sheeting, ensuring good ventilation (using fans to exhaust air outward), and wearing appropriate personal protective equipment (respirator, goggles, gloves).
In conclusion, kitchen cabinet refinishing using a paint sprayer is a rewarding DIY project that can dramatically transform your kitchen’s appearance. By following these detailed steps and paying close attention to preparation and technique, you can achieve beautiful, professional results. Happy spraying!