
Can I paint my kitchen cupboards with chalk paint? Yes, you absolutely can paint your kitchen cupboards with chalk paint, and it’s a fantastic way to achieve a beautiful chalk paint kitchen cabinet transformation. This guide will walk you through everything you need to know for a successful DIY chalk paint cupboard makeover.
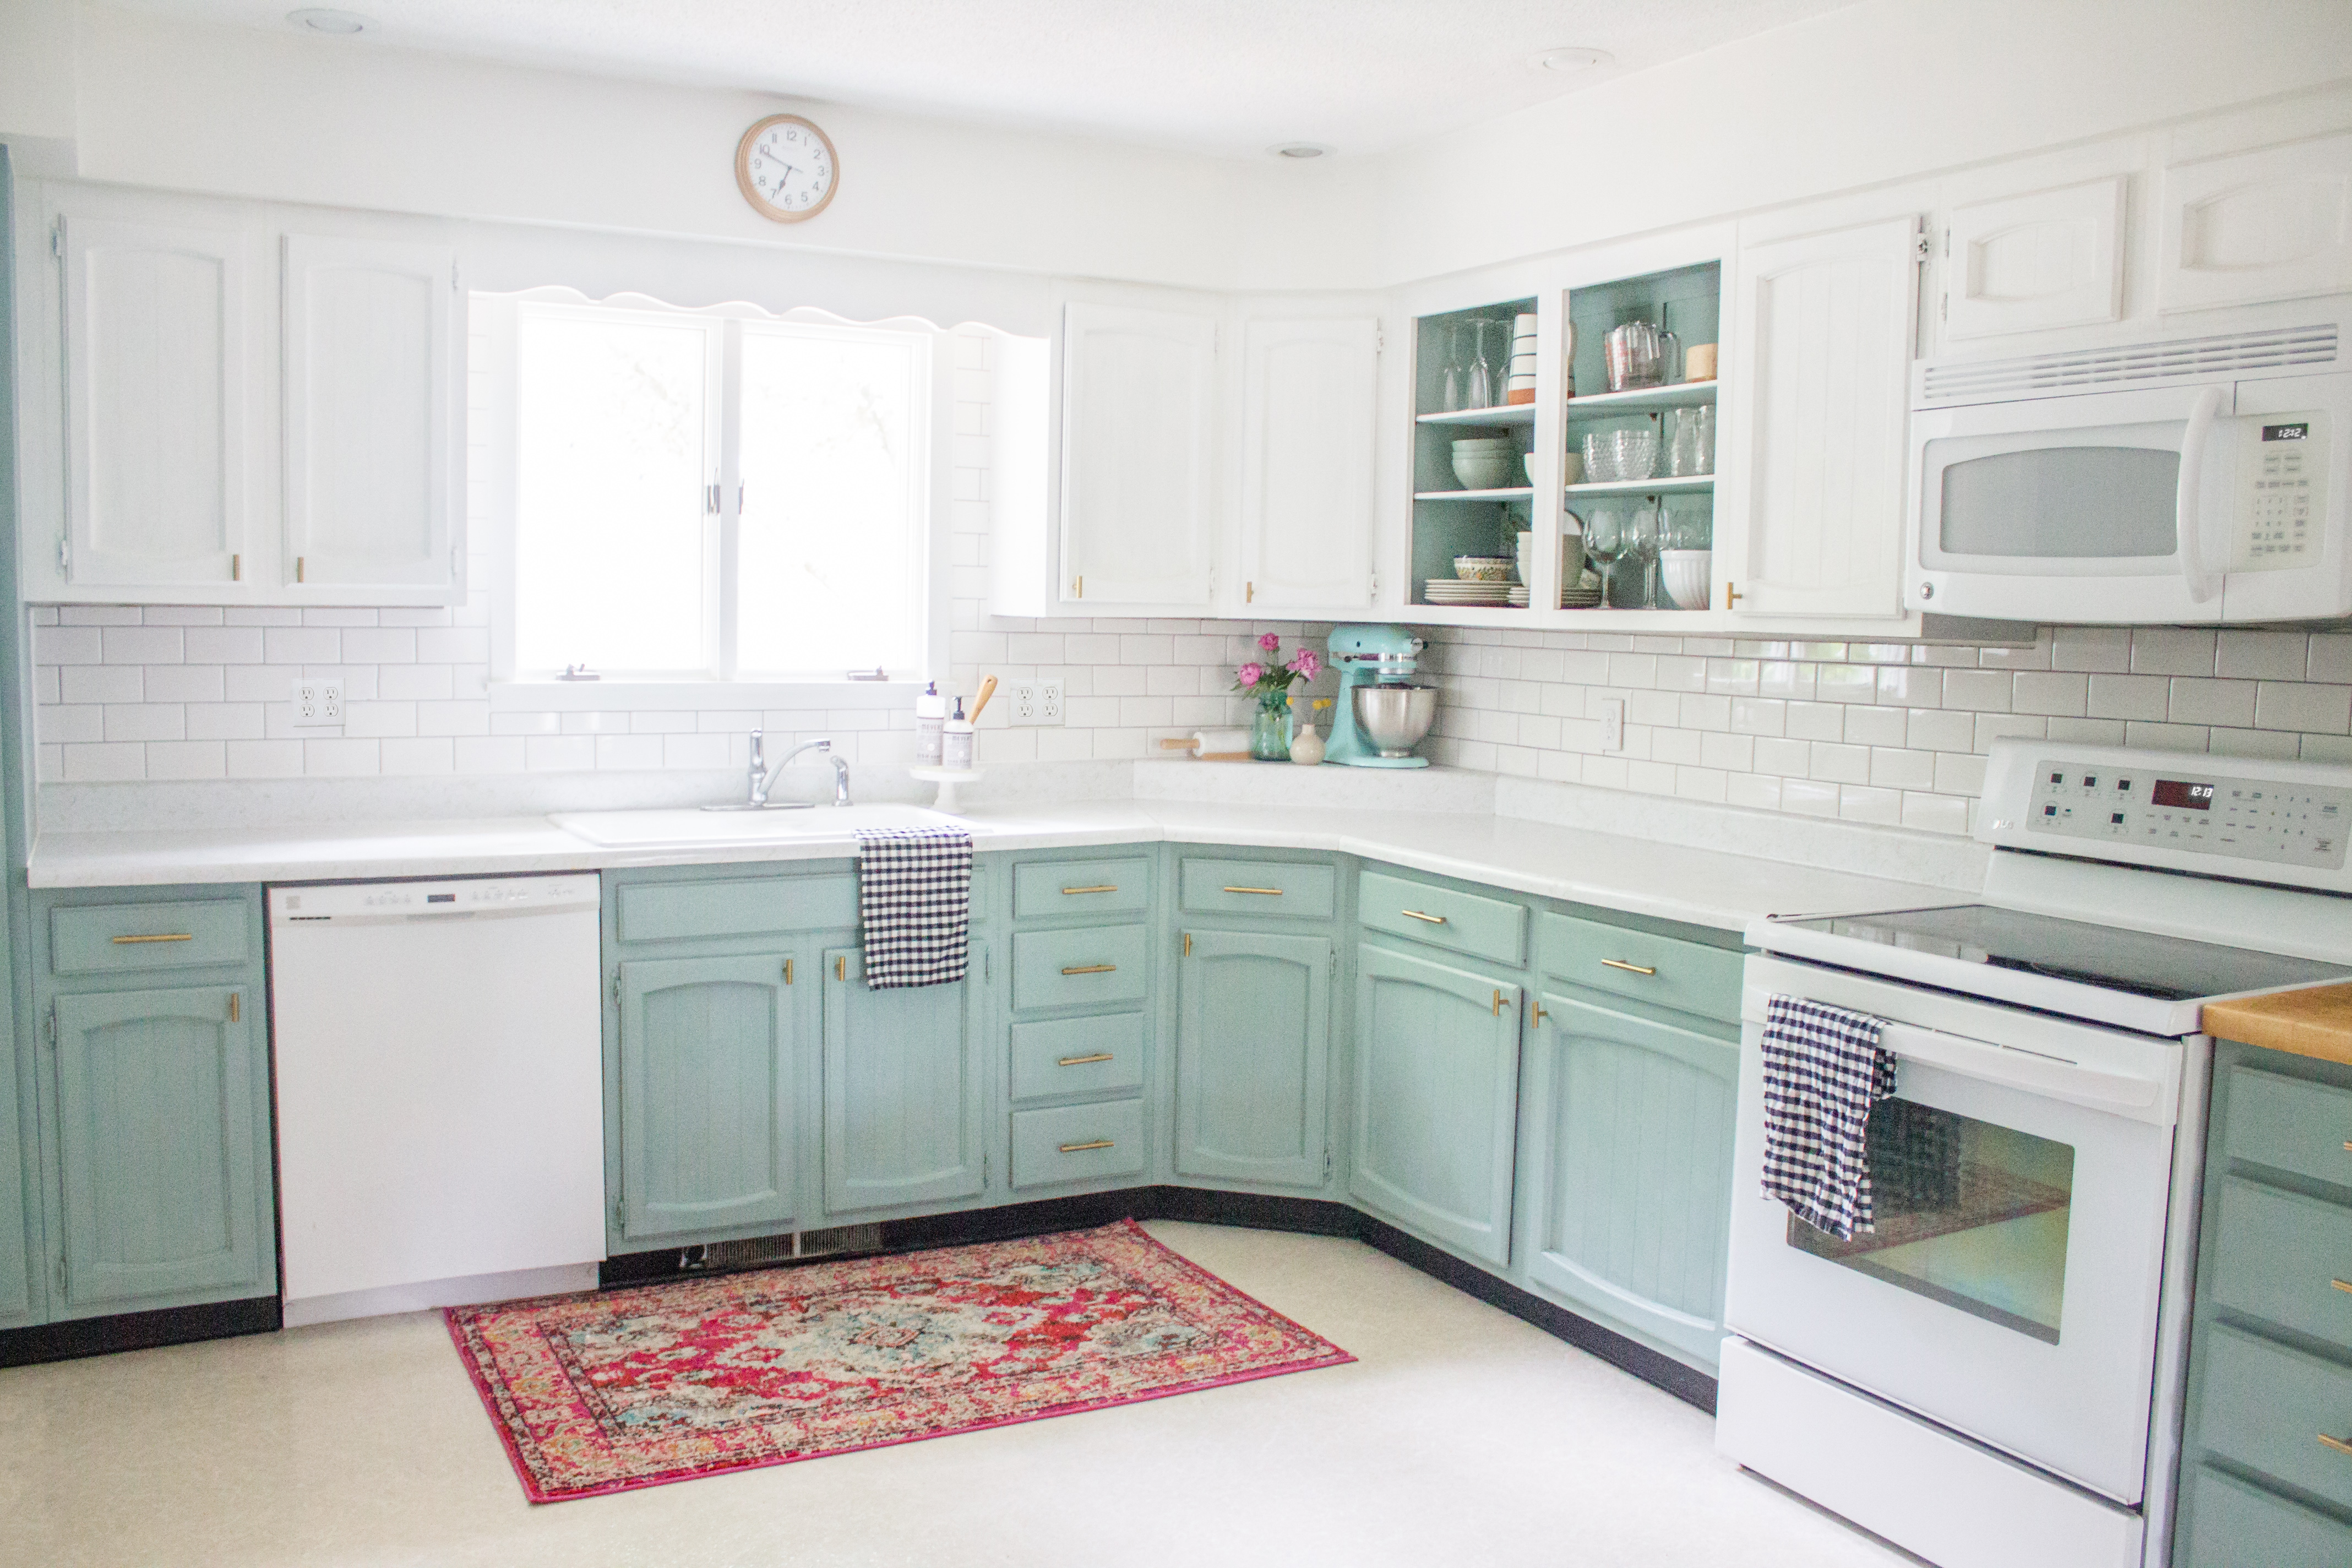
Image Source: hollandavenuehome.com
Preparing Your Kitchen Cabinets for Chalk Paint
Getting your cabinets ready is key to a lasting finish. This process is often called prepping kitchen cabinets for chalk paint, and it’s not as daunting as it sounds.
Step 1: Cleaning Your Cabinets
This is the most crucial step. Any grease, grime, or dust will prevent the paint from adhering properly.
- Gather your supplies: You’ll need a good degreaser (like a TSP substitute or a strong kitchen cleaner), clean cloths or sponges, and a bucket of water.
- Degrease thoroughly: Work in sections. Apply the degreaser, let it sit for a few minutes according to the product instructions, then scrub gently. Pay extra attention to areas around the handles and stovetop, which tend to accumulate the most grease.
- Rinse well: It’s vital to rinse off all the degreaser. Use a clean cloth dampened with plain water and wipe down each surface. You might need to rinse your cloth multiple times.
- Dry completely: Use a clean, dry towel to ensure all surfaces are thoroughly dry before moving to the next step. Moisture can also affect paint adhesion.
Step 2: Minor Repairs
Before painting, take a moment to fix any small issues.
- Fill holes and cracks: Use a wood filler for any dings, dents, or screw holes. Let it dry completely according to the manufacturer’s instructions.
- Sand fillers: Once dry, gently sand the filled areas smooth with fine-grit sandpaper (around 220 grit). Wipe away any dust with a damp cloth.
Step 3: Removing Hardware
This makes painting much easier and ensures a cleaner finish.
- Keep track of screws: Put the screws in a small baggie and tape it to the inside of the cabinet door or drawer they came from. This way, you won’t lose them or mix them up.
- Store hardware safely: You can either give your old hardware a fresh coat of spray paint or replace it with new knobs and pulls for an updated look.
Choosing the Best Chalk Paint for Kitchen Cabinets
Not all chalk paints are created equal, especially when it comes to kitchen cabinets. You need a paint that is durable and can withstand the wear and tear of a busy kitchen.
What to Look for in Chalk Paint:
- Durability: The chalk paint kitchen cabinet durability is a significant factor. Look for brands specifically formulated for high-traffic areas or furniture that gets a lot of use.
- Coverage: Good coverage means fewer coats, saving you time and paint.
- Color Selection: Most chalk paint brands offer a wide range of colors, so you can find the perfect shade for your kitchen.
- Low VOCs: Many chalk paints are low in volatile organic compounds (VOCs), making them a safer choice for indoor projects.
Popular Chalk Paint Brands:
While many brands are great, some are consistently praised for their performance on kitchen cabinets.
| Brand Name | Key Features | Best For |
|---|---|---|
| Annie Sloan | Original chalk-paint, rich color palette, velvety finish | Traditional look, creative finishes |
| Dixie Belle | Durable, good coverage, wide color range | Everyday use, modern and classic styles |
| Fusion Mineral Paint | Built-in topcoat, excellent adhesion, durable | High-traffic areas, low-maintenance finish |
| Rust-Oleum Chalked | Affordable, widely available, good for beginners | Budget-friendly projects, simple makeovers |
| Behr Premium Plus | Specifically designed for cabinets, durable | Long-lasting finish, professional look |
When starting your DIY chalk paint cupboard makeover, consider these brands. Many find Fusion Mineral Paint and Dixie Belle to be excellent choices for chalk paint kitchen cabinet durability due to their inherent toughness.
Painting Your Kitchen Cupboards with Chalk Paint: The Process
Now for the fun part! Painting is straightforward with chalk paint, especially when painting kitchen cupboards without sanding or with minimal prep.
Step 1: Applying the First Coat of Chalk Paint
- Stir the paint: Always stir chalk paint thoroughly before use. Avoid shaking, as this can create air bubbles.
- Apply thinly: Use a good quality synthetic brush or a foam roller. Apply a thin, even coat. Chalk paint is forgiving, but thin coats build better than thick ones.
- Work in sections: Paint the doors and drawer fronts while they are off the cabinets, and paint the cabinet frames. This gives you better access and a cleaner finish.
- Drying time: Allow each coat to dry completely. Drying times can vary depending on humidity and temperature, but typically range from 20 minutes to a couple of hours.
Step 2: Applying Additional Coats
- Second coat: You may need a second coat for full coverage, especially if you’re painting over a dark color or using a light shade. Apply this coat in the same manner as the first.
- Third coat (if needed): Some colors or finishes might require a third coat. Check for any thin spots or streaks after the second coat dries.
Step 3: Achieving a Distressed Look (Optional)
One of the joys of chalk paint is its ability to be distressed for a vintage feel. This is where distressed chalk paint kitchen cupboards get their charm.
- Light sanding: Once the final coat of paint is completely dry (wait at least 24 hours), use fine-grit sandpaper (220 grit or higher) or a sanding block.
- Focus on edges and high-wear areas: Gently sand along the edges of doors, drawer fronts, and any areas that would naturally show wear over time, like around knobs.
- Wipe away dust: Use a tack cloth or a slightly damp cloth to remove all sanding dust.
Chalk Paint Cupboard Finishing Techniques
The finish is what protects your paint and gives it its final look. This is where chalk paint cupboard finishing techniques come into play. For kitchen cabinets, durability is paramount.
Option 1: Wax
- Types of wax: You can use clear wax or dark wax. Clear wax provides protection and a soft sheen, while dark wax adds an aged, antiqued look and can also be used to highlight distressing.
- Application: Apply the wax with a good quality wax brush or a lint-free cloth. Work in thin, even layers.
- Buffing: After the wax has dried slightly (usually 15-30 minutes), buff it with a clean, lint-free cloth until you achieve a smooth, slightly satiny finish.
- Multiple coats: For kitchen cabinets, a minimum of two to three thin coats of wax is recommended for adequate protection. Allow each coat to dry and buff before applying the next.
Important Note on Wax: While beautiful, wax alone might not be the most durable finish for a high-traffic kitchen environment. It can be susceptible to water marks and heat.
Option 2: Polycrylic or Water-Based Polyurethane (Recommended for Kitchens)
For superior durability and moisture resistance, a water-based polycrylic or polyurethane is the best chalk paint for kitchen cabinets. This is how you ensure excellent chalk paint kitchen cabinet durability.
- Types of finishes: Available in matte, satin, or semi-gloss. Satin is often a good choice for kitchens as it offers a slight sheen and is easy to clean.
- Application:
- Thin coats are key: Apply very thin, even coats using a high-quality synthetic brush or a foam roller. Avoid overworking the product, which can lead to brush strokes.
- Work in sections: Paint a section, then immediately smooth out any puddles or drips.
- Light sanding between coats: For the smoothest finish and best adhesion, lightly sand with 320-400 grit sandpaper between coats once the previous coat is dry. Wipe away dust thoroughly with a tack cloth.
- Number of coats: Apply 2-4 thin coats for robust protection.
- Curing time: Water-based topcoats typically cure fully within 7-21 days. While they feel dry to the touch much sooner, they will be at their hardest after the full curing period. Be gentle with your cabinets during this time.
Option 3: Specialized Chalk Paint Topcoats
Some brands offer specific topcoats designed for chalk paint that offer excellent durability. Always check the manufacturer’s recommendations for the best chalk paint for kitchen cabinets.
Sealing Chalk Painted Cabinets: The Crucial Step
Sealing chalk painted cabinets is non-negotiable for kitchen use. It protects your beautiful paint job from moisture, grease, and general wear.
Why Sealing is Essential:
- Protection against stains: Kitchens are prone to spills. A good sealant will make your cabinets resistant to coffee, wine, sauces, and grease.
- Durability: It adds a protective layer that prevents chipping and scuffing, extending the life of your painted cabinets.
- Ease of cleaning: Sealed surfaces are much easier to wipe down and clean without damaging the paint.
Best Sealing Options for Kitchens:
- Water-Based Polycrylic (Recommended): As mentioned, this is the gold standard for sealing chalk-painted kitchen cabinets. It’s clear, non-yellowing, and provides excellent protection. Look for satin or semi-gloss finishes for a practical sheen.
- Water-Based Polyurethane: Similar to polycrylic but can sometimes have a slightly more yellow undertone, especially in glossier finishes. It offers robust protection.
- Chalk Paint Wax (with caveats): While traditional, wax is less durable for kitchens. If you opt for wax, apply multiple thin coats and be prepared for more frequent touch-ups and careful cleaning. It’s best for low-traffic areas or if you prioritize a very matte, soft finish above all else.
How to Apply Your Sealant:
- Ensure paint is fully dry: Wait at least 24 hours after the last paint coat before sealing.
- Apply thin coats: Use a good quality synthetic brush or foam applicator. Avoid overloading your brush.
- Work evenly: Cover the entire surface in one direction.
- Allow drying time: Follow the manufacturer’s drying times between coats.
- Light sanding between coats: For polycrylic and polyurethane, lightly sand with fine-grit sandpaper (320-400 grit) after each coat dries. This creates a smoother surface for the next coat.
- Wipe away dust: Always use a tack cloth or a slightly damp microfiber cloth to remove sanding dust before applying the next coat.
- Multiple coats: Aim for 2-4 coats of your chosen sealant for maximum protection.
Painting Kitchen Cupboards Without Sanding
Many people wonder about painting kitchen cupboards without sanding. With chalk paint, this is often possible, making the process much faster and less messy.
When is Sanding Not Necessary?
- Clean surface: The cabinets must be exceptionally clean and free of grease, wax, or residue.
- Good adhesion: The existing finish should be in good condition, without peeling or significant damage.
- Chalk paint’s grip: Chalk paint is known for its excellent adhesion to various surfaces, often eliminating the need for extensive sanding.
If You Choose Not to Sand:
- Extreme cleaning is vital: Go above and beyond with your cleaning and degreasing steps. A good TSP substitute or a dedicated cabinet cleaner is a must.
- Test patch: Consider painting a small, inconspicuous area first to ensure good adhesion.
- Use a liquid deglosser: If you’re hesitant but don’t want to sand, a liquid deglosser can dull the existing sheen without creating dust. Follow the product instructions carefully.
When Sanding Might Still Be Beneficial:
- Glossy or slick surfaces: If your cabinets have a very high-gloss finish, a light scuff sand (220 grit) can improve adhesion even for chalk paint.
- Damaged surfaces: If there are peeling paint, significant scratches, or rough patches, sanding will create a smoother, more professional-looking finish.
- Desired finish: If you plan on distressed chalk paint kitchen cupboards, sanding is a necessary part of that process.
Chalk Paint Kitchen Cabinet Ideas
The versatility of chalk paint opens up a world of chalk paint kitchen cabinet ideas. Whether you want a modern look or a vintage charm, chalk paint can help you achieve it.
Color Palettes:
- Soft Neutrals: Whites, creams, greys, and greiges are timeless and work in almost any kitchen. They create a bright, airy feel.
- Bold Hues: Don’t shy away from blues, greens, or even black for a dramatic statement.
- Two-Tone: Paint the upper cabinets one color and the lower cabinets another for visual interest. For example, white uppers and navy lowers.
- Pastels: Soft blues, mint greens, and blush pinks can create a charming, cottage-inspired look.
Finishing Touches:
- Hardware: Swapping out old knobs and pulls for new ones is a simple yet impactful way to update your kitchen. Consider brushed nickel, matte black, or antique brass.
- Distressing: As mentioned, gently sanding edges creates a beautiful aged look.
- Glazing: A glaze can be applied over chalk paint to add depth and antique it further. It’s applied like a thin wash and wiped back.
- Stenciling: Add decorative patterns to cabinet doors with stencils for a unique touch.
Examples of Chalk Paint Kitchen Cabinet Transformations:
- From dated oak to modern grey: Painting oak cabinets in a soft grey chalk paint and sealing with a matte polycrylic can completely modernize a kitchen.
- From white to classic navy: A bold navy chalk paint can create a sophisticated and dramatic kitchen, especially when paired with brass hardware.
- Distressed cottage look: A soft white or cream chalk paint, lightly distressed on the edges and sealed with wax, gives a charming, handmade feel.
Frequently Asked Questions (FAQ)
How long does chalk paint last on kitchen cabinets?
With proper preparation, application of multiple thin coats of chalk paint, and a durable topcoat like polycrylic, your chalk-painted cabinets can last for many years. The durability is significantly enhanced by the sealant. Expect them to last 5-10 years or even longer with good care, similar to professionally painted cabinets.
Is chalk paint good for kitchens?
Yes, chalk paint can be excellent for kitchens, but only if sealed correctly. The paint itself is porous and not naturally durable enough for a kitchen environment. A robust topcoat is essential to protect against grease, moisture, and wear.
Do I need to prime kitchen cabinets before using chalk paint?
Generally, no. Chalk paint is known for its ability to adhere to surfaces without primer. However, if your cabinets are a very dark color (like dark stained wood) and you’re painting them a very light color, or if the wood is prone to bleeding (like redwood or cedar), a stain-blocking primer might be beneficial to prevent the original color or tannins from showing through the paint.
How many coats of chalk paint do I need?
Typically, two to three thin coats are sufficient for good coverage. Always assess your coverage as you go. Some lighter colors over dark bases may require a third coat.
How do I clean chalk painted cabinets?
Clean with a soft, damp cloth. For tougher grime, use a mild, pH-neutral soap and water. Avoid abrasive cleaners or harsh chemicals, as they can damage the paint and sealant. Always wipe spills immediately.
Can I use Fusion Mineral Paint instead of chalk paint?
Yes! Fusion Mineral Paint is often considered a hybrid paint that offers the ease of chalk paint (minimal prep, great adhesion) but has a built-in topcoat, making it incredibly durable and often a better choice for kitchens. It adheres well and offers excellent chalk paint kitchen cabinet durability without needing a separate topcoat.
By following these steps and tips, you can confidently undertake your DIY chalk paint cupboard makeover and achieve a stunning chalk paint kitchen cabinet transformation. Enjoy your refreshed kitchen!