
Can you paint laminate kitchen cabinets? Yes, you absolutely can paint laminate kitchen cabinets, and it’s a fantastic way to update your kitchen’s look without a huge renovation budget. This guide will walk you through every step, from choosing the right materials to achieving a smooth, durable finish. You’ll learn how to prep laminate cabinets properly, select the best paint for laminate, and transform your tired cabinets into something you’ll love. This isn’t just about a coat of paint; it’s a full laminate cabinet makeover.
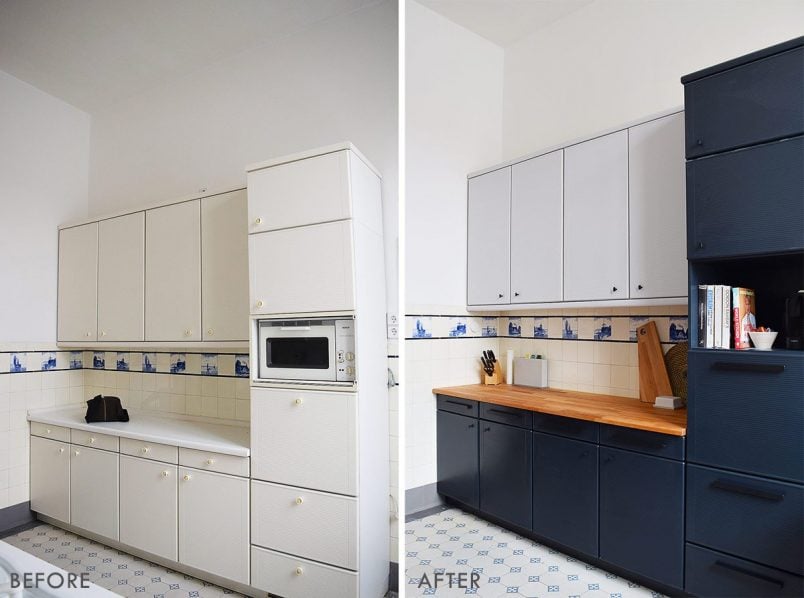
Image Source: www.littlehouseonthecorner.com
Why Paint Your Laminate Cabinets?
Laminate cabinets are popular for their affordability and ease of cleaning. However, over time, their appearance can become dated or worn. Painting offers a cost-effective solution to refresh your kitchen’s aesthetic. Instead of a complete remodel, a DIY paint job can:
- Save Money: Compared to replacing cabinets, painting is significantly cheaper.
- Update Style: Easily adapt your kitchen to current design trends.
- Hide Imperfections: Cover scuffs, minor scratches, and faded colors.
- Personalize Your Space: Choose any color to match your decor.
- Increase Home Value: A refreshed kitchen can boost your home’s appeal.
Is Painting Laminate Cabinets Difficult?
While painting laminate cabinets requires careful preparation and the right materials, it’s a very achievable DIY project. With patience and attention to detail, you can achieve professional-looking results. This guide is designed to make the process clear and manageable for beginners.
What You’ll Need: A Comprehensive Supply List
Gathering all your supplies before you begin is crucial for a smooth process. Here’s a breakdown of what you’ll need for your laminate cabinet refinishing project:
Preparation Supplies:
- Screwdriver (Phillips and flathead)
- Gloves
- Safety glasses
- Drop cloths or old sheets
- Painter’s tape
- Degreaser or TSP substitute cleaner
- Clean cloths or sponges
- Fine-grit sandpaper (150-220 grit)
- Sanding block or orbital sander (optional, for larger areas)
- Tack cloths
- Denatured alcohol or rubbing alcohol
- Wood filler (if filling any holes or gouges)
Painting Supplies:
- Primer: A high-quality bonding primer specifically designed for laminate or slick surfaces. You’ll learn more about how to prime laminate cabinets effectively later.
- Paint: The best paint for laminate is typically a water-based acrylic enamel or a hybrid oil-based paint. Look for paints labeled as “cabinet paint” or “furniture paint” for durability.
- Paint Brushes: High-quality synthetic brushes for smooth application, especially for details and edges.
- Paint Rollers: Small foam rollers (3/8-inch nap) for smooth surfaces.
- Paint Tray: For rollers.
- Stir sticks
- Optional: Cabinet sprayer for a very smooth, professional finish.
Hardware:
- New cabinet knobs or pulls (optional, but a great way to complete the look)
- Small plastic baggies and a marker (to keep track of screws and doors)
Step 1: Removing and Disassembling Cabinets
The first step in any laminate cabinet makeover is to get the doors and drawers out of the way. This allows for easier access and a more even finish.
Taking Down Cabinet Doors and Drawer Fronts
- Label Everything: Before you start removing anything, grab your marker and plastic baggies. Label each cabinet door and drawer front with a number or name. Do the same for the corresponding screw that holds it. This is vital for putting everything back together correctly.
- Remove Doors: Use your screwdriver to detach the hinges from the cabinet frame. Carefully hold the door as you loosen the last screws. Place the screws in their labeled baggie.
- Remove Drawer Fronts: Drawer fronts are usually attached to the drawer box with screws from the inside. Open the drawer, locate the screws on the back of the drawer front, and remove them.
- Remove Hardware: Take off any existing knobs or pulls. Keep their screws with the corresponding door or drawer front.
- Store Safely: Stack your doors and drawer fronts carefully. You can place them on a protected surface, like a drop cloth on the floor, or lean them against a wall.
Removing Drawer Boxes
If you’re painting the drawer boxes as well, you’ll need to remove them from their slides.
- Extend Drawer Fully: Pull the drawer out as far as it will go.
- Locate Release Levers: Most drawer slides have small plastic levers on the sides that you need to push down or lift up to disengage the drawer from the slide.
- Remove Drawer Box: Once disengaged, the drawer box should slide out completely.
Step 2: Preparing the Surface: The Foundation for Success
Proper preparation is the most critical stage when you’re painting over laminate. Skipping or rushing this step will lead to peeling paint and a subpar finish. Laminate surfaces are often smooth and non-porous, making adhesion a challenge without the right prep.
How to Clean Laminate Cabinets
- Initial Wipe Down: Start by wiping down all surfaces with a damp cloth to remove dust and debris.
- Degrease Thoroughly: Kitchen cabinets are prone to grease buildup. Use a good degreaser or a TSP (trisodium phosphate) substitute. Mix the cleaner according to the product instructions.
- Scrub Gently: Use a soft sponge or cloth to scrub all surfaces, paying close attention to areas around the stove and sink.
- Rinse and Dry: Wipe down all surfaces with a clean, damp cloth to remove any cleaner residue. Then, dry everything thoroughly with another clean cloth. Make sure there is no moisture left.
Sanding for Adhesion
This step creates a “tooth” for the primer and paint to grip.
- Choose Your Grit: For laminate, you don’t need to go too aggressive. Fine-grit sandpaper (150-220 grit) is ideal. Avoid coarse sandpaper, which can damage the laminate.
- Sanding Technique:
- By Hand: Use a sanding block to ensure even pressure. Sand all surfaces you intend to paint. Go with the grain if there are any visible wood grain patterns.
- Orbital Sander (Optional): If you have a lot of cabinets or prefer using a power tool, an orbital sander with fine-grit sandpaper can speed up the process. Be very careful not to over-sand.
- Dust Removal: After sanding, you’ll have a fine dust. This needs to be removed completely.
- Vacuum: Use a shop vacuum with a brush attachment to get the bulk of the dust.
- Tack Cloths: Wipe down all surfaces with tack cloths. These sticky cloths are designed to pick up fine dust particles. Work in sections and use a fresh part of the tack cloth as it becomes dirty.
Filling Imperfections
If your cabinets have small dents, scratches, or holes from old hardware:
- Apply Wood Filler: Use a small putty knife to apply wood filler to any imperfections. Overfill slightly.
- Let it Dry: Allow the wood filler to dry completely according to the manufacturer’s instructions.
- Sand Smooth: Once dry, lightly sand the filled areas with your fine-grit sandpaper until they are flush with the cabinet surface.
- Dust Again: Wipe down these areas with a tack cloth to remove any sanding dust.
Cleaning with Alcohol
For a final clean and to remove any remaining oils or residues that might interfere with adhesion:
- Apply Denatured Alcohol: Dampen a clean cloth with denatured alcohol or rubbing alcohol.
- Wipe Surfaces: Wipe down all surfaces again. This also helps to ensure the surface is completely dry and free of any lingering contaminants.
- Air Dry: Let the surfaces air dry completely.
Step 3: Applying Primer: The Crucial Bonding Layer
This is where we prime laminate cabinets effectively. The right primer is essential for ensuring the paint adheres properly and for achieving a smooth, long-lasting finish.
Choosing the Right Primer
- Bonding Primer: Look for a primer specifically designed to bond to difficult surfaces like laminate, melamine, or glossy finishes. Brands like Zinsser B-I-N (shellac-based) or Kilz Adhesion (water-based) are excellent choices. Shellac-based primers offer superior adhesion and stain blocking but have strong fumes and require mineral spirits for cleanup. Water-based bonding primers are easier to use and clean up.
- Adhesion Promoters: Some products are specifically called “adhesion promoters” rather than primers. These can also be effective.
Applying Primer to Laminate
- Stir Well: Always stir your primer thoroughly before and during use. Do not shake it, as this can create air bubbles.
- Application Method:
- Brush: Use a good quality synthetic brush for edges, corners, and areas where a roller can’t reach easily.
- Roller: Use a foam roller for the larger, flat surfaces. Apply thin, even coats. Avoid overloading the roller, which can lead to drips and an uneven finish.
- Sprayer (Optional): If you have a paint sprayer, this will provide the smoothest finish. Ensure you have proper ventilation and a respirator if using a sprayer.
- Thin, Even Coats: The key to a good primer coat is applying it thinly and evenly. Don’t try to get full coverage in one coat. It’s better to have two thin coats than one thick, splotchy one.
- Drying Time: Allow the primer to dry completely according to the manufacturer’s instructions. This is critical for proper adhesion. Rushing this step can ruin your paint job.
- Light Sanding (Optional but Recommended): Once the primer is dry, you can do a very light sanding with 220-grit sandpaper or a fine-grit sanding sponge. This knocks down any minor imperfections or brush strokes in the primer and creates an even smoother surface for the paint.
- Clean Again: After sanding, wipe everything down with a tack cloth to remove any dust.
Step 4: Painting Your Cabinets: Achieving a Durable Finish
Now that your cabinets are primed and ready, it’s time for the paint. Choosing the best paint for laminate and applying it correctly will determine the durability and overall look of your laminate cabinet refinishing.
Selecting the Best Paint for Laminate
- Type of Paint:
- Water-Based Acrylic Enamels: These are durable, flexible, and easy to clean. They offer good adhesion and are available in a wide range of colors and finishes (satin, semi-gloss, high-gloss). They also have lower VOCs and are easier to clean up.
- Hybrid Enamels: These combine the benefits of latex and oil-based paints, offering excellent durability and a smooth finish.
- Cabinet-Specific Paints: Many paint brands offer lines specifically formulated for cabinets, which are designed for high traffic and durability.
- Sheen:
- Satin: Offers a subtle sheen, hides imperfections well, and is easy to clean. A good all-around choice.
- Semi-Gloss: More reflective, very durable, and easy to wipe down. It can highlight imperfections more than satin.
- High-Gloss: Very durable and reflective, but will show every imperfection.
- Durability: Look for paint labeled as “cabinet paint,” “enamel,” or “durable finish.” You want a paint that can withstand frequent wiping and the general wear and tear of a kitchen environment. A durable laminate paint is key.
Applying Paint: Thin, Even Coats are Key
Just like with the primer, applying thin, even coats is crucial for a smooth, professional finish.
- Stir the Paint: Stir your paint thoroughly. Avoid shaking.
- Application Methods:
- Brush: Use a high-quality synthetic brush for edges and details. Apply paint in smooth, even strokes.
- Roller: Use a foam roller for flat surfaces. Apply thin coats, working in one direction. Overlap your strokes slightly. Avoid applying too much pressure, which can cause drips.
- Sprayer (Best for Smoothness): If you’re aiming for a perfectly smooth, factory-like finish, a paint sprayer is the best option. Follow the manufacturer’s instructions for thinning and application.
- First Coat: Apply the first coat of paint to all surfaces.
- Drying Time: Allow the first coat to dry completely according to the paint manufacturer’s recommendations. This can vary, but often it’s at least 2-4 hours.
- Light Sanding (Optional but Recommended): After the first coat is dry, lightly sand any rough spots or imperfections with 220-grit sandpaper or a fine-grit sanding sponge. This step significantly improves the smoothness of your final finish.
- Clean and Tack: Wipe down the sanded surfaces with a tack cloth to remove all dust.
- Second Coat: Apply the second coat of paint, following the same technique as the first.
- Additional Coats: Depending on the paint color and coverage, you might need a third coat. Continue applying thin coats with light sanding and tack-cloth cleaning in between until you achieve full coverage and a smooth finish.
Step 5: Reassembling and Finishing Touches
Once your cabinets are painted and fully cured, it’s time to put everything back together.
Reattaching Hardware and Doors
- Reattach Hardware: If you’re reusing your old knobs and pulls, reattach them to the doors and drawer fronts using the original screws. If you’ve bought new hardware, install it now.
- Hang Doors: Carefully reattach the cabinet doors to the frames using the hinges and your labeled screws.
- Reinsert Drawers: Slide the drawer boxes back into their slides.
- Final Check: Ensure all doors and drawers open and close smoothly.
Curing Time
- Patience is Key: While the paint will feel dry to the touch within hours, it takes several days, sometimes up to 30 days, for the paint to fully cure and reach its maximum hardness and durability.
- Be Gentle: During the curing period, be extra gentle with your cabinets. Avoid slamming doors or drawers, and be careful when cleaning.
Tips for Painting Faux Wood Grain Laminate Cabinets
If you have cabinets with a faux wood grain laminate finish, the prep process remains the same. The key is to ensure good adhesion. The faux grain itself will still be visible through the paint unless you are using a very thick, opaque paint and have sanded thoroughly to obscure it. If your goal is to have a solid color, the sanding and priming steps are even more critical to ensure the faux grain doesn’t show through as the paint wears over time.
Maintaining Your Newly Painted Laminate Cabinets
To keep your newly painted cabinets looking great for years to come:
- Regular Cleaning: Dust regularly with a soft microfiber cloth.
- Wipe Spills Immediately: Clean up any spills or splatters promptly with a soft, damp cloth.
- Gentle Cleaning Solutions: For tougher grime, use a mild dish soap diluted in water or a designated cabinet cleaner. Avoid abrasive cleaners or harsh chemicals, as they can damage the paint finish.
- Avoid Excess Moisture: While the paint is durable, prolonged exposure to excessive moisture isn’t ideal. Wipe down any damp areas promptly.
Frequently Asked Questions (FAQ)
Q1: What is the best primer for laminate cabinets?
A1: The best primer for laminate cabinets is a high-quality bonding primer or an adhesion promoter specifically designed for slick surfaces. Products like Zinsser B-I-N (shellac-based) or Kilz Adhesion (water-based) are excellent choices.
Q2: Can I paint over laminate without sanding?
A2: While some products claim to adhere without sanding, it is highly recommended to sand laminate cabinets. Sanding creates a surface texture (a “tooth”) that the primer and paint can grip, ensuring better adhesion and a more durable finish. Skipping sanding greatly increases the risk of paint peeling.
Q3: What type of paint is best for laminate cabinets?
A3: The best paint for laminate cabinets is a durable, water-based acrylic enamel or a hybrid enamel. These paints offer good adhesion, flexibility, and resistance to wear and tear. Look for paints labeled as “cabinet paint” or “furniture paint” for the best results.
Q4: How many coats of paint do I need?
A4: Typically, two to three thin, even coats of paint are recommended for cabinets. This ensures full coverage, a smooth finish, and optimal durability.
Q5: How long does it take for painted laminate cabinets to cure?
A5: While paint will feel dry to the touch within a few hours, it takes a significant amount of time for laminate cabinet paint to fully cure and reach its maximum hardness. This curing process can take anywhere from 7 to 30 days, depending on the paint type and environmental conditions. Be gentle with the cabinets during this period.
Q6: Can I use chalk paint on laminate cabinets?
A6: Yes, you can use chalk paint on laminate cabinets, but thorough prep (cleaning, light sanding, and priming with a bonding primer) is still essential for good adhesion. Chalk paint typically requires a topcoat or wax for durability, especially in a high-traffic area like a kitchen.
Q7: My laminate has a faux wood grain. Will painting cover it?
A7: Painting will cover the color of the faux wood grain. However, the texture of the grain might still be slightly visible through thinner paint layers. Thorough sanding and multiple thin coats of paint will help to minimize its appearance. If you want a completely smooth, solid finish, you might consider a primer specifically designed to level surfaces or a very smooth-applying paint.
This comprehensive guide should equip you with the knowledge and confidence to undertake your laminate cabinet painting project. Happy painting!