
Yes, you can paint laminate kitchen cupboards. It’s a fantastic way to update your kitchen without the expense of replacing them. This guide will walk you through everything you need to know to achieve a beautiful, durable finish. Can I paint laminate cabinets? Absolutely! With the right preparation and materials, painting laminate cabinets is a very achievable DIY project. Many people wonder if it’s possible to achieve a professional-looking finish, and the answer is a resounding yes. This process is also often referred to as laminate cabinet refinishing, and it’s a popular method for a laminate kitchen cabinet transformation.
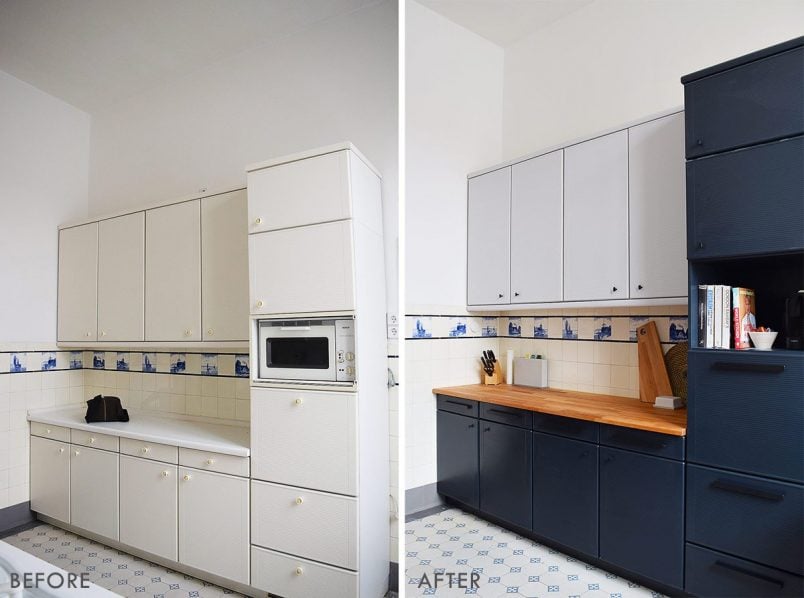
Image Source: www.littlehouseonthecorner.com
Why Paint Your Laminate Kitchen Cupboards?
Laminate kitchen cupboards are a common feature in many homes, offering a budget-friendly and durable surface. However, their style can sometimes feel dated, or the finish might be worn. Painting them offers a significant aesthetic upgrade, allowing you to personalize your kitchen to your taste. It’s an affordable alternative to cabinet replacement, and when done correctly, it can dramatically change the look and feel of your entire kitchen. This laminate cabinet makeover can add value and appeal to your home.
Essential Supplies for Painting Laminate
Before you start, gather all your supplies. Having everything ready will make the process smoother.
- Cleaning Supplies:
- Degreaser or TSP (Trisodium Phosphate) substitute
- Clean cloths or sponges
- Bucket
- Water
- Sanding Supplies:
- Fine-grit sandpaper (150-220 grit)
- Sanding block or orbital sander (optional, but helpful for larger areas)
- Tack cloths
- Priming Supplies:
- High-quality bonding primer (specifically designed for slick surfaces)
- Paint rollers (foam rollers work well for smooth finishes)
- Paint brushes (for cutting in edges and details)
- Paint tray
- Paint Supplies:
- Durable paint (alkyd enamel, acrylic enamel, or specialized cabinet paint)
- Paint rollers (same as primer)
- Paint brushes (same as primer)
- Paint tray
- Top Coat (Optional but Recommended):
- Water-based polyurethane or a cabinet-specific top coat
- Hardware:
- Screwdriver or drill for removing doors and hardware
- New cabinet knobs or pulls (optional)
- Protection:
- Painter’s tape
- Drop cloths or old sheets
- Safety glasses
- Gloves
- Dust mask
Step-by-Step Guide to Painting Laminate Cupboards
Achieving a lasting finish on laminate requires careful attention to detail at each stage. Let’s break down the process.
Step 1: Prep Laminate Cupboards – The Crucial First Step
This is the most important phase. Proper prep work ensures your paint adheres well and doesn’t peel or chip later. Thoroughly prep laminate cupboards by following these sub-steps:
Removing Doors and Hardware
- Label Everything: As you remove cabinet doors and drawer fronts, label each one clearly with a piece of painter’s tape and a number or letter. This will make reassembly much easier.
- Organize Hardware: Place the screws and hardware for each door in a separate, labeled baggie.
- Remove Doors and Drawers: Use a screwdriver or drill to detach the doors from the cabinets and remove the drawer fronts. This allows you to paint them flat, which gives a much smoother finish.
Thorough Cleaning
Laminate surfaces can accumulate grease and grime, especially in a kitchen. This needs to be completely removed for paint adhesion.
- Degrease: Use a strong degreaser or a TSP substitute. Follow the product instructions carefully. Wipe down all surfaces you intend to paint, both the cabinet frames and the doors/drawer fronts. Pay extra attention to areas around the stove and sink.
- Rinse: After degreasing, wipe down all surfaces with a clean, damp cloth to remove any residue from the cleaner. Allow them to dry completely.
Light Sanding for Adhesion
While laminate is slick, a light scuff-sand creates a surface for the primer and paint to grip.
- Choose Your Grit: Use fine-grit sandpaper (150-220 grit). You’re not trying to remove the laminate, just to dull the shiny surface.
- Sand Smoothly: Use a sanding block or an orbital sander with a light touch. Sand all surfaces that will be painted. Work in smooth, even strokes.
- Wipe Away Dust: After sanding, use a vacuum with a brush attachment to remove as much dust as possible. Then, use a tack cloth to pick up any remaining fine dust particles. A tack cloth is sticky and will grab even the smallest bits of dust, which is crucial for a smooth finish.
Step 2: Priming for Durability
Priming is non-negotiable when painting laminate. It acts as a bonding layer and helps prevent stains from bleeding through the paint. Choosing the best primer for laminate is key.
Selecting the Best Primer for Laminate
Look for a high-quality bonding primer. These are specifically formulated to adhere to slick, non-porous surfaces like laminate, metal, and plastic.
- Good Options:
- Shellac-based primers: Excellent for adhesion and stain blocking, but can have strong fumes.
- Water-based bonding primers: Easier to use and clean up, with lower VOCs. Brands like Kilz Adhesion or Zinsser B-I-N are often recommended.
Applying the Primer
- Stir Well: Thoroughly stir the primer. Do not shake it, as this can create air bubbles.
- Apply Thin Coats: Apply a thin, even coat of primer using a foam roller for smooth surfaces and a good quality brush for edges and corners. Avoid applying it too thickly, as this can lead to drips and an uneven finish.
- Allow Drying Time: Let the primer dry completely according to the manufacturer’s instructions. This is usually at least a few hours, but overnight is often best.
- Light Sanding (Optional but Recommended): Once dry, you can lightly sand the primed surface with 220-grit sandpaper or a sanding sponge. This smooths out any minor imperfections and provides an even better surface for the paint. Wipe away dust with a tack cloth.
- Second Coat (If Needed): If the laminate is a dark color or has any visible stains, a second coat of primer might be beneficial.
Step 3: Painting Your Laminate Cabinets
Now for the fun part – applying the color! You can paint laminate cabinets using a brush and roller or by spray painting.
Method 1: Brush and Roller
This is the most common DIY method.
- Choose Your Paint: For cabinets, you want a durable, hard-wearing paint.
- Alkyd Enamel: Offers excellent durability and a hard finish, but requires mineral spirits for cleanup and can yellow over time.
- Acrylic Enamel or Cabinet Paint: Water-based, easier to clean up, and less prone to yellowing. Look for paints specifically labeled for cabinets or high-traffic areas.
- Apply Thin, Even Coats: Apply the first coat of paint using a high-quality foam roller for smooth surfaces and a good brush for the edges. Work in thin coats. It’s better to apply two or three thin coats than one thick one.
- Avoid Overworking: Don’t go over areas repeatedly with the roller. Try to get a smooth, even coverage in one pass.
- Drying Between Coats: Allow each coat of paint to dry thoroughly according to the manufacturer’s recommendations. This is crucial for durability. Typically, this means at least 4-6 hours, but check your specific paint.
- Light Sanding Between Coats (Optional): For an extra smooth finish, you can lightly sand between coats with very fine-grit sandpaper (320-400 grit) and wipe with a tack cloth.
- Multiple Coats: Apply 2-3 coats of paint for best coverage and durability.
Method 2: Spray Painting Laminate Cabinets
This method can yield a very smooth, professional-looking finish, but requires more setup and practice.
- Preparation is Key: Ensure you have a well-ventilated area. Protect surrounding surfaces thoroughly with drop cloths and painter’s tape, as overspray can travel.
- Choose the Right Sprayer: An HVLP (High Volume Low Pressure) sprayer is ideal for cabinets as it offers more control and less overspray than airless sprayers.
- Thin Your Paint: Most spray paints require thinning. Follow the paint and sprayer manufacturer’s instructions carefully for the correct thinning ratio.
- Practice: If you’re new to spray painting, practice on a piece of cardboard or scrap wood first to get a feel for the trigger control and spray pattern.
- Apply Thin, Even Coats: Hold the sprayer a consistent distance from the surface (usually 8-12 inches) and move in smooth, overlapping strokes.
- Crosshatch Pattern: For cabinets, a common technique is to spray horizontally first, then vertically to ensure even coverage.
- Drying Between Coats: Allow adequate drying time between coats as per paint manufacturer’s instructions.
Step 4: Applying a Top Coat (Optional but Recommended)
For maximum durability and protection against wear and tear, a top coat is highly recommended, especially for kitchen cabinets. This is part of a good laminate cabinet refinishing process.
- Choose a Top Coat: A water-based polyurethane or a specialized cabinet top coat will add a protective layer. Look for a satin or semi-gloss finish, as these are more durable and easier to clean than matte finishes.
- Apply Thin Coats: Apply the top coat in thin, even coats using a foam roller or a high-quality brush. Avoid over-application, which can lead to drips.
- Drying Time: Allow each coat to dry completely, typically 2-4 hours, before applying the next.
- Multiple Coats: 2-3 thin coats are usually sufficient.
Step 5: Reassembling and Finishing Touches
Once everything is dry and cured, it’s time to put your kitchen back together.
- Reattach Hardware: Screw the hardware back onto the doors and drawer fronts.
- Rehang Doors: Carefully rehang the cabinet doors and reinsert the drawers.
- New Knobs/Pulls: If you decided to update your hardware, now is the time to install the new knobs or pulls.
Painting Laminate Furniture
The same principles apply if you’re looking to do a painting laminate furniture project. Whether it’s a dresser, a table, or shelves, the prep work (cleaning, light sanding) and the use of a good bonding primer are essential for a durable finish on laminate furniture. The choice of paint and top coat will depend on the item’s use and desired look.
Updating Laminate Cabinets with Chalk Paint
Chalk paint laminate is a popular method for a vintage or distressed look. Chalk paint adheres well to many surfaces with minimal prep, but for a durable finish on kitchen cabinets that will see heavy use, some steps are still recommended.
Chalk Paint Method for Laminate
- Light Cleaning: Clean the cabinets thoroughly to remove grease and grime.
- No Sanding Required (Often): Many chalk paint brands claim you don’t need to sand. However, for kitchen cabinets, a very light scuff sand (220 grit) with a tack cloth wipe-down will improve adhesion significantly and is recommended.
- Apply Chalk Paint: Apply 2-3 thin coats of chalk paint with a brush, working in one direction for a smoother finish or using varied strokes for a distressed look.
- Wax or Top Coat: Chalk paint needs a protective top coat. For a durable finish on cabinets, use a water-based polycrylic or a good quality furniture wax. Apply the wax or top coat after the paint has fully dried. Apply wax in thin layers, buffing between coats. Polycrilic is usually applied with a foam roller or brush.
While chalk paint offers a unique look, it might be less durable than enamel paints for high-traffic kitchen environments unless sealed exceptionally well.
Achieving a Laminate Cabinet Makeover
A successful laminate cabinet makeover hinges on patience and meticulous preparation. Don’t rush the drying times between coats of primer, paint, and top coat. This ensures each layer cures properly, creating a strong bond that will last.
Tips for a Flawless Finish
- Work in Good Lighting: This helps you spot any missed spots or drips.
- Use Quality Tools: Good rollers and brushes make a significant difference in the final appearance.
- Ventilation: Always ensure good ventilation when painting, especially if using oil-based products.
- Test a Small Area: If you’re unsure about a product or color, test it on the back of a door or an inconspicuous area first.
- Patience is Key: Rushing any step can compromise the final result.
Frequently Asked Questions (FAQ)
Q1: Can I paint over glossy laminate cabinets?
A1: Yes, you can. The key is proper preparation. You’ll need to clean the cabinets thoroughly to remove any grease or residue, and then lightly scuff-sand the glossy surface to create a “tooth” for the primer to adhere to.
Q2: What kind of paint is best for laminate cabinets?
A2: For laminate cabinets, it’s best to use a high-quality bonding primer followed by a durable paint like an acrylic enamel, alkyd enamel, or a specialized cabinet paint. These paints offer good adhesion and a hard, washable finish.
Q3: Do I need to sand laminate before painting?
A3: Yes, it’s highly recommended. Even if the product states “no sanding required,” a light scuff-sand with fine-grit sandpaper (150-220 grit) will greatly improve adhesion and prevent chipping or peeling.
Q4: How many coats of paint do I need for laminate cabinets?
A4: Typically, you’ll need one coat of primer and two to three thin coats of paint for even coverage and durability. A top coat might also require two to three thin coats.
Q5: How long will painted laminate cabinets last?
A5: With proper preparation, priming, painting, and sealing, painted laminate cabinets can last many years. Durability depends on the quality of materials used and how well they are cared for.
Q6: Can I use spray paint on laminate cabinets?
A6: Yes, spray painting can give a very smooth, professional finish. You’ll need to use a primer suitable for spray application and thin your paint correctly. Ensure you have a well-ventilated area and take precautions against overspray.
Q7: What is the best primer for laminate?
A7: The best primer for laminate is a high-adhesion bonding primer. Look for products specifically designed for slick surfaces, such as shellac-based primers or water-based bonding primers from reputable brands.
Q8: How do I get a smooth finish on laminate cabinets?
A8: To get a smooth finish, use high-quality foam rollers for flat surfaces and good brushes for edges. Apply thin, even coats and avoid overworking the paint. Lightly sanding between coats with fine-grit sandpaper and wiping with a tack cloth can also help achieve a smoother result.
By following these detailed steps, you can confidently undertake a laminate kitchen cabinet transformation, giving your kitchen a fresh, modern look. This updating laminate cabinets project is a rewarding DIY endeavor.