
When planning to install recessed lighting in your kitchen, you might wonder about the best way to place them for optimal illumination and aesthetics. The ideal placement involves considering the kitchen’s layout, task areas, and overall design, aiming for even light distribution and the elimination of shadows.
Installing new ceiling lights in a kitchen can dramatically transform the space, making it brighter and more functional. This guide will walk you through how to place recessed lighting in a kitchen for a perfect layout, covering everything from the initial planning stages to the final installation. We’ll explore different kitchen lighting design principles and help you choose the best recessed lighting for your needs. Whether you’re undertaking a full kitchen ceiling remodel or simply upgrading your lighting, this information will be invaluable. We’ll delve into creating an effective recessed lighting layout for your kitchen, ensuring every corner is well-lit. You can even tackle this as a DIY kitchen lighting project if you’re comfortable with basic electrical work, or know when to call in the professionals.
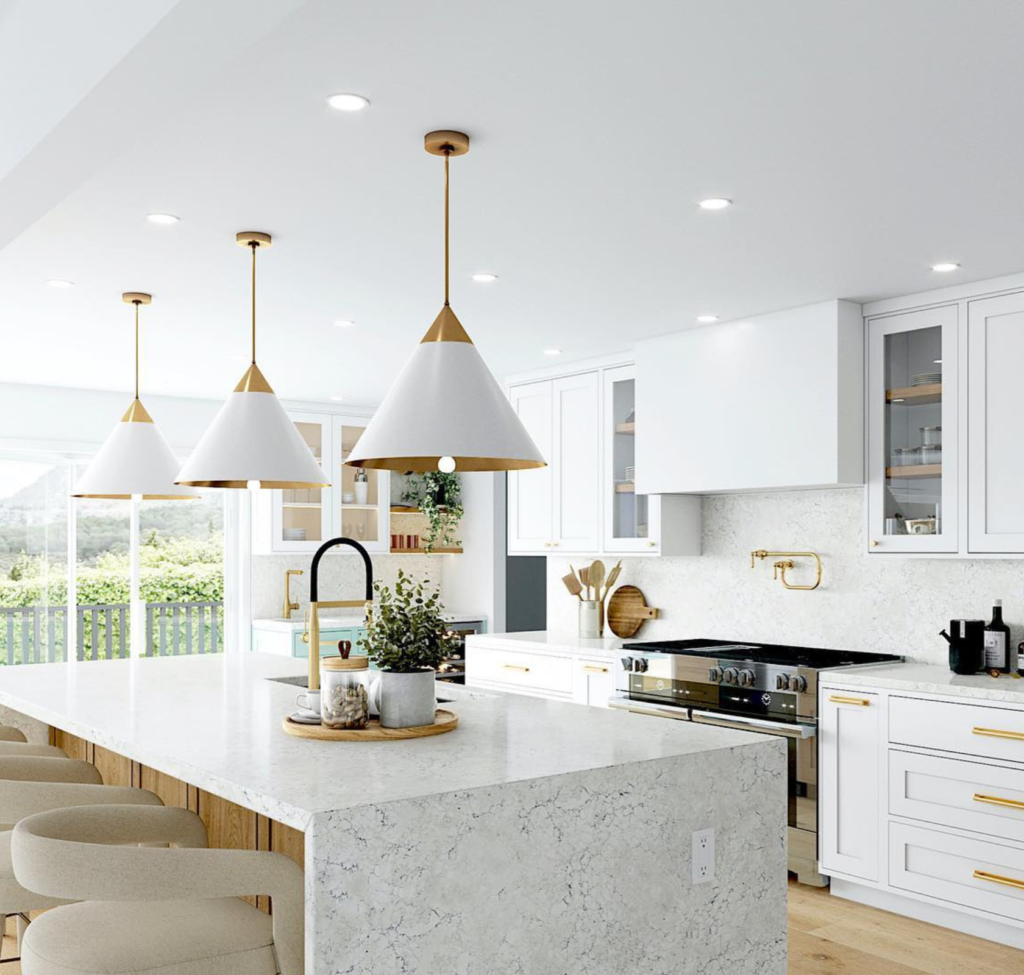
Image Source: blog.1800lighting.com
Planning Your Kitchen Lighting Layout
Before you even think about drilling holes in your ceiling, careful planning is key. A well-thought-out recessed lighting layout kitchen will prevent common issues like dark spots, glare, and uneven lighting. This section focuses on the foundational steps to ensure your kitchen lighting placement is spot on.
Assessing Your Kitchen’s Needs
Every kitchen is different. What works for one might not work for another. Think about how you use your kitchen daily.
- Cooking and Food Prep: Do you spend a lot of time chopping vegetables or cooking at the stove? These areas need focused task lighting.
- Reading or Hobbies: Is there a small nook where you read recipes or do crafts? This area might benefit from dedicated lighting.
- Ambiance and Entertaining: Do you often host guests? You’ll want lighting that creates a warm and inviting atmosphere.
- General Illumination: How bright do you want the overall space to be?
Key Areas for Lighting
Consider these specific zones within your kitchen that require attention:
- Work Areas:
- Countertops: Essential for food preparation, these areas need to be free of shadows.
- Sink Area: Cleaning dishes requires good visibility.
- Stovetop/Range: Cooking often involves intricate tasks that need bright, direct light.
- Traffic Flow: Hallways or pathways through the kitchen should be safely illuminated.
- Cabinet Interiors: For easier access to stored items.
- Decorative Elements: Highlight artwork or architectural features.
Understanding Light Layers
Good kitchen lighting design isn’t just about one type of light. It’s about layering different sources:
- Ambient Lighting: This is the general, overall light in the room. Recessed lights are excellent for this.
- Task Lighting: Focused light for specific activities, like under-cabinet lights or a pendant over an island.
- Accent Lighting: Used to highlight features, like artwork or cabinets.
Choosing the Right Recessed Lights
The type of recessed lighting kit kitchen you choose will impact the overall look and feel.
- Trim Style:
- Standard/Recessed: The most common, with the baffle or cone sitting slightly below the ceiling.
- Soffit/Shower Rated: Designed for damp locations, often used in kitchens near sinks or dishwashers.
- Eyeball/Gimbal: Allows you to direct the light, useful for accenting specific areas.
- Adjustable/Sloped Ceiling: For angled ceilings.
- Aperture Size: The visible opening of the can. Common sizes are 4-inch and 6-inch. Smaller apertures are generally preferred for a more modern and less “institutional” look in residential kitchens.
- Housing Type:
- New Construction: For new builds or ceilings that are open from above.
- Remodel/Old Work: Designed to be installed from below in existing ceilings. These are what most DIYers will use for a kitchen ceiling remodel lighting project.
Bulb Types (LED is King)
- LED: Highly energy-efficient, long-lasting, and available in a wide range of color temperatures. They produce very little heat, making them ideal for kitchens. Look for dimmable LEDs for flexibility.
- Halogen: Produce good color rendering but are less energy-efficient and get hotter than LEDs.
- Incandescent: Being phased out due to inefficiency.
Color Temperature (Kelvin – K):
* Warm White (2700K-3000K): Cozy, inviting light. Good for dining areas within a kitchen.
* Cool White (3500K-4000K): Brighter, more energizing light. Excellent for task areas.
* Daylight (5000K+): Very bright, natural light. Can be too harsh for some kitchen settings but good for very specific task needs.
Lumens and Brightness
Lumens measure the total light output. The number of lumens needed per square foot depends on the room’s function. For a kitchen, you generally want between 70-80 lumens per square foot for general lighting.
Crafting the Recessed Lighting Layout Kitchen
Now, let’s get down to the specifics of placement. A good recessed lighting layout kitchen aims for even light distribution and avoids creating shadows where you need light most.
The 2×4 Rule (A Good Starting Point)
A common guideline for general ambient lighting is the “2×4 Rule.” This suggests placing lights approximately 2 feet from walls and 4 feet from each other.
- 2 Feet from Walls: This helps to wash the walls with light, preventing them from looking like dark voids and making the room feel larger. It also illuminates any wall-mounted items or artwork.
- 4 Feet from Each Other: This provides a balanced spread of light across the ceiling.
Example Application of the 2×4 Rule:
Consider a rectangular kitchen that is 10 feet by 12 feet.
- Along the 12-foot walls:
- Place lights 2 feet from each end. This means lights at 2 feet, 6 feet, and 10 feet along the 12-foot length.
- For the other side, offset them. If the lights are 2 feet from the wall, they will be 6 feet apart.
- Along the 10-foot walls:
- Place lights 2 feet from each end. This means lights at 2 feet and 8 feet along the 10-foot width.
- This creates a grid.
Table: Example Placement in a 10′ x 12′ Kitchen
| Row/Column | Distance from Wall 1 | Distance from Wall 2 | Distance from Wall 3 | Distance from Wall 4 |
|---|---|---|---|---|
| Row A | 2 ft | 6 ft | 2 ft | 6 ft |
| Row B | 2 ft | 6 ft | 2 ft | 6 ft |
| Row C | 2 ft | 6 ft | 2 ft | 6 ft |
(Note: This is a simplified example. Actual placement will depend on room shape and obstructions.)
Adapting the Layout to Your Kitchen’s Shape
The 2×4 rule is a starting point, but you’ll need to adjust it for specific kitchen layouts.
Straight Kitchens (Galley Kitchens)
In a galley kitchen, you’ll typically have two parallel rows of cabinets.
- Placement: Place lights in two parallel lines down the center of the room, or slightly closer to the working side of the kitchen.
- Spacing: Maintain even spacing down the length of the kitchen. Consider placing lights directly above the work aisles and task areas.
L-Shaped Kitchens
An L-shaped kitchen has cabinets and countertops on two adjacent walls.
- Placement: Focus on lighting the work areas.
- Place lights about 2 feet from the outer walls.
- In the corner where the ‘L’ bends, avoid placing a light directly overhead as it might cast shadows on your work surface. Instead, position them slightly out from the corner.
- If there’s an island or peninsula, light it separately.
U-Shaped Kitchens
A U-shaped kitchen has cabinets and countertops on three walls.
- Placement: Similar to L-shaped, focus on lighting the three work zones.
- Ensure good coverage along all countertop runs.
- Pay attention to the corners, as these can become dark spots. Consider adjusting spacing slightly to brighten corners.
Kitchens with Islands or Peninsulas
Islands and peninsulas are focal points and often work surfaces, so they require special lighting considerations.
- Placement:
- Directly Above: You can place recessed lights directly above the island, spacing them evenly. This provides general illumination for the island itself.
- Task Lighting: For more focused task lighting on an island, pendant lights are often a better choice. If you use recessed lights, consider using adjustable or “eyeball” trims to direct light onto the task surface.
- Perimeter: Continue your general ambient lighting around the perimeter of the island, keeping it a few feet away from the island edge to avoid a “halo” effect and create a more cohesive lighting scheme.
Task Area Illumination
Dedicated task lighting is crucial for a functional kitchen.
Countertops
- Placement: The most effective way to light countertops is with under-cabinet lighting. However, recessed lights can supplement this.
- Spacing: Place recessed lights about 2 feet from the walls where countertops are located. This ensures light falls directly onto the counter surface and minimizes shadows cast by upper cabinets or the person working.
Sink and Stovetop
These are high-activity areas.
- Sink: Place lights to illuminate the sink area without glare. If the sink is under a cabinet, under-cabinet lighting is essential. A recessed light placed 2-3 feet from the wall will help.
- Stovetop: If your stovetop doesn’t have a built-in hood with lights, you’ll need to ensure good overhead lighting. Recessed lights placed about 2-3 feet in front of the stovetop (away from the wall) can provide ample light. Some cooks prefer them slightly further back to avoid direct glare from cooking flames or pots.
Dimmer Switches: The Key to Versatility
Installing dimmer switches on your recessed lighting is one of the best ways to enhance kitchen lighting design.
- Flexibility: Dimmers allow you to adjust the light levels for different activities and times of day.
- Ambiance: Create a softer, more intimate atmosphere for dining or entertaining.
- Energy Saving: Dimming LEDs also saves energy.
Installation Steps for Kitchen Recessed Light Installation
Now that you have your layout planned, it’s time for the actual installation. This section covers the basic steps for kitchen recessed light installation, focusing on remodel-style fixtures.
Safety First!
- Turn Off Power: Always turn off the power to the circuit you’ll be working on at the breaker box. Double-check with a non-contact voltage tester.
- Wear Safety Gear: Safety glasses are a must to protect your eyes from debris.
Tools and Materials You’ll Need
- Recessed lighting kit kitchen (cans, trims, bulbs)
- Wire strippers/cutters
- Screwdriver set (Phillips and flathead)
- Non-contact voltage tester
- Drywall saw or oscillating multi-tool
- Measuring tape
- Pencil
- Fish tape (optional, for pulling wires)
- Wire nuts
- Electrical tape
- Stud finder
- Safety glasses
- Ladder or step stool
Step-by-Step Installation Process
- Confirm Power is Off: As mentioned, this is the most crucial step.
- Locate Joists and Obstructions: Use a stud finder to identify ceiling joists, pipes, or existing wiring. Mark their locations. This is critical for planning where your cans can go without running into structural elements.
- Mark Your Holes: Based on your planned recessed lighting layout kitchen, use a measuring tape and pencil to mark the center of each location where a light will be installed.
- Cut the Holes:
- Trace the Template: Most remodel cans come with a cardboard template. Hold this template at your marked center point and trace around it with a pencil.
- Cut Carefully: Use a drywall saw or an oscillating multi-tool to carefully cut along the traced line. Make sure you cut a clean, circular hole. If you’re unsure about cutting drywall, it might be time to consider professional help or practice on scrap pieces.
- Run the Wiring (If Necessary):
- If you’re adding new circuits or extending existing ones, you’ll need to run electrical cable (e.g., Romex) from your junction box or from one light to the next.
- This is often the most challenging part of DIY kitchen lighting. You’ll need to fish wires through the ceiling joists and walls.
- Series Wiring: Most recessed lights are wired in series. Power comes into the first can, connects to the second, and so on, until the last can, which then connects back to the power source.
- Wire the Can:
- Open the Junction Box: On the side of the recessed light housing (the can), there’s a small metal junction box. Open its cover.
- Strip Wires: Strip about 1/2 inch of insulation from the ends of the electrical cable wires (black, white, and ground) and from the wires inside the junction box.
- Make Connections:
- Connect the black wire from the cable to the black wire in the junction box using a wire nut.
- Connect the white wire from the cable to the white wire in the junction box.
- Connect the bare copper or green ground wire from the cable to the ground screw or wire in the junction box.
- Secure Connections: Ensure all wire nuts are tight and the connections are secure. Tuck the wires neatly back into the junction box and close the cover.
- Install the Can:
- Push into Hole: Gently push the wired can up into the hole you cut in the ceiling.
- Secure Clips: Remodel cans have clips or springs on the sides. These clips will automatically extend and grip the drywall, holding the can firmly in place.
- Attach the Trim and Bulb:
- Insert Trim: Most trims have a connector that plugs directly into the socket inside the can. Some may have screws.
- Screw in Bulb: Install the appropriate LED bulb.
- Secure Trim: Push the trim firmly against the ceiling. It will usually have springs that clip into the can to hold it securely.
- Restore Power and Test:
- Go back to the breaker box and turn the power back on.
- Test each light to ensure it works. If a light doesn’t work, turn the power off again and recheck your wiring connections.
Advanced Kitchen Lighting Placement Considerations
Beyond the basic layout, several factors can elevate your kitchen lighting design.
Layering with Other Fixtures
Recessed lighting is excellent for ambient light, but consider adding other layers:
- Under-Cabinet Lights: Absolutely essential for task lighting on countertops. They eliminate shadows cast by upper cabinets and provide focused illumination for food prep. They come in various forms: LED strips, puck lights, or linear fluorescent fixtures.
- Pendant Lights: Perfect over kitchen islands or peninsulas. They add a decorative element and can provide focused task lighting.
- Sconces: Can add warmth and style to certain areas, like a breakfast nook or a wall without upper cabinets.
- In-Cabinet Lighting: Illuminates the inside of cabinets, making it easier to find items.
Using Different Beam Spreads
Recessed light trims come with different beam spreads (the angle at which light is emitted).
- Narrow Beam (e.g., 15-25 degrees): Good for accent lighting, highlighting specific objects or areas.
- Medium Beam (e.g., 25-40 degrees): Versatile, good for general lighting and task areas.
- Wide Beam (e.g., 40-60 degrees): Excellent for broad ambient lighting, covering larger areas with fewer fixtures.
For general ambient lighting in a kitchen, medium to wide beam spreads are often preferred.
Color Rendering Index (CRI)
CRI measures how accurately a light source reveals the true colors of objects.
- High CRI (90+): Essential for kitchens, especially for food preparation. It ensures that the colors of your food look natural and appetizing. Look for LED bulbs with a CRI of 90 or higher.
Glare Control
Glare can be uncomfortable and reduce visibility.
- Baffle Trims: Have a ribbed interior that helps absorb light and reduce glare.
- Snoot/Deep Baffle Trims: Set the bulb further up into the housing, further minimizing direct glare.
- Wall Washing Trims: Designed to direct light specifically onto walls, creating a uniform wash of light and reducing glare on work surfaces.
Creating Visual Interest
Don’t just think about function; consider aesthetics.
- Staggered Layouts: Instead of a strict grid, staggering lights can create a more organic feel.
- Accentuate Features: Use adjustable or “eyeball” trims to highlight artwork, shelves, or architectural details.
- Ceiling Design: Consider how the lights will look against your ceiling. For a cleaner look, flush mount lights kitchen or trims with a very thin lip can be used.
When to Call a Professional for Kitchen Recessed Light Installation
While DIY kitchen lighting is achievable for some, there are instances where hiring a qualified electrician is the best course of action.
Signs You Should Hire a Pro
- Unfamiliarity with Electrical Codes: Building codes for electrical work are strict and vary by location. An electrician ensures your installation is safe and compliant.
- Complex Wiring: If your kitchen requires new circuits, extending existing ones significantly, or working with older wiring systems, it’s best left to professionals.
- Lack of Experience: If you’ve never done electrical work before, the risks of shocks, fires, or damaging your home are higher.
- Uncertainty About Layout: If you’re struggling to finalize your recessed lighting layout kitchen or are unsure about the best placement for optimal light, an electrician or lighting designer can provide expert advice.
- Dimmer and Smart Home Integration: Integrating complex dimmer systems or smart home controls might be beyond a typical DIYer’s skill set.
- Structural Concerns: If you’re unsure about finding joists or cutting into your ceiling, a professional can handle this safely.
Frequently Asked Questions About Kitchen Recessed Lighting
Here are some common questions homeowners have about installing recessed lighting in their kitchens.
How many recessed lights do I need in my kitchen?
The number of recessed lights depends on the size of your kitchen, the lumen output of the lights you choose, and the desired brightness. A general guideline is to use the 2×4 rule (2 feet from walls, 4 feet apart) as a starting point and adjust based on your specific kitchen layout and needs. For task areas like countertops, you might need lights placed closer to the walls.
What is the best placement for recessed lights in a kitchen?
The best placement aims for even illumination and avoids shadows. For general ambient light, place them about 2 feet from walls and spaced 4 feet apart. Crucially, ensure task areas like countertops, the sink, and the stovetop are well-lit, often by placing lights closer to these zones (2-3 feet from the wall).
Can I install recessed lights without an electrician?
Yes, if you have basic electrical knowledge and are comfortable with the process, you can undertake a DIY kitchen lighting project. However, safety is paramount. Always turn off power at the breaker, use a voltage tester, and if you have any doubts or the wiring is complex, it’s strongly recommended to hire a qualified electrician.
What size recessed lights are best for a kitchen?
For most residential kitchens, 4-inch or 6-inch recessed lights are common. Smaller 4-inch lights can offer a more modern and less obtrusive look, while 6-inch lights provide broader light distribution. The choice often comes down to aesthetic preference and the overall lighting design.
How far apart should recessed lights be in a kitchen?
A common guideline is to space them 4 feet apart for general ambient lighting. However, this can vary. For task lighting near countertops, you might place them closer to the wall (about 2 feet) to provide direct illumination. Always consider the beam spread of the bulbs and the fixture’s aperture.
Should recessed lights be flush with the ceiling?
The “flush mount lights kitchen” aesthetic is popular for a clean, minimalist look. Most recessed light trims are designed to sit slightly recessed or flush with the ceiling. When installing, ensure the trim sits neatly against the drywall without significant gaps.
Do I need special recessed lights for the kitchen ceiling remodel lighting?
For a kitchen ceiling remodel lighting project, you will typically use “remodel” or “old work” style recessed light housings. These are designed to be installed from below the ceiling in existing drywall, featuring clips or springs to secure them without needing access from above. Ensure the lights are suitable for kitchen use, considering moisture and grease.
What type of bulbs are best for kitchen recessed lighting?
LED bulbs are the best choice for kitchen recessed lighting due to their energy efficiency, long lifespan, and wide variety of color temperatures and brightness levels. Look for dimmable LEDs with a high Color Rendering Index (CRI) of 90+ to ensure accurate color representation of food and decor.
By carefully planning your recessed lighting layout kitchen and considering all these factors, you can achieve a bright, functional, and beautiful kitchen that perfectly suits your needs. Whether you’re looking for the best recessed lighting kitchen setup for cooking or creating a warm ambiance, this guide provides the foundation for a successful lighting project.