
Can you refinish kitchen cabinets with stain? Yes, you absolutely can! Refinishing your kitchen cabinets with stain is a fantastic way to give your kitchen a fresh, updated look without the hefty price tag of a full renovation. This DIY project can transform tired, outdated wood cabinets into stunning focal points that elevate your entire kitchen’s aesthetic. This guide will walk you through every step of the process, from preparing your cabinets to applying the final protective coat.
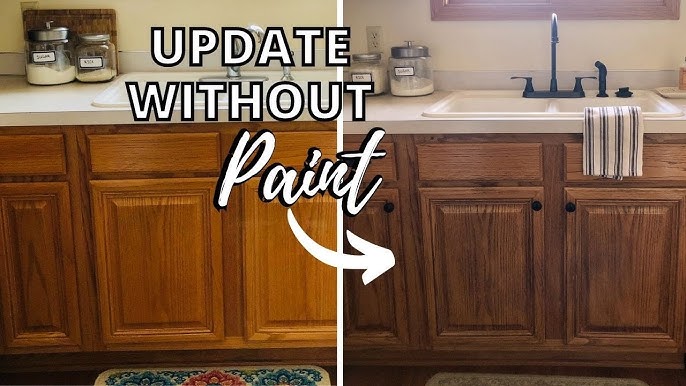
Image Source: i.ytimg.com
Why Refinish Your Kitchen Cabinets?
Updating wood cabinets with stain offers numerous benefits. It’s an economical alternative to replacing cabinets, allowing you to achieve a high-end look on a budget. Staining also highlights the natural beauty of the wood grain, something paint can often obscure. For those seeking a more natural or traditional kitchen style, staining is the ideal choice. It’s a rewarding project that can significantly boost your home’s value and your own satisfaction with your living space.
Benefits of Staining Cabinets:
- Cost-Effective: Significantly cheaper than cabinet replacement.
- Aesthetic Enhancement: Brings out the natural beauty of wood grain.
- Customization: Allows for a wide range of color choices.
- Durability: When done correctly, stained cabinets are very durable.
- Satisfaction: A rewarding DIY project with impactful results.
Planning Your Cabinet Refinishing Project
Before you dive in, careful planning is key to a successful kitchen cabinet refinishing. This involves choosing your stain color, gathering the necessary supplies, and setting aside enough time.
Choosing Cabinet Stain Colors
Selecting the right cabinet stain colors is crucial. Think about your kitchen’s overall style and color palette. Do you want a warm, rich look with a dark walnut or cherry stain? Or perhaps a lighter, airier feel with a natural oak or pine stain? Consider the existing countertops, backsplash, and flooring.
Factors to Consider When Choosing a Stain:
- Wood Type: Different woods absorb stain differently. Lighter woods like pine or maple can take on a variety of colors, while darker woods like oak or cherry may have their natural tones enhanced.
- Kitchen Style: Modern kitchens might suit grays or blacks, while traditional kitchens often look best with warm browns.
- Existing Decor: Match or complement your countertops, backsplash, and appliances.
- Light Exposure: Light in your kitchen can alter how the stain color appears. Test samples in different lighting conditions.
- Durability: While stain itself doesn’t add durability, the topcoat does. Consider how much wear and tear your cabinets get.
Tip: Always test your chosen stain on an inconspicuous area of a cabinet door or a piece of scrap wood from the same material. This helps you see how the stain will look on your specific cabinets and if the color is what you envisioned.
Gathering Your Supplies
Having all your tools and materials ready before you start will make the process smoother.
Essential Supplies for Cabinet Staining:
- Screwdrivers: For removing cabinet doors and hardware.
- Putty Knife or Scraper: For removing old finish.
- Sanding Blocks or Electric Sander: For sanding.
- Sandpaper: Various grits (80, 120, 220).
- Chemical Stripper (Optional but Recommended for some finishes): For tough finishes.
- Tack Cloths: To remove dust after sanding.
- Clean Rags or Paper Towels: For applying stain and cleaning up.
- Foam Brushes or Foam Applicator Pads: For stain application.
- Good Quality Brushes: For detail work.
- Wood Conditioner (Highly Recommended): Helps ensure even stain absorption.
- Wood Stain: Your chosen color and type (oil-based or water-based).
- Polyurethane or Other Protective Topcoat: For durability.
- Gloves: To protect your hands.
- Safety Glasses: To protect your eyes.
- Dust Mask or Respirator: For sanding and chemical use.
- Drop Cloths or Plastic Sheeting: To protect your floors and surrounding areas.
- Painter’s Tape: To protect areas you don’t want stained.
- Small Containers: For stain samples.
Preparing Cabinets for Staining: The Crucial First Steps
Proper preparation is the most critical part of kitchen cabinet refinishing. Skipping or rushing these steps will lead to a poor finish and a less durable result. This stage involves cleaning, stripping, sanding, and conditioning.
Step 1: Remove Cabinet Doors and Hardware
This makes the entire process much easier. Lay out all your cabinet doors and drawer fronts on a protected surface. Keep track of where each piece came from, perhaps by labeling the back with painter’s tape and a number or letter. Remove all hinges, handles, and knobs.
Step 2: Clean the Cabinets Thoroughly
Grease and grime are the enemies of good adhesion. You need to remove every trace of kitchen grease and dirt.
Cleaning Methods:
- Degreaser: Use a strong degreaser specifically designed for cabinets or a solution of warm water and a few drops of dish soap.
- Mineral Spirits: For stubborn grease, mineral spirits can be effective, but ensure good ventilation and wear gloves.
- TSP (Trisodium Phosphate): A powerful cleaner, but use with caution and proper protection as it’s a strong chemical.
Wipe down all cabinet surfaces, doors, and drawer fronts. Rinse with clean water and allow them to dry completely.
Step 3: Strip the Old Finish (If Necessary)
If your cabinets have a thick, old finish, paint, or varnish that is peeling or cracking, you’ll need to strip it. If the cabinets are already bare wood or have a light, intact finish, you might be able to skip stripping and go straight to sanding.
Cabinet Stripping Techniques:
- Chemical Strippers: Apply the stripper according to the product instructions. Allow it to work, then use a putty knife or scraper to lift the old finish. This can be messy and requires good ventilation and protective gear.
- Sanding: For lighter finishes or if you prefer not to use chemicals, heavy-grit sandpaper (80-100 grit) can remove some finishes.
Always follow the manufacturer’s safety guidelines when using chemical strippers.
Step 4: Sanding for a Smooth Surface
Sanding is essential for ensuring the stain penetrates evenly and adheres properly. This is a multi-step process.
Sanding Grits and Process:
- Initial Sanding (Stripping Stage, if needed): Use 80-100 grit sandpaper to remove any remaining old finish or imperfections. If you stripped the cabinets, you might start here with 120 grit.
- Medium Sanding: Move to 120-150 grit sandpaper. Sand with the grain of the wood. This step smooths out the surface and removes any scratches left by the coarser grit.
- Fine Sanding: Finish with 220 grit sandpaper. This creates a very smooth surface that is ideal for applying stain. The smoother the surface, the more even your stain application will be.
Important: Always sand in the direction of the wood grain. Going against the grain will create visible scratches that will be highlighted by the stain.
Sanding Tips:
- Electric Sander: An orbital sander can speed up the process for larger surfaces. Use a light touch and move the sander constantly.
- Sanding Blocks: Useful for corners, edges, and detailed areas.
- Dust Removal: After each sanding stage, thoroughly wipe down the cabinets with a tack cloth to remove all dust. Dust left behind will ruin your finish.
Step 5: Apply Wood Conditioner (Crucial for Even Staining)
This step is often overlooked but is vital for achieving a uniform color, especially on soft woods like pine or maple, which can stain blotchy. Wood conditioner acts as a sealer, allowing the stain to penetrate more evenly.
How to Apply Wood Conditioner:
- Apply the conditioner with a brush or rag, working it into the wood grain.
- Wipe off any excess conditioner with a clean, lint-free cloth after the time recommended by the manufacturer (usually 5-15 minutes).
- Let the conditioner dry completely according to the product’s instructions.
Applying Wood Stain: Bringing Your Vision to Life
Now for the exciting part – applying the stain! This is where your kitchen cabinets start to transform.
Choosing Your Stain Type: Oil-Based vs. Water-Based
- Oil-Based Stains: Offer a richer, deeper color and are more forgiving, allowing more working time before drying. They typically require mineral spirits for cleanup.
- Water-Based Stains: Dry faster and have lower VOCs (Volatile Organic Compounds), making them a more environmentally friendly option. Cleanup is with soap and water. They can sometimes be more prone to blotchiness if not conditioned properly.
Cabinet Staining Techniques
The method of application can affect the final look. Experiment on scrap wood to find what works best for you.
Application Methods:
- Rag Application: This is a popular DIY method.
- Dip a clean, lint-free rag into the stain, or pour a small amount of stain onto the rag.
- Apply the stain to the wood in long, even strokes, following the wood grain.
- Work in small sections to prevent the stain from drying too quickly.
- Let the stain penetrate for the time recommended on the can (usually 5-15 minutes).
- Use a clean rag to wipe off the excess stain, again, following the wood grain. The longer you leave the stain on before wiping, the darker the color will be.
- Brush Application:
- Use a good quality natural bristle brush for oil-based stains or a synthetic bristle brush for water-based stains.
- Apply the stain evenly, working with the grain.
- Use a brush for areas where a rag might be difficult to use, like in grooves or edges.
- Wipe off excess with a clean rag as with the rag method.
- Foam Applicator Pad:
- These can offer a smooth, even application and are good for larger, flat surfaces.
- Apply stain evenly and wipe off excess with a clean rag.
Tip for Darker Colors: To achieve a darker or richer color, you can apply a second coat of stain after the first coat has dried completely. Always wipe off the excess after each application.
Achieving an Even Stain (Dealing with Blotches)
Blotching occurs when wood absorbs stain unevenly. While wood conditioner helps, some woods are naturally prone to it.
Tips to Minimize Blotching:
- Wood Conditioner: As mentioned, this is your first line of defense.
- Pre-Stain Wood Conditioner: Some products are specifically designed to prevent blotching.
- Test Stains: Always test on scrap wood of the same species.
- Rag Application: Wiping off excess stain with a rag is generally better at preventing blotching than leaving it to soak in.
- Multiple Thin Coats: Applying stain in multiple thin coats rather than one heavy coat can help achieve a more uniform color.
Allowing Stain to Dry
Patience is crucial here. Let the stain dry completely according to the manufacturer’s instructions before applying a topcoat. This can take anywhere from 24 to 72 hours, depending on the type of stain and humidity.
Applying a Protective Cabinet Finish (Topcoat)
The stain gives your cabinets their color, but the topcoat protects that color and the wood from moisture, scratches, and everyday wear. This is a critical step in wood cabinet restoration.
Choosing a Topcoat
Several options are available, each with its pros and cons.
Topcoat Options:
- Polyurethane (Oil-Based): Extremely durable, offers a hard, protective finish, and enhances the warmth of the stain. Yellows slightly over time, which can be desirable for some wood tones. Cleanup with mineral spirits.
- Polyurethane (Water-Based): Dries clear, with no yellowing. Less durable than oil-based but still very effective. Quick drying time. Cleanup with soap and water.
- Polyacrylic: Similar to water-based polyurethane but offers slightly better clarity and scratch resistance.
- Varnish: A traditional choice, offering excellent durability and water resistance. Can be oil- or water-based.
- Lacquer: Dries very quickly and provides a hard finish, but is less flexible and can be prone to chipping if applied too thickly.
For kitchen cabinets, a durable polyurethane or polyacrylic is generally recommended.
Applying the Topcoat
The application of the topcoat is similar to staining in terms of technique, but you’re aiming for a smooth, even sheen.
Application Process:
- Light Sanding: After the stain is completely dry, lightly sand the cabinet surfaces with 220-grit sandpaper or a fine-grit sanding sponge. This creates a slightly rough surface for the topcoat to adhere to.
- Dust Removal: Thoroughly wipe down all surfaces with a tack cloth to remove any dust from sanding.
- First Coat: Apply a thin, even coat of your chosen topcoat using a high-quality synthetic brush or foam applicator. Work with the wood grain. Avoid over-applying, as this can lead to drips and an uneven finish.
- Drying: Let the first coat dry completely according to the manufacturer’s instructions.
- Light Sanding Between Coats: Once dry, lightly sand the surface again with 220-grit sandpaper or a sanding sponge. This smooths out any imperfections or raised grain and ensures good adhesion for the next coat.
- Dust Removal: Again, use a tack cloth to remove all dust.
- Subsequent Coats: Apply 2-3 more thin coats, repeating the light sanding and dust removal process between each coat. Most projects will benefit from at least 3 coats for maximum durability.
Tip: For a factory-smooth finish, some professionals recommend using a foam roller specifically designed for smooth surfaces.
Reassembling Your Cabinets
Once the final topcoat has fully cured (this can take several days to a week, even if it feels dry to the touch), you can reattach your hardware and rehang the doors and drawer fronts.
Frequently Asked Questions (FAQ)
Q: Can I refinish my laminate kitchen cabinets with stain?
A: No, you cannot stain laminate cabinets. Stain is designed to penetrate porous wood. Laminate is a non-porous plastic surface. For laminate cabinets, you would need to paint them after proper cleaning and priming.
Q: How long does it take to refinish kitchen cabinets?
A: The time varies depending on the size of your kitchen, the condition of your existing cabinets, and your drying times. A typical DIY refinishing project can take anywhere from a long weekend to a week or more, factoring in drying times between coats and steps.
Q: Can I stain over existing paint?
A: No, you cannot stain over paint. Stain needs to penetrate the wood to change its color. If your cabinets are painted, you would need to strip the paint down to the bare wood before you can stain them.
Q: Do I need to remove the cabinet doors?
A: While it’s possible to stain cabinets with the doors on, removing them makes the process significantly easier and ensures a more even, professional-looking finish. It also allows you to properly clean, strip, sand, and stain the inside edges of the doors and the cabinet frames more effectively.
Q: What is the best stain for kitchen cabinets?
A: The “best” stain depends on your desired look and the type of wood. Oil-based stains generally offer richer colors and are more forgiving. Water-based stains dry faster and are easier to clean up. Consider testing different brands and types on scrap wood to see which performs best for your project.
Q: How many coats of stain do I need?
A: Typically, one coat of stain is sufficient for a good color. However, if you want a darker or richer hue, you can apply a second coat after the first has dried completely. Always wipe off excess stain after each application.
Q: How many coats of topcoat should I apply?
A: For kitchen cabinets, durability is key. We recommend a minimum of three coats of a good quality protective topcoat like polyurethane or polyacrylic. This will provide the best protection against moisture, grease, and wear.
Conclusion: Your Beautifully Refinished Kitchen Awaits
Refinishing your kitchen cabinets with stain is a rewarding DIY project that can dramatically improve the look and feel of your kitchen. By following these comprehensive steps, from careful preparation to meticulous application, you can achieve professional-looking results. This DIY cabinet makeover will not only update your space but also give you a sense of accomplishment every time you walk into your kitchen. Enjoy your beautifully restored wood cabinets!