
Can you restain kitchen cabinets yourself? Yes, you absolutely can! Restaining kitchen cabinets is a rewarding DIY project that can dramatically update your kitchen’s look without the cost of full replacement. This guide will walk you through everything you need to know for a successful DIY cabinet makeover, from initial preparation to the final coat. We’ll cover cabinet refinishing in detail, transforming tired cabinets into a focal point of your kitchen.
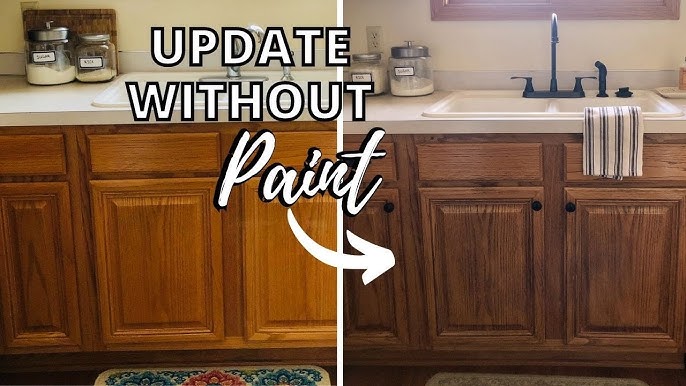
Image Source: i.ytimg.com
Why Restain Your Kitchen Cabinets?
Restaining offers a fantastic way to refresh your kitchen’s appearance. It’s a step up from merely painting kitchen cabinets because it preserves and highlights the natural beauty of the wood. If your cabinets are structurally sound but the finish is dated or worn, restaining is an excellent solution. It can also allow you to change the color of your cabinets, from a light oak to a rich walnut, all while showcasing the wood grain. This kitchen cabinet renewal project can increase your home’s value and your enjoyment of your kitchen space.
Benefits of Restaining:
- Cost-Effective: Significantly cheaper than replacing cabinets.
- Customizable: Allows you to choose any wood stain color.
- Highlights Wood Grain: Unlike paint, stain lets the natural wood show through.
- Durable Finish: A properly applied stain and topcoat can last for years.
- Environmentally Friendly: Extends the life of existing cabinets, reducing waste.
Planning Your Kitchen Cabinet Restaining Project
Before you dive in, careful planning is crucial. This ensures you have all the necessary materials, understand the process, and can allocate your time effectively.
Assessing Your Cabinets:
- Wood Type: Most wood cabinets can be restained. However, some woods, like oak, have a prominent grain that can be harder to cover smoothly with stain. Laminate or veneer cabinets often cannot be successfully restained.
- Current Finish: Are your cabinets painted or stained? This guide focuses on restaining existing stained cabinets or refinishing painted cabinets. If they are painted, you’ll need to strip the paint before staining.
- Condition: Are there any damaged areas, veneer peeling, or structural issues? Minor kitchen cabinet repair can often be done before restaining.
Choosing Your Stain Color:
The stain color you choose will significantly impact your kitchen’s overall aesthetic.
Factors to Consider:
- Existing Decor: Match or complement your countertops, flooring, and wall color.
- Light Levels: Darker stains can make a small or dark kitchen feel smaller. Lighter stains can brighten a space.
- Wood Species: Different wood species accept stain differently. Always test your stain on a scrap piece of wood or an inconspicuous area of a cabinet door.
Gathering Your Supplies:
Having all your tools and materials ready before you start will make the process smoother.
Essential Tools and Materials:
- Screwdriver: For removing cabinet doors and hardware.
- Orbital Sander or Sanding Blocks: For initial stripping and smoothing.
- Sandpaper: Various grits (e.g., 80, 120, 150, 220).
- Sanding Sponges: For getting into nooks and crannies.
- Tack Cloths: To remove dust after sanding.
- Clean Rags or Applicator Pads: For applying stain.
- Disposable Gloves: To protect your hands.
- Safety Glasses: To protect your eyes from dust and chemicals.
- Respirator Mask: Crucial for protecting your lungs from dust and VOCs.
- Drop Cloths or Plastic Sheeting: To protect your floors and surrounding areas.
- Wood Conditioner (Pre-stain): Recommended for even stain absorption.
- Wood Stain: Your chosen color.
- Polyurethane or Topcoat: For protection and durability.
- Small Paint Brushes or Foam Brushes: For precise application.
- Mineral Spirits or Denatured Alcohol: For cleanup (depending on your finish).
- Wood Filler: For repairing any dings or scratches.
- Cabinet Cleaner: For initial cleaning.
Step-by-Step Guide to Restaining Kitchen Cabinets
This detailed process covers all the essential stages for a professional-looking finish.
Step 1: Preparation is Key – Kitchen Cabinet Prep
This is arguably the most crucial stage for a successful outcome. Proper kitchen cabinet prep ensures the stain adheres well and the finish is smooth.
Removing Doors and Hardware:
- Label Everything: As you remove doors and drawers, label them clearly with masking tape and a marker. Note their original position (e.g., “Upper Left,” “Drawer Front 3”). This will save you a lot of headaches during reassembly.
- Store Safely: Place doors and drawer fronts on a flat surface, perhaps on sawhorses or a covered workbench, to prevent scratching.
- Remove Hardware: Unscrew hinges, knobs, and pulls. Store them in labeled bags or containers.
Cleaning the Cabinets:
- Degrease: Kitchen cabinets accumulate grease and grime. Use a dedicated degreaser or a solution of warm water and a few drops of dish soap.
- Wipe Down: Thoroughly wipe down all cabinet surfaces, inside and out, with a clean cloth.
- Rinse and Dry: Wipe down again with a clean, damp cloth to remove any soap residue, and then dry thoroughly with another clean cloth.
Step 2: Sanding – The Foundation of a Smooth Finish
Sanding removes the old finish and creates a surface that will readily accept the new stain. This is a vital part of cabinet sanding and finishing.
Stripping the Old Finish:
- If Cabinets are Stained: You’ll need to remove the existing stain. Start with a coarser grit sandpaper (80-100 grit) on your orbital sander. Work with the grain of the wood.
- If Cabinets are Painted: Paint needs to be completely removed. You might need a chemical paint stripper for this, followed by sanding. Always follow the manufacturer’s instructions for paint strippers and wear appropriate safety gear, including a respirator.
Sanding for Stain Adhesion:
- Initial Sanding: After removing the old finish, or if you’re working with raw wood, start with a medium-grit sandpaper (e.g., 120 grit) to smooth out any imperfections and remove remaining old finish.
- Progressive Grits: Move to finer grits of sandpaper (150 grit, then 220 grit). Each subsequent grit refines the surface, removing the scratches left by the previous grit.
- Sanding Technique: Always sand with the grain of the wood. Sanding against the grain will create visible scratches that will show through the stain.
- Sanding Sponges: Use sanding sponges for detailed areas, corners, and edges where an orbital sander can’t reach.
- Dust Removal: After each sanding pass, use a vacuum with a brush attachment or compressed air to remove dust. Then, wipe down with a tack cloth. This is critical for a clean surface.
Step 3: Wood Conditioning – For Even Stain Absorption
Wood conditioner (or pre-stain) is essential for achieving a uniform stain color, especially on softwoods like pine or maple, or woods with a varied grain.
- What it Does: It seals the wood pores, preventing some areas from absorbing more stain than others, which can lead to blotchy results.
- Application: Apply a thin, even coat of wood conditioner with a brush or rag.
- Drying Time: Allow the conditioner to dry for the time recommended by the manufacturer (usually 15-30 minutes). Do not let it dry completely and form a film; wipe off any excess.
Step 4: Applying Wood Stain – The Color Transformation
This is where your cabinets start to take on their new look. Applying wood stain requires patience and attention to detail.
Testing Your Stain:
- Scrap Wood: Always test your stain on a piece of scrap wood from your project or on the back of a cabinet door.
- Apply Stain, Wipe Off: Apply the stain with a rag or applicator pad, working in sections and following the grain.
- Wipe Off Excess: After allowing the stain to penetrate for the time recommended on the can (usually 5-15 minutes), wipe off the excess stain with a clean rag, again, always following the wood grain.
- Observe: Let the test spot dry to see the true color. You can apply a second coat for a darker shade if desired.
Staining Your Cabinets:
- Work in Sections: Stain one door or drawer front at a time.
- Apply Evenly: Apply a liberal amount of stain with your rag or applicator pad, brushing or wiping in the direction of the wood grain.
- Allow Penetration: Let the stain sit for the recommended time (check the can). This is how the wood absorbs the color.
- Wipe Off Excess: Use a clean, lint-free rag to wipe off the excess stain, working in the direction of the grain. Make sure you remove all excess, or you’ll end up with a sticky, uneven finish.
- Second Coat (Optional): If you want a darker color, wait for the first coat to dry completely (check the can for drying times, usually 24-48 hours) and apply a second coat, repeating steps 2-4.
Important Cabinet Staining Techniques:
- Consistent Pressure: Apply even pressure when wiping off excess stain for a uniform look.
- Feathering Edges: When staining, avoid leaving harsh lines. Feather the edges of your stained area into the unstained area.
- Drying Time: Do not rush the drying process. Proper drying between coats is crucial for adhesion and a durable finish.
Step 5: Applying a Protective Topcoat – Sealing the Deal
A topcoat protects your newly stained cabinets from moisture, stains, and wear. It’s essential for kitchen cabinet renewal.
- Types of Topcoats: Polyurethane (oil-based or water-based), polycrylic, or lacquer are common choices. Oil-based products typically offer greater durability but can impart a slight amber tone to lighter stains. Water-based products are lower in VOCs and dry clearer.
- Application:
- Light Sanding: After the stain is completely dry (at least 24-48 hours), lightly sand the cabinet surfaces with 220-grit sandpaper or a fine-grit sanding sponge. This “de-nibbing” smooths out any raised grain or imperfections and provides a better surface for the topcoat to adhere to.
- Dust Removal: Thoroughly clean off all dust with a tack cloth.
- Apply First Coat: Apply a thin, even coat of your chosen topcoat using a high-quality synthetic brush or a foam applicator. Avoid over-brushing.
- Dry and Sand: Let the first coat dry completely according to the manufacturer’s instructions. Then, lightly sand again with 220-grit sandpaper or a fine sanding sponge, and remove dust with a tack cloth.
- Subsequent Coats: Apply two to three more thin coats, sanding and cleaning between each. More coats will provide greater durability.
Step 6: Reassembly – Bringing it All Together
Once all doors and drawer fronts have been restained and have their final topcoat, it’s time to put everything back.
- Reinstall Hardware: Attach knobs, pulls, and hinges.
- Rehang Doors: Carefully rehang the cabinet doors and reinsert the drawers. Use your labels to ensure everything goes back in its correct place.
- Adjust Hinges: Adjust the hinges as needed so the doors hang straight and close properly.
Common Issues and Solutions in Restaining
Even with careful work, you might encounter some hiccups. Here’s how to address them.
Blotchy Stain:
- Cause: Uneven absorption of stain, often due to skipping the wood conditioner or not sanding properly.
- Solution: If the blotchiness is minor, you might be able to lightly sand the affected area with 220-grit sandpaper and reapply stain, ensuring you use a wood conditioner this time. For severe blotching, you may need to strip the stain and start over, making sure to use a wood conditioner.
Sanding Scratches:
- Cause: Using too coarse a grit of sandpaper, sanding against the grain, or not removing dust adequately between sanding steps.
- Solution: Lightly sand the area with a finer grit sandpaper, always with the grain. Ensure all dust is removed before applying stain. If the scratches are deep, you may need to use wood filler and re-sand.
Uneven Topcoat:
- Cause: Applying the topcoat too thickly, over-brushing, or not sanding between coats.
- Solution: If the finish is still wet, you can try to feather out the thicker areas with a brush. If it’s dry, you’ll need to lightly sand the entire surface with 220-grit sandpaper and reapply a thinner, more even coat.
Frequently Asked Questions (FAQ)
Q1: How long does it take to restain kitchen cabinets?
A: The time it takes can vary greatly depending on the size of your kitchen, the number of cabinets, and your experience level. A typical DIY project can take anywhere from a long weekend to a full week or more, accounting for drying times between coats.
Q2: Can I restain laminate or particleboard cabinets?
A: Generally, no. Laminate and particleboard cabinets are not made of solid wood and have a plastic or paper-like veneer that cannot be sanded and stained effectively. Attempting to do so will likely result in an uneven, peeling, or damaged finish. For these types of cabinets, painting is a much better option.
Q3: Do I need to remove my cabinet doors to restain them?
A: Yes, it is highly recommended. Removing the doors and drawers allows for easier and more thorough application of stain and topcoat, ensuring you get a smooth, even finish on all surfaces and edges. It also makes cleaning and sanding much more manageable.
Q4: What’s the difference between restaining and refinishing cabinets?
A: While often used interchangeably, “restaining” specifically refers to applying a new stain color over an existing stain or bare wood. “Refinishing” is a broader term that can include restaining, painting, or simply reapplying a new topcoat to an existing finish if it’s still in good condition. This guide focuses on the process of restaining, which often involves refinishing.
Q5: How many coats of stain do I need?
A: Typically, one to two coats of stain are sufficient. The number of coats depends on the desired color intensity and the type of wood. Always test on scrap wood first to achieve your preferred shade.
Q6: How many coats of topcoat are necessary?
A: For kitchen cabinets, which experience a lot of wear and tear, at least three coats of a durable topcoat (like polyurethane or polycrylic) are recommended. Four coats will provide even more protection.
Q7: Can I paint kitchen cabinets instead of staining them?
A: Absolutely! Painting kitchen cabinets is another popular DIY option for updating their look. While staining highlights the wood grain, painting offers a solid color finish. The prep work for painting is similar, involving cleaning and sanding, but instead of stain, you’ll apply primer and paint specifically designed for cabinets.
Q8: How do I handle kitchen cabinet repair before restaining?
A: Minor repairs like filling small dents, scratches, or holes can be done with wood filler. Apply the filler, let it dry, and then sand it smooth to be flush with the surrounding wood. For larger issues like veneer peeling or damaged doors, you may need more extensive repairs or consider professional help before proceeding with restaining.
Conclusion: Your Beautifully Transformed Kitchen Awaits
Restaining your kitchen cabinets is a significant undertaking, but with careful preparation and patience, you can achieve professional-looking results. This kitchen cabinet renewal project offers a cost-effective way to dramatically change your kitchen’s aesthetic. By following these detailed DIY steps for cabinet refinishing, you’ll create a beautiful, updated space that you’ll love for years to come. Remember, the key to a successful DIY cabinet makeover lies in the prep work and the quality of your materials and execution. Enjoy the process and the stunning transformation of your kitchen!