
Can you restore kitchen cabinets? Absolutely! Restoring kitchen cabinets can dramatically refresh your kitchen’s look. What is cabinet resurfacing? It’s a way to update your cabinets without a full replacement, often involving cleaning, repairing, and applying a new finish or covering. This guide will walk you through the entire process, from simple cleaning to more involved DIY cabinet restoration.
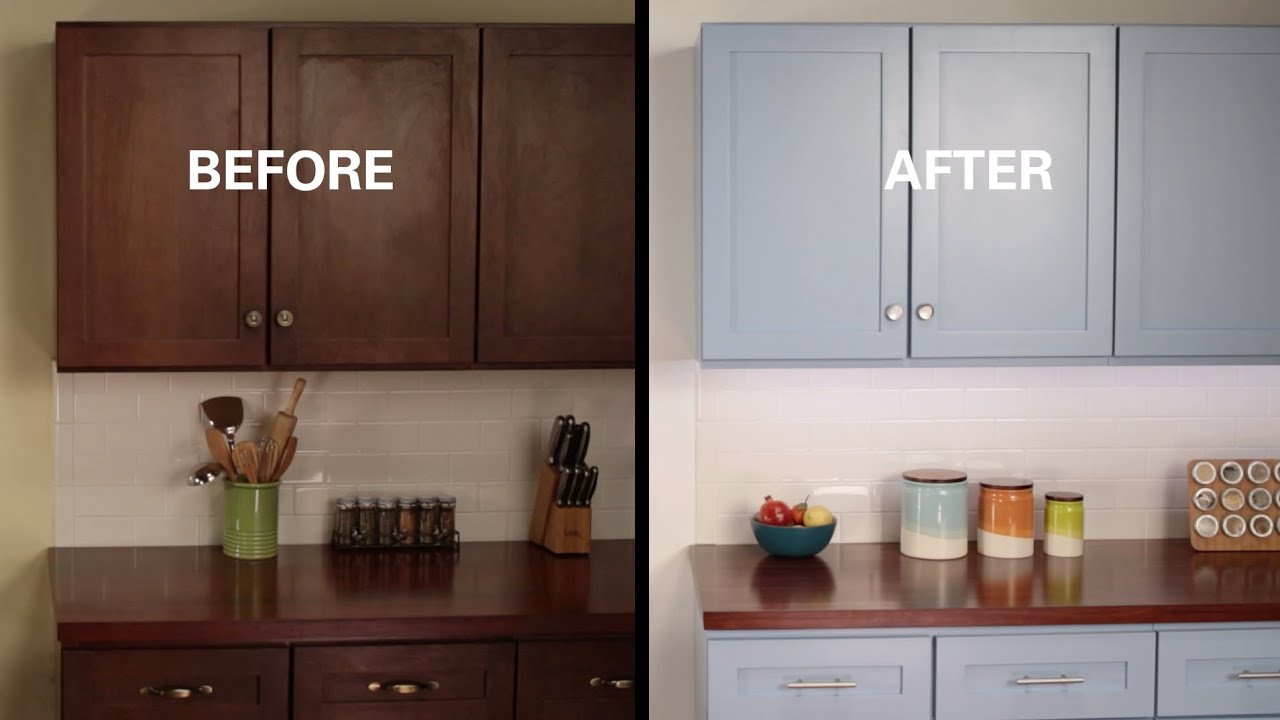
Image Source: i.ytimg.com
Reviving Your Kitchen: A Comprehensive Guide to Cabinet Restoration
Your kitchen cabinets are the heart of your cooking space. Over time, they can show wear and tear, losing their original luster. But before you consider a costly replacement, know that a wealth of options exist to bring them back to life. Whether you’re aiming for a subtle refresh or a complete transformation, restoring kitchen cabinets is a rewarding endeavor. This in-depth guide covers everything you need to know to refurbish kitchen cabinets, refinish cabinets, and achieve a stunning kitchen cabinet makeover.
Assessing Your Cabinets: The First Step to Restoration
Before diving into any work, it’s crucial to assess the current state of your cabinets. This assessment will guide your choices on the best restoration methods.
Types of Cabinet Finishes and Their Restoration Needs
- Wood Stains: These enhance the natural grain of wood. Restoration might involve cleaning, light sanding, and re-staining.
- Paint: Painted cabinets can chip or fade. Cabinet painting is a popular option for a new look, but preparation is key.
- Veneer: This thin layer of wood can peel or scratch. Repairing veneer is delicate and may require specialized adhesives.
- Laminate/Melamine: These surfaces are durable but can chip. Often, a full replacement of the cabinet door or drawer front is the best option for significant damage.
Identifying Wear and Tear
Look for common issues:
- Scratches and Gouges: Minor scratches can often be filled and blended. Deep gouges may require wood filler.
- Fading and Discoloration: Sunlight and heat can cause finishes to fade unevenly.
- Grease Buildup: Years of cooking can lead to stubborn grease accumulation.
- Peeling Finish: This indicates the current finish is failing and needs to be removed.
- Loose Hinges or Hardware: This is a simple fix that can greatly improve the cabinet’s function and appearance.
Preparing Your Cabinets for Restoration
Proper preparation is paramount for a successful kitchen cabinet repair and refinishing project. This phase ensures the new finish adheres well and lasts.
Step 1: Thorough Cabinet Cleaning
This is more than just a wipe-down. You need to remove all grime, grease, and old polish.
What You’ll Need for Cleaning:
- Mild dish soap
- Warm water
- Clean cloths or sponges
- Degreaser (for stubborn grease)
- Gloves
Cleaning Process:
- Empty Cabinets: Remove all contents from your cabinets.
- Remove Doors and Drawers: This makes cleaning and subsequent steps much easier. Label each door and drawer front with its location so you can reassemble correctly.
- Initial Wipe-Down: Use a damp cloth with a mild soap and water solution to wipe down all surfaces.
- Tackle Grease: For greasy areas, apply a degreaser directly or mix it with warm water according to the product’s instructions. Let it sit for a few minutes, then scrub gently.
- Rinse: Wipe down all surfaces with a clean cloth dampened with plain water to remove soap residue.
- Dry Thoroughly: Use a dry cloth to ensure all surfaces are completely dry. Moisture can affect adhesion of new finishes.
Step 2: Hardware Removal
Remove all hinges, knobs, pulls, and any other hardware. Store them in a safe place, perhaps in labeled bags, to prevent loss. This also allows you to clean the hardware separately or replace it for a completely new look.
Methods for Kitchen Cabinet Restoration
Several methods can revive your cabinets, ranging in difficulty and impact.
Method 1: Deep Cleaning and Polishing (The Easiest Refresh)
For cabinets that are generally in good condition but just look dull or dirty, a deep clean and polish can work wonders. This is a great starting point for wood cabinet restoration when there are no major defects.
What You’ll Need:
- Cabinet cleaning solution or mild soap and water
- Soft cloths
- Wood polish (for wood cabinets) or appropriate cleaner for painted/laminate surfaces
Process:
- Clean as per Step 1 above.
- Apply Polish: For wood cabinets, apply a small amount of wood polish to a clean cloth. Rub it into the wood in the direction of the grain. Buff with a separate clean cloth until shiny.
- For Painted Cabinets: Use a specialized cabinet cleaner or a damp microfiber cloth. Avoid abrasive cleaners that can damage the paint.
- For Laminate/Melamine: Use a soft cloth with a mild cleaner. Avoid harsh chemicals that can damage the surface.
This method is excellent for maintaining the existing finish and is a part of routine cabinet cleaning and polishing.
Method 2: Kitchen Cabinet Repair and Refinishing
If your cabinets have minor damage like scratches, scuffs, or faded finishes, refinish cabinets might be the perfect solution. This involves preparing the surface and applying a new coat of stain or paint.
Step 2.1: Surface Preparation for Refinishing
This is the most critical step for a professional-looking finish.
Essential Tools for Preparation:
- Screwdriver (for hardware removal)
- Medium-grit sandpaper (100-150 grit)
- Fine-grit sandpaper (180-220 grit)
- Sanding block or orbital sander
- Tack cloths
- Wood filler (if needed)
- Putty knife
- Primer (if painting)
- Wood conditioner (if staining)
Detailed Preparation Steps:
-
Repair Minor Imperfections:
- Scratches: For light scratches, rubbing with a furniture polish or a matching crayon can often hide them. Deeper scratches can be filled with wood filler. Apply the filler with a putty knife, pressing it into the scratch. Let it dry completely, then sand it smooth.
- Dents: Similar to scratches, small dents can sometimes be raised with a damp cloth and a hot iron (place the damp cloth over the dent and apply the iron briefly). For deeper dents, use wood filler.
-
Sanding:
- Purpose of Sanding: Sanding removes the old finish, creates a uniform surface, and provides “tooth” for the new finish to adhere to.
- Initial Sanding: Start with medium-grit sandpaper (100-150 grit) to remove the existing finish, working in the direction of the wood grain. If using an orbital sander, keep it moving to avoid creating divots.
- Finer Sanding: Once the old finish is removed or heavily scuffed, switch to fine-grit sandpaper (180-220 grit). This smooths the surface and prepares it for the new finish. For painted cabinets, you might need to sand between coats of primer and paint as well.
- Hand Sanding: Use a sanding block for flat surfaces and edges to ensure an even finish. For details and carvings, use folded sandpaper or specialized sanding sponges.
-
Cleaning After Sanding:
- Use a vacuum cleaner with a brush attachment to remove most of the dust.
- Wipe down all surfaces with a tack cloth. Tack cloths are slightly sticky and effectively pick up fine dust particles that vacuuming might miss.
-
Applying Wood Conditioner (if staining):
- Wood conditioner helps to ensure an even stain absorption, especially on woods like pine or maple, which can blotch. Apply according to the product’s instructions and allow it to penetrate.
Step 2.2: Applying the New Finish
This is where your cabinets start to transform.
What You’ll Need:
- Chosen finish (stain, paint, or varnish)
- High-quality brushes (for detailed work)
- Foam rollers or brushes (for flat surfaces)
- Clean, lint-free cloths
- Painter’s tape (for masking)
- Drop cloths
Refinishing Process:
-
Priming (if painting):
- Apply a thin, even coat of primer. Primer helps the paint adhere better, covers imperfections, and provides a uniform base color.
- Allow the primer to dry completely according to the manufacturer’s instructions.
- Lightly sand with fine-grit sandpaper (220 grit) after the primer dries and wipe with a tack cloth. This creates a smoother surface for the paint.
-
Applying Stain (for wood cabinets):
- Apply the stain evenly with a brush or cloth, working in the direction of the wood grain.
- Allow the stain to penetrate for the time recommended on the product label (usually 5-15 minutes).
- Wipe off the excess stain with a clean cloth, again following the grain.
- Allow the stain to dry completely. You may need to apply a second coat for deeper color.
-
Applying Paint:
- Stir the paint thoroughly. Do not shake.
- Apply thin, even coats. It’s better to apply multiple thin coats than one thick coat.
- Use a brush for corners and edges and a foam roller or brush for larger flat areas.
- Allow each coat to dry completely before applying the next.
- Lightly sand between coats with very fine-grit sandpaper (320 grit or higher) and wipe with a tack cloth for a smoother finish.
-
Applying Top Coat (Sealer/Varnish):
- Once the stain or paint is fully dry, apply a protective top coat (polyurethane, varnish, or lacquer). This protects the finish from wear and moisture.
- Apply 2-3 thin coats, allowing each to dry and lightly sanding between coats with fine-grit sandpaper (320 grit) and cleaning with a tack cloth.
- Important: Ensure good ventilation when working with finishes and wear a respirator mask.
This process is often referred to as cabinet painting or cabinet staining and is a significant part of wood cabinet restoration.
Method 3: Cabinet Resurfacing (Covering and Overlaying)
Cabinet resurfacing offers an alternative when the existing cabinet fronts are damaged beyond simple repair or when you desire a completely different look without extensive sanding and refinishing of the original material. This can involve applying a new laminate, veneer, or even a specialized contact paper.
Options for Cabinet Resurfacing:
- Contact Paper/Vinyl Wraps: These are adhesive sheets that come in various finishes (wood grain, solid colors, textures).
- Pros: Relatively inexpensive, easy to apply, wide variety of styles.
- Cons: Can be less durable than traditional finishes, may peel over time, especially in high-moisture areas or with heavy use.
- Veneer Overlays: Thin sheets of real wood can be adhered to existing cabinet fronts.
- Pros: Creates a genuine wood look, can be stained or painted.
- Cons: Requires careful application to avoid bubbles and creases, can be more expensive than vinyl.
- Wood Panels/Moulding: Adding decorative wood panels or moulding can update the look of flat cabinet doors.
- Pros: Adds dimension and style, relatively easy to install.
- Cons: Requires precise cutting and attachment, needs to be painted or stained to match.
Basic Steps for Applying Contact Paper/Vinyl Wraps:
- Clean and Dry: Ensure cabinet surfaces are spotless and dry.
- Measure and Cut: Measure the cabinet door or drawer front and cut the vinyl wrap with an overlap.
- Peel and Stick: Peel back a small portion of the backing paper. Carefully align the vinyl with the edge of the cabinet and begin smoothing it down with a squeegee or credit card.
- Smooth and Trim: Gradually peel the backing while smoothing the vinyl with the squeegee, working out any air bubbles as you go. Trim excess vinyl with a sharp craft knife.
- Edges and Corners: Wrap the vinyl around the edges and use a hairdryer on a low setting to make it more pliable for tighter corners.
This method is a great way to achieve a dramatic kitchen cabinet makeover without the intensive labor of sanding and staining.
Method 4: Cabinet Painting
Cabinet painting is a popular DIY project for a significant kitchen update. It allows for a complete color change and can hide minor imperfections.
Step 4.1: Ensuring a Flawless Paint Job
This involves meticulous preparation and application.
Tools and Materials for Painting:
- Screwdriver
- Degreaser and cleaner
- Sandpaper (100-220 grit)
- Sanding block or orbital sander
- Wood filler
- Putty knife
- Tack cloths
- Primer (high-quality bonding primer is recommended for cabinets)
- Cabinet-grade paint (enamel or latex)
- High-quality brushes (angled sash brush for details)
- Foam rollers (for smooth finishes)
- Paint tray
- Painter’s tape
- Drop cloths
- Respirator mask
The Cabinet Painting Process:
- Complete Preparation: Follow all the steps outlined in Method 2, Step 2.1 (Cleaning, Hardware Removal, Repairing Imperfections, Sanding, Cleaning after Sanding).
- Apply Primer:
- Apply one or two coats of primer, ensuring each coat dries completely.
- Lightly sand between coats with 220-grit sandpaper and wipe with a tack cloth.
- Paint Application:
- Apply thin, even coats of your chosen cabinet paint.
- Start with edges and details using a brush, then move to larger surfaces with a foam roller. Avoid overworking the paint.
- Allow ample drying time between coats (check paint can for recommendations).
- Lightly sand with 320-grit sandpaper between coats for the smoothest finish, wiping with a tack cloth each time.
- Typically, two to three coats of paint are needed for full coverage and durability.
- Curing Time: Be aware that paint takes time to fully cure, which is when it reaches its maximum hardness and durability. Avoid heavy use of cabinets for at least 7-14 days after painting, even if the surface feels dry.
This DIY approach can significantly improve the aesthetic of your kitchen, making it a rewarding DIY cabinet restoration project.
Refurbishing Cabinets: Beyond the Basics
Refurbish kitchen cabinets can also involve more specialized techniques to address specific issues or achieve unique looks.
Replacing Cabinet Doors and Drawer Fronts
If your cabinet boxes are in good shape but the doors and drawer fronts are beyond repair or you simply want a new style, replacing them is a viable option.
Considerations for Replacement:
- Style: Choose doors that complement your kitchen’s overall design.
- Material: Match or complement the existing cabinet box material.
- Construction: Decide between solid wood, MDF, or plywood doors.
- Measuring: Accurate measurements are crucial for a perfect fit. Measure the existing door sizes precisely.
Adding or Replacing Hardware
New knobs and pulls can instantly update the look of your cabinets and are a simple part of kitchen cabinet repair or a kitchen cabinet makeover.
Choosing New Hardware:
- Style: Modern, traditional, rustic, minimalist – the options are endless.
- Finish: Chrome, brushed nickel, brass, black, oil-rubbed bronze are popular choices.
- Function: Ensure the hardware is comfortable to grip and use.
- Installation: Most hardware attaches with screws. Ensure the hole spacing matches your existing holes or be prepared to drill new ones.
Drawer Slide and Hinge Upgrades
Worn-out drawer slides and hinges can make cabinets difficult to open and close. Upgrading to modern, soft-close mechanisms can significantly improve functionality and user experience.
Maintaining Your Restored Cabinets
Once you’ve put in the effort to restore your cabinets, proper maintenance will ensure they stay beautiful for years to come.
Routine Cleaning
- Wipe down surfaces regularly with a soft, damp cloth to remove dust and minor spills.
- Address spills immediately to prevent staining or damage.
Deep Cleaning and Polishing Schedule
- Perform a more thorough cleaning and polishing every 3-6 months, depending on usage.
- Use specialized cabinet cleaners appropriate for your cabinet’s finish.
- For wood cabinets, a quality furniture polish will help maintain the shine and protect the wood.
Protecting Against Damage
- Avoid placing hot items directly on cabinet surfaces.
- Be mindful of abrasive cleaners or scrubbing pads that can scratch finishes.
- Ensure good ventilation in the kitchen to minimize moisture buildup, which can damage finishes over time.
Frequently Asked Questions About Kitchen Cabinet Restoration
Q: How long does it take to restore kitchen cabinets?
A: The time required varies greatly depending on the method chosen and the condition of the cabinets. A deep clean and polish might take a few hours, while a full sanding, staining, and sealing process could take several days to a week, including drying times between coats.
Q: Can I paint over stained cabinets?
A: Yes, you can paint over stained cabinets, but proper preparation is essential. This involves cleaning, degreasing, sanding to create a surface the primer can adhere to, and then applying a quality primer before painting.
Q: What is the best finish for kitchen cabinets?
A: The “best” finish depends on your preferences and lifestyle. For durability and moisture resistance, a high-quality polyurethane or a cabinet-specific enamel paint is often recommended. For a natural wood look, a durable stain followed by multiple coats of a protective topcoat is ideal.
Q: Do I need to remove cabinet doors for refinishing?
A: While you can refinish cabinets with doors on, it’s highly recommended to remove them. This allows for more thorough cleaning, sanding, and even application of finishes on all sides, including edges and interiors if desired.
Q: How do I repair a deep scratch in a wood cabinet?
A: For deep scratches, you’ll need to use a wood filler. Choose a filler that matches your wood tone or can be stained. Apply it with a putty knife, overfilling slightly, let it dry completely, then sand it smooth with progressively finer grits of sandpaper until it’s flush with the surrounding wood. You may need to re-stain or re-paint the area to match.
Q: Is cabinet resurfacing a good option?
A: Cabinet resurfacing can be an excellent option if your existing cabinet boxes are in good condition but the doors and drawer fronts are damaged, outdated, or you simply want a new look without the cost and effort of a full replacement. It’s also a quicker alternative to traditional refinishing in some cases.
Restoring your kitchen cabinets is a rewarding way to transform your kitchen’s appearance and functionality. With the right approach and a bit of elbow grease, you can achieve a beautiful, refreshed look that you’ll enjoy for years to come.