
Do you find your kitchen shears struggling to cut through herbs, packaging, or even chicken bones? The answer to “Can I sharpen kitchen shears at home?” is a resounding yes! You don’t need to be a culinary expert or a seasoned DIYer to bring your dull blades back to life. Sharpening kitchen scissors is a straightforward process that can dramatically improve your kitchen efficiency and safety.
This comprehensive guide will walk you through various kitchen shear sharpening methods, ensuring you can find the best way to sharpen kitchen shears for your needs. We’ll cover everything from simple DIY techniques to using specialized tools, helping you tackle sharpening dull kitchen scissors and master how to maintain kitchen shears for long-lasting performance. Whether you’re sharpening knife shears, sharpening poultry shears, or simply aiming for sharp blades kitchen shears need, this article has you covered.
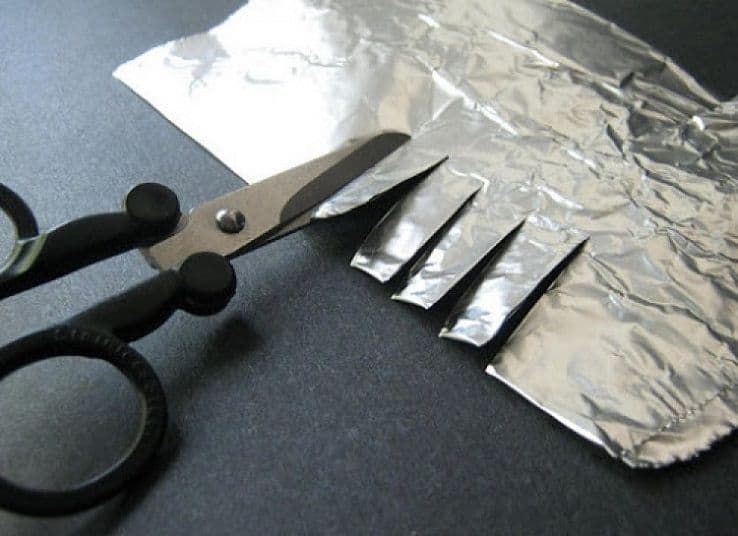
Image Source: static.thedaringkitchen.com
Why Sharpen Your Kitchen Shears?
Your trusty kitchen shears are more than just scissors; they’re versatile tools designed for a multitude of tasks. From snipping herbs and trimming fat to opening stubborn packaging and deboning poultry, their utility in the kitchen is immense. However, like any blade, their sharpness diminishes with regular use.
Using dull kitchen shears isn’t just frustrating; it can be dangerous.
- Inefficiency: Dull blades require more force, leading to less precise cuts. This can result in squashed herbs, torn packaging, and unevenly cut ingredients.
- Increased Risk of Injury: When you have to force a dull blade, it’s more likely to slip, potentially causing cuts or nicks. Sharp blades glide through materials with ease, reducing the chance of accidents.
- Damage to Food: Squashed herbs lose their fresh flavor and vibrant appearance. Torn packaging can spill contents. Dull blades can crush delicate ingredients.
- Reduced Lifespan of Shears: Constantly forcing dull blades can put undue stress on the pivot and the blades themselves, potentially shortening their lifespan.
Regular sharpening ensures your kitchen shears remain effective, safe, and ready for any culinary challenge.
Identifying Dull Kitchen Shears
Before you start sharpening, it’s helpful to know if your kitchen shears actually need it. Here are some tell-tale signs:
- Tearing Instead of Cutting: If your shears are tearing through paper or herbs rather than making clean cuts, they’re dull.
- Needing Excessive Force: If you find yourself pressing down hard to make a simple cut, the blades have lost their edge.
- Crushing Herbs: Fresh herbs should be cleanly snipped. If they get crushed or bruised, your shears are likely dull.
- Difficulty Cutting Through Packaging: Trying to open plastic packaging or tough food wrappers with dull shears is a common, frustrating experience.
- Visible Nicks or Imperfections on the Blade: While these might not be the sole indicator of dullness, nicks can hinder a clean cut.
Kitchen Shear Sharpening Methods: A Comprehensive Look
There are several effective ways to sharpen your kitchen shears at home. The best method often depends on the tools you have available and your comfort level.
H3: The Foil Method: A Quick Fix for Minor Dullness
This is perhaps the simplest and quickest way to refresh your kitchen shears. It’s ideal for minor dullness and for a quick touch-up.
H4: What You’ll Need:
- Aluminum foil (heavy-duty is best)
- Your kitchen shears
H4: Steps:
- Prepare the Foil: Take a sheet of aluminum foil, about 12-18 inches long. Fold it over two or three times to create a thicker strip. This layering gives the blades something more substantial to cut through.
- Make the Cuts: Hold the folded foil securely with one hand. With the other hand, carefully insert the blades of your kitchen shears into the foil. Make several clean, deliberate cuts through the foil, as if you were chopping herbs.
- Repeat: Continue cutting through the foil for about 5-10 minutes. This process helps to hone and realign the microscopic edge of the blades.
- Clean Up: After sharpening, wipe down your shears with a damp cloth to remove any tiny metal shavings or residue.
H5: Benefits of the Foil Method:
- Fast and Easy: Requires no special equipment.
- Accessible: Most households have aluminum foil.
- Good for Maintenance: Excellent for keeping blades sharp between more intensive sharpening sessions.
H5: Limitations of the Foil Method:
- Not for Severely Dull Blades: This method is best for light touch-ups. It won’t significantly sharpen blades that are very dull or damaged.
- Potential for Small Debris: Although minimal, tiny metal shavings can be produced.
H3: The Glass Jar Method: Another Simple DIY Approach
Similar to the foil method, this technique uses a common household item to hone your blades.
H4: What You’ll Need:
- A clean glass jar with a relatively smooth rim (like a jam jar or pickle jar)
- Your kitchen shears
H4: Steps:
- Secure the Jar: Place the glass jar on a stable, non-slip surface.
- Position the Blades: Open your kitchen shears. Carefully place the edge of one blade against the rim of the glass jar.
- Make the Cuts: Slowly and gently move the blade along the rim, as if you were trying to “cut” the glass. Repeat this motion several times, making sure to cover the entire length of the blade.
- Sharpen the Other Blade: Turn the shears around and repeat the process on the other blade.
- Test and Clean: Test your shears on a piece of paper. If they still struggle, repeat the process. Wipe your shears clean afterward.
H5: Benefits of the Glass Jar Method:
- Readily Available: Uses an everyday item.
- Simple Execution: Easy to perform with minimal effort.
- Effective for Light Honing: Can help realign slightly dulled edges.
H5: Limitations of the Glass Jar Method:
- Risk of Breakage: While low, there’s a slight risk of the glass jar breaking if too much pressure is applied. Always use a sturdy jar.
- Limited Effectiveness: Like the foil method, this is best for maintaining sharpness rather than restoring a dull edge.
H3: Using a Kitchen Scissor Sharpener
For more significant dullness or for those who want a more precise sharpening experience, a dedicated kitchen scissor sharpener is a worthwhile investment. These tools are specifically designed to create a consistent and effective edge.
H4: Types of Kitchen Scissor Sharpeners:
- V-Slot Sharpeners: These often have angled slots where you insert the blade. As you pull the shears through, abrasive materials within the slots hone the edge. Many are designed with protective guards to prevent accidental cuts.
- Rod-Type Sharpeners: Similar to knife sharpeners, these use rods (often diamond-coated or ceramic) that you can angle to match the bevel of your shear blades. This offers more control but requires a bit more practice.
- Electric Sharpeners: These are the most convenient but also the most expensive. They have pre-set angles and automated sharpening stages, making it very easy to achieve sharp blades.
H4: General Steps for Using a Kitchen Scissor Sharpener (V-Slot Type):
- Read the Instructions: Always start by reading the manufacturer’s instructions for your specific sharpener.
- Secure the Sharpener: Place the sharpener on a stable surface. Some have rubber feet for grip.
- Position the Blade: Identify the slot for sharpening. Open your kitchen shears and insert one blade into the designated slot. Ensure the blade is flush against the sharpening surface.
- Pull Through: With firm, consistent pressure, pull the blade through the sharpener. Do this several times, usually in one direction.
- Repeat for Other Blade: Turn the shears and sharpen the second blade in the same manner.
- Test and Clean: Test the sharpness on paper. Wipe down your shears to remove any residue.
H5: Benefits of Dedicated Sharpeners:
- Effective Sharpening: Designed to create a proper, lasting edge.
- Consistent Results: Especially true for V-slot and electric models.
- Safer: Often incorporate safety features to protect your hands.
H5: Considerations for Dedicated Sharpeners:
- Cost: Can be more expensive than DIY methods.
- Learning Curve: Some types, like rod sharpeners, may require practice.
H3: Sharpening with a Whetstone (The Artisan Approach)
For those who enjoy a more hands-on, traditional approach, a whetstone can be used to sharpen kitchen shears. This method offers the most control and can achieve exceptional sharpness, but it requires patience and practice. This is a method that can be used for sharpening knife shears as well.
H4: What You’ll Need:
- A whetstone (combination stones with coarse and fine grits are ideal)
- Water or honing oil (depending on the stone type)
- A stable surface
- A clean towel
- Your kitchen shears
H4: Steps:
- Prepare the Whetstone: If using a water stone, soak it according to the manufacturer’s instructions until it stops releasing bubbles. If using an oil stone, apply a few drops of honing oil.
- Stabilize the Stone: Place the whetstone on a damp cloth or a non-slip mat to prevent it from moving.
- Disassemble the Shears (Optional but Recommended): For the best results, carefully disassemble your kitchen shears. This allows you to access each blade individually at its natural angle. There is usually a screw or bolt holding them together.
- Find the Bevel Angle: Identify the angled edge (the bevel) on one side of the blade. For most kitchen shears, this angle is around 15-20 degrees. You can use a sharpening angle guide or simply try to match the existing angle.
- Sharpen the First Blade:
- Place the bevel of the blade flat against the whetstone at the correct angle.
- Using moderate pressure, draw the blade across the stone in a smooth, sweeping motion from heel to tip.
- Lift the blade and return it to the starting position. Repeat this motion for 10-15 strokes.
- Flip the blade over and repeat the process on the other side of the bevel (this is called the “back stroke” or “burr removal”).
- Switch to the finer grit side of the whetstone and repeat the sharpening and burr removal steps for a few strokes on each side to refine the edge.
- Sharpen the Second Blade: Repeat the entire process for the other blade.
- Reassemble and Test: Carefully reassemble the shears. Test the sharpness by cutting a piece of paper or a tomato.
- Clean and Maintain: Clean the blades and the whetstone thoroughly. Allow the whetstone to dry completely before storing it.
H5: Benefits of Using a Whetstone:
- Superior Sharpness: Can achieve the sharpest possible edge.
- Full Control: You control the angle and pressure, allowing for precision.
- Versatility: Can be used for knives and other bladed tools.
H5: Challenges of Using a Whetstone:
- Steep Learning Curve: Requires practice to master the correct angles and techniques.
- Time-Consuming: Takes longer than other methods.
- Requires Specific Tools: You need to purchase a whetstone and potentially angle guides.
H3: Sharpening Poultry Shears: Special Considerations
Sharpening poultry shears often requires a bit more attention due to their robust design and the tasks they perform. Many poultry shears have a serrated edge on one blade and a smooth edge on the other, and some even include features like a nutcracker or bone-cutting notch.
- Serrated Edges: Sharpening serrations is tricky. Ideally, you would use a ceramic honing rod or a fine-grit sharpening stone and try to match the angle of each individual serration. However, for most home users, it’s often sufficient to gently hone the smooth edge and use the serrated edge for its intended grip-and-cut function without intensive sharpening, as it’s designed to cut through fibrous materials. If the serrations are truly dull, professional sharpening might be a better option to avoid damaging them.
- Bone Notches: These are not for sharpening but for leverage. Keep them clean and free of debris.
- Robust Construction: Poultry shears are built to be strong, so they can handle tougher materials. Ensure your sharpening method can cope with slightly thicker blades.
When sharpening kitchen shears that are specifically designed for poultry, focus on maintaining the integrity of the smooth blade. For the serrated blade, gentle honing with a ceramic rod is usually sufficient for home maintenance.
How to Maintain Kitchen Shears for Longevity
Sharpening is only part of the equation. Proper maintenance will keep your kitchen shears performing well for years.
H4: Cleaning After Each Use
This is crucial for preventing rust and buildup.
- Hand Wash Only: Never put kitchen shears in the dishwasher. The high heat, harsh detergents, and prolonged water exposure can dull the blades, loosen the pivot screw, and cause rust.
- Use Warm, Soapy Water: Wash them immediately after use with warm water and mild dish soap.
- Dry Thoroughly: Use a clean, dry towel to dry the blades and handles completely. Pay special attention to the pivot area, as moisture can linger there.
H4: Oiling the Pivot
A little lubrication goes a long way.
- Apply Food-Grade Mineral Oil: A drop or two of food-grade mineral oil applied to the pivot point can ensure smooth operation and prevent corrosion.
- Wipe Away Excess: After applying oil, open and close the shears a few times to distribute it, then wipe away any excess oil.
H4: Storage
Proper storage prevents damage and accidental dulling.
- Blade Guards: If your shears came with a blade guard, use it! It protects the blades from accidental contact with other items in a drawer.
- Dedicated Drawer or Block: Store your shears in a way that prevents them from banging against other utensils. A dedicated slot in a knife block or a separate compartment in a drawer works well.
H4: Occasional Deep Cleaning
For tougher grime or dried-on food:
- Baking Soda Paste: Mix baking soda with a little water to form a paste. Apply it to any stubborn residue, let it sit for a few minutes, then gently scrub with a soft brush or cloth. Rinse and dry thoroughly.
- Vinegar Soak (for Stainless Steel Only): For stainless steel shears with minor rust spots, a short soak (5-10 minutes) in white vinegar can help lift the rust. Rinse and dry immediately and thoroughly afterward. Avoid this for carbon steel or coated blades, as vinegar can cause damage.
Frequently Asked Questions About Sharpening Kitchen Shears
H5: What is the best way to sharpen kitchen shears?
The “best” way depends on your needs. For quick touch-ups, the foil or glass jar methods work well. For more effective and lasting sharpness, a dedicated kitchen scissor sharpener is recommended. For ultimate precision, a whetstone offers the best results but requires practice.
H5: How often should I sharpen my kitchen shears?
This depends on how frequently you use them and what you use them for. If you notice them struggling with tasks they used to handle easily, it’s time to sharpen. For light home use, sharpening might be needed every few months. For heavy-duty kitchen tasks, you might need to sharpen them more often.
H5: Can I sharpen serrated kitchen shears?
Yes, but it’s more challenging. You ideally need a ceramic rod or a very fine-grit stone that can fit the angle of each serration. For most home users, gentle honing of the smooth blade and careful use of the serrated blade is sufficient. If your serrated blades are very dull, professional sharpening might be the best solution to avoid damaging the serrations.
H5: Do I need to disassemble my kitchen shears to sharpen them?
It’s not always necessary, especially for simpler sharpening methods like the foil or dedicated sharpeners. However, for whetstone sharpening, disassembling the shears allows you to access each blade at its individual bevel, leading to a more precise and effective sharpening job.
H5: How do I know if I’m sharpening at the correct angle?
For most kitchen shears, the bevel angle is typically between 15 and 20 degrees. You can often tell by looking at the existing bevel on the blade. Angle guides are available for whetstones, and many dedicated sharpeners have pre-set angles that ensure you’re sharpening correctly. Consistent angle is more important than hitting an exact number if you’re unsure.
By following these methods and maintenance tips, you can ensure your kitchen shears remain sharp, efficient, and a pleasure to use for all your culinary endeavors. Say goodbye to dull blades and hello to effortless cutting!