
Can you stain kitchen cabinets darker? Yes, you absolutely can! Refinishing kitchen cabinets to a darker shade is a popular and achievable DIY project that can dramatically transform your kitchen’s look. This guide will walk you through the entire process, from choosing the right stain to applying the finishing touches. You’ll learn how to achieve a beautiful, professional-looking result without the hefty price tag of professional refinishing.
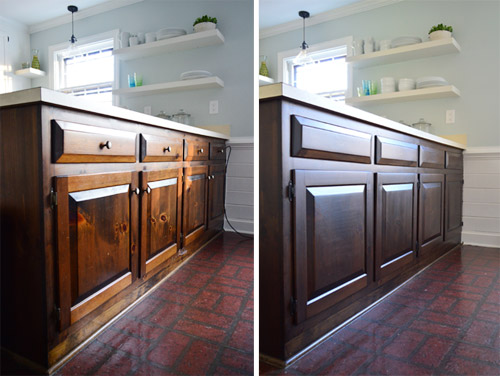
Image Source: images.younghouselove.com
Why Darken Your Kitchen Cabinets?
Darkening kitchen cabinets offers a sophisticated and modern aesthetic. Dark wood tones can add warmth, depth, and a sense of luxury to any kitchen space. They provide a beautiful contrast to lighter countertops, backsplashes, and walls, making the entire room pop. For those looking to update their kitchen on a budget, refinishing kitchen cabinets dark is an excellent way to achieve a high-impact makeover.
Benefits of a Darker Cabinet Finish:
- Modern Appeal: Darker stains create a contemporary and chic look.
- Visual Depth: They add richness and dimension to your kitchen.
- Contrast and Accent: Dark cabinets can highlight other kitchen features.
- Durability: A well-stained and sealed cabinet is resilient to daily wear and tear.
- Cost-Effective Update: Significantly cheaper than replacing cabinets.
Planning Your Cabinet Refinishing Project
Before you dive in, thorough planning is key to a successful DIY cabinet staining project. This involves selecting the right materials, understanding the scope of work, and preparing your workspace.
Choosing Your Dark Wood Stain:
The best dark wood stain for kitchen cabinets will depend on the existing wood type, your desired finish, and the overall style of your kitchen.
Types of Wood Stains:
- Oil-Based Stains: These penetrate wood deeply, offering rich color and durability. They are excellent for how to deepen wood color. They typically require mineral spirits for cleanup and have a longer drying time.
- Water-Based Stains: These dry faster and are easier to clean up with soap and water. They may not penetrate as deeply as oil-based stains but offer good color saturation.
- Gel Stains: These are thicker and sit on top of the wood, making them ideal for surfaces that have been previously finished or for creating a layered look. They are forgiving and don’t require extensive wood stripping. This is often a go-to for dark wood cabinet stain applications on existing finishes.
- Dye Stains: These are translucent and add color without obscuring the wood grain. They are good for enhancing the natural beauty of the wood.
Factors to Consider When Selecting a Stain:
- Wood Type: Different woods absorb stain differently. Oak and maple are popular choices for staining.
- Existing Finish: If your cabinets have a thick, glossy finish, a gel stain might be easier to work with.
- Desired Shade: Look at stain samples on a piece of scrap wood to see how the color appears.
- Durability: For kitchen cabinets, a durable stain is essential.
Gathering Your Supplies:
Having all your tools and materials ready before you start the cabinet staining process will save you time and frustration.
Essential Tools and Materials:
- Screwdriver or Drill: To remove cabinet doors and hardware.
- Sanding Sponges or Sandpaper: Various grits (e.g., 100, 150, 220) for preparation.
- Tack Cloth: For removing dust.
- Disposable Gloves: To protect your hands.
- Safety Glasses: To protect your eyes.
- Respirator Mask: Especially important when sanding or using solvent-based stains.
- Painter’s Tape: For masking off areas not to be stained.
- Drop Cloths or Plastic Sheeting: To protect your floors and surrounding areas.
- Wood Cleaner/Degreaser: To clean the cabinet surfaces.
- Wood Conditioner (Optional but Recommended): Helps ensure even stain absorption, especially on softer woods.
- Your Chosen Dark Wood Stain: Ample supply for the number of cabinets.
- Foam Brushes or High-Quality Natural Bristle Brushes: For applying stain.
- Lint-Free Rags: For wiping off excess stain.
- Polyurethane or Clear Topcoat: For protection and durability.
- Applicator for Topcoat: Foam brushes or specialized applicators.
Step-by-Step Guide to Staining Kitchen Cabinets Darker
The cabinet staining process involves several crucial stages, each contributing to the final, beautiful finish. Follow these steps carefully for optimal results.
Step 1: Preparation is Paramount (Prep Work for Cabinet Staining)
This is arguably the most critical step in refinishing kitchen cabinets dark. Proper preparation ensures the stain adheres well and the finish is smooth and even.
Removing Cabinet Doors and Hardware:
- Label Everything: As you remove each door and drawer front, label it with a piece of painter’s tape and a number corresponding to its location. This makes reassembly much easier.
- Store Hardware: Keep all screws, hinges, and knobs in labeled bags so you don’t mix them up.
- Remove Doors and Drawers: Use a screwdriver or drill to carefully detach the doors and drawer fronts.
Cleaning the Cabinet Surfaces:
- Degrease Thoroughly: Kitchen cabinets accumulate grease and grime. Use a good quality degreaser or a solution of TSP (Trisodium Phosphate) or a TSP substitute and water. Wear gloves and ensure good ventilation.
- Wipe Down: After degreasing, wipe all surfaces with a clean, damp cloth to remove any residue from the cleaner. Allow them to dry completely.
Sanding for Adhesion:
Sanding removes the existing finish and creates a smooth surface for the new stain to adhere to.
- Start with Medium Grit: Begin with 100 or 120-grit sandpaper or sanding sponges. Sand all surfaces of the cabinet doors, drawer fronts, and the cabinet frames. Sand in the direction of the wood grain.
- Progress to Finer Grits: Follow up with 150-grit, and then 220-grit sandpaper. This creates a smooth surface that will readily accept the stain.
- Hand Sanding vs. Power Sanding: For cabinet doors and drawer fronts, hand sanding or using a small orbital sander is effective. For cabinet frames, a power sander can speed up the process, but be careful not to oversand and remove too much material.
- Edge and Detail Sanding: Use sanding sponges or folded sandpaper to get into corners and edges.
Dust Removal:
- Vacuum: After sanding, vacuum all surfaces to remove loose dust.
- Tack Cloth: Wipe down every surface with a tack cloth. Tack cloths are sticky and effectively pick up fine dust particles that vacuuming might miss. Ensure no dust remains, as it will mar your final finish.
Step 2: Applying the Wood Stain
This is where the magic happens, transforming your cabinets with a new, darker hue.
Applying Wood Stain to Cabinets:
- Test Your Stain: Always test your dark wood cabinet stain on a scrap piece of wood that is similar to your cabinet material, or on an inconspicuous area of a cabinet door (like the back). This allows you to see the true color and practice your application technique.
- Apply the Stain:
- Method: Use a high-quality natural bristle brush or a foam brush. For larger flat areas, a foam roller can also work.
- Technique: Apply the stain liberally in the direction of the wood grain. Work in small sections to avoid the stain drying before you can wipe it off.
- Wipe Off Excess Stain:
- Timing: After allowing the stain to penetrate for the time recommended on the product label (typically 5-15 minutes), use a clean, lint-free rag to wipe off the excess stain.
- Direction: Always wipe in the direction of the wood grain.
- Evenness: Ensure you wipe away all excess stain evenly. If you leave puddles or uneven patches, it will result in a blotchy finish.
- Achieving Deeper Color: To achieve a darker finish or how to deepen wood color further, you can apply a second coat of stain. Allow the first coat to dry completely (check product instructions, usually 24 hours for oil-based stains), then lightly sand with 220-grit sandpaper, wipe with a tack cloth, and apply the second coat as before.
Using Gel Stain for Darkening Kitchen Cabinets:
Gel stains are often favored for their ease of use and ability to provide a rich, opaque finish.
- Application: Apply gel stain with a foam brush or a quality synthetic brush. Work in small sections, applying a thin, even coat.
- Wiping: Wipe off the excess with a lint-free rag, just as you would with traditional stain. The amount of time you leave the stain on before wiping dictates the depth of color.
- Multiple Coats: For a very dark finish, multiple thin coats are often better than one thick coat. Allow each coat to dry completely before applying the next.
Step 3: Applying the Protective Topcoat
A topcoat is crucial for protecting your stained cabinets from moisture, stains, and daily wear.
Choosing a Topcoat:
- Polyurethane: Available in oil-based and water-based. Oil-based poly offers a warm, amber tone and is very durable. Water-based poly dries clear and is lower in VOCs.
- Varnish: Also provides excellent protection and can offer a range of sheens.
- Lacquer: Dries very quickly and provides a hard finish, but requires good ventilation and spray application for best results.
For DIYers, polyurethane is often the most accessible and forgiving option. Consider a satin or semi-gloss finish for kitchen cabinets, as high-gloss can show imperfections.
Applying the Topcoat:
- Ensure Stain is Dry: The stain must be completely dry according to the manufacturer’s instructions before applying any topcoat. This is critical for the topcoat to adhere properly and not pull the stain.
- Apply Thin Coats: Apply thin, even coats of your chosen topcoat. Avoid applying it too thickly, as this can lead to drips and an uneven finish.
- Brush Strokes: If brushing, use long, smooth strokes in the direction of the wood grain. Lightly brush out any bubbles that form.
- Sanding Between Coats: After each coat of topcoat dries (usually 24 hours for polyurethane), lightly sand the surface with very fine-grit sandpaper (220 or 320-grit). This de-glosses the surface, allowing the next coat to adhere better and creates a smoother final finish.
- Tack Cloth After Sanding: Always wipe down the sanded surface with a tack cloth to remove all dust before applying the next coat of topcoat.
- Number of Coats: Apply at least 2-3 coats of topcoat for adequate protection in a kitchen environment.
Step 4: Reassembly
Once the final coat of topcoat is dry and cured (which can take several days to a week for full hardness), it’s time to reassemble.
- Reattach Hardware: Carefully reattach the hinges and knobs to the cabinet doors and drawer fronts.
- Rehang Doors and Drawers: Use your labels to place each door and drawer back in its original position.
- Clean Up: Dispose of all used materials properly and clean your workspace.
Alternative Methods for Darkening Cabinets
While staining is the most common method, other techniques can achieve a darker look. These kitchen cabinet refinishing techniques offer different aesthetics and suitability depending on your cabinets.
Painting Cabinets a Dark Color:
If your cabinets are not suitable for staining or you prefer a solid, opaque look, painting is a great option.
- Advantages: Offers endless color possibilities, can cover imperfections, and can be a faster process than detailed staining for some.
- Process: Requires thorough cleaning, sanding, priming with a high-quality bonding primer, and applying multiple thin coats of durable cabinet paint.
- Considerations: Paint can chip over time if not applied correctly with proper prep and topcoat.
Using Wood Dyes:
Wood dyes penetrate the wood more deeply than stains and are known for their clarity and intensity.
- Advantages: Can achieve very rich, deep colors, allows wood grain to show through beautifully.
- Process: Applied to bare wood after thorough sanding. Often requires a pre-stain wood conditioner.
- Considerations: Dyes are more translucent than stains, so imperfections in the wood will still be visible. Requires a protective topcoat.
Antiquing or Glazing:
These techniques add depth and character, often creating an aged or distressed look.
- Advantages: Adds visual interest and can hide minor flaws.
- Process: Typically involves applying a darker glaze over a stained or painted base coat, then wiping it off to highlight the grain and details.
- Considerations: This is more of a decorative finish and might not be the primary method for simply darkening kitchen cabinets, but it can be incorporated.
Maintaining Your Newly Stained Cabinets
Proper care will ensure your freshly refinished cabinets look great for years to come.
- Regular Cleaning: Wipe down cabinets with a soft, damp cloth regularly to remove dust and light grime.
- Avoid Harsh Chemicals: Do not use abrasive cleaners, ammonia-based products, or excessive water, as these can damage the finish.
- Address Spills Quickly: Wipe up any spills immediately to prevent them from staining or damaging the finish.
- Touch-Ups: Keep a small amount of your stain and topcoat for any minor nicks or scratches that may occur.
Troubleshooting Common Staining Issues
Even with the best intentions, you might encounter a few hiccups. Knowing how to address them can save your project.
Blotchy or Uneven Stain:
- Cause: Uneven wood porosity, lack of wood conditioner, or inconsistent stain application/wiping.
- Solution: For minor blotchiness, you might be able to lightly sand the area and reapply the stain, ensuring to use a wood conditioner first and wiping off excess evenly. For severe issues, you may need to strip the stain and start over.
Stain Too Light:
- Cause: Stain didn’t penetrate enough, or a second coat wasn’t applied.
- Solution: Apply a second coat of stain after the first has dried thoroughly. Lightly scuff sand with 220-grit sandpaper and wipe with a tack cloth between coats.
Stain Too Dark:
- Cause: Left the stain on too long, applied too thickly, or used a very dark pigment.
- Solution: If the stain is still wet, you can try wiping it off with a rag dampened with mineral spirits (for oil-based stains) or water (for water-based stains). If dry, you may need to lightly sand it down and reapply, or consider a glaze to lighten the tone.
Bubbles or Streaks in Topcoat:
- Cause: Applying topcoat too thickly, stirring the topcoat too vigorously (introduces air bubbles), or applying in a dusty environment.
- Solution: If caught while wet, you may be able to gently brush them out. If dry, you’ll need to sand the affected area smooth with fine-grit sandpaper and reapply a thin coat.
Frequently Asked Questions (FAQ)
Q1: Do I need to strip my cabinets completely before staining them darker?
A1: Not always. If your cabinets have a light-colored, intact finish, you can often clean, lightly sand, and then apply a gel stain or a darker oil-based stain directly. If the existing finish is damaged, peeling, or very dark, stripping may be necessary for a uniform result.
Q2: How many coats of stain do I need?
A2: This depends on the wood, the stain color, and your desired depth. It’s common to apply 2-3 coats to achieve a rich, dark finish. Always allow each coat to dry completely before applying the next, and consider lightly sanding between coats for better adhesion and a smoother finish.
Q3: Can I stain over an existing dark finish to make it even darker?
A3: It’s difficult to stain over an already dark finish and achieve a significantly darker, uniform look through staining alone. You might get a slightly deeper tone, but for a dramatic change from dark to darker, you might need to lighten the existing finish with a chemical stripper or heavy sanding first, or consider painting.
Q4: What’s the best way to apply dark wood stain for kitchen cabinets?
A4: The best way is to apply it in thin, even coats in the direction of the wood grain using a high-quality brush or foam applicator. Wipe off excess stain with a clean, lint-free rag, always wiping with the grain. Work in manageable sections.
Q5: How long does it take to stain kitchen cabinets?
A5: The entire process, including preparation, staining, drying time between coats, and applying topcoats, can take anywhere from a few days to a week or more, depending on how much time you can dedicate each day and the drying times of the products used.
Q6: Is it better to stain or paint kitchen cabinets?
A6: It depends on your desired look and the condition of your cabinets. Staining preserves and highlights the natural wood grain, offering a classic and warm look. Painting provides a solid color, allowing for more design flexibility and can hide imperfections. For darkening, staining often provides a richer, more nuanced result.
By following this comprehensive guide, you can confidently undertake the task of darkening kitchen cabinets yourself, breathing new life and style into your home’s heart. Enjoy your beautifully refinished kitchen!