
Yes, you can absolutely update laminate kitchen cabinets without replacing them! This guide will show you easy ways to achieve a fresh look on a budget, focusing on refinishing laminate cabinets and painting laminate kitchen cabinets for a stunning laminate cabinet makeover. We’ll cover resurfacing laminate cabinets, the importance of a good laminate cabinet primer, the best laminate cabinet paint options, and how to give your entire kitchen a kitchen cabinet refresh. We’ll also touch on laminate cabinet repair and updating cabinet surfaces with durable cabinet laminate coatings.
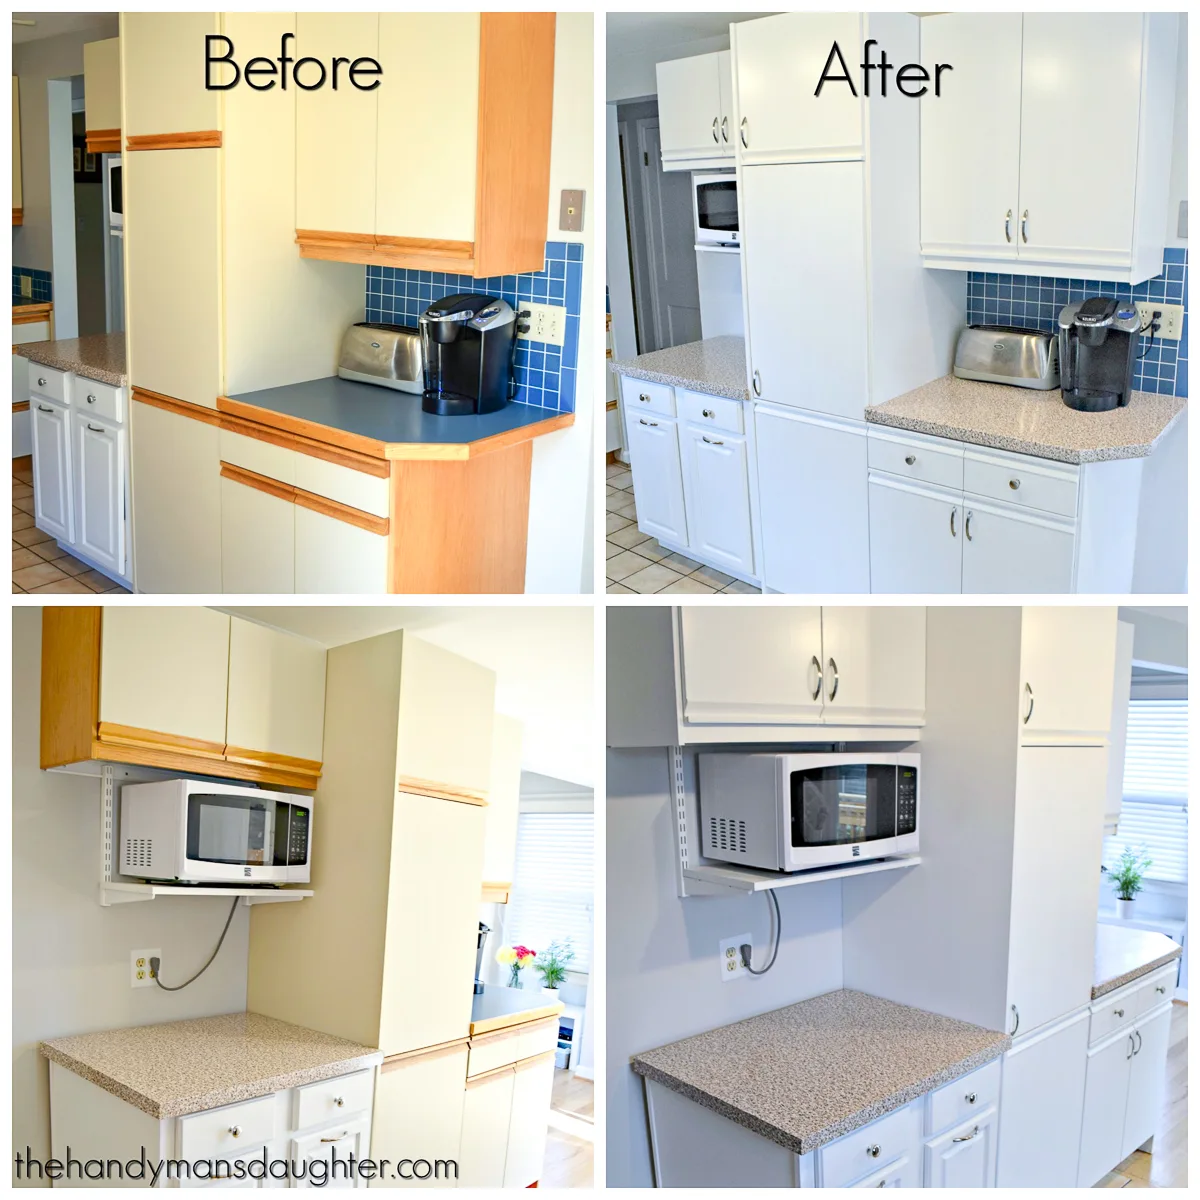
Image Source: www.thehandymansdaughter.com
Easy Ways to Update Laminate Kitchen Cabinets (Budget & Shine)
Are your laminate kitchen cabinets looking a bit tired? Don’t worry! You don’t need a huge budget or a complete remodel to give your kitchen a brand-new feel. Laminate cabinets, while often budget-friendly, can sometimes lack the high-end look of wood. But with a few simple techniques, you can transform them into a stylish centerpiece of your kitchen. This article will walk you through the most effective and affordable ways to achieve a beautiful laminate cabinet makeover, focusing on painting laminate kitchen cabinets and other updating cabinet surfaces methods that are both budget-friendly and deliver a fantastic shine.
Why Update Your Laminate Cabinets?
Laminate cabinets are popular for their affordability and ease of maintenance. However, over time, the color might fade, the finish can scratch, or the style might simply feel dated. Instead of investing in a costly replacement, consider the following benefits of updating your existing laminate cabinetry:
- Cost Savings: This is the biggest advantage. A full kitchen cabinet replacement can cost thousands of dollars. Updating existing cabinets is a fraction of that price.
- Time Efficiency: Many update methods are quicker than full cabinet replacement, meaning less disruption to your daily life.
- Environmental Friendliness: By updating rather than replacing, you reduce waste and your environmental footprint.
- Customization: You get to choose the exact color and finish you want, tailoring your kitchen to your personal style.
- Increased Home Value: A fresh, modern kitchen can significantly boost your home’s appeal and value.
Getting Started: Preparation is Key for a Successful Laminate Cabinet Makeover
Before you even think about paint or new hardware, meticulous preparation is crucial for any laminate cabinet makeover. Skipping this step is the most common reason for poor results when refinishing laminate cabinets.
Cleaning Your Laminate Cabinets Thoroughly
Dust, grease, and grime are the enemies of adhesion. You need a perfectly clean surface for any new coating to stick.
- Everyday Cleaning: For regular cleaning, use a soft cloth dampened with mild dish soap and water. Wipe down all surfaces, paying attention to areas around the handles and edges where grease tends to accumulate.
- Deep Cleaning for Grease Removal: For stubborn grease, a degreaser is your best friend. A mixture of TSP (trisodium phosphate) and water, or a dedicated cabinet degreaser, will cut through the toughest grime. Always follow product instructions and wear gloves and eye protection.
- Rinsing and Drying: After cleaning, wipe down all surfaces with a damp cloth to remove any residue from the cleaning solution. Then, dry thoroughly with a clean, lint-free cloth. Any moisture left behind can interfere with priming and painting.
Repairing Laminate Cabinet Damage
Before updating cabinet surfaces, assess them for any damage. Minor issues can often be fixed easily.
- Scratches and Dents: Small scratches can sometimes be buffed out with a melamine scratch repair pen or a touch-up marker that matches your cabinet’s current color. For deeper dents or chips, a wood filler or an epoxy putty designed for laminate can be used.
- Application: Apply the filler with a putty knife, slightly overfilling the damaged area.
- Drying: Allow the filler to dry completely according to the product’s instructions.
- Sanding: Once dry, gently sand the filled area smooth and flush with the surrounding surface using fine-grit sandpaper (around 220-grit).
- Peeling Laminate: If the laminate veneer is peeling away from the substrate, you might be able to glue it back down.
- Adhesive: Use a strong adhesive like a spray adhesive or a contact cement.
- Application: Carefully apply the adhesive to both the cabinet surface and the back of the peeling laminate.
- Bonding: Press the laminate back into place firmly. You can use clamps or heavy books to hold it down while the adhesive dries.
- Trimming: Trim any excess laminate with a sharp utility knife.
- Damaged Edges: Edges that are chipped or worn can be repaired with a specialized edge banding or a touch-up paint pen.
Sanding Laminate Cabinets: The Crucial Step for Adhesion
Sanding might seem counterintuitive on laminate, but it’s vital for creating a surface that your laminate cabinet primer and laminate cabinet paint can adhere to. Laminate has a smooth, non-porous surface, and sanding creates microscopic scratches that give the primer something to grip.
- Choosing the Right Grit: Use fine-grit sandpaper, typically between 180 and 220 grit. Avoid coarse sandpaper, which can scratch the laminate too deeply and create an uneven surface.
- Sanding Technique:
- Cabinet Doors and Drawer Fronts: Remove cabinet doors and drawer fronts from their frames. Lay them flat on a drop cloth or work surface.
- Even Pressure: Sand the entire surface with light, even pressure. You’re not trying to remove the laminate, just to dull the finish.
- Corners and Edges: Pay attention to corners and edges.
- Dust Removal: After sanding, thoroughly wipe down all surfaces with a tack cloth or a slightly damp microfiber cloth to remove all dust particles. This is critical! Any remaining dust will create a bumpy finish.
Painting Laminate Kitchen Cabinets: Your Budget-Friendly Transformation
Painting laminate kitchen cabinets is one of the most popular and effective ways to update them. It offers incredible flexibility in terms of color and finish.
Choosing the Right Paint and Primer
The success of your painted laminate cabinets hinges on using the correct products.
- Laminate Cabinet Primer: This is non-negotiable. A good laminate cabinet primer is designed to bond to slick surfaces and create a base for your paint. Look for primers specifically labeled for laminate, melamine, or difficult-to-stick-to surfaces.
- Oil-Based Primers: These offer excellent adhesion and durability but have stronger fumes and require mineral spirits for cleanup.
- Water-Based (Latex) Primers: Many modern water-based primers are formulated for excellent adhesion and are easier to work with and clean up. Look for those with good reviews for laminate.
- Adhesion Promoters: Some primers are essentially adhesion promoters, creating a grippy surface for subsequent coats.
- Laminate Cabinet Paint: Once primed, you can use a variety of paints, but durability is key in a kitchen environment.
- Enamel Paints: High-quality enamel paints (both oil-based and water-based acrylic enamels) offer a hard, durable finish that can withstand kitchen wear and tear.
- Cabinet-Specific Paints: Many brands offer paints specifically formulated for cabinets, often with a built-in primer or exceptional adhesion properties.
- Sheen: Consider the sheen. Semi-gloss or satin finishes are generally recommended for kitchens as they are more durable, easier to clean, and resist moisture better than matte finishes.
The Painting Process: Step-by-Step
-
Apply the Laminate Cabinet Primer:
- First Coat: Apply a thin, even coat of your chosen laminate cabinet primer using a high-quality synthetic brush or a foam roller. Avoid applying it too thick, as this can lead to drips and an uneven finish.
- Drying Time: Allow the primer to dry completely according to the manufacturer’s instructions. This is crucial for proper adhesion.
- Light Sanding (Optional but Recommended): After the primer is dry, lightly sand the surface with 220-grit sandpaper or a sanding sponge. This will knock down any imperfections and further improve adhesion for the paint. Wipe away all dust with a tack cloth.
- Second Coat (If Needed): If your primer isn’t providing full coverage or if you want extra assurance, apply a second thin coat of primer, following the same drying and sanding steps.
-
Apply the Laminate Cabinet Paint:
- First Coat: Apply your laminate cabinet paint in thin, even coats. Use a high-quality synthetic brush for cutting in edges and details, and a foam roller (specifically designed for smooth surfaces) for the main cabinet panels and doors. Work in the direction of the cabinet’s grain if applicable.
- Avoid Overworking: Don’t overwork the paint, as this can lead to brush marks or an uneven sheen.
- Drying Time: Allow each coat of paint to dry thoroughly. This can take several hours, depending on the paint type and humidity. Check the paint can for specific drying times between coats.
- Light Sanding Between Coats (Optional but Recommended): For the smoothest finish, lightly sand between coats with 320-grit sandpaper or a fine-grit sanding sponge. This helps to smooth out any minor imperfections and ensures better adhesion for subsequent coats. Always remove all dust with a tack cloth.
- Multiple Coats: Most cabinet painting projects will require at least two to three thin coats of paint to achieve full, opaque coverage and a durable finish.
-
Curing Time:
- Paint doesn’t fully harden immediately. It goes through a “curing” process that can take several weeks. During this time, your cabinets will be more susceptible to scratches and damage. Be gentle with them until they are fully cured.
Refinishing Laminate Cabinets: Beyond Simple Painting
While painting is a primary method for refinishing laminate cabinets, other techniques can also give them a new lease on life.
Laminate Cabinet Makeover with Contact Paper or Vinyl Wrap
For a very budget-friendly and temporary update, consider using decorative contact paper or vinyl wrap. This is a great option for renters or those who like to change their decor frequently.
- Pros:
- Extremely affordable.
- Wide variety of patterns and colors available.
- Relatively easy to apply if you’re patient.
- Can be removed (though sometimes leaving residue).
- Cons:
- Durability can be an issue; prone to scratches and peeling at edges over time.
- May not look as high-end as painted cabinets.
- Application requires precision to avoid bubbles and wrinkles.
- Application Tips:
- Clean and dry cabinets thoroughly.
- Measure and cut the vinyl with an overlap.
- Peel back only a small section of the backing at a time.
- Use a squeegee or credit card to smooth the vinyl onto the surface, working out air bubbles as you go.
- Trim excess with a sharp craft knife.
Resurfacing Laminate Cabinets with New Laminate Sheets
This method involves applying new, self-adhesive laminate sheets directly over your existing laminate. It’s a more durable laminate cabinet makeover than contact paper and offers a more authentic finish.
- Pros:
- Can provide a very smooth, clean look.
- More durable than contact paper.
- Many realistic wood grain or solid color options.
- Cons:
- Requires a higher level of precision to apply without bubbles or seams.
- Can be more expensive than paint or contact paper.
- Edges might still show signs of wear over time if not sealed.
- Application Tips:
- Ensure cabinets are perfectly clean and smooth.
- Use a sharp blade for cutting.
- Apply slowly and steadily with a laminate roller or squeegee to ensure good adhesion and prevent air bubbles.
- Consider using a primer designed for laminate before applying the new laminate sheets for extra adhesion.
Updating Cabinet Surfaces with Different Finishes
Beyond paint, think about how different finishes can contribute to your kitchen cabinet refresh.
Using a Top Coat for Added Protection and Shine
Once you’ve painted your laminate cabinets, applying a clear top coat or sealant can add a layer of durability and enhance the sheen.
- Polyurethane: A water-based polyurethane offers good protection and is easy to clean up. Choose a satin or semi-gloss finish to match your paint.
- Polycrylic: Similar to polyurethane, polycrylic is water-based and dries clear, making it a great choice for lighter-colored cabinets.
- Application: Apply thin, even coats with a high-quality synthetic brush or foam applicator. Allow each coat to dry thoroughly before applying the next. Two to three coats are usually sufficient.
Hardware Updates: The Finishing Touch to Your Kitchen Cabinet Refresh
Don’t underestimate the power of new hardware! Swapping out old knobs and pulls can dramatically change the look of your cabinets, even without updating cabinet surfaces.
- Considerations:
- Hole Spacing: Measure the distance between the screw holes on your existing hardware to ensure new pulls will fit.
- Style: Choose hardware that complements your kitchen’s overall style (modern, farmhouse, traditional, etc.).
- Finish: Black, brushed nickel, brass, and oil-rubbed bronze are popular choices that can add a touch of elegance.
- Comfort: Make sure the hardware is comfortable to grip and use.
- Installation:
- Remove the old hardware.
- If the new hardware has different hole spacing, you may need to fill the old holes (using wood filler if necessary) and drill new ones. Use a template to ensure accurate placement.
- Install the new hardware.
Tools and Materials Checklist for Your Laminate Cabinet Makeover
Having the right tools and materials will make the process smoother and the results better.
Essential Tools
- Screwdriver set (for removing doors and hardware)
- Putty knife (for filler)
- Sandpaper (180-220 grit, 320 grit)
- Sanding sponges
- Tack cloths
- Drop cloths or old sheets
- Painter’s tape
- High-quality synthetic brushes
- High-quality foam rollers (for smooth surfaces)
- Paint tray
- Stir sticks
- Gloves
- Safety glasses
- Utility knife
- Measuring tape
- Drill and drill bits (if changing hardware with different hole spacing)
- Optional: Oscillating multi-tool with sanding attachment for easier sanding.
Essential Materials
- Mild dish soap or degreaser
- TSP (trisodium phosphate) or alternative cleaner
- Wood filler or epoxy putty (if needed)
- Adhesive (if repairing peeling laminate)
- Laminate Cabinet Primer
- Laminate Cabinet Paint (e.g., acrylic enamel)
- Clear top coat or sealant (optional but recommended)
- Contact paper or vinyl wrap (if using this method)
- New cabinet hardware (knobs, pulls)
Laminate Cabinet Repair: Addressing Small Issues Effectively
Sometimes, the goal is a kitchen cabinet refresh rather than a complete overhaul. For minor wear and tear, targeted laminate cabinet repair can make a big difference.
Filling Small Holes and Scratches
- Method: Use a melamine repair crayon or a small amount of wood filler applied with a fine putty knife.
- Process: For filler, smooth it flush with the surface and allow it to dry. Then, gently sand it smooth with fine-grit sandpaper.
- Touch-up Paint: For a perfect match, you might need to find a color-matching paint pen or small sample pot of paint.
Sealing Edges
- Problem: Edges are often the first place where laminate begins to lift or chip.
- Solution: Clean the area thoroughly. Apply a clear, flexible sealant or even a small amount of clear super glue to the edge. You can also use a laminate edge banding product if the damage is significant.
Creating Shine: Tips for a Lustrous Finish
Achieving a beautiful shine on your updated cabinet surfaces is about more than just paint.
- Smooth Surface: Proper sanding and priming are the foundation for a smooth finish that will reflect light well.
- Even Paint Coats: Thin, even coats of paint prevent drips and brush marks that can disrupt the shine.
- Quality Top Coat: A good quality clear top coat can add depth and a consistent sheen to your painted cabinets.
- Buffing: After the top coat has fully cured, you can sometimes buff the surface with a very fine polishing compound (like those used for car paint) for an ultra-high-gloss finish. Test this in an inconspicuous area first.
Durability and Maintenance of Updated Laminate Cabinets
Once you’ve completed your laminate cabinet makeover, proper care will ensure your hard work lasts.
- Cleaning:
- Use a soft, damp cloth with mild dish soap.
- Avoid abrasive cleaners, scouring pads, or harsh chemicals, as these can damage the new finish.
- Wipe up spills immediately.
- Protection:
- Be mindful of sharp objects that could scratch the surface.
- Avoid placing hot items directly on the cabinets.
- Touch-ups: Keep a small amount of your primer and paint on hand for any minor touch-ups that may be needed over time.
Can laminate kitchen cabinets be painted?
Yes, laminate kitchen cabinets can absolutely be painted. The key to success is proper preparation, including thorough cleaning, light sanding to create adhesion, and using a high-quality primer specifically designed for laminate surfaces.
Frequently Asked Questions (FAQ)
Q1: Will paint adhere to laminate cabinets?
A: Yes, paint can adhere to laminate cabinets, but only if you prepare the surface correctly. You must clean the cabinets thoroughly and then lightly sand them to create a “tooth” for the primer and paint to grip. Using a laminate cabinet primer is essential for good adhesion.
Q2: What is the best primer for laminate cabinets?
A: The best primer for laminate cabinets is one specifically formulated for slick surfaces, laminate, or melamine. Look for adhesion-promoting primers, whether they are oil-based or a high-quality water-based acrylic. These primers create a stable base for your laminate cabinet paint.
Q3: What kind of paint should I use on laminate cabinets?
A: For durability and a smooth finish, high-quality enamel paints are recommended. Acrylic enamel paints, especially those designed for cabinets, will provide a hard, washable surface. Satin or semi-gloss sheens are ideal for kitchens as they are easier to clean and resist moisture.
Q4: How do I prevent paint from chipping off laminate cabinets?
A: Preventing chipping involves thorough preparation: cleaning, sanding, priming with a good laminate cabinet primer, and applying thin, even coats of high-quality laminate cabinet paint. Allowing adequate drying and curing time between coats and for the final finish is also crucial. A durable top coat can add an extra layer of protection.
Q5: Can I use a roller or do I need to spray paint laminate cabinets?
A: You can achieve a great finish using rollers and brushes. For a smooth, professional look, use high-density foam rollers designed for smooth surfaces and good quality synthetic brushes. Spray painting will give the smoothest finish but requires specialized equipment and a well-ventilated area.
Q6: How long does it take to paint laminate cabinets?
A: The time varies depending on the size of your kitchen, how many coats you apply, and drying times. A typical kitchen cabinet painting project can take anywhere from a weekend for very basic updates to a week or more for a more thorough laminate cabinet makeover with multiple coats and drying periods. Remember that paint needs time to cure, which can take up to 30 days for maximum hardness.
Q7: Can I update laminate cabinets without sanding?
A: While some “paint and primer in one” products claim to adhere to laminate without sanding, the results are often less durable and more prone to chipping. For the best and longest-lasting results when refinishing laminate cabinets, sanding is a critical step. Even a light scuff-sand will significantly improve adhesion.
Q8: What if my laminate is peeling? Can I still update it?
A: If the laminate is peeling, you’ll need to address that first. You can try gluing down small peeled areas with strong adhesive. If the laminate is extensively peeling or delaminating, it might be challenging to get a smooth, durable finish by painting. In such cases, resurfacing laminate cabinets with new laminate sheets or even replacing the doors might be better options.
Q9: How do I clean laminate cabinets after painting?
A: After your cabinets have fully cured, clean them using a soft, damp cloth with mild dish soap. Avoid abrasive cleaners, scouring pads, or harsh chemicals, as these can damage the new paint finish. Always wipe up spills promptly.
Q10: Are there alternatives to painting for updating laminate cabinets?
A: Yes, besides painting, you can update laminate cabinets using decorative contact paper or vinyl wraps for a temporary change, or by applying new self-adhesive laminate sheets for a more durable resurfacing. You can also update the hardware for a quick refresh. These methods contribute to updating cabinet surfaces in different ways.
By following these detailed steps and choosing the right products, you can achieve a beautiful and budget-friendly kitchen cabinet refresh, transforming your laminate cabinets into a stylish and durable feature of your home.