
So, how many can lights do you need in your kitchen? The short answer is: it depends on the size of your kitchen, the type of lights you choose, and how you plan to use the space. A good starting point is to aim for one can light every 4 to 6 feet in areas where general illumination is needed.
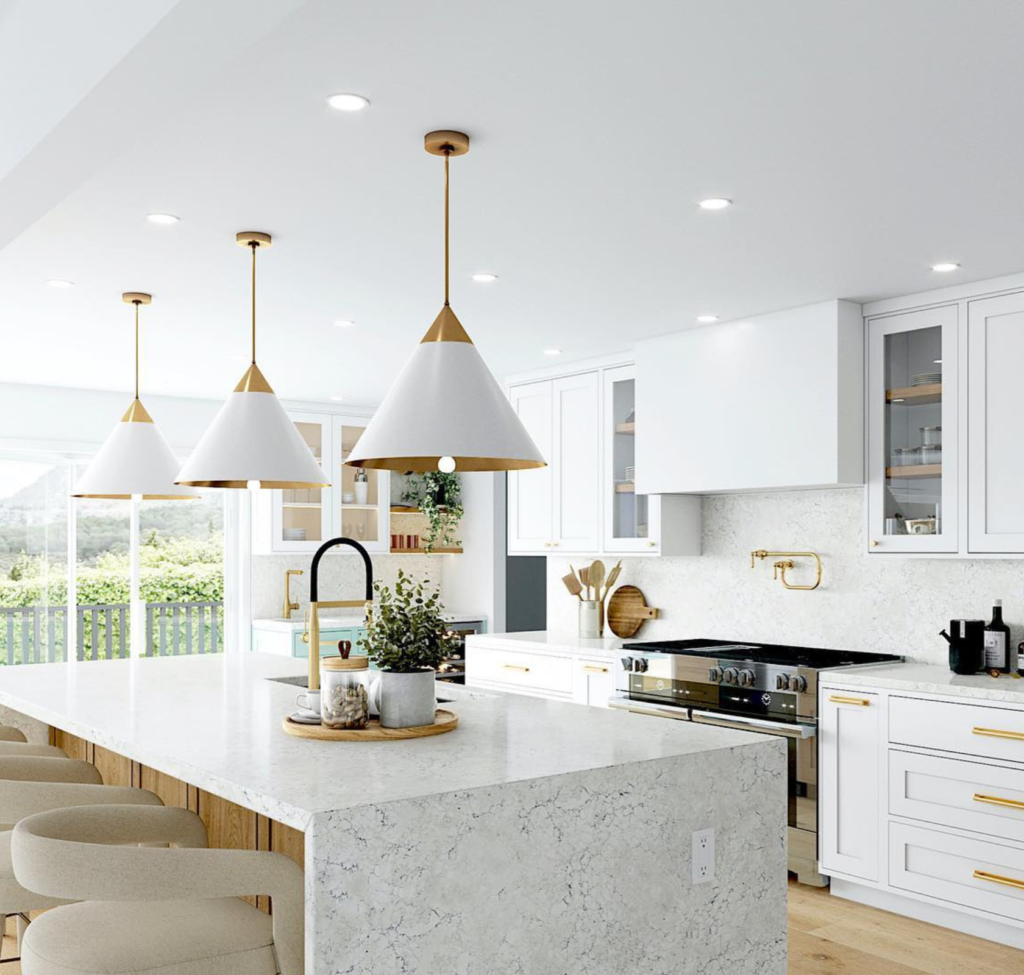
Image Source: blog.1800lighting.com
Deciphering Your Kitchen Lighting Needs
Lighting your kitchen is crucial for both functionality and ambiance. Beyond just seeing what you’re doing, the right kitchen lighting design can transform your space into a warm, inviting hub or a highly efficient workspace. When we talk about recessed lighting kitchen installations, we’re generally referring to can lights, which are a popular choice for their clean look and ability to provide widespread light.
Fathoming the Factors for Optimal Kitchen Lighting
Before we dive into calculations, let’s explore the key elements that influence the number of recessed cans you’ll need:
- Kitchen Size and Shape: A larger kitchen naturally requires more light sources than a smaller one. The shape also matters; irregular layouts or kitchens with many nooks and crannies might need strategic placement to ensure even illumination.
- Ceiling Height: Higher ceilings often require more powerful bulbs or a greater density of lights to achieve adequate brightness. Lower ceilings might benefit from fewer, but well-placed, fixtures.
- Task Areas: Kitchens are workhorses. Think about where you chop, cook, read recipes, and wash dishes. These task areas need focused light.
- Aesthetic Goals: Are you aiming for a bright, modern feel, or a cozy, traditional atmosphere? The type of lighting and its distribution play a big role in this.
- Existing Fixtures: If you have pendant lights over an island or under-cabinet lighting, these will supplement your recessed lighting kitchen plan and might reduce the number of can lights needed for general illumination.
The Core of the Matter: Can Light Spacing
The can light spacing is arguably the most important consideration when planning your kitchen lighting layout. Spacing too far apart will result in dark spots, while spacing too close will create an overwhelming amount of light and can feel sterile.
Standard Spacing Guidelines
A common rule of thumb for recessed lighting kitchen installations is to space can lights about half the height of the ceiling apart.
- For an 8-foot ceiling: Space lights approximately 4 feet apart.
- For a 9-foot ceiling: Space lights approximately 4.5 feet apart.
- For a 10-foot ceiling: Space lights approximately 5 feet apart.
This guideline helps ensure that the light from each fixture overlaps sufficiently to provide an even wash of light across the room.
Calculating Your Needs: A Practical Approach
So, how do we translate these guidelines into a concrete number of recessed cans? We can use a few methods to get a good estimate.
Method 1: The Square Footage Rule
This is a straightforward method for general illumination.
- Measure your kitchen’s square footage: Length x Width = Square Footage.
- Determine the required lumens: Lumens are a measure of brightness. For kitchens, a good general illumination target is around 20-30 lumens per square foot. For task lighting, you might need 50-100 lumens per square foot in specific areas.
- Calculate total lumens needed: Square Footage x Lumens per Square Foot = Total Lumens.
- Divide by the lumen output of your chosen bulbs: If you choose bulbs that output 800 lumens each, divide your Total Lumens by 800 to get an approximate number of lights per room.
Example:
A 10ft x 12ft kitchen (120 sq ft) aiming for 25 lumens per square foot:
120 sq ft x 25 lumens/sq ft = 3000 lumens needed.
If you use 800-lumen bulbs: 3000 lumens / 800 lumens/bulb = 3.75 bulbs. You’d likely round up to 4 bulbs for general coverage.
This method gives you a ballpark figure for the overall brightness, but doesn’t directly address can light spacing.
Method 2: The Spacing Grid
This method focuses more on achieving even coverage based on can light spacing.
- Determine your desired spacing: Based on your ceiling height (as mentioned earlier), decide on the distance between each can light. Let’s say for an 8-foot ceiling, you choose 4 feet.
- Map out your kitchen: Draw a rough sketch of your kitchen.
- Create a grid: Imagine placing lights on a grid with the chosen spacing. For a 10ft x 12ft kitchen with 4ft spacing:
- Along the 10ft wall: You could place lights at 2ft, 6ft, and 10ft (3 lights). Or center them at 2.5ft, 5ft, 7.5ft (3 lights).
- Along the 12ft wall: You could place lights at 2ft, 6ft, 10ft, 12ft (4 lights). Or center them at 2ft, 6ft, 10ft (3 lights, leaving 2ft at each end).
This method requires some visual planning and can be adjusted based on the kitchen’s layout.
Table: Example Spacing for a Rectangular Kitchen
| Ceiling Height | Desired Spacing | Kitchen Dimensions | Lights Along Shorter Wall | Lights Along Longer Wall | Total Cans (Approx.) |
|---|---|---|---|---|---|
| 8 ft | 4 ft | 10 ft x 12 ft | 3 | 3 | 9 |
| 8 ft | 4 ft | 12 ft x 15 ft | 3 | 4 | 12 |
| 9 ft | 4.5 ft | 10 ft x 12 ft | 2 (at 2.5ft, 7.5ft) | 3 (at 2.25ft, 6.75ft, 11.25ft) | 6 |
| 10 ft | 5 ft | 12 ft x 15 ft | 3 (at 2.5ft, 7.5ft, 12.5ft) | 3 (at 2.5ft, 7.5ft, 12.5ft) | 9 |
Note: These are simplified examples. Actual placement would consider cabinet locations, windows, and doors.
Recessed Lighting Placement Strategies
Simply scattering lights evenly might not be the most effective approach. Thoughtful recessed lighting placement considers how you use your kitchen.
General Ambient Lighting
This is the foundational layer of light. For most kitchens, especially those with 8-foot ceilings, placing can lights in a grid pattern, spaced about 4-6 feet apart, is a good starting point for general illumination.
- Perimeter Lighting: Placing lights 2-3 feet from the walls can help wash the walls with light and make the room feel larger. This also helps illuminate countertops that might be against the wall.
- Central Grid: For open-plan kitchens or those without wall-hugging counters, a central grid pattern provides overall brightness.
Task Lighting Integration
While can lights can provide task lighting, they are most effective when positioned strategically.
- Over Countertops: Position can lights directly over the edge of countertops, ideally 6-12 inches in from the cabinet face. This ensures the light shines down onto your workspace without creating shadows cast by your body. If you have upper cabinets, consider under-cabinet lighting as well, as it’s often more effective for task lighting and uses less energy.
- Over the Sink: A dedicated can light above the sink area is essential for cleaning and prep tasks.
- Over the Stove/Cooktop: While a dedicated range hood with a light is best, an additional can light in front of the cooktop can improve visibility.
Accent Lighting
Can lights can also be used for accent lighting, though this is less common for general kitchen lighting. Gimbal or adjustable trims allow you to direct light onto artwork, cabinets, or architectural features.
Key Considerations for Kitchen Ceiling Lights
When selecting and placing your kitchen ceiling lights, keep these points in mind:
- Trim Types:
- Standard Baffle Trim: Reduces glare, good for general lighting.
- New Construction vs. Remodel Cans: Ensure you have the correct type for your ceiling.
- Adjustable/Gimbal Trim: Allows you to aim light, useful for accenting specific areas.
- Specially Designed Trims: Some trims are designed for washing walls or highlighting artwork.
- Beam Spread:
- Narrow Beam: More focused, good for accent lighting.
- Wide Beam: Distributes light over a larger area, ideal for general ambient lighting. Most kitchen can lights use a wide beam.
- Color Temperature (Kelvin):
- Warm White (2700K-3000K): Creates a cozy, inviting atmosphere, suitable for dining areas within a kitchen.
- Cool White (3500K-4000K): Brighter and more neutral, good for task areas and general kitchen illumination where clarity is key.
- Daylight (5000K+): Very bright and crisp, can mimic natural daylight but might feel too sterile for some kitchens. For optimal kitchen lighting, a mix of warm and neutral white is often preferred.
- Dimmers: Installing dimmers on most, if not all, of your kitchen lights is highly recommended. This allows you to adjust the brightness for different activities and times of day, enhancing both functionality and mood.
Recessed Light Calculation in Practice: A Step-by-Step Example
Let’s walk through a realistic scenario for a medium-sized kitchen.
Kitchen Dimensions: 12 feet x 15 feet
Ceiling Height: 9 feet
Goal: Provide good ambient light and effective task lighting over countertops.
Step 1: Ambient Lighting Grid
- Spacing based on ceiling height: For a 9-foot ceiling, we’ll use a spacing of roughly 4.5 feet.
- Layout:
- Along the 12-foot walls: Place lights at approximately 2.5 ft, 7 ft, and 11.5 ft (3 lights per wall).
- Along the 15-foot walls: Place lights at approximately 2.5 ft, 7.5 ft, and 12.5 ft (3 lights per wall).
- Initial Ambient Count: 3 lights/wall x 2 walls + 3 lights/wall x 2 walls = 12 lights.
Step 2: Task Lighting Over Countertops
Assume you have countertops along one 12-foot wall and one 15-foot wall, with upper cabinets.
- 12-foot wall: You have 3 ambient lights already placed on a grid that likely covers this area. However, to ensure good task lighting directly over the counter, you might want to add lights specifically positioned 6-12 inches from the cabinet face. If the ambient lights are already close enough, you might not need more. If they are further away, add 1-2 more lights. Let’s assume the ambient lights are well-placed for this.
- 15-foot wall: Similarly, the ambient grid might suffice. However, if there’s a particular prep area, consider adding a dedicated light or ensuring one of the ambient lights is positioned optimally.
Step 3: Over the Sink and Cooktop
- Sink: If the sink is under a cabinet on one of the walls, ensure there’s a light positioned to illuminate it. One of the ambient lights might do the job if placed correctly. If not, add one.
- Cooktop: If the cooktop is in the center or on a wall without direct overhead ambient light, add a dedicated can light in front of it.
Revised Count for our Example Kitchen:
Let’s refine the ambient grid to incorporate task lighting principles.
- Wall 1 (12 ft): Countertop along this wall. Place lights at 2.5 ft, 7 ft, 11.5 ft. These lights, positioned about 1 foot from the wall, provide both ambient and task lighting. (3 lights)
- Wall 2 (15 ft): Countertop along this wall. Place lights at 2.5 ft, 7.5 ft, 12.5 ft. (3 lights)
- Wall 3 (12 ft): No countertop, just wall space. Place lights at 6 ft and 12 ft (2 lights). These would be centered to provide general light.
- Wall 4 (15 ft): No countertop, just wall space. Place lights at 3.75 ft, 7.5 ft, and 11.25 ft (3 lights). These would be centered.
Total for this refined ambient layout: 3 + 3 + 2 + 3 = 11 lights.
Now, let’s consider task-specific additions if the ambient lights aren’t perfectly placed:
- Sink: If the sink is under Wall 1’s cabinets, one of the 3 lights there should be adequate if placed correctly.
- Cooktop: If the cooktop is in the middle of Wall 2, the ambient light at 7.5 ft might work. If it’s a large cooktop, you might add another light.
Final Count for our example: Let’s say 10-12 can lights would provide excellent, flexible illumination for this 12ft x 15ft kitchen with 9ft ceilings, ensuring both good general coverage and focused task lighting. This is a good recessed light calculation example.
Common Pitfalls to Avoid
- Too Few Lights: This is the most common mistake, leading to dim areas and reliance on other, less effective light sources.
- Too Many Lights: Can make the space feel overly bright, sterile, and can be costly.
- Incorrect Spacing: Leads to dark corners or overlapping pools of light.
- Wrong Beam Angle: Using narrow beams for general lighting or wide beams for focused task lighting.
- Ignoring Task Areas: Failing to place lights directly over workspaces.
- Not Using Dimmers: Limiting your ability to control the mood and brightness.
The Role of Other Lighting Layers
Recessed lighting kitchen designs are most effective when part of a layered lighting approach.
- Ambient Lighting: Provided by your can lights.
- Task Lighting: Under-cabinet lights, pendant lights over an island, or dedicated task lamps.
- Accent Lighting: To highlight features or create mood.
A well-designed kitchen lighting layout will integrate these layers seamlessly. For instance, you might use 6-8 strategically placed can lights for general ambient light in a medium kitchen, then add a few pendant lights over the island for task and decorative lighting, and finally, under-cabinet lighting for the primary prep surfaces.
How Many Lights Per Room? A Broader Perspective
While we’ve focused on kitchens, the principle of layered lighting and strategic placement applies to any room. The number of lights per room will always vary based on its size, function, and ceiling height. Bedrooms might need fewer lights than a kitchen or living room. Bathrooms require bright, shadow-free light around the vanity, often achieved with sconces or a well-placed overhead fixture.
The Future of Kitchen Lighting
LED technology has revolutionized recessed lighting kitchen options. LEDs are energy-efficient, long-lasting, and come in a wide range of color temperatures and brightness levels. Many modern LED recessed lights are integrated units, meaning the light source and fixture are one. This simplifies installation and offers excellent performance. Smart home integration is also becoming more common, allowing you to control brightness, color, and even schedule your lights via your phone or voice commands.
Frequently Asked Questions (FAQ)
- Q1: Do I need a specific type of can for my kitchen?
A1: For kitchens, especially over countertops, it’s beneficial to use trims that minimize glare and distribute light evenly. Consider LED integrated fixtures for efficiency and longevity. Ensure you choose the correct type of housing for new construction or remodel situations. - Q2: Can I use decorative pendants instead of can lights in my kitchen?
A2: Yes, pendants are excellent for adding style and task lighting, especially over kitchen islands or dining areas. However, for overall ambient light, a combination of recessed lighting and pendants usually provides the best results. - Q3: How far should can lights be from kitchen cabinets?
A3: To effectively illuminate countertops and avoid shadows cast by your body, aim to place can lights 6 to 12 inches away from the face of your upper cabinets. This ensures the light falls directly onto your workspace. - Q4: What is the best color temperature for kitchen lights?
A4: For optimal kitchen lighting, a color temperature between 3500K and 4000K (Cool White to Neutral White) is often recommended for general and task lighting. This provides bright, clear light without being too harsh. Warmer tones (2700K-3000K) can be used in dining nooks within the kitchen for a cozier feel, and dimmers allow for flexibility. - Q5: How do I calculate the number of recessed lights for a non-standard shaped kitchen?
A5: For non-standard shapes, break the kitchen down into smaller, more manageable rectangular or square zones. Calculate the lighting needs for each zone and then integrate them. You may also need to adjust spacing or add lights in corners or along unusual walls to ensure even coverage. Visualizing the light spill and aiming for overlap is key.
By carefully considering these factors and employing smart recessed lighting placement, you can create a kitchen lighting layout that is both beautiful and highly functional, bathing your kitchen in optimal kitchen lighting.