
Can you add texture to your kitchen to make it more interesting? Yes, absolutely! Adding texture to your kitchen is a fantastic way to add depth to kitchen designs and make them feel more inviting and visually appealing. It transforms a space from flat and one-dimensional to rich and engaging, inviting touch and sight. Think about how different materials feel and look – a smooth granite countertop versus a rough wood cabinet. These differences are what texture is all about. This blog post will dive deep into how you can incorporate tactile elements kitchen spaces, helping you layer textures kitchen for maximum impact. We’ll explore various surfaces, finishes, and materials to help you create visual interest kitchen areas that are both beautiful and functional.
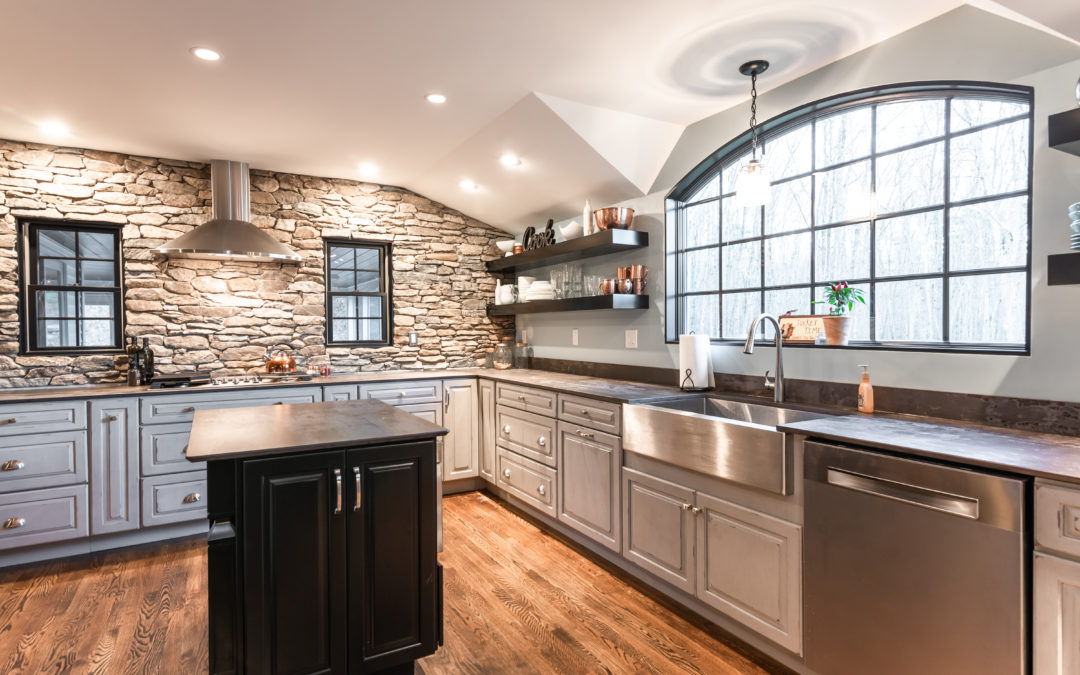
Image Source: fairviewkitchens.com
The Power of Tactile Appeal
Texture is more than just how something feels; it’s also about how it looks. Different textures can change the perception of light, space, and even color. A rough, matte finish might absorb light, creating a cozy feel, while a glossy, smooth surface will reflect light, making a space feel brighter and larger. By thoughtfully combining different textures, you can:
- Add depth to kitchen layouts, making them feel more expansive or intimate as desired.
- Create visual interest kitchen areas without relying solely on color or pattern.
- Incorporate tactile elements kitchen that encourage interaction and sensory engagement.
- Layer textures kitchen to build a sophisticated and inviting atmosphere.
Kitchen Surface Finishes: The Foundation of Texture
When we talk about kitchen surface finishes, we’re referring to the materials and treatments applied to cabinets, countertops, backsplashes, and flooring. These are the main players in your kitchen’s textural landscape. Choosing the right finishes is crucial for achieving the desired look and feel.
Cabinet Material Textures: The Heart of Your Kitchen’s Touch
Cabinets are often the largest surface area in a kitchen, making their material textures incredibly important. The feel and appearance of your cabinet doors and drawers set the tone for the entire space.
-
Wood:
- Smooth Wood: Think of polished maple, cherry, or oak. These offer a classic, elegant feel. The grain is visible but subtle.
- Pros: Durable, versatile, timeless appeal.
- Cons: Can be more expensive, requires maintenance.
- Textured Wood: Consider distressed finishes, reclaimed wood, or wood with a prominent grain pattern like rift-sawn oak. These add a rustic or natural character.
- Pros: Adds warmth and personality, can hide minor imperfections.
- Cons: May require sealing, some finishes can be harder to clean.
- Painted Wood: A painted finish can offer a smooth, matte, or even slightly textured look depending on the application.
- Pros: Wide range of color options, can be updated.
- Cons: Can chip or scratch, especially with heavy use.
- Smooth Wood: Think of polished maple, cherry, or oak. These offer a classic, elegant feel. The grain is visible but subtle.
-
Laminates and Veneers: Modern laminates and veneers can mimic the look and feel of real wood with great accuracy. Many now offer textured surfaces that replicate natural grain patterns.
- Pros: Cost-effective, durable, easy to clean.
- Cons: Can sometimes look less authentic than real wood, less customizable.
-
High-Gloss Acrylics/Lacquer: These provide a very smooth, reflective surface that can add depth to kitchen spaces by bouncing light around.
- Pros: Sleek, modern, easy to clean.
- Cons: Shows fingerprints easily, can scratch.
-
Metal Finishes: Stainless steel, brushed nickel, or even powder-coated metals can offer a sleek, industrial, or contemporary texture.
- Pros: Durable, hygienic, modern aesthetic.
- Cons: Can show fingerprints, may feel cold.
Table 1: Cabinet Material Texture Comparison
| Material | Texture Description | Feel | Visual Impact | Best For |
|---|---|---|---|---|
| Smooth Wood | Polished, consistent grain | Soft, sleek | Elegant, refined | Traditional, modern, transitional kitchens |
| Textured Wood | Distressed, prominent grain, reclaimed | Rough, natural | Warm, rustic, characterful | Farmhouse, rustic, industrial kitchens |
| High-Gloss | Smooth, reflective | Very smooth | Bright, spacious, contemporary | Modern, minimalist kitchens |
| Brushed Metal | Slightly textured, non-reflective | Cool, smooth | Industrial, modern, sleek | Industrial, modern kitchens |
| Matte Laminate | Smooth or subtly textured, non-reflective | Smooth, matte | Clean, practical, versatile | Budget-friendly, family kitchens |
Countertop Texture Options: Where Function Meets Feel
Your countertops are a high-traffic area, so their texture needs to be both beautiful and practical. Mixing countertop textures can be a powerful way to create visual interest kitchen zones.
-
Granite & Quartzite: These natural stones often have a polished or honed finish.
- Polished: Smooth and reflective, making surfaces appear brighter.
- Honed: A matte or satin finish, offering a softer, more natural look. It’s less reflective and can hide minor smudges better.
- Pros: Durable, heat resistant, unique patterns.
- Cons: Can be porous (granite needs sealing), can be expensive.
-
Quartz: Typically comes in polished or matte finishes. The matte finish offers a more contemporary and less “shiny” look, which can be very appealing.
- Pros: Non-porous, very durable, low maintenance, consistent patterns.
- Cons: Can be prone to thermal shock, limited by manufactured patterns.
-
Marble: Known for its veining and often comes in polished or honed finishes. The natural variations create inherent texture.
- Pros: Luxurious, beautiful veining patterns.
- Cons: Porous, prone to staining and etching, requires careful maintenance.
-
Butcher Block (Wood): Offers a warm, natural, and inviting texture. It can be finished with food-safe oils or sealants.
- Pros: Warm, natural look, can be repaired by sanding.
- Cons: Requires regular oiling/maintenance, prone to scratches and water damage.
-
Concrete: Can be poured in place or pre-cast, offering a modern, industrial, and textured look. It can be polished to a smooth finish or left with a more raw, matte appearance.
- Pros: Highly customizable, durable, modern aesthetic.
- Cons: Can be porous and stain if not sealed properly, prone to cracking.
-
Stainless Steel: Offers a smooth, reflective, and utilitarian texture, often associated with professional kitchens.
- Pros: Hygienic, durable, heat resistant.
- Cons: Shows fingerprints and scratches easily.
Table 2: Countertop Texture Options
| Material | Common Finishes | Texture Feel | Visual Impression | Durability | Maintenance |
|---|---|---|---|---|---|
| Granite | Polished, Honed | Smooth, slightly rough | Luxurious, natural variation, elegant | High | Sealing needed |
| Quartz | Polished, Matte | Smooth, very smooth | Modern, consistent, sleek | Very High | Low |
| Marble | Polished, Honed | Smooth, naturally varied | Elegant, classic, soft veining | Medium | High (etching) |
| Butcher Block | Oiled, Sealed | Natural, wood grain | Warm, inviting, organic | Medium | Regular oiling |
| Concrete | Polished, Troweled | Smooth, slightly rough, matte | Industrial, modern, raw | High | Sealing needed |
| Stainless Steel | Brushed, Polished | Smooth, cool | Professional, sleek, utilitarian | Very High | Cleaning wipes |
Backsplash Texture Ideas: The Kitchen’s Accent Piece
The backsplash is a prime opportunity to layer textures kitchen and add a focal point. It’s a smaller surface, so you can be more adventurous.
- Subway Tile: While classic, subway tiles can be laid in various patterns (stacked, herringbone, diagonal) to create different textural effects. The grout lines themselves add a subtle textural element.
- Mosaic Tiles: Small tiles like glass, stone, or ceramic mosaics create a rich, detailed texture. Variations in color and finish within the mosaic can further enhance this.
- Natural Stone Tiles: Travertine, slate, or limestone offer inherent natural textures and variations. Honed or tumbled finishes add a softer, more tactile feel.
- 3D or Textured Tiles: Many manufacturers now offer tiles with raised patterns, geometric shapes, or undulating surfaces that create dramatic tactile and visual interest. Think of wave patterns, ribbed tiles, or geometric reliefs.
- Metal Backsplashes: Stainless steel or copper sheets can provide a sleek, reflective, or even hammered texture.
- Glass Backsplashes: While often smooth, colored glass or frosted glass can offer a unique textural quality and depth.
- Brick Veneer: Exposed brick or brick veneer brings a raw, industrial, or rustic texture.
Backsplash texture ideas range from smooth and glossy to rough and natural. Consider how the light will hit the surface and how easy it will be to clean.
Flooring Texture Kitchen: The Grounding Element
Flooring anchors your kitchen and its texture plays a significant role in the overall feel.
- Hardwood: Offers natural warmth and a smooth or slightly textured grain.
- Pros: Classic, warm, comfortable underfoot.
- Cons: Can be susceptible to water damage and scratches.
- Tile: Ceramic, porcelain, or natural stone tiles offer a vast array of textures.
- Smooth Glazed Porcelain: Reflective, easy to clean, but can be slippery when wet.
- Textured Porcelain/Ceramic: Many tiles mimic the look of wood or stone with a slightly raised surface for better grip and added texture.
- Natural Stone: Slate, travertine, and limestone offer inherent, often rougher textures.
- Pros: Durable, water-resistant, wide variety of looks.
- Cons: Grout lines can be hard to clean, some stones are porous.
- Luxury Vinyl Tile (LVT) / Vinyl Plank: Modern LVT can mimic wood or stone with impressive realism, often featuring embossed textures that replicate grain or stone patterns.
- Pros: Water-resistant, durable, relatively affordable, good for high-traffic areas.
- Cons: Can look less premium than real materials.
- Concrete Flooring: Polished or stained concrete can provide a smooth, industrial texture.
- Pros: Very durable, modern, easy to clean.
- Cons: Can be hard and cold underfoot, requires sealing.
- Linoleum: A natural product with a smooth, matte finish.
- Pros: Eco-friendly, durable, comfortable.
- Cons: Requires sealing, can be susceptible to stains.
Flooring texture kitchen choices impact comfort, safety, and the overall aesthetic. A slightly textured floor can add warmth and prevent slips.
Wall Treatment Kitchen: Adding Dimension to Vertical Spaces
Don’t forget your walls! Wall treatment kitchen options can dramatically add depth to kitchen designs.
- Paint: Beyond color, consider paint finishes. Matte paints absorb light for a soft feel, while satin or semi-gloss finishes reflect light and add a subtle sheen. Textured paints or finishes can also be used.
- Wallpaper: Wallpaper can introduce intricate patterns and textures that paint alone cannot. Think of textured wallpapers like grasscloth, embossed vinyl, or even subtle geometric prints.
- Tile: As mentioned for backsplashes, tile can extend to accent walls or even cover entire walls for a bold textural statement.
- Wood Paneling: Shiplap, beadboard, or reclaimed wood walls add significant warmth and a rustic or coastal texture.
- Exposed Brick or Stone Veneer: These bring a strong, natural, and often rugged texture into the kitchen.
- Plaster or Venetian Plaster: These artisanal finishes offer a unique, subtly textured, and often monochromatic look that feels both luxurious and grounded.
How to Layer Textures Kitchen Effectively
The key to a successful textured kitchen is to layer textures kitchen thoughtfully. Avoid overwhelming the space by mixing too many competing textures without a unifying element. Here’s how to master it:
1. Start with a Neutral Base
Choose a dominant texture or material that feels calming and serves as a backdrop. This could be smooth, painted cabinetry, a neutral tile floor, or a simple painted wall. This base layer provides a canvas for other textures.
2. Introduce Contrasting Textures
Once your base is set, introduce contrasting textures. If you have smooth cabinets, consider a textured backsplash like natural stone or a relief tile. If your countertops are highly polished, opt for a matte or wood cabinet finish.
-
Example 1: Modern Farmhouse
- Base: Shaker-style cabinets in a matte white finish.
- Contrast: A honed marble backsplash with subtle veining and a reclaimed wood island countertop.
- Accent: Woven pendant lights and brushed brass hardware.
-
Example 2: Industrial Loft
- Base: Smooth, dark concrete flooring.
- Contrast: Stainless steel countertops and exposed brick walls.
- Accent: Rough-hewn wood open shelving and matte black fixtures.
3. Consider Scale and Proportion
The size of the textural elements matters. A large expanse of rough texture can be overwhelming, while small accents can get lost.
* Use larger, bolder textures on dominant features like islands or accent walls.
* Employ smaller, more intricate textures for details like backsplashes, hardware, or decorative objects.
4. Play with Finishes (Matte vs. Glossy, Smooth vs. Rough)
The interplay between different finishes is crucial for creating visual interest.
* Smooth + Rough: A smooth countertop paired with a rough stone backsplash.
* Matte + Glossy: Matte cabinetry with glossy tile.
* Reflective + Absorbing: A shiny metal appliance against a matte wall.
5. Don’t Forget Soft Textures
Incorporate textiles for comfort and visual softness.
* Rugs: A woven or textured rug under a kitchen table or island can break up hard surfaces.
* Upholstery: If you have dining chairs or banquette seating, choose textured fabrics like linen, boucle, or woven cotton.
* Window Treatments: Linen or textured blinds can add a subtle layer.
* Dish Towels & Pot Holders: Even these small items can contribute to the overall textural feel.
6. Utilize Lighting to Enhance Texture
Lighting can dramatically change how textures are perceived.
* Accent lighting: Spotlights can highlight textured walls or backsplashes.
* Diffused lighting: Matte finishes are enhanced by softer, diffused light.
* Task lighting: Good lighting over countertops ensures you can appreciate the textures while working.
Bringing It All Together: A Step-by-Step Approach
To effectively add texture to your kitchen, follow these steps:
- Define Your Style: What aesthetic are you aiming for? Modern, farmhouse, traditional, industrial, transitional? This will guide your material choices.
- Identify Key Surfaces: Decide which areas will be your primary textural features (e.g., cabinets, backsplash, island).
- Select Your Base Texture: Choose a primary material for a large surface area, like your cabinets or flooring.
- Introduce Contrasting Textures: Select secondary materials that offer a different feel and look. Aim for at least two distinct textures to layer textures kitchen effectively.
- Incorporate Accent Textures: Add smaller details through hardware, lighting fixtures, or decorative items.
- Consider Soft Textures: Introduce textiles like rugs or upholstery if applicable.
- Evaluate Lighting: Ensure your lighting plan enhances the textures you’ve chosen.
- Test Samples: Always get physical samples of materials to see how they look and feel together in your kitchen’s actual light.
Frequently Asked Questions (FAQ)
Q1: How do I balance different textures in my kitchen without making it look too busy?
A: The key is layering textures kitchen with a mindful approach. Start with a dominant neutral texture for your largest surfaces (like cabinets or flooring). Then, introduce one or two contrasting textures in complementary materials (e.g., a rough backsplash against smooth cabinets). Use smaller accents for details. Think of it like building an outfit – a foundation, a statement piece, and accessories. Ensure there’s a cohesive color palette to tie everything together.
Q2: What are some simple ways to add texture without a major renovation?
A: You can easily add texture to your kitchen with accessories and minor updates:
* Hardware: Swap out plain cabinet knobs for textured ones (e.g., hammered metal, ceramic, wood).
* Backsplash: Install a peel-and-stick textured tile backsplash.
* Rugs: Add a woven or patterned rug.
* Linens: Use textured dish towels, oven mitts, or placemats.
* Decor: Display wooden bowls, ceramic vases, or woven baskets.
* Paint: Consider a subtle textured paint finish on an accent wall.
Q3: Is it okay to mix different types of wood in a kitchen?
A: Absolutely! Mixing wood tones can add character and create visual interest kitchen spaces. The trick is to ensure there’s a unifying element, like a consistent finish style (e.g., all matte or all semi-gloss) or a shared color undertone (e.g., both woods lean warm or cool). You can also use hardware or paint colors to bridge the gap between different wood types.
Q4: What are the most durable textured finishes for high-traffic areas like countertops?
A: For durability and texture, consider:
* Honed Granite: Offers a natural stone look with a less slippery surface than polished.
* Matte Quartz: Provides the durability of quartz with a softer, less reflective finish that can hide minor smudges better.
* Textured Porcelain Tile: Many porcelain tiles designed to mimic wood or stone have durable, slightly raised surfaces that offer grip and visual texture.
* Treated Butcher Block: While requiring maintenance, well-oiled butcher block is a durable and warm textured option.
Q5: How does texture affect the perceived size of a kitchen?
A: Smooth, reflective textures tend to add depth to kitchen spaces and make them feel larger and brighter because they bounce light around. Conversely, very rough or dark textures can make a space feel more intimate and smaller, but also cozier. By strategically layering textures – using smoother, lighter textures on larger surfaces and incorporating more tactile, possibly darker textures as accents – you can manipulate the perception of space. For instance, a highly textured backsplash can draw the eye and create a sense of dimension without making the entire kitchen feel cramped.