
Can you stain kitchen cabinets without sanding? Yes, you absolutely can! This guide will show you the best way to achieve a beautiful, updated look for your kitchen cabinets without the tedious work of sanding. We’ll cover everything from choosing the right products to applying them for a flawless finish. Get ready for an amazing cabinet makeover no sanding required!
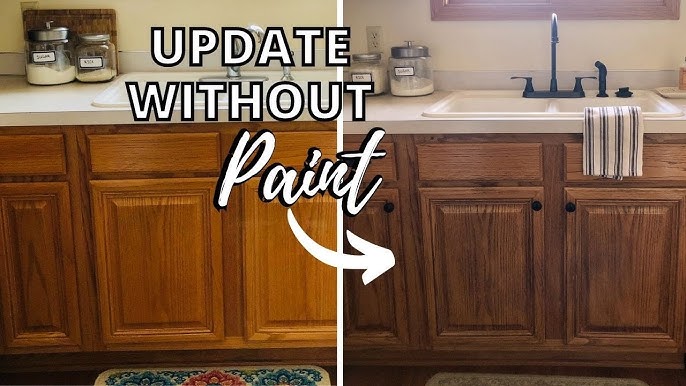
Image Source: i.ytimg.com
The Magic of No-Sand Cabinet Stain
Cabinet refinishing without sanding is a game-changer for DIYers. It significantly cuts down on time, effort, and mess. Forget the dust! This method is perfect for those who want a professional-looking result without the hassle of traditional sanding. We’ll delve into why this is such a popular and effective technique for kitchen cabinet restoration no sanding.
What is No-Sand Cabinet Stain?
No-sand cabinet stain, often referred to as a gel stain or a wiping stain, is a specially formulated product designed to adhere directly to existing finishes like paint or varnish. Unlike traditional stains that penetrate wood, gel stains sit on the surface, offering excellent coverage and color without needing to strip the old finish. This makes easy cabinet staining a reality for everyone.
Why Skip the Sanding?
Sanding is often the most dreaded part of any cabinet refinishing project. It’s time-consuming, messy, and requires careful attention to avoid damaging the wood. By opting for a no-sand method, you bypass these challenges entirely. This is the best way to stain cabinets without sanding for most DIY projects.
- Time Savings: Reduces project time by a significant margin.
- Less Mess: Eliminates dust and debris from sanding.
- Accessibility: Perfect for those new to DIY or with limited tools.
- Durability: Modern no-sand products offer excellent adhesion and longevity.
- Versatility: Works on various cabinet materials and existing finishes.
Choosing the Right Products for Your Cabinet Makeover No Sanding
The success of your cabinet makeover no sanding hinges on selecting the right products. For this method, you’ll primarily be using a high-quality gel stain and a compatible topcoat.
Gel Stain: The Star of the Show
Gel stain kitchen cabinets is the key. Gel stain is thicker than traditional liquid stain, which means it stays on the surface rather than soaking into the wood. This is what allows it to adhere to pre-finished surfaces.
- Types of Gel Stains:
- Water-based: Easier cleanup with water.
- Oil-based: Often considered more durable and richer in color.
- Key Features to Look For:
- Good Coverage: You want a stain that builds color evenly.
- Ease of Application: Look for brands known for smooth application.
- Color Selection: Choose a color that complements your kitchen.
Prep Products: Crucial for Adhesion
Even without sanding, proper cleaning and degreasing are non-negotiable for a lasting finish.
- Degreaser/Cleaner: A good kitchen cabinet cleaner or a TSP (trisodium phosphate) substitute is essential to remove grease, grime, and any old polish.
- Bonding Primer (Optional but Recommended): For extra assurance, especially on slick or glossy finishes, a bonding primer can improve adhesion. Look for one specifically designed for cabinets or difficult surfaces.
Topcoat: Protecting Your New Finish
A good topcoat is vital to protect your newly stained cabinets from wear and tear.
- Water-based Polyurethane: Dries quickly, low odor, and is non-yellowing.
- Oil-based Polyurethane: Offers a slightly harder, more durable finish but can yellow over time.
- Water-based Polyacrylic: Similar to polyurethane but generally clearer and more flexible.
- Lacquer: Dries very quickly but requires a spray application for best results and good ventilation.
Step-by-Step Guide to Staining Kitchen Cabinets Without Sanding
This process is straightforward and highly rewarding. Follow these steps carefully for a beautiful pre-finished cabinet look.
Step 1: Cleaning is Key
This is arguably the most important step for DIY cabinet staining no prep (beyond cleaning!). Any dirt, grease, or residue will prevent the stain from adhering properly.
- Remove Doors and Drawers: Take all cabinet doors and drawer fronts off their hinges. Label them so you know where they go.
- Clean Thoroughly: Use your degreaser or TSP substitute. Apply it with a clean cloth or sponge. Work in sections.
- Rinse and Dry: Wipe down all surfaces with a clean, damp cloth to remove any cleaner residue. Allow the cabinets to dry completely.
Step 2: Light Scuff (Optional but Beneficial)
While this guide focuses on no sanding, a very light scuff with a fine-grit sanding sponge (like 220-grit or higher) or a deglossing liquid can improve adhesion, especially on very shiny surfaces. Think of it as a gentle nudge for the stain to grip. If you choose to skip this entirely, ensure your cleaning is impeccable.
Step 3: Apply a Bonding Primer (Optional)
If your cabinets have a very slick or glossy finish, or if you’re concerned about adhesion, applying a bonding primer is a good idea.
- Application: Apply a thin, even coat of the bonding primer using a high-quality synthetic brush or a foam roller.
- Drying: Allow the primer to dry completely according to the manufacturer’s instructions.
Step 4: Apply the Gel Stain
This is where the magic happens! Gel stain is forgiving and builds color beautifully.
- Work in Sections: Apply the stain to one door or a manageable section at a time.
- Application Method:
- Brush: Use a high-quality synthetic brush for an even coat.
- Foam Roller: A foam roller can provide a very smooth finish.
- Lint-Free Cloth: For a more “wiped” look, a lint-free cloth works well.
- Technique:
- Apply a thin, even coat of gel stain. Avoid applying it too thickly, as this can lead to drips and an uneven finish.
- Allow the stain to sit for a few minutes (check product instructions for recommended time).
- Using a clean, lint-free cloth, gently wipe off the excess stain. Wipe in the direction of the wood grain.
- The longer you let the stain sit before wiping, the deeper the color will be.
- Building Color: For a richer, deeper color, apply a second coat after the first coat has dried completely. Follow the same application and wiping process.
Step 5: Apply the Topcoat
Once your stain is dry and you’re happy with the color, it’s time to seal it.
- Application: Use a high-quality synthetic brush or a foam applicator. Apply thin, even coats.
- Multiple Coats: Apply at least two to three coats of your chosen topcoat for maximum durability.
- Sanding Between Coats (Lightly): For a super smooth finish, you can lightly scuff the surface between coats with a very fine-grit sanding sponge (320-grit or higher) or a soft foam pad. Wipe away dust thoroughly after sanding. This step is optional but highly recommended for a professional pre-finished cabinet look.
Step 6: Reassemble
Once the final coat of topcoat is fully cured (check product instructions – this can take several days!), reattach your cabinet doors and drawer fronts. Stand back and admire your work!
Tips for Success
- Test First: Always test your stain on an inconspicuous area or a scrap piece of wood with the same finish as your cabinets to ensure you like the color and application.
- Ventilation: Ensure good ventilation, especially when using oil-based products or primers.
- Work in Good Lighting: Proper lighting helps you see any missed spots or uneven application.
- Patience: Allow adequate drying time between coats. Rushing the process can lead to a less durable and less attractive finish.
- Clean Tools: Clean your brushes and rollers immediately after use.
What If I Want to Paint Over Stained Cabinets?
If you’ve already stained your cabinets and now want to paint them, or if you’ve bought cabinets with an existing stain and want to paint, you can! Yes, you can paint over stained cabinets. The key is proper preparation, even without sanding.
- Clean: Thoroughly clean the cabinets to remove all grease and grime.
- Degloss (Optional but Recommended): Use a liquid deglosser or a very fine-grit sanding sponge (220+ grit) to lightly dull the surface of the stain. This creates a better surface for the paint to adhere to.
- Prime: Apply a high-quality bonding primer. This is crucial when painting over stain to prevent the old color from bleeding through.
- Paint: Apply your chosen cabinet paint. Two thin coats are usually better than one thick coat.
- Topcoat: Apply a durable topcoat for protection, especially if you’re using a latex-based paint.
This is a viable option if you’re aiming for a different aesthetic or if the gel stain didn’t turn out as expected.
Comparing No-Sand Staining Methods
Let’s look at how different approaches stack up for cabinet refinishing without sanding.
| Method | Pros | Cons | Best For |
|---|---|---|---|
| Gel Stain | Excellent adhesion, builds color, no sanding needed, forgiving | Can be thick, requires specific application technique for smoothness | Most cabinet types, DIYers, achieving a wood-look without stripping |
| Bonding Primer + Paint | Wide color range, can cover imperfections, durable finish | Less of a natural wood look, requires priming and painting steps | Changing cabinet color completely, covering dark stains, achieving a solid color |
| Liquid Wiping Stain (on specific pre-primed surfaces) | Easy application, natural wood look | Less forgiving than gel, may require a primer for adhesion | Cabinets with a factory-applied, ready-to-stain finish |
Why Gel Stain is Often the Preferred No-Sand Choice
Gel stain kitchen cabinets offers a balance of ease and aesthetic appeal. It allows you to update the color of your cabinets while still retaining a wood grain look, if desired. It’s more forgiving than liquid stains when applied over existing finishes, and the results can be stunning.
Common Challenges and How to Overcome Them
Even with an easy cabinet staining method, you might encounter a few hiccups.
Challenge: Streaky or Uneven Stain Application
- Cause: Applying the stain too thinly, wiping off too much, or not working consistently.
- Solution: Ensure you’re applying a consistent coat. Work in small, manageable sections. When wiping, use a clean cloth and apply even pressure. If it’s still streaky, a second coat can often even things out.
Challenge: Color Isn’t Deep Enough
- Cause: Not allowing the stain to penetrate long enough before wiping, or applying coats too thinly.
- Solution: Apply a second (or even third) coat. Follow the product instructions for drying and reapplication times. For deeper colors, let the stain sit for the maximum recommended time before wiping.
Challenge: Bubbling or Peeling Finish
- Cause: Inadequate cleaning, applying product over a damp surface, or using incompatible products.
- Solution: Ensure cabinets are absolutely clean and dry. Allow ample drying time between all coats. Always use compatible primer and topcoat products.
Challenge: Gloppy or Thick Finish
- Cause: Applying the gel stain too thickly or not wiping off enough excess.
- Solution: Aim for thin, even coats. Wipe off the excess stain thoroughly but gently. If you’ve already applied it too thick, you might need to carefully wipe off the excess with a clean cloth dampened with the appropriate solvent (check stain manufacturer for recommendations) and reapply.
Achieving That Pre-Finished Cabinet Look
The goal for many tackling a cabinet makeover no sanding is to achieve a pre-finished cabinet look. This means a smooth, durable, and professional finish that looks like it was done in a factory.
- Quality Products: Invest in good quality gel stain and topcoat.
- Cleanliness: Meticulous cleaning is paramount.
- Thin Coats: Layering thin coats of both stain and topcoat is key.
- Proper Drying: Respect drying and curing times.
- Optional Scuff Sanding: Lightly sanding between topcoats creates an ultra-smooth surface.
Frequently Asked Questions (FAQ)
Q1: Do I really need to clean the cabinets if I’m not sanding?
A: Absolutely! Cleaning is the most critical step when you’re not sanding. Grease, grime, and dust will prevent the stain or primer from adhering properly, leading to a finish that peels or streaks.
Q2: What kind of cloth should I use for wiping off gel stain?
A: Use a clean, lint-free cloth. Microfiber cloths or high-quality cotton rags work well. Avoid cloths that shed fibers, as these will get stuck in the wet stain.
Q3: Can I stain cabinets that are already painted?
A: Yes, you can! If you want to stain over existing paint, you’ll need to clean them thoroughly and then apply a bonding primer specifically designed for adhesion to painted surfaces. After the primer dries, you can apply your gel stain. Alternatively, you can paint over the stained cabinets if that’s your desired look.
Q4: How many coats of gel stain do I need?
A: This depends on the desired color depth and the brand of stain. Typically, one to three coats are needed. Always allow the previous coat to dry completely before applying another. Test your color on a hidden spot first to gauge how many coats will achieve your desired look.
Q5: How long does it take for gel stain to dry?
A: Drying times vary depending on the product, humidity, and temperature. Generally, gel stain is dry to the touch within 4-8 hours. However, it’s crucial to allow at least 24 hours for drying before applying another coat of stain or a topcoat. Check the manufacturer’s specific instructions.
Q6: What is the difference between gel stain and liquid stain?
A: Gel stain is thicker and sits on the surface, making it ideal for adhering to existing finishes without sanding. Liquid stain is thinner and penetrates the wood, requiring a sanded, bare wood surface for proper application.
Q7: Can I paint over gel stain?
A: Yes, you can paint over stained cabinets that were finished with gel stain, provided you prep the surface correctly. Clean the cabinets thoroughly, lightly scuff the surface with a fine-grit sandpaper or use a liquid deglosser, and then apply a good quality bonding primer before painting.
Q8: What is the best way to apply gel stain for a smooth finish?
A: For a smooth finish, apply the gel stain in thin, even coats using a high-quality synthetic brush or a foam applicator. Work with the grain of the wood. Wipe off the excess stain evenly with a lint-free cloth. For an extra smooth finish, consider lightly sanding between topcoats with very fine-grit sandpaper (320 grit or higher).
By following these steps and tips, you can successfully stain your kitchen cabinets without the arduous task of sanding, achieving beautiful results and a refreshed kitchen space. Enjoy your easy cabinet staining project!